jmooner3
-
Posts
272 -
Joined
-
Last visited
-
Days Won
4
Content Type
Links Directory
Profiles
Articles
Forums
Downloads
Store
Gallery
Blogs
Events
Everything posted by jmooner3
-
I bled the brakes again with very little bubbles and crystal clear brake fluid coming out. Seems mechanical at this point (At the wheel or at the master cyl). As "oldmopar" said the front and rear drums/shoes are different on the 1ton. The rear looks like there is only the eccentric at the bottom pivot can be adjusted. There is a lot of play from piston all the way in to extend out to drum...am I missing an adjustment there? As for the fronts, looks like there are more adjustments. I dialed the eccentric at bottom pivot to just touching drum both front and rear, backed off and that's it. How do I adjust the top and take up some of the play. It seems that is creating all the peddle travel. Net is: I dialed in front and rear with just the bottom pivot eccentric and the peddle travel is all the way to the floor...Any help in what I can tweak to get more than the flintstone braking system is welcome. Where to go next, at the wheels or at the master cyl?
-
I did not have access to the Ammco or Miller tools. I made a rough one to dial in shoes were equal distant at the pivot. I did move the eccentrics to accomplish this. This is a 1950 B2D one ton. Both front and rear shoes pivot at the bottom with single double piston at top. Shoes are mounted differently (Back just at bottom, Front have mid spring fastener and show allignment) I moved bottoms til just rubbing drum and then back a touch, verified they were equdistant with my home made jig, bled the lines and now have plenty of travel. I'll re-bleed to see if that fixes the soft peddle. Rich I saw your brake notes in the archive- great stuff...could it be just air or am I in need of THE Mighty TOOL!
-
WHat should the travel be for the brake peddle be? I finally got new lines run, all four wheel cyl honed and new kits installed, bled the system and the truck stops now...Peddle goes alll the way to the floor and the truck slows to a stop. Not sure what it should do, If I pump the peddle it stops better I can get a slight skid out of the back wheels. If this is not normal, are there adjustments I can make?could there still be air in the line? Advice welcome...
-
Ready to purchase 5 window four speed
jmooner3 replied to mrizzodpm's topic in Mopar Flathead Truck Forum
Where are you located? There's one up north of me... http://burlington.craigslist.org/cto/1664795601.html -
Is 30 weight the preferred oil of those of you "in the know"? I live in Vermont but only plan to drive my toys in the many seasons other than winter (that's the other 3 months of the year here where it's above 4o degrees .
-
Does anyone else need a dozen? I just need 1 and if the price is right I'll have a bunch to give back to the site.
-
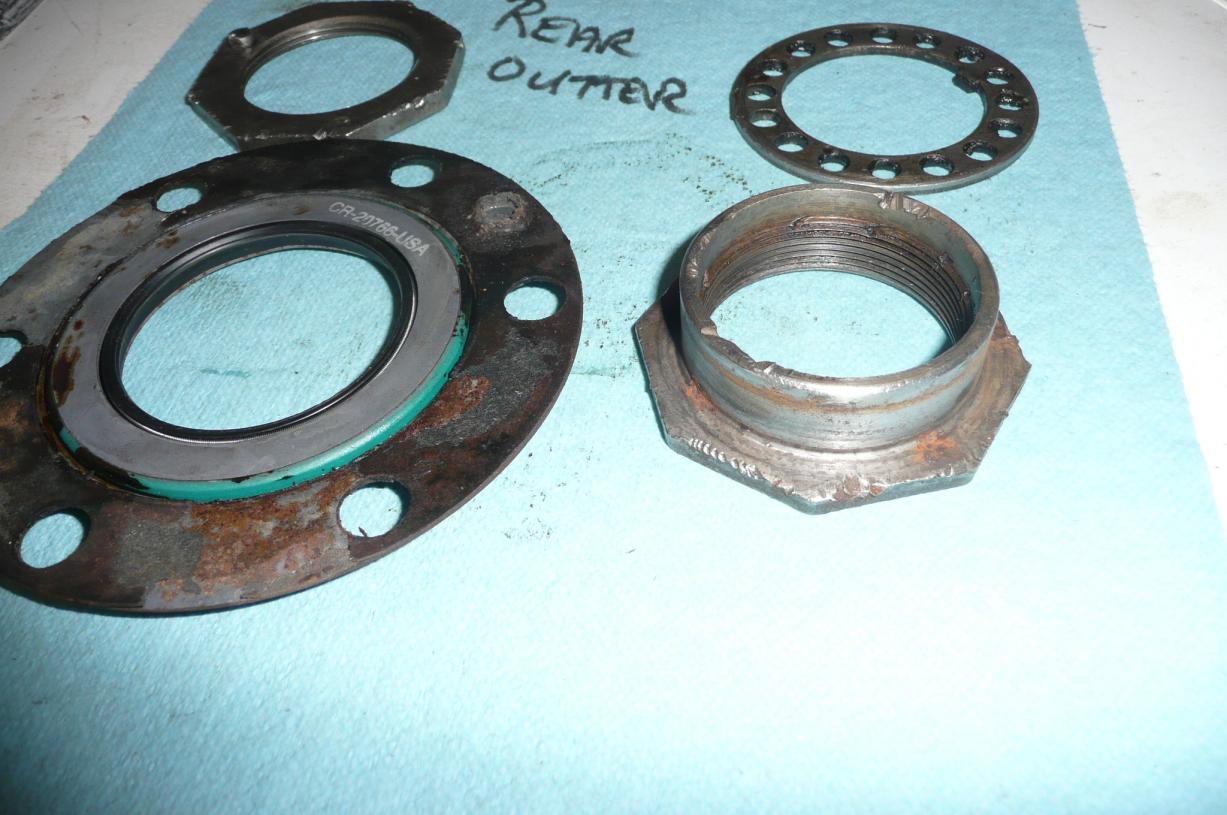
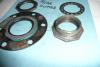
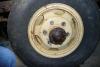
:confused:I popped the bearings iout of the passenger side - Timken and the numbers on the bearings are 2984 (Outter) and 28682 (Inner). I found them at Autozone ~$20 inner and $40 for the outter. Still working on getting the Drivers side off - bearning nut is froze to the shaft - PB blaster soaking as I type... Question for the gurus. Rear Brake Cylinders - I have two new ones in my parts box that came with the truck - they are no longer in boxes but there are two bags with different part numbers on themjust like "Oldmopar" said(9375/9376). I've heard there is a left and right...? I pulled the Pass side cyl and popped off the rubber to reveal diff size pistons I can only assume the drivers side is opposite config to also put the bigger piston in the rear...? The parts I have are both the same not opposite and I don't yet have the other side off to see if they are different. Does it matter if the big or small piston is to the back? I still need a source for the retaining ring (the one with the tab and a bunch of holes that receive the stud on the outter bearing nut.
-
Thanks guys got one wheel apart and only need the inner seal there. The other wheel clearly got a good drink of water and is rusted inside. I suspect it'l need bearnings (Haven't found a source yet) I bought the inner seals from Roberts today. Still need the gaskets, and I need the locking ring (the one with the tab and the holes to lock the outter bearing nut) the tab is gone and it's in rough shape. The nut is in rough shape too but I think re-useable. Anyone have an extra lock ring or nut or know of a source for the ring?
-
Thanks! 2 -3/8 jacking screws pushed the hub right off, punch and hammer to spin off the nut, hub and axle shafts came out easy. Brake shoes look good, spring is red and looks new? Wheel cyl rusted and spent. I have two new ones in a bag that came with the truck. Seems like it was meant to be. Are they left and right? how to tell? The paper seal ripped and the inner seal the one all the way at the back of the inner bearing (flip the whole drum over and there is what looks like a dust seal on the outside of the inner bearning) it is dry-rotted. So it's looking like I need a paper seal and that inner dust seal (#28116) to continue my quest for stoppage.
-
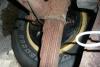
Well I agree with the hidden condition stinking! Mine is not a hidden conditon anymore, I bent new lines replaced hoses bled the lines and after a couple pedal pushes no pressure...I knew ther'd be a mess by one of the connections.... shure enough big puddles at both rear wheels and juice still flowing out of the brake backer plate! I suspect both wheel cylinders popped and puked thier goods all over inside the drum and on pads. We'll the good news is I'll have a look at the back brakes. I could use a bit more help on the process. I think I understand the axles need to come out with the hub flange. Do I need to open the differential and disconnect anything? Or is this all from the hub side? "Oldmopar" filled me in on the need for ..outer seal, 2 nuts ,a bearing some washers, and I need the correct axle nut wrench...He thought 2 9/16" Any good ideas on how to clean up a pint of brake fluid off the garage floor? THanks for your help guys!!!
-
Thanks - I'm thinking maybe I will get all the new lines bent and get some juice in the system and just see if the back brakes are working...Seems like a good point for don't fix it til you know it's broke.
-
Thanks I rummaged around in my plubming parts and found a plug. I did not do anything to the diff at this point, just put in 90W lube and I figured I run it a bit and see if there are any problems...While I'm a big fan of preventitive maintenance, the diff seems to turn fine with no binding and I'm finding plenty of tangents to go off on as it is...brakes, then wires, then find front clip is the path I gotta stay...the ol don't fix it till it's broke. Thanks for the insight!
-
OK I'm into the brakes on my truck now. I pulled front and inspected, all looks great, new pads, new wheel cyl, drums look to have been machined recently...Also have new hoses to them. I lubed bearings and reinstalled. Now as for the back...? I pulled the wheel, took off the nuts on the hub cover and read in the shop manual to screw bolts into the cap to pop it off. What size screw? What will I find in there, anything to be careful of flying out or losing..? I just want to pop off the drum to inspect, replace pads or correct any other issues in there. Advice welcome!
-
Hey guys as I began to rip out the rusted brake lines on my 50 1Ton. I found the differential covered in old lube and mud, scraped a lot off and tried to figure out where the leak was. Well on the passenger side there is a ~1" hole with no plug in it (duh could be the source!) there was also a lot of slop on the other side and there looks to be a nut welded to the dif about the same height and location as the other side with a sloted plug or screw in it? I figured I should learn a bit about the rearend... There appears to be no drain plug so I suspect you pop the back cover off to drop what's left of the lube. Suggestions to clean out the gears or just leave as is. Any idea what size and thread the missing plug is? I found 90weight gearlube recommended other thoughts cautions? Should I just use the "goop" copper RTV stuff as gasket after inspecting inside? Also I've seen some dialog on what ratio rears people have, where do I find that (if I can get through the grime) I'd like to be looking in the right general area. Thanks.
-
Thanks guys as I said looks like some of the parts have been swapped already, I need to get the wheels off and the drums off and see what I'm up against. All steel lines are old and rusted, but the front hoses have been replaced. Any tricks to getting the drums off or ways to set up the shoes without a miller tool?
-
Thanks for the discussion on brake fluid, ya'll have me thinking that simply adding the juice is not the smartest move...single cylinder system with surface rust showing on the lines would indicate a need for all new. From the sounds of the discussion dot 5 might be the way to go once all new. Anyone have a good source for fittings, know the diameter of the lines, fittings needed, etc. (are these double flare fittings?) Also there appears to be a 3 way proportioning valve in the rear, pretty rusted and appears to be welded to the rear axle... Is this part available?
-
Thanks guys, sounds like if i run with the old plumbing I should stay DOT 3 if I refurb I should go to DOT5. The hard lines seem easy enough to bend and rout, anyone have a good source for fittings, know the diameter of the lines, fittings needed, etc. Also there appears to be a 3 way proportioning valve in the rear, pretty rusted, but it looks like it might be welded in place? Is this part available?
-
Guys - I'll be turning to brakes soon... Looks like my truck has had some new parts added...New hoses on the front and the pins visible through the backing plate are new...I didn't pull wheels to check pads. The master cyl is bone dry, I figured I'd add fluid and use the advice of some of you on the forum to bleed the system to see if what I have in place will stop the old girl. Can I just use Dot 3 brake fluid or is there some other coctail that should be used in these trucks?
-
Don - Some of your 8000 have been wisdom sharing advice that saved me time and cussing ---sincerely-from me and Jake---> Thank you!
-
Front clip from 49 1/2 ton fit 50 1 ton?
jmooner3 replied to jmooner3's topic in Mopar Flathead Truck Forum
Thanks guys... Eric - I'm heading down the path you suggested, get the 50 running and tinker on the 49. My boy and I have the engine running on the 50, I rigged an 87 camero radiator from the junkyard so it can idle without overheating...Funny looking and fun as heck...we'll be addressing brakes next, wiring etc. Any leads on front sheet metal in the North east / New England area...? Does anyone know how the gears are packed on a speed column shift? I think it's a 3 speed. Reverse is up and away towards the front. I'm not sure if 1st is up and back or up and front "under" reverse... -
Will the front clip from my 49 1/2 ton fit the 50 1 ton? The 1 ton is certainly bigger, bigger wheels, etc. But the only sheet metal I have is from my 49 1/2 ton... I need to get the brakes working, electrical, and a laundry list of other stuff but If the sheet metal will fit that is a step in the right direction...
-
Spark+Compression+ Fuel should = run!
jmooner3 replied to jmooner3's topic in Mopar Flathead Truck Forum
Thanks for the encouragement guys, I dropped the oil-milkshake and changed to fresh oil. Rigged up a fuel tank and rigged a radiator... My boy fired her up and she ran like a top!!! Ran for 5 minutes, She held temp, block warm to to touch but not smoking the rad must be doing it's job. The temp gauge read around 140 (if the gauge works). The oil was bubbly no where near as bad as it was - but still could be residual water in the pan. Next I'm going to drop the pan and clean it out good. This is too much fun to play with this toy with my son. -
Spark+Compression+ Fuel should = run!
jmooner3 replied to jmooner3's topic in Mopar Flathead Truck Forum
I checked compression on all 6 as you suggested ...all ~90PSI # 6 ~ 80psi. Maybe I didn't pop the head gasket aftera all -and it really was just old water in the pan? The only thing is right after she steamed off, I checked head bolts and all were 1/4 to 1/2 a turn from torqued, I did torque them all and otherwize could have disturbed the crime scene. I thik I'm going to finish the oil change start her up again and then decide if just for peace of mind I may swap the ehad gasket and have a look in the bores for rust. Thanks for your insight! -
Spark+Compression+ Fuel should = run!
jmooner3 replied to jmooner3's topic in Mopar Flathead Truck Forum
Encouraging words Dave!!! I had pulled the dipstick when I brought her home and the oil was golden new, I spose it could have seperated from coolent when I heated it up. I had run the engine a couple times with no rad but never more than a minute and the head was never too hot to touch when I shut her down. I did rev it a few times it skipped and sputterd but idled fine, the exhaust was hot of course but again the head was never too hot to put my hand on... I drained the milkshake and will take your advice on checking compression again. It is confusing where the water/coolent came from with no coolent loop attached or presurized?????? Another compression test is in order. -
Spark+Compression+ Fuel should = run!
jmooner3 replied to jmooner3's topic in Mopar Flathead Truck Forum
Thanks for the radiator advice, however I won't be needing it all that soon. My boys and I started the 50 again just for a minute (no radiator hooked up) to hear the sweet sound of success, we hopped in and tried the clutch just to see if she would roll, she did and we shut her down, oddly there was steam wisping out of the coolent return hose on top of the motor, now mind you she ran for less than a minute, I pulled the dip stick to find a nice milkshake... The only thing I can come up with is there must have been some coolent in the motor (remember no rad hooked up) and it must have turned to steam and blown the head gasket...Other theories? With the engine still warm all head bolts easily turned 1/4 turn... Regardless, our nicely running engine that was all highfives and fun earlier in the week has turned to another opportunity to pull a head and change a gasket:( I was not planning on doing a ring job and prior to me cooking the engine the compression was around 70psi on all cyls... If I don't see anything glaring when I open her up, my plan is new gasket and while I have it apart I'll pull the water pump and cooling sytem check, give it a coat of paint and get it running again:rolleyes: Another thing I noticed is there is no oil filter on this engine like my other one. Anyone have a spare oilfilter can and bracket to sell?