


Robert Harrison
-
Posts
89 -
Joined
-
Last visited
Content Type
Links Directory
Profiles
Articles
Forums
Downloads
Store
Gallery
Blogs
Events
Everything posted by Robert Harrison
-
They are used to keep the trim bezzels up tight instead of flop around on the handles. They are not to hold the pin in place. If it were me I would put a little bit of lock tite on the pins.
-
I understand you have a manual? If not or even if you do you might want to get the Chrysler industrial Engine manual from Vintage Power wagons. Its really the best I have seen for the Chrysler based flat head sixes. Don Bunns book Dodge Trucks has some build tips this is the book with the red and white pickup on the cover. I frequently copy posts put up for future reference i thought you might like to see this one. You should have the long block 25 inch engine which was originally a Chrysler product where as the 23 inch engine was originally a Plymouth based engine as far as the original developers. Dodge used both series of engines. Desoto stuck with the long block as well as a lot of stuff in Canada. US pickups and passenger cars mostly used the 23 inch Plymouth based engine but big trucks used the 25 inch engine as well as larger passenger cars and trucks over 1.5 tons. The 25 inch block should be what you have. It came in both divorced bypass filter systems and full flow systems that were integrated in the block. By 57 you could have had the full flow system. The file below was originaly posted by a vert talented guy who had a 3 ton big truck fully restored the engine with the dual exhaust went into that but those are special engines only seen really in this kind of application. You will notice the woodie he restored as well. Both really nice. Hope this article helps. Big block engine types.doc
-
Remove key lock on Passenger door? 1948 b1b
Robert Harrison replied to Dodging Work's topic in Mopar Flathead Truck Forum
if you drill out the set screw and I would do anything possible to get it out. Now that the Threads have been drilled out for the screw you will have to figure out how to anchor the replacement lock. Hopefully you could tap a larger set screw through the hole in the door? . The other thing is you should have a hole in the end of the tong it is for installing a wire probably hard wire to feed through the door and lock mechanism to aid feeding the tong through the lock mechanism. -
Remove key lock on Passenger door? 1948 b1b
Robert Harrison replied to Dodging Work's topic in Mopar Flathead Truck Forum
My familiarity is with the 39-47's so I dont know if I will be much help. With my truck the devise retaining the lock assembly I mean the part you put the key in is retained by a set screw you access in the end of the door. The access hole being probably no more than 3/8 of an inch. If you have a hole that is at the same height as the door lock at the end of the door this could be what you need to remove this set screw which uses a standard flat blade screw driver to remove the actual door lock. Looking at the lock from the side as if removed you have a cylinder mechanism with a long rectangular tonge on the end this tonge is retained by the set screw in the end of the door. The set screw basically screws into a holder in the door against the tonge. So if you are trying to remove the keyed section of the lock you have to have the door open so you can get to the set screw. Try looking for a hole with a flashlight in the end of the door. Im not quite sure from your description what you are doing? A common way for locks in general is to drill out the end of the lock where the key goes in this destroy the tumbers little teeth that follow the key cut and allows the cylinder to turn. But that is not going to remove the lock if you have the set screw I am talking about. It will destroy the current lock and you still need to get it out of the door. So I am thinking you most likely are drilling out the key portion maybe from some online stuff you have found about locks on the net Lock cylinders often are made of brass so that is why I am thinking that is why you see brass. The tounge could be brass most likely steel so if you are drilling out the set screw you will somehow have to retap this but you could be drilling into the toung if it is breas. If that is what you are doing you can roll down the window and you might be able to see if the toung is brass. If it is that is the brass you are seeing and you should be able to stop drilling. If your locking mechanism is similar to the 39-47 models you are not going to repair or replace teh lock by drilling where the key is. Spray PB blaster the set screw from anywhere you can upper window opening using the little straw that comes with the can or through the hole to help get it out if you have not drilled it. Try initially tightening it a bit at first spray again then try to back and forth twist the set screw occasionally spray it be patient it would be a pain to fix the door where it is taped in place. lots of patience. Replace the set screw with a modern hex type as the flat blade set screw is likely to strip. Then pull the lock assembly straight out the door. Its going to take some wiggeling PB blaster on the tonge etc. Dont pry against the door skin You will just have to work it out carefully it will be a little stuck. hope this helps -
Im sorry this is so confusing. Oil l seals only go on one way. Modern oil seals have a lip. The lip has to intersect the shaft in just the right way to form the seal. So it is about understanding how the lip is supposed to sit on the shaft. The better manufactures all have technical support. I suggest you call the manufacture of the seal you hope to use. When you look on their sites they have drawings. look at the way the ridge of the seal rides on the shaft it will become more obvious. Im having trouble following this metal lip thing. All I can say is if you have doubts about this part dont use it they are cheap and you will gladly pay many times the money. Obviously if the dimensions are not right then dont do that. Seals come by dimensions so there are sealed seals, open seals, double lip seals etc Can be different by design and manufacture but all have the same shaft, OD and thickness or maybe not. They are listed by dimensions. The seal I used was open on the chain side and had a spring wound such that it helps push the seal closed radially on the shaft. So, there is only one way it could be installed with metal side out and open side with spring on the inside. If I installed dozens of these I would by now know which seal was the best choice but I dont so we will see. Follow the instructions given above to install it radially use sealant and on the face if the seal presses into the timing cover from the inside to a lip that is the face of the timing cover. RTV probably a good choice I use the old fashioned red stuff cant remember what it is called.
-
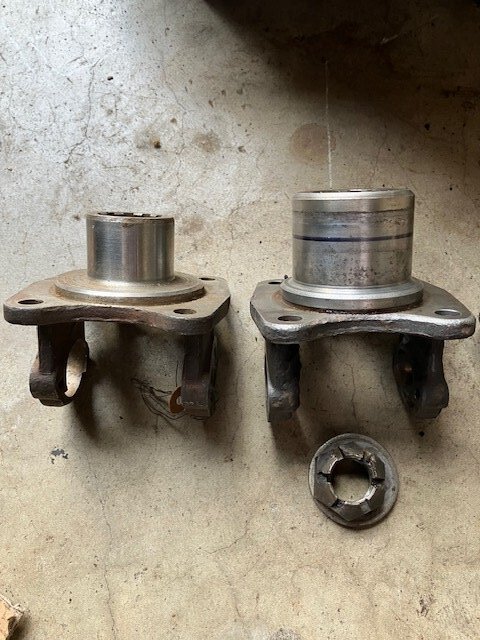
1952 B-3 drive shaft help…
Robert Harrison replied to 3rdowner's topic in Mopar Flathead Truck Forum
These designated factory nomenclature for Chrysler based cars in the period. Like your truck is a B3. The sedans might be called P15 or D24 etc. -
1952 B-3 drive shaft help…
Robert Harrison replied to 3rdowner's topic in Mopar Flathead Truck Forum
3rddowner the yolk adapter that has the 4 bolt holes 1122 682 does that fit your 4 bolt pice at the end of the tranny? If so that is a big help. Somehow the Drive line shop can probably come up with a spline and a female Yolk to match. The circlip type is a later design hard for me to say exactly when it came into play but more flexible for a solution for you more standard and fewer parts needed. For the rear they made a bunch of goofy versions about this time I think the rear axel flange you bought is one of those. I would measure the flange existing on the axel and use it as is. It looks like the type that has a little stop in each saddle sort of a nipple to keep the cross from coming out measure between those nipples and see if you can find a cross through a local auto parts store to fit or take the measurement(s) including pictures of that flange on the rear axel and take everything you have to a drive line specialist/rebuilder. finding the yolk adapter you have is a big deal if it fits. splines are not a big deal to come up with at the drive line shops. it would be best if you can find the female portion of the forward yolk to match. The transmission end of the fluid drive shaft the yolks of course are not going to work. KenCombs layout drawing is about what I would have expected at some point in development it is simply the upgraded version of the type we used in the 39-47 verisons. Chrysler is famous for combining parts at the end of the year from over stock so its entirely possible to find a mix of ball and trunion on the front end and a Cleaveland on the rear. When you measure the spline usually the female portion of the slip joint rides about 1/2 along the spine in the normal sitting of the truck so as to have room to pull eighter direction as the axel goes up and down or rocks. This would be the total length of the drive shaft its self. Too long and as the drive shaft moves forward if it strikes the end you will damage the trans or rear axel bearings. -
1952 B-3 drive shaft help…
Robert Harrison replied to 3rdowner's topic in Mopar Flathead Truck Forum
There are several types of Ujoints all deriving from what I would call the Cleaveland type. The ones I am familiar with are the side strap which is what I have on my 41 WF 1.5 ton and my 47 1/2 ton which I imagine would be like your original set up. If you look at the posts I gave you of the transmission end flanges you can see how the bolts come in on the end of the joint and the joint is held together with a strap. What you have on your rear axel is another type but likely more applicable for welding on a flange to a drive shaft if you can match it up. If you look at what you have there you see little tangs in the saddle of the joint those replace the end straps securing the Ujoint from moving out of the joint sidewise. So with that type of joint you need one of a couple of types of retaining mechanisms. one type is a simple u shaped strap it goes around the bearing of the cross through your joint with a nut on the end. My modified Dana 44 in my Jeep it came from an 80's axel. The other type basically completes what you have with a cast cap that looks like the bottom half of the flange you have on the axel this uses through bolts and your flange would be threaded to accept the bolt. I have not seen the drive shaft you bought so I dont have an idea as to what you have there. You should send pics. If you make the measurements I told you to take you can then go to a supplier and order a couple of returnable crosses and test the fit this may help you identify a flange to fit if you wish to keep this rear axel. with that and a tube diameter you are moslty set. I think the transmission end is going to be your bigger issue figuring that out. I also had a modle A at 16 I used to drive it every where got it up to 70 on the freeway over 4 lanes. Used to park it in my high school Vice principals parking slot which pissed him off but like I told him get to work on time and I would have to park somewhere else. Bob Harrison -
1952 B-3 drive shaft help…
Robert Harrison replied to 3rdowner's topic in Mopar Flathead Truck Forum
-
Hello JB so are you suggesting not using a slinger washer with the rubber seal? Just confirming. I see your point but this is new to me. Its also possible to install seals backwards although I dont see it here but with industrial seals it can happen so I thought I would make sure people knew that typically the lip folds inward when installed and be sure to lube it well and use a sealant on the outside of the seal when installing it.
-
1952 B-3 drive shaft help…
Robert Harrison replied to 3rdowner's topic in Mopar Flathead Truck Forum
I would expect cleaveland joints at both ends that would look like the Ujoint 3 and 4 speed joints just posted. -
1952 B-3 drive shaft help…
Robert Harrison replied to 3rdowner's topic in Mopar Flathead Truck Forum
I cant tell what you have for a rear end now. I dont think this is a stock rear flange so I dont know even what you have. Im more familiar with the 49-47 trucks but I think the drive line would have been the same. Your rear yolk looks like a more moder style that may use U straps to hold the joint or has caps that bolt to the yolk that yolk would be threaded the strap type uses nuts. Hard to say what Ujoint you will need for that end but you can measure from the inside of the little bumps in the saddle and get the diameter from the width of the concave saddle. It might have the dimensions in the joint I have an attachment for. There are 4 parts on the transmission end. You have the spline (1) then the female portion of the spline (2) then the Ujoint cross, then the yolk to transmission U joint adapter. The 4 bolt transmission flange you see in your pic may be part of the trunion style joint which would likely have been from an early truck pre 41. If so going with a ball an trunion to fit might be your best bet instead on that end. I belive the original yolk sets had side mounted bolts and plates to hold the Ujoint in place. I have included some articles I made some time back The 4 bolt flanges below are the adapters that bolt to the transmission with the cross type ujoint. a picture of the drive line ends you bought would help Cleveland Ujoint Assemblies.doc Ujoint replacement.doc
-
1952 B-3 drive shaft help…
Robert Harrison replied to 3rdowner's topic in Mopar Flathead Truck Forum
PS you need to send pics of what you have. Both flanges at axel and trans and flanges on driveline so people can help you. -
1952 B-3 drive shaft help…
Robert Harrison replied to 3rdowner's topic in Mopar Flathead Truck Forum
I'm a little confused about your descriptions. I'm more familiar with the 39-47 models but have owned and sold some of the Ball and Trunion Ujoints to others. On 39-47 models they eventually went to the Cleaveland brand or type of cross type Ujoint so I am surprised you have ball and Trunion type Ujoints in your year. At some point the complexity of the drive shafts sort of forced the factory to produce a separate manual depicting the driveshafts, lengths and joints for trucks anyway. I'm surprised that there would be a slip joint at the rear axel? I wonder if you have a drive shaft from a 4x4 or maybe your rear axel is from a passenger car as the cars continued to use the ball and Trunion (corporate type) ujoints into the 1960's I think. I suspect if you have a ball and trunion flange at the rear axel that the axel may have been traded out at the rear axel with a passenger axel to get the gear rations up. Factory gear ratios were probably about 4.11. Im guessing yours might be higher. Would have thought you would have the standard cross type Cleaveland joint at the trans too. One of the reasons you have the truck and or it was not running might be because someone else got into this mix match and gave up on it not understanding what they have or how to deal with it. So, I would start with checking your axel and see it the ratio was higher its just an indicator though if you had a factory set up with automatic your axel could be higher. If you have a trunion type rear axel flange I think rather than mess with a good axel I would go back to the ball and trunion on that end but no slip joint on that end. I dont know about the bolt pattern thing but it points to a different time slot of manufacture or swap car to truck or something like flywheel bolt flanges as the vehicle gets heavier or is a truck its possible the flange is the same just more bolts and if it fits together but you drill more holes I suspect you will be fine. I like the cleaveland joints better the Ujoints are availalbe for the 1/2 and 3/4 ton from DCM classics and flanges for the trans come up on ebay but if you find the trunion stuff at that end you could do that the 39-40's were like that but they were all manuals. The trunion type have to be set up carefully I understand when I sold the parts I had I told the guy he should find a driveline shop and have them do it for him. He did and was pleased with the out come. I think you should located a driveline rebuilder near you and have them help you. Here in Seattle we have Drivelines NW they are basically too expensive but these guys can build something to what you need balaced and everything. They can take flanges off one thing or the other and make it into what will fit. You may need to find some flanges here and there or trunions to get there but I think this will give you the best option for a resolution. Unless you have a leak at the rear pinion I would not disturb the flange to trade out for a different type if you have a ball and trunion on that end I would stay with that on that end. Bob Harrison -
1952 B-3 drive shaft help…
Robert Harrison replied to 3rdowner's topic in Mopar Flathead Truck Forum
-
The oil tube supplies oil to the gears and chain. Typically an oil slinger which is like a big washer is there to fling excess oil away from the seal to prevent excessive leaking. I dont think you can get a new leather seal anymore and probably dont want one. Should you decide to get a NOS leather seal they are around be sure to soak the leather over night in motor oil and work the leather to loosen it up with a wooden handle from say a hammer. I would check clearances and use your best judgement but the timing chain/sprocket wont move much just a few thousands of an inch. Its been too long but I think there was an oil slinger check the parts book. 3/16 is a lot of space. you can go to Rock auto and put an original number in and it may give you some choices. Also I built this list of parts a few years back for our 39-47 Job rated trucks some of this will work for you See the attachment below Bob Harrison 39-47 Group Parts List DodgeRevised7-31-2013 (1).xls
-
There are charts onlline that compare tires in inch measurements to metric measurements. The stock 16 inch wheels dont take tubes and you can run radials. Discount tire may have one you put in the standard measurements such as width, height, rim size and it will compare directly. I thought the stock Datta book gave tires sizes by width and height but it only tells us rim width and tire width. The rim is only 4 inches wide. They list tires size as 6.0 to 6.5 It does not give height. Old time tire manufacturers such as Cokker, maybe Continental and others might be able to help but I am sure others will help with sizing experience too. Dont over size the tires width wise 2 inche over size on a 4 inch wide rim may be a lot.
-
Congratulations on getting your truck going. It sounds promising. 1. Carbs/fuel system are probably the number one cause of old vehicles coming off the road originally. Your idle issue sounds like contaminated carb/fuel. It does not take much to foul the passages etc in the carb and so the problem goes all the way back to the tank and its cleanliness. So,Tank, lines, pump, filters, fuel, carb. Tanks can be dropped cleaned out best you can do and taken to a radiator shop. I used to have access to a steam cleaner and I used boiling hot water and large amounts of TSP but there are lots of ways to clean them out and seal them. I prefer buying a new one on most cases. I think the tanks Inc. Tank might fit your truck. You will have to go through the carb too, flush the lines, filters and maybe go through the pump. 2. Leave one front wheel on the ground while jacking the other just off the ground so that it is free. With have someone help you hold the wheel on the ground so that it does not move. Rock the free wheel with hands at 9 and 3 o'clock. Rock it with your left and right arms looking for any movement in the joints. You are going to find something loose, tie rod end, link, linkage, pitman arm. Excessive toe-in can cause this too but you probably have something loose. Replace the offending parts. Since most of our trucks are Hobbie driven I would just replace the bad parts being careful to make sure the wheels are on the ground and have not moved during disassembly and road test try not to disturb alignment. After that you can check alignment at home. Since you are doing this you need also to check wheel bearings. Now hold the wheel at 12 and 6 and repeat the rocking motion. If the bearings are loose you will have 1/8 or less movement. Keng pin wear also shows up during this test. I dont remember what the 3rd concern was but I would drop your oil pan, throughly clean it out before taking it to a machine shop for cleaning. The gas tank can to to a radiator shop after you clean it out the best you can. You have to just find a radiator shop that has a large enough tank.
-
1947 ½ ton correct generator bracket
Robert Harrison replied to Spuhn's topic in Mopar Flathead Truck Forum
Here is a photo of my bracket from my 47 half ton. I may have an extra if you need one. Bob Harrison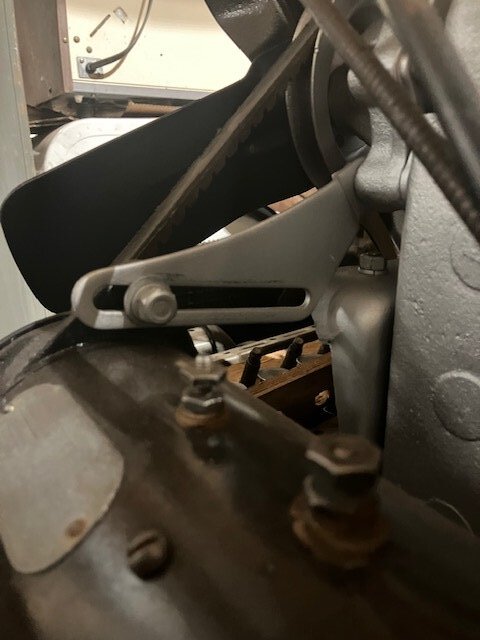

-
I think you are talking about Budd wheels. These are split ring type wheels used by many manufactures during the 40's and 50's. But I would stay with Dodge while searching. As well as some military trucks. Recently I have been looking for fenders for my 47 Dodge pickup and have been looking at Youtube. I watched a bunch of these vids hoping to find what I was looking for. The big trucks 1.5 tons and 3 tons were pretty common. If you find some the ideal ones still have air in the tires as the flat ones have a tendency to fill with water trap the moisture and rust badly inside. Quality Auto in Austin Tx had a 39-47 truck in picks they sent me. I used an online search engine to find them originally and that turned out to be compromised as later I had some guy who wanted me to send money w/0 sending detailed photos of the product dont fall for that kind of thing insist on detailed photos up front. Call them directly. Taylor in Aliance Nebraska had a School bus I noticed Maybe Dolloff in S. Dakota Rudys classic Autos in Nebraska French Creek or lake Auto parts in Minnesota Desert Valley in Casa Grande Arizona L&L in Wendal Idaho Brians north of San Francisco He wont ship but maybe you can get someone in the group to help you I am most familiar with the wheels from 39-47 some pilot era trucks but I think they were mostly one tons had a different type of slotted wheel likely 16 inch as did the 39-47's So I suggest you contact these people and send them pictures of what you have. The 1.5 ton (called WF type) trucks from this era had 5 and 7 inch rims. Which should be roughly equivalent to what you have. Perhaps you are looking for a 6.5 when it is actually a 7? As the rim size gets wider the same size tire gets shorter visa versa if you put a 5 inch rim on the tire gets squished and gets taller so you might be looking for a 7 inch rim. If push comes to shove I have one I am pretty sure is a 7 inch that is surplus to me it has been blasted nice wheel over all will have to look for a lock ring and I am not certain it is actually a Dodge wheel but it came off of a Dodge 2 ton. Bob Harrison
-
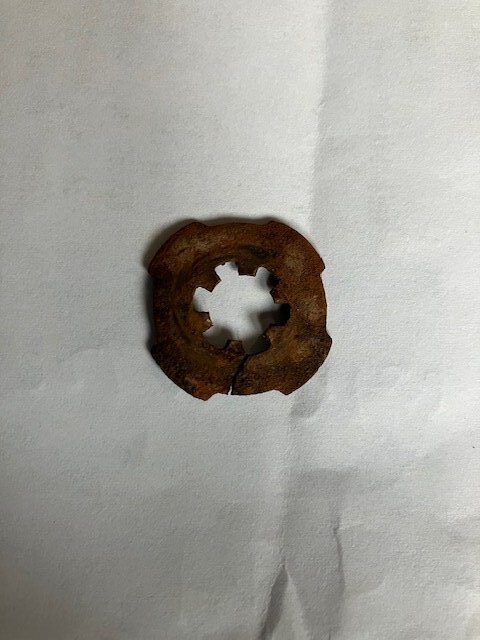
Looking for the special lock washers that hold the nose assemblies and fenders together. These are for 5/16 inch bolts and are 7/8 inch square. See pic
-
Is 1940 powerwagon windshield frame same as Fargo?
Robert Harrison replied to harmony's topic in Mopar Flathead Truck Forum
There is a super high fibrous body filler available I had a local shop fill mine with such look around and see what you can find. the stuff he showed me was Yellow from memory but I dont have the brand. Bob Harrison -
Its such a general question. By todays standards the old lamps often do seem dimmer. One thing you can try is to run a ground wire (its actually your positive lead in our trucks if you have a positive ground) to the engine and cab to tie it all together. Generators dont charge well at idle so if you get out of the truck and take a look at the lamps at idle they probably are dimmer. To check this you can have someone rev the engine up to say 2000+ and see if it gets measurably brighter. The industry solved this issue with Alternators that charge at the lower levels as well. The standard generator on a 39-47 truck was 32 to 35 amps but there is an optional generator that is rated at 40 amps. It bolts right up using the same bracket. These were mostly found after 47. Probably won't make a difference at idle but could help with wipers or heater motor. Some guys go to aftermarket converted Delco alternators and I think they can do up to 8V and use modern sealed battery types but of course this doesn't look original. There are youtubes where they actually show you how to build your own converted alternator if you are curious. You could try taking a jumper cable and getting on good metal on the engine and clamp it to bare metal on the dash and chassis just as a test to see if things light up better. Of course the old battery cable connection thing is the first to suspect. I like to take a digital voltmeter post to post for a measurement and then battery lead end to battery lead end for measurements and compare to see if there is a voltage drop between the two measurements. 6V systems require much heavier battery cables also--lower voltage requires higher current draw. So you could have and that is all you can find it seems today at an autoparts store the smaller 12v rated cables. Probably wont make a difference with headlights but will with starter. I'm also thinking of going Led 7 inch sealed bean headlights if I can find some that look original. Bob Harrison
- 1 reply
-
- 1
-

-
If your pilot house trucks key assembly is similar to the 39-47 type which it probably is. Your corresponding tumblers should be on the top as it goes in the door. They are under the flat area that is about a quarter inch wide and about 3/4s of an inch long. This would mean in the normal position where you can easily pull the key the notches of the key are pointing up. I believe it is normal for you to be able to turn the key assembly out of the truck anyway by close to 360 degrees. I assume the Tonge (the 1/4 inch shaft) of the assembly turns with the key. If reorienting the assembly in the door does not work not being specific here sometimes there are clips that come off of the door latch assembly in the door. If you can stick a long screwdriver or long piece of square stock in the door with the key assembly and turn the female slot left and right you can see if the assembly is working maybe by sticking your phone in the door while you manipulate the slot you might figure out something. The other thing is if the key assembly was installed incorrectly. I suppose it is possible with all the fidgeting that the mechanism itself is now also out of clock. This means that there are up to 4 possible combinations of the two assemblies for timing so try first of all setting the keys teeth facing upward and see how it goes. But dont give up you may have to turn the internal slot around the other way and try again. Ed is probably right. I had this problem years ago on a model A or early Corvette and all I had to do was turn the key assembly around. Please let us know what you find might save me a little frustration when I get to it on mine.
-
Well I know what I would try. take a pair of needle nose pliers and squeeze the legs of the pin together some below the head. This way you dont have to use your fingers and the collapsed pins will fit better. Then you could also give it a wrap with a rubber hammer to seat it. I have a set of needle nose pliers that is actually bent about a 1/3 of the way back from the tip. Its really nice for such things as it allows me to hold what ever I am working on more ergonomically as you hand does not have to be right up to the surface to make this work. Also if you are not careful the point end of the pliers is more likely to dig into what you are doing if not careful. This way the tip end is more parallel to the surface. There are a couple of types of interior kits the cardboard and the fiberglass type. The cardboard is a lot cheaper and more like the original in that it is cardboard. It is not patterned as I understand it and the trucks came with eighter blue or brown originally. How do you like your kit and where did you get it? I do have two NOS RH blue Kick panels I wont be needing. Those fit the 39-40's
