Scott Knecht
-
Posts
88 -
Joined
-
Last visited
-
Days Won
2
Content Type
Links Directory
Profiles
Articles
Forums
Downloads
Store
Gallery
Blogs
Events
Everything posted by Scott Knecht
-
Thanks Bob. I was actually going to post this as I still have the instructions the kit came with. I’ve said before if I had to do this again I would definitely just fab the parts. It’s just careful measuring and placement once the parts are made.
-
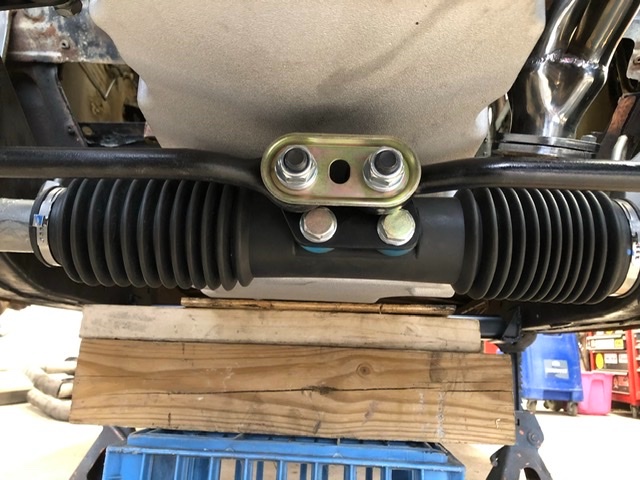
That is a good idea and something I’d probably do the next time. As far the C-clamp they’re easily made from 1” x 1/8” steel available anywhere. Got mine at Tractor supply. Bend them with just enough clearance so the bolts cinch them snug to the rubber bushing and they’ll secure the rack perfectly.
-
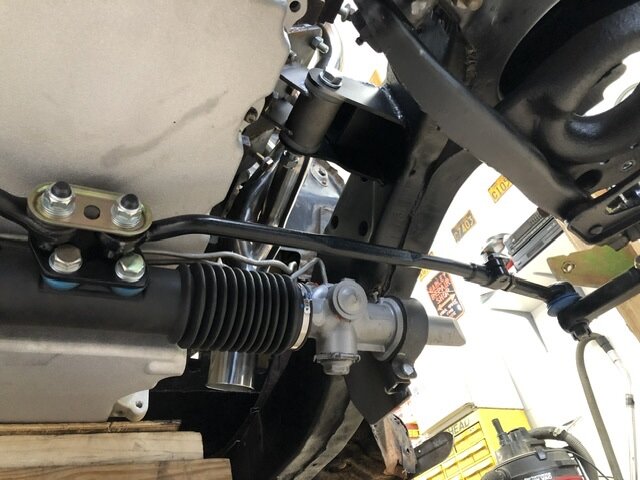
I’m sorry I don’t. I had to call them direct to order it. I do know they make up the kits as orders come in. I don’t believe they stock them. The Borgeson U-joint and custom made threaded adapters are the expensive parts. Anyone could fab the brackets and honestly if I had to do it over again I would have to save $300. You can get the U-joint for about $60 and I’d just have a machine shop make the adapters. They are 18mm left hand thread on the inner tie rod end and 14mm right hand thread on the outer rod end. The total secret to no-bumpsteer is getting the inner tie rod pivots of the rack in line with the lower A-arm pivots. Then fab up the brackets accordingly. One note however I did have to make 1 and 3/8” shorter steering arms to work with the throw of the rack otherwise the car would not have a tight turning radius.

-
It’s kind of hard to tell from the photo but is that an S10 frame under there? I see it’s front steer and I’m curious where you got the nice heavy sway bar from?
-
Thank you James! Yes it was a learning process but now looking back it’s really not that hard of a modification. Just gotta pay attention to the details. I do have to confess I sort of was wondering about weight however. I mean a Cavalier is what? 2600lbs maybe? I’m guessing my Special Deluxe to be around 3800 but I don’t know for sure. The car steers fantastic and the power assist makes it feel like the Plymouth weighs nothing. So far so good here but in a Suburban it may be too light a unit.
-
Hi David. Well all in all the steering swap cost me a tick over $700 total. The biggest expense being the FatMan kit at $320. A reman rack was $110 at Napa. I think the rod ends and tie rods came in around $180. The bar stock for the steering arms was $20. The bushing kit for the inner tie rod mounts was around $20. Also the tapered reamer I purchased on eBay was $70. Keep in mind these are all new prices. If you have a yard to scour you would save a lot. You also always have the hidden cost of labor if you’re not doing it yourself. Here is the link to FatMan https://www.google.com/search?q=fatman+fabrications&ie=UTF-8&oe=UTF-8&hl=en-us&client=safari#
-
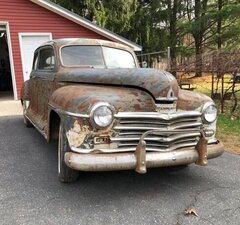
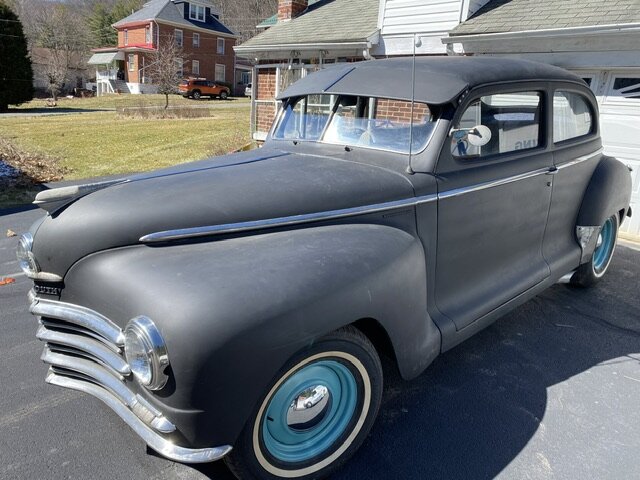
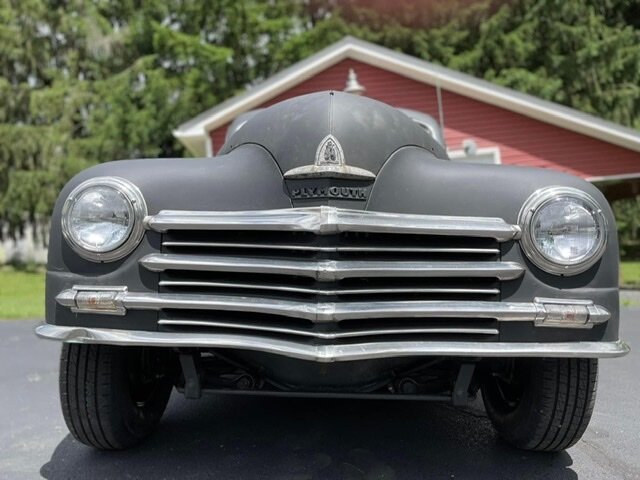
My ‘48 Plymouth Special Deluxe rat rod project
Scott Knecht replied to Scott Knecht's topic in P15-D24 Forum
Thank you andyd! I am going to continue further massaging the body and yes maybe one day I’ll spent the time and coin to put a quality paint job on it. I actually enjoy spending more time with her than my Harley. Lol -
My ‘48 Plymouth Special Deluxe rat rod project
Scott Knecht replied to Scott Knecht's topic in P15-D24 Forum
No center support or mount. It fits perfectly snug as is. Does not flop even at 100. Lol -
My ‘48 Plymouth Special Deluxe rat rod project
Scott Knecht replied to Scott Knecht's topic in P15-D24 Forum
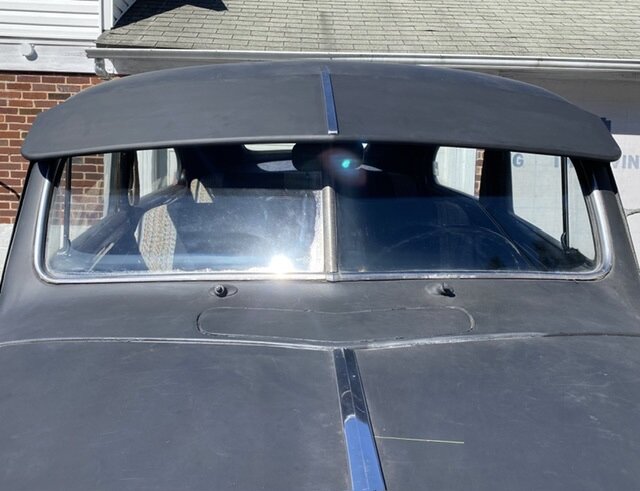
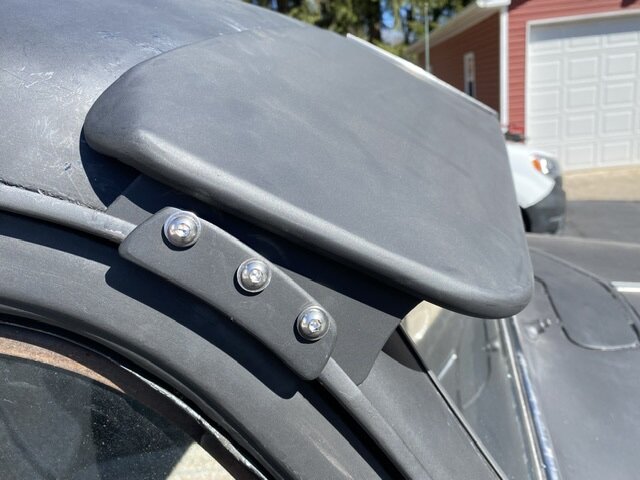
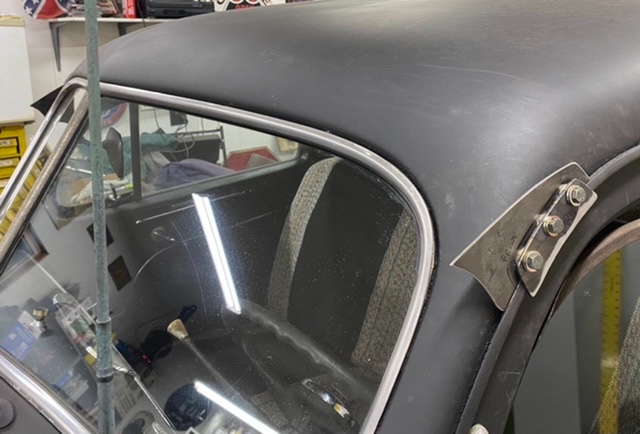
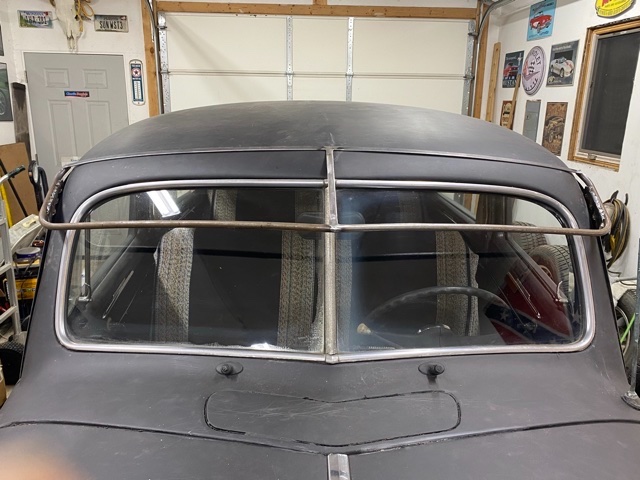
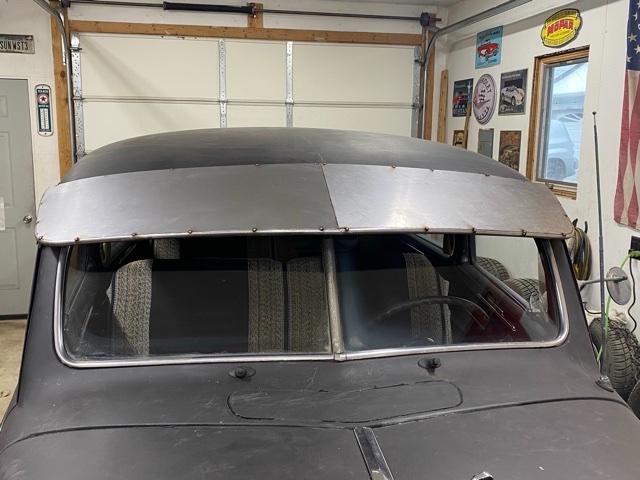
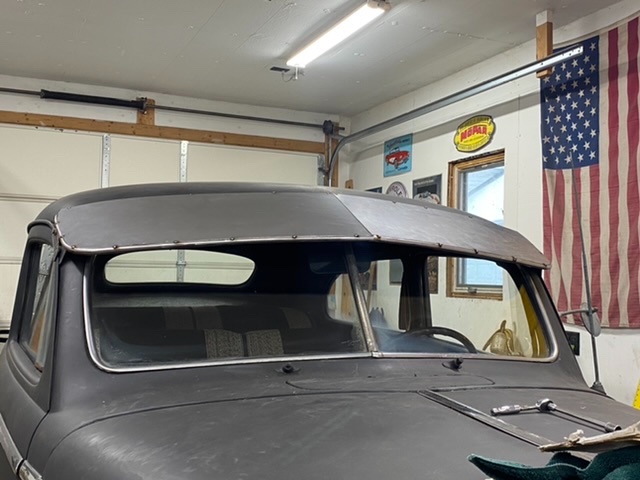
Just an update on my ‘48 project. After seeking out a visor for my car and discovering the out of sight prices, I decided to build my own. I fabbed up the frame work from 1/2” aircraft tubing (which bends nicely in my Harbor Freight pipe bender) and some 1/8” by 1/2” flat stock. Some 24 gauge sheet metal stretched over it all welded around the edges and smoothed makes it look like one stamped piece. Found an old piece of stainless trim I had laying around the shop to cover the center seam. I made some clamps to hold it to the rain gutter held on with 3 stainless button screws on each side. Easy to remove if need be and no holes needed to be drilled to mount it. Finally I added a few small pieces of thin rubber glued under the 1/8” flat stock where it meets the roof to prevent damage and provide a vented area for air to pass through.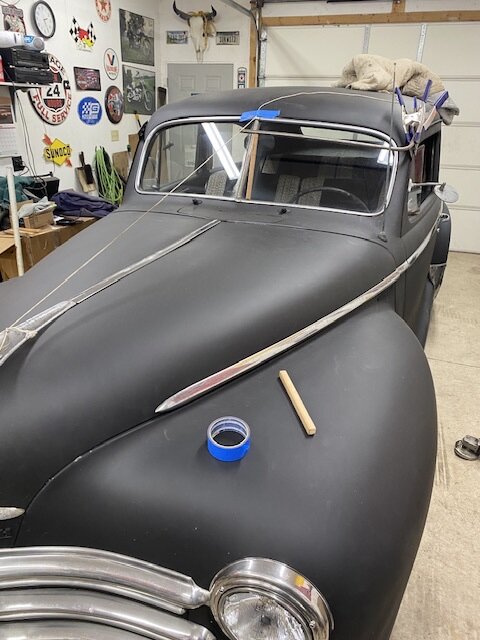


-
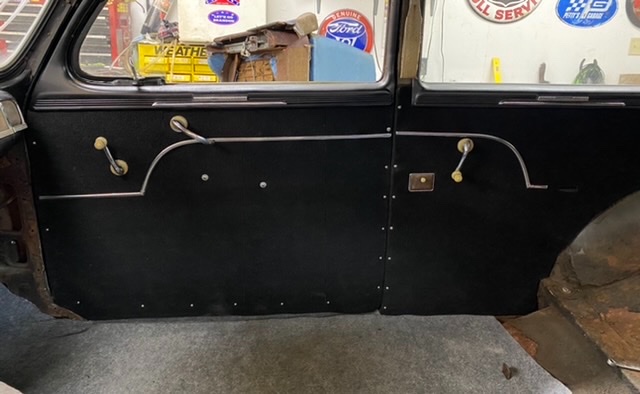
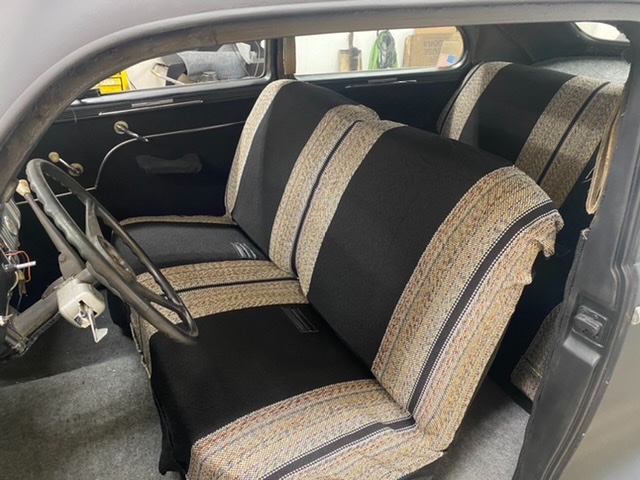
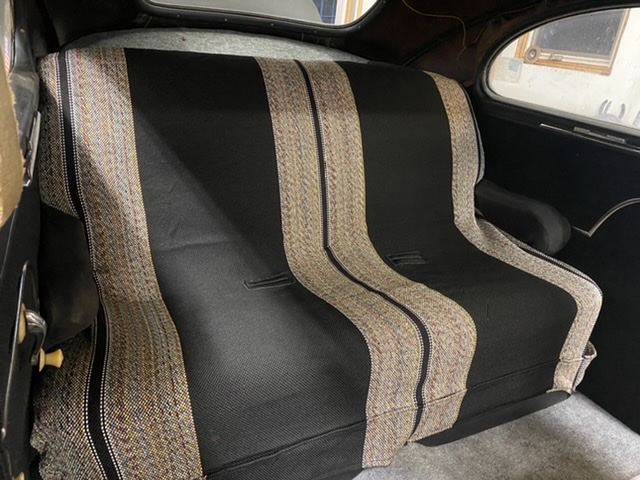
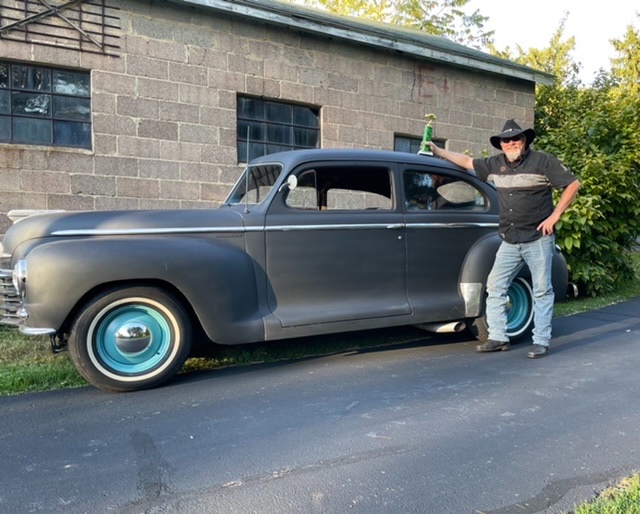
Haven’t been on here in while so just wanted to add a few photos of the recent progress to my ride. This past summer I redid the interior for under $150. Some Marine carpeting and cheap seat covers from Amazon made fairly easy work of the refresh. Recovered the factory door panels and made some kick panels. My current project is a custom built windshield visor. Still in progress with this one. I made some clamps that attach solely to the drip edge so no need for drilling anything. Easily removable. She also won a trophy at a local car show over the summer.


-
Thanks Sniper! I will probably start a new thread with a general overview and some pics of the project as a whole in the near future.
-
Thanks Andy! Yes that bearded fellow was smiling all day yesterday! Especially when the tires broke loose from a rolling start. Haha
-
Well guys it’s been far longer than I expected to test drive this project but it finally happened yesterday! I’m excited to report the rack and pinion and all the mods paid off hugely! 2-1/2 turns lock to lock effortlessly and factory spec turning radius. A quick rip down the not-so-smooth road by my house produced zero bump steer! I’m very happy with things so far. Still have much to finish on the project as a whole. Some exterior trim, some interior pieces, etc. but overall I’m stoked about driving it soon for some summer fun.


-
My ‘48 Plymouth Special Deluxe rat rod project
Scott Knecht replied to Scott Knecht's topic in P15-D24 Forum
Well the day finally came yesterday when I could give it a flogging and see how things worked. I’m delighted to say the rack and pinion works flawlessly! Steering radius is factory spec with the shorter arms and the 2-1/2 turns lock to lock are effortless. Zero bump steer too! This whole project took longer than I expected and there’s still things left to do such as finish installing some trim and interior items but all in all I’m very happy so far. And yes knuckleharley I spent some time and effort and repaired all the rust but I am leaving the black primer for now. Lol I’ll probably start a new thread at some point so for now I’ll leave a few pics and say thank you to all who joined the conversation and shared thoughts and opinions. This is a great site!

-
Also RacerX I’m not sure what column you’re using but my factory unit is splined to only fit one way on the shaft. That may be an issue when you try to put it straight.
-
Also RacerX I’m not sure what column you’re using but my factory unit is splined to only fit one way on the shaft. That may be an issue when you try to put it straight.
-
Yeah I did some quick research the other day and found some racks do in fact have a 3 turn lock on them. Apparently some models used wider ratio steering. So something is definitely binding in your case. One thing I’ve learned with this project is just about every modification leads to another to get everything to work. Hopefully you can figure it out without too much distress. Sorry to hear of the surgery situation. That’s a drag. Hope you have a speedy recovery and can resume the project in short order.
-
I’m feeling pressured Bob! Haha Racer x, Are you sure you have 3 turns lock to lock on your rack? Mine only turns 2-1/2. If yours is actually 2-1/2 that would explain why you can’t turn fully in one direction. The rack isn’t centered too start with. I’m not saying there aren’t racks that turn 3 full turns, I just know mine does not.
-
Hoping to get a test drive early next year and report the steering experience. Lol Stay tuned!
-
Yes sniper I did. The stock Cavalier rods use pressed in rubber bushings and sleeves much like a shock absorber mount. I will not fully tighten them until the car is on the ground at rest. Then they’ll be in a neutral position. I would think tightening them in any other position would potentially cause binding. Yes it would be really easy though to adapt spherical rod ends and I’ve actually given it some thought given what I’m now seeing with the failed FatMan adapter sleeve failure.
-
Kind of bummed about the no response from Fat Man. I thought they would defend their product. Like Sniper mine too had the long and short factory tie rods. As far as the full droop situation, my spindles only moved inward about 2 degrees at the very, very bottom of travel and were perfectly straight the rest of the range all the way to maximum compression. By the way I tested my travel without any bump stops installed and I still had over an inch frame to tie rod clearance at maximum compression. So with bump stops installed top and bottom, the steering should stay pretty neutral and move bind-free I hope. All I can say is getting your inner tie rod pivots in line with the A-arm pivots is the key to everything moving as it should. As I said before I mounted the rack where I did for header clearance and because I wanted the engine as low and far back as possible. So fabricating the center tie rod mount allowed me to dial in the pivot points almost dead on.
-
Racer X if you go back in this post you’ll see where Sniper was able to post my little bump steer video.
-
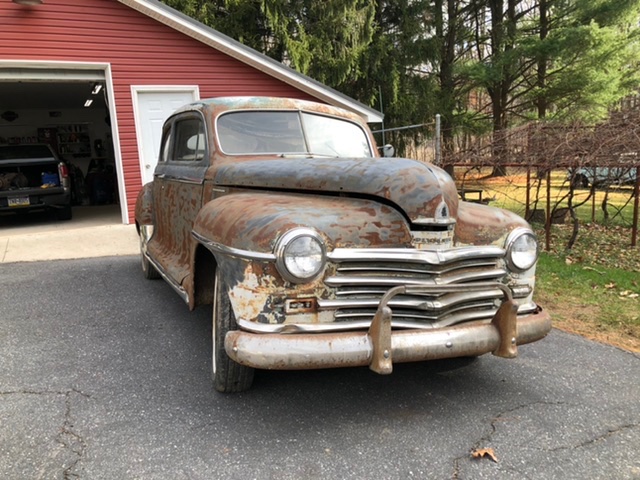
Yeah I’d be interested in hearing what Fat Man’s response is to the broken adjuster. As far as the steering arms, I just rotated the spindles stop to stop and compared that to the distance the Cavalier rack moved lock to lock. I came up with 1-3/8” shorter arms and it seemed to work. I simply made the arms from 1”x1” mild steel bar stock bent to the same angle as the factory arms. Got a 7 degree reamer from eBay on the cheap for my ball joint holes and of course careful measurements for the mount holes. Being mild steel I welded a bit of extra material around the holes and left them cool slowly. Dressed them up with a flap wheel. I couldn’t bend them in my 20ton press without heat so I’m pretty sure they’ll hold up. As for the backing plates they came from Scarebird Classics in New Mexico if I remember correctly. Remove the stock drums from the hubs and turn them slightly smaller to fit in the rotor. Rotors are from Ford Probe, calipers from El Dorado and pads from S10. Was pretty simple really. Sorry these are the latest pictures. I’ve been slacking. Lol


-
Racer X this was the crazy angle I had on my rod ends at ride height with the factory long steering arms. At full on suspension compression it would exceed the angle limit of the ball joint. Not sure if you had any of these problems or not or if that contributed to your failure? I don’t have a recent close up of the revised set up but it now has a more neutral “at rest” orientation. But yes I still think the adjuster sleeve is scary looking for strength.

-
Wow Racer X that’s a disconcerting situation. Now you have me second guessing the quality here. I’m spending money like a drunkin’ sailor trying to get my rod up and running. The last thing I need is to spend more. Lol I did make shorter steering arms on the same plane side to side to get the same turning radius with the Cavalier rack and also used two passenger side inner tie rods to eliminate the funky angle of the factory Cavalier driver's side piece. I also made a revised center mount to get the inner pivots as high as possible to the oil pan and in line with the A-arm pivots. (I had to move the rack closer to the driver’s side for header clearance reasons) It totally eliminated my bump steer problem which I’m sure puts undue stress on steering components. All my mods also put the tie rod end ball joints in a 90 degree neutral alignment at ride height which I believe will further reduce unwanted forces on the steering. But I have to say I questioned the strength of those tie rod “sleeves” when I took them out of the box. Thanks for sharing this info. You may have saved some rides from a nastier fate! Also just curious did you contact FatMan fabrications about this problem? Or wherever you got the kit?