Mertz
-
Posts
399 -
Joined
-
Last visited
Content Type
Links Directory
Profiles
Articles
Forums
Downloads
Store
Gallery
Blogs
Events
Everything posted by Mertz
-
There 2 wires going to the head lights and one to the parking light. I believe the parking light uses the same ground as the head lights. It’s been awhile since I took it apart. The wiring diagram just so 3 wires to the headlight buckets. I’ll see if I can press the terminal back on but I’m skeptical. At least it’s on the easier side to reach. Not sure what you mean by a round bullet.
-
I watched a few videos on adding turn signals to our trucks. I want to use the front running lights as the front markers and the back tail light plus one I’ll add for the rear. The rear should not be a problem but the front would need a separate circuit for each lamp. I did some testing and they appear to be on one circuit split at front of the wiring harness. There is a terminal on the light switch which has come off that appears to be controlling those running lights. Question 1 how do I remove the light switch if I need to reconnect the terminal? Question 2 has anyone this conversion and can share a few tips?
-
The engine going in my Plymouth was originally used as a stationary engine and I realized today that it does not have a vacuum advanced on the distributor. The unit is in very good condition compared to the ordinal and I would like to use it. When tuning my other cars I try to put in as much vacuum as possible without pinging. This being a low compression engine I don’t think pinging is going to be a problem. Should I use the good distributor and just add a lot of advance or would the work of rebuilding the old one be worthwhile?
-
I did visually compare the disc to a new one and it appears that the old one had just been replaced with very little wear showing. The through out bearing is being replaced because it is what normally fails first. I never replace a clutch without replacing the through out bearing. Having said that I will check the old one. The engine going in was used as a stationary engine I believe to pump water and it had a new pilot bushing installed when the engine was rebuilt so it is basically new.
-
I’m installing the old disc and pressure plate. I took the disc to a parts store and compared surface thickness with a new one and mine looked very good. When I laid the pp on I have about 1/8” of clearance between the pp and the flywheel before tightening the bolts. Does that sound right?
-
If the springs are at 145 I would use the pp. You are correct about it being old equipment. The truck was used on a Montana farm and only shows 26000 miles on the odometer which based on the internals of the non synchro 4 speed trans and rear end, which look like new, it appears an accurate reading. There is still good surface on the disc and the faces of the pp and flywheel just need resurfacing. I don’t know if springs weaken over time by non use or not. I bought the truck 30 years ago and it’s alway been stored undercover. Everyone knows that when working on a clutch always replace the throughout bearing. While I have it apart and easy to get to, it makes sense to replace everything but with the pp looking good and being on a limited budget I would like to at least use the pp. I think I will put some pressure on it like pictured above and see what kind of resistance I get. If it moves to easily it will be replaced, if it has good resistance regardless of actual psi I will probably use it. Thanks for all all the comments and help
-
Mine looks a little different. The 3 fingers are stamped steel. It does have the ability to adjust the pressure. Your setup with the jack would work for me if I could get a pressure gauge in between the jack and the hitch. Mine is a 10” clutch. I believe the correct pressure is 155psi at 1.5” depression.
-
I have a clutch out my 40 Plymouth that looks to be in very good condition. The disc doesn’t look bad either. I was tempted to use both but I think I will definitely replace the disc. The only way I would use the pressure plate if it can be tested for correct pressure but I can’t find anybody in Spokane who can test them. I don’t have a press. Can anybody suggest how I can test it or who might be able to test it for me?
-
I tested the 6v firewall mounted coil that I would like to use because the way it connects to the key. The primary coil reading is 2.5 ohms which I believe it okay for a non ballast resister vehicle. The secondary reads 3.5k. On a 12v coil that should be between 11k-15k. Most are much less around 9k. Is 3.5k normal for a 6v coil or is the secondary non voltage specific?
-
The springs are pretty much centered but the plate that holds them is to one side which from looking at other clutch discs that have it marked “flywheel side” it appears the side with the plate closer to the friction surface is the flywheel side.
-
Mine is the same thickness on each side so I guess it could go either way but there must be a correct way. Maybe it has to do with the way the slots in the disc run. Anyone know how thick a new disc is supposed to be? Mine looks pretty good and would like to use it if the thickness is close enough to new.
-
Thanks I appreciate the help. Can you tell me which face of the clutch disc goes toward the flywheel?
-
I’m getting my engine and tranny put back together. I got the flywheel installed but don’t have the torque specs for it or the pressure plate. Is there a listing for all the torque specs for the engine. I can’t seem to find one in my manual.
-
WD40 overnight and drilling out the access hole was a success but I can’t get the latch out because of the window track attachment to the door. It had to go in so has to come out that is if the track was added before the latch mechanism. I’m stumped.
-
Unfortunately mine does have the small slotted screw. I have filed down a screw driver to get a good fit but it is still at an angle because the hole is off center of the screw. I’m going to enlarge the hole and try again. If that doesn’t work I’m off to Harbor freight to get some reverse drill bits. Hopefully the screw will come out without retapping. My lock works with the ignition key and is in very good condition since it was hardly used. I will be replacing the screw with an Allen head to make getting it in much easier. Wish me luck!
-
Mine being a Montana farm truck I don’t think the lock was ever used. I think I’ll get some reverse drill bit to try to get it out if nothing else works.
-
I found the hole but my truck has a much smaller hole and I can’t get a screwdriver on the set screw. I will try to enlarge the hole so I have better access. I tried pounding on the shaft with a punch and moved it out about a 1/4” but that didn’t loosen things up so I pushed it back in. I spayed WD on it and will try again tomorrow.
-
So what looks to be a square shaft is the set screw?
-
I have everything loose trying to get the door latch out to repair a broken or missing spring but it is being held up by the key assembly. I have removed to chrome cover and tried to unscrew it. Not budging and very hard to get a grip on it. I have a key and thought it might release with the key in the correct position but that doesn’t work. There is access to a square shaft in the inside of the door. 1940 Plymouth truck. Any help would be greatly appreciated. Thanks
-
I’m trying valvoline max life transmission stop leak and it seems to be absorbing pretty well. I’ll let it soak for as long as I can and then give it a test. I found a couple of o-rings I had laying around. I put one on top of the other so hopefully when I reinstall the pitman arm the spring will apply enough pressure to form a good seal.
-
I have a leather seal on the tail shaft of my 40 Plymouth 4 speed transmission. I have tried to rejuvenate it by soaking it in oil but oil still goes past the seal. Is there a way to get the leather to swell to form a good seal? The seal is out of stock at Andy’s. The steering gear box is leaking at the cork washer/seal. Does anyone know were to get a replacement? thanks
-
My 1940 Plymouth truck has a broken window on the passenger side. Do I have to remove the entire regulator assembly to get it out or can I just remove the window and track? Thanks
-
I just put it in its place so I won’t forget again where it goes. I haven’t finished that part of the frame so it will have to come off again. I sure like this site and all its helpful people.
-
Thanks. I remember now that that is the way it went in. When I took it off I had a feeling that I would put it back together right.
-
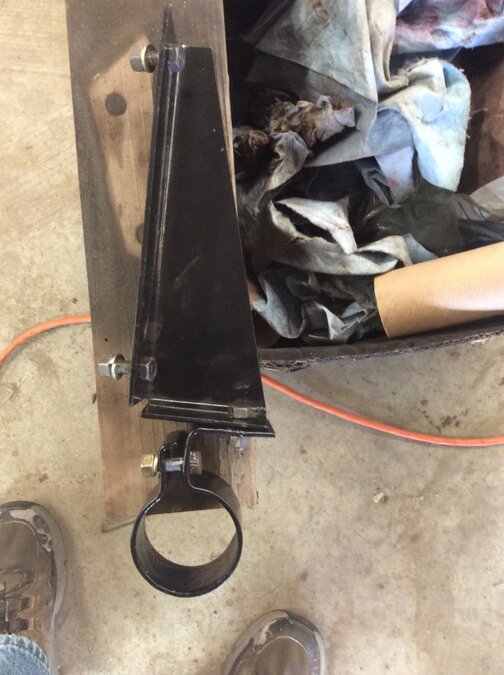
I have a couple of parts that I did not get a picture of before taking them off and restoring them. I originally thought they are part of the exhaust hanger but could not find where it bolted on. The only place it seems to fit is at the gas tank where the bolts line up with the other bracket. I’m not sure what it is for and what the round clamping piece is for. Any help would be greatly appreciated.