

Ed McDermott
-
Posts
82 -
Joined
-
Last visited
Content Type
Links Directory
Profiles
Articles
Forums
Downloads
Store
Gallery
Blogs
Events
Everything posted by Ed McDermott
-
So the solution in this post from Jim is that the vacuum advance diaphragm was bad. Would this have been noticed during testing if the vacuum advance line was disconnected at the carb and the carb port plugged. In my case there was no difference. I await your answer but it is an interesting thought as I mentioned I had a hard time with setting idle with the carb before being rebuilt. Could only set it at 800 to 900 for steady run. Thanks Ed
-
I am using manifold vacuum, but i had not disconnected the vacuum line (forgot). Will do today as looking for a vacuum leak. Also per Jerry Roberts, could the the pipe plug be carbon plugged. The car arrived with no bolt in the pipe plug and I drove it short distances and ran the engine over two years and not noticed any pressure escaping from the port. So just wondering since I have no practical experience with a pipe plug. Thanks everyone your suggestions help.
-
the throttle linkage is connected to the spring and the throttle plate is fully closed with the rpm at 1400 rpm.
-
Hi I need some insight into a problem in setting idle speed using the vacuum method. Background: 1948 Dodge Custom fluid drive with a 1953 B-3-B model 306 truck engine. 1 no pointer on engine for referencing timing marks on balancer. 2 pipe plug hole is plugged at bottom by broken bolt (guess). No pressure escapes (or felt) when engine running 3 so trying to use vacuum method. 4 Engine ran reasonable but could not set reliable idle below 800 rpm 5 rebuild carburetor as car ran rich and have no history on the car 6 Re-installed carb and set out to time. Warmed up engine. vacuum advance was still connected. Could not set idle below 1600 rpm. turned idle mixture in but engine stalled out without getting much reduction in rpm before stall out. Checked engine compression (1-6) 120, 120, 120, 110, 115*, 120 * gauges may not have been tight enough in spark plug hole checked vacuum at 1600 rpm and maxed vacuum with idle mixture and vacuum was steady at 19 in/hg with 1/2 in of jitter pulsed the accelerator and vacuum went to 0 and returned to 19 in. checked float setting reset float a little to insure full closure. checked idle speed and was able to adjust lower to 1400 rpm min. So I am looking for some guidance, as to what the problem in setting the idle rpm may be as not sure what to do next. Thanks Ed
-
Hi I have a engine casting number #T306*I7I384* (I = cap i) with a date code in the head casting of 6-22-53 , which I believe is a truck engine model 306 and produced in June 22 1953. I am not sure what the *I7I384 indicates. The engine is installed in my 1948 Dodge Custom Sedan with Fluid Drive which I bought from an farm estate in Lake, Odessa MI. in 2020. So I have no history on the vehicle. I have the Dodge Custom manual and the timing spec's but on line data for a B-3-B 306 is different from the sedans 218 engine specs. Does anyone have the correct timing and sparkplug gap spec's if T306 is the id for the Truck engine model 306? Thanks
-
headliner installation question for 48 dodge sedan
Ed McDermott replied to Ed McDermott's topic in P15-D24 Forum
Thanks for the photo and hints. i am ready to move forward now. Ed -
headliner installation question for 48 dodge sedan
Ed McDermott replied to Ed McDermott's topic in P15-D24 Forum
Thanks my brackets are slightly different and I believe when the fabric is inserted behind the bracket with a tool (putty knife) the bracket is gently hammered to compress the bracket on the material. Ed -
headliner installation question for 48 dodge sedan
Ed McDermott replied to Ed McDermott's topic in P15-D24 Forum
Thanks All. I have tried a sample piece of headliner as suggested above and the approach worked well. now I can move forward. Ed -
headliner installation question for 48 dodge sedan
Ed McDermott replied to Ed McDermott's topic in P15-D24 Forum
Thanks All. I have tried a sample piece of headliner as suggested above and the approach worked well. now I can move forward. Ed -
headliner installation question for 48 dodge sedan
Ed McDermott replied to Ed McDermott's topic in P15-D24 Forum
The headliner was almost completely torn out. But yesterday, I did have similar thought like your suggestion. Last night, I did see a YouTube video on a 71 VW Beatle headliner installation which indicated using a putty knife to push the headliner under the bracket and then pounding on the the lower part of the bracket to secure the headliner on the sharp points inside the bracket. I thought I would try a sample piece of headliner today with that approach. Ed -
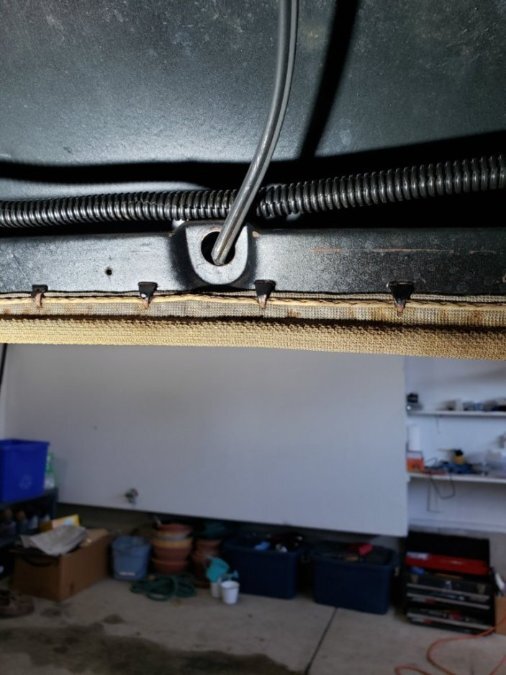
Hi I am preparing to install a new headliner in my 48 Dodge Custom. I have watched many YOU Tube headliner installations videos but none address the way to secure the sides of the headliner to the bracket that is provided. I have attached two images: 1) One is of the windlace attachment with the bracket for the headline attachment removed. This seems very direct and no problem. 2) The second is of the part of the bracket for holding the sides of the headliner over the windlace and over the doors. The picture is taken rotated ~45 degrees left. Does any body know how the sides of the headliner are attached over the bracket and then attaching the bracket screws without damaging the fabric? And keeping the fabric taught. Any suggestions appreciated.

-
Thanks Great help and your previous responses to some of my questions were great. Ed
-
Question on the electric choke. My 48 Dodge D24 Fluid drive has a Sission electric choke which has not been operational. I removed, it cleaned, all including electrical terminal. After which and still off the car the electric solenoid worked and moved the linkage for the choke plate on the carburetor. The way the coke is supposed to work is that the electrical signal from the starter switch pulls in the solenoid and temporarily set the choke plate based on the position of the choke metallic thermostat. Qnce the starter switch is released the choke will remain set if the thermostat is cold and time out as it warms up. If the thermostat is warm then the choke will not set the choke plate to a closed position. The following is my question. With the choke removed from a cold soak and setting on the bench, and the choke is initiated with an 6 volt signal. The choke solenoid sets but does not hold its position after the the 6v signal is removed and I am trying to figure out what holds the choke when cold. I have a cross sectional drawing view of a Sission choke and my choke seems to have all the correct parts. Does anybody know if the metal thermostat (which is a v shaped metal 3/8 wide wedge shape is a bi-metallic material or just a steel v shaped metal material. I believe its the change in the open measurement of this V shaped material ( a function of temperature) that control both the holding quality of the choke at cold temperatures and its change with temperature. If the metallic v material is steel then I think the V shape needs to be opened up in order to hold the choke setting. But before tampering with the V shaped metal strip i though I would ask for help. If its bi- metallic then I think its failed. The other possibility is that I don't know what I am talking about. Any help would be appreciated. Ed
-
Thanks but are you saying even though the pipe plug has been missing since I have had the car (1 yr) that the carbon deposit was so strong that the engine does not leak on the compression stroke when running and one would need to dissolve or break out the carbon deposit?
-
Thanks for the information which I followed and also found a short you tube video showing the technique. Set out to find the pipe plug and found only a threaded hole (see image). Pushed a rod in and it would only go down 1/2 - 3/4 inches so I guessed it may have been snapped off by previous owners. Ran the engine and did not notice and positive or negative pressure coming from the threaded opening. So I guess that my only option would be to for reference to get back to (1) mark the distributor current position, (2) connect the timing light to cylinder #1 spark wire and mark a chalk line referencing the TDC indicated by 0 degrees on the crank, then(3) slowly turn the distributor ccw until you hear a ping and back off a few degree. perhaps this is how it got to its current setting?

-
Perhaps you could help me a little more. By pipe plug do you mean the spark plug lead wire and attaching the timing light to that #6 wire or something else? Or is this a mechanical procedure to get top dead center. My Chrysler Dodge shop manual shows the timing reference pointer to be on the passenger side as best I can make out from page 93 fig 16. Also a little confused should timing be set using #1 spark plug wire for the timing light? Perhaps there is more to this than I understand and appreciate any help. I have included two photos taken from the driver side looking down at the crank. It is hard to see any timing reference or place that it might have been there. Also towards the top of the picture there is a small jagged piece sticking out which I thought might be remnants of a broken indicator but I believe that is too far above the crank reference marks.


-
thanks again
-
thanks for the info will try Ed
-
Trying to check dwell and timing on my 48 Dodge Custom Fluid Drive and recently discovered that I have a 51-53 truck engine installed . Engine # T306*I7I384* I was able to set the dwell according to the manual 38 degrees not sure if this is correct for the engine? On timing, I could not find a reference point (tab) for the timing. See image. I subsequently just checked the timing with a light and the 0 degree marked appeared at approximately 12 o'clock. The car runs reasonably well at this point. So any suggestions as to a timing mark reference tab. I don't see a place to mount one if I had one or could fabricate one. Another question. Is there any significant difference in the 51 truck engine and the 48 original custom engine regarding timing and dwell settings or other things I might not be aware of? thanks Ed

-
Had a similar situation on my 48 Dodge. If the bulbs sockets you will have to run the 4 new wires from the turn signal to the respective bulbs. For the front go thru the firewall you can usually find room. wiring on my dodge goes to the rear by traveling up the driver side A column and under the roof liner and along the roof line and down into the trunk . It was impossible to snake additional wires along this path. For the rear wire along the main frame member and up into the trunk at the rear. takes some time. unless the car has existing turn signal wires you have some work to do but its doable.
-
thanks that helps a lot ed
-
I am redoing the right rear brakes on my 1948 dodge custom. It took 7 days of on on and off effort with the puller and breaker bar before it finally came off with a really big bang.. Question: Is there any recommendations on applying any anti seize grease or grease to the shaft and keyway to insure it will be easier to come off next time? Also There is a small crack on the outer edge of the drum (face of the drum and the side of the rim). I assume this is non-repairable and needs to be replaced?

-
48 dodge 49 dodge _ Plymouth starter interchangeability
Ed McDermott posted a topic in P15-D24 Forum
I have a 48 Dodge custom D24 sedan. I pulled the starter out over some starting issues and to rebuild the starter. When I removed the starter, the name plate on it was Chrysler corp. and auto Lite model MCH-6101. I was not able to get a complete 48 dodge rebuild just the brushes. I did an online search for auto lite MCH-6101 and for a kit. Auto lite MCH-6101 shows as fitting 49 -53 Dodge and Plymouth as well as some tractors. Could it be that MCH-6101 fits a 48 Dodge ? Or did a previous owner just put one in because they are available? Any ideas? thanks Ed -
48 Dodge Battery to starter trouble shooting _ any ideas
Ed McDermott replied to Ed McDermott's topic in P15-D24 Forum
Tanks for the info the video was helpful with the voltage drop values. Battery check ok starter solenoid checks or from +5 to 6.2 volts with variable power supply and low ohmic value. replaced some wires and recleaned some connections and now on to voltage tests as you recommended. Ed

