


DonaldSmith
-
Posts
2,436 -
Joined
-
Last visited
-
Days Won
24
Content Type
Links Directory
Profiles
Articles
Forums
Downloads
Store
Gallery
Blogs
Events
Classifieds
Posts posted by DonaldSmith
-
-
See the crankshaft pulley. The pully or a damper, if one, should have timing marks on it. See recent posts on finding top dead center when No. 1 is finishing its compressionstroke.
-
Hmm. So, you have your probe in the spark plug hole, over the intake valve, rather than in the plug hole over the piston. It took me a minute to figure it out.
Whatever works.
-
Shirley, you can't be Sirius. ( I have trouble being serious. Sometimes I just can't help myself.)
-
Hmm. So, you have your probe in the spark plug hole, over the intake valve, rather than in the plug hole over the piston. It took me a minute to figure it out.
Whatever works.
-
The starter solenoid is the entire apparatus that rides horseback on the starter. The upper posts power the coil that closes the heavy duty connection between the two bottom posts and also engages the bendix drive to the flywheel.
-
There are two thin plates under the distributor that allow for making major and minor timing adjustments.
As seen in the photo above, we see the upper plate bolted to the bottom of the distributor. The lower plate is bolted through a slotted hole to the engine block. This is for the major adjustment.
The platea are bolted together below the vacuum advance. (The bolt head has a screwdriver slot in it, but it takes a big screwdriver.) This is the minor adjustment. The crankshaft turns twrice for every turn of the distributor, so a degree adjustment her makes two degrees difference in the timing.
This is all 'splained somewhere in the shop manual
-
 1
1
-
-
"Picky, picky, picky."
(Just kidding. Comedian Pat Paulsen's shtick was to run for president. In answering his opponent's accusions of dishonesty, etc., those three words were his rebuttal. )
-
Maaybe set the distributor to 4 to 6 BTD with todays gas.
One trick for getting the distributor close to right timing is to have a test light with two leads.
First, check TDC on the compression stroke vs which plug wire the rotor is pointing to (7:00 is typical.)
Then disconnect the distributor wire at the coil and connect one lead of the test bulb to that wire. Connect the other lead to the hot post of the battery, or other live source. The light bulb should remain on as the points remain closed, but shut off when the points open, which is when the coil would fire. .
Loosen the distributor bolt(s) and rotate the distributor. Note where the pulley is in regards to the pointer when the light shuts off.
Rotate the distributor until the pointer points to your intended target.
If you hve a vacuum bauge, yu can tweak it finer, for maximum vacuum at idle.
-
1
-
-
When I turned 80, i didn't feel that old; But when I turned 81, I felt that old.
Everything hurts, but thankfully, not all at once. The other day, briefly, nothing hurt at all I felt like I was 65 again.
-
 3
3
-
-
Binger said: "The upper left is connected to the generator.' OK if the generator is OK. You could try grounding the wire somewhere else, as a test.
-
Images of the steering getting loose and the car swinging out behind the tow car. You would want to have a very strong belt.
And it's probably illegal some places.
-
Looking at the solenoid,
Upper right stud: Yes, that's the one you jump to, to actuate the solenoid.
Lower right stud: That's the heavy stud, with the positive cable from the battery.
Lower left stud: This has a copper bar going into the starter, to complete the starter circuit. Also, there's a small wire to the Sisson choke, to partially close the choke while the engine is cranking.
Upper Left Stud: This has to be grounded somewhere, to complete the control circuit. Ma Mopar grounded it to the generator, so we can't crank the starter when the engine is running. With an alternator instead of a generator, we have to ground that post to the engine block somewhere, and remember not to push the starter button when the engine is runninig. Awful sound.
Have hou checked that the Upper left Stud has a good ground?
-
Main Oil Gallery?
-
I believe that Plymouth-Dodge blocks are different from DeSoto-Chrysler blocks. And maybe there are running changes in each case.
Just past the red cable, below the large solenoid post, is an oil line coming from a 90 degree elbow in a hole in the block that faces up and to the rear. I had to remove the starter to replace the elbow fitting which was leaking. This is the return line from the filter.
To the right of the dipstick tube is a whole lot going on. A couple of hjoles to plug or tap, and the large plug at the oil pressure relif valve. The oil line from there branches off to the oil filter and to the oil pressure gauge.
I don't know what everything is. I just reconected new lines the way the old lines were.
oillinesupclose.JPG.aec59cfae41fc13885aeb4547ffb5812.JPG)
-
After mentally taking my door apart, I thought I would check how the mechanism is supposed to work, and have a look at the latch and the strike, before doing anything drastic.
When the door closes, the strike rotates the rotor by one tooth, while a tooth in the strike folds out of the way. Then the strike tooth falls in place behind the rotor tooth.
The strike works fine; its spring is strong.
The rotor is free-wheeling in the direction that the strike pushes it, but needs to be released to rotate theother way, to free the door for opening. The rotor resists backward motion at every click. So the rotor seems fine. The teeth are a bit ragged, with some of the metal gouged and pushed up.
So I fiddled withcthe adjustment of the strike and found a sweet spot that works most of the time. I think I'll file down the totor teeth sometime, and see if sm0othing them off would help the occasional failiiure to latch.
a
-
This is pipe thread. The threaded hole gets narrower the deeper it gets, and the end ot the threaded plug is narrower. This produces an interference fit as the plug (or pipe, or fitting) is screwed tight. You could get a pipe thread tap to chase the threads in the block. Do not use an SAE thread tap or it won't get narrower and seal right.
(I remember old plumbing specifications requiring that the pipe joints be sealed tight without the use of pipe dope. I tighten the joints but still use some pipe dope.)
-
 1
1
-
-
Here's a photo taken during a transmission removal a few years go.
For the long wheelbase cars, there is a short fixed-length driveshaft, as shown, then a trunnion, universal joint, and the usual splined driveshaft. I had to unbolt the trunnion and move the short driveshaft back, in order to remove the tansmission.
For a standard car, you could unbolt the universal joint at the transmission, but it's simpler to pull the splined end of the drive shaft out. With either way, there should be no lekage out of the back of the trnsmission.
driveshafts.JPG.6efef08e5c3f8142e687add74884369a.JPG)
-
White-out also works.
-
You are correct. To remove the driveshaft, you only have to take apart the U-joint at the differential. The front end of the driveshaft has a splined shaft that will sllide out of the transmissin, so the U-joint there can remain together.
Suddenly, it's all coming back to me. My son was afraid to drive his Jeep with the Suburban towed behind it, so he let me bear the responsibility. I drove slowly to avoid handling problems (braking) and problems overheating sometning.
I considered a tow dolly for the 75 miles to the Desoto Convention this year, but someone on the forum recommended against leaving the driveshaft on. The fear is that at that diatance and at highway speeds it may overheat the Mopar semi-automatic transmmission's hydraulic system. How great a distance and at what speed?
Your portfolio is qute impressive. You've probably towed a few cars. And they are all different. As a kid,we had a 52 Caddie with a Hydromatic Transmission. It was a no-no even to push the car to get it started. My brother wouldn't listen to me, and he trashed a recent transmission rebuild.
-
For a 2-1/2 hour trip, remove the driveshaft. Before disassembling the two ends, mark them so they will assemble the same and won't get 180 degrees off, which could cause vibrations.
If this is not the long wheelbase like my Suburban ,the car will fit on a U-Haul Car Transport trailer. Drive it on, strap it down. U-Haul will want to know what you are pulling it with. That may be th case with the dolly, too, since the trailer has surge brakes and the dolly has none.
20 years ago, I dollied my Suburban home, with my son's Jeep. I pulled the driveshaft and drove really slowly. For this year's DeSoto convention, we rented a 3/4 ton truck and a large flatbed trailer, afet finding out the the Suburban wear wheels didn't quite get onto the U-Haul trailer.
I just want to say, good luck; we're all counting on you
-
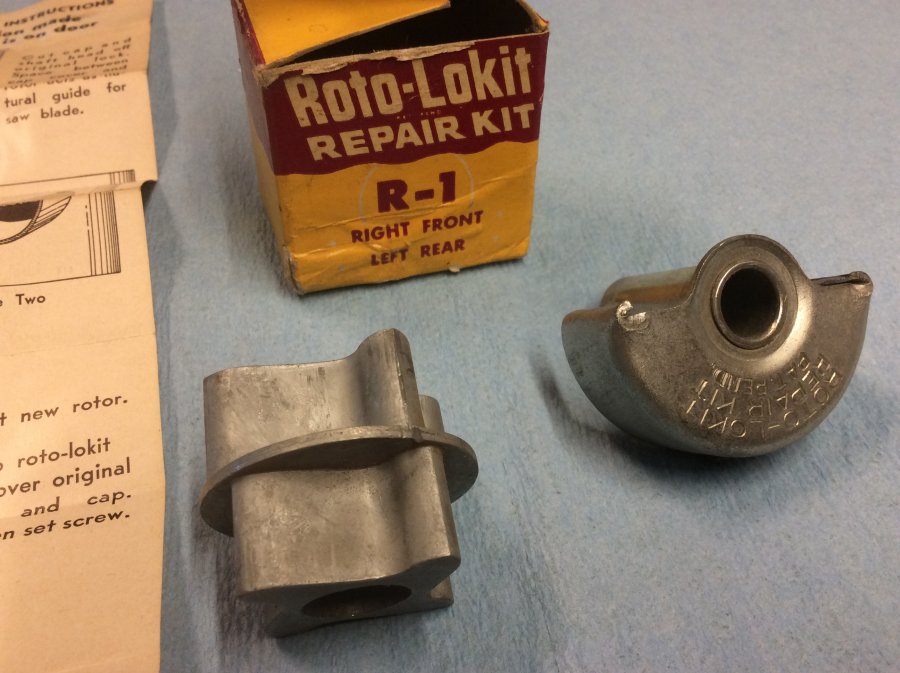
I looked through my photos of one of my door tatches. The rotor has star-shaped points inside and outside. The inner side is what keeps the rotor from moving when the door is latched. And the points of the inner star get their own wear. Also, the profile of the inner star may be different. So it looks like I can't switch the right rear with the left rear.
This photo is looking at the latch from the outside. As the door closes, the outer points that we see come toward us. As rhe inner points move from our right to the left, the three springs keep the rotor from rotatoing back in the other direction. The latch mechanism works to lift those spring ends away fromthe rotor so that the door can open.
Maybe there is a fault within the mechanism to keep these springs from doing their job. Maybe a nice wintertime project.
Doug&Deb have a rotor kit for a 52. Also there are some on line for 49-52. Anone know if it would fit pre-49? (These were used on a number of cars. Someone on line fixed his 41 Stude with a kit.)
-Copy.jpg.e5e4ad621811a3473a55e69bf441144b.jpg)
-
Yes, dear, I'll be careful.
I jack up a corner of the car high enough so that the wheel clears the ground (or slab).
Then I set a racheting jack stand so high that it doesn't clear the frame.
Then I jack the car up so that the jack stand clears the frame, and I'll slip the jack stand under the frame.
Finallly I lower the jack so the frame rests on the jack stand, and I'll close the valve of the jack.
If I remove the wheel, sometimes I'll be triple-safe, and slip the wheel under the frame.
-
1 minute ago, DonaldSmith said:
My left rear door does not want to latch, 3 out of 4 tries. The rotor is worn.
Photo from a thread about 5 years ago. (Editing - more text:) These kits must be as scarce as hen's teeth. However, it looks like the rotor is double-sided. Can it be flipped from one door to one on the other side? Or do the concealed lobes have a different function? The kit is specific as to which side it is for.
There are some rotor kits for 49-52 Mopars. Would they not fit a 47? (With my luck, probably not.)
x
x
-
Photo forom thread about 5 yers ago. x
x
x
Best way to time a 230 engine
in P15-D24 Forum
Posted
Pondering deeply the question "The best way to time an engine?" Surely, Labrauer knows how to time an engine; he's probably done it once or twice. He was asking the best way to time an engige. Maybe that's like asking the best oil to use. No single answer, and don't call him Shirley.
Labrauer mentions the timing chain. When assembling an engine. one has to get the cam working in sync with the craink. That's a form of timing.
The usual situation is timing the distributor to the crank and the cam. This involves finding top dead center of the crank and determining the end of the compression stroke for No. 1 cylinder, so the rotor points to No. 1 spark plug. Some guys use the probe hole in the No. 6 cylinder to find TDC. Some of us use the timhg marks on the pulley or damper. And the compression stroke can be found by a thumb, or golf ball, or whatever, on the spark plug hole. (Add your own favorite metnod.)
As in all philosophical matters, further ponderings and opinions are in order.