


DonaldSmith
-
Posts
2,439 -
Joined
-
Last visited
-
Days Won
24
Content Type
Links Directory
Profiles
Articles
Forums
Downloads
Store
Gallery
Blogs
Events
Classifieds
Posts posted by DonaldSmith
-
-
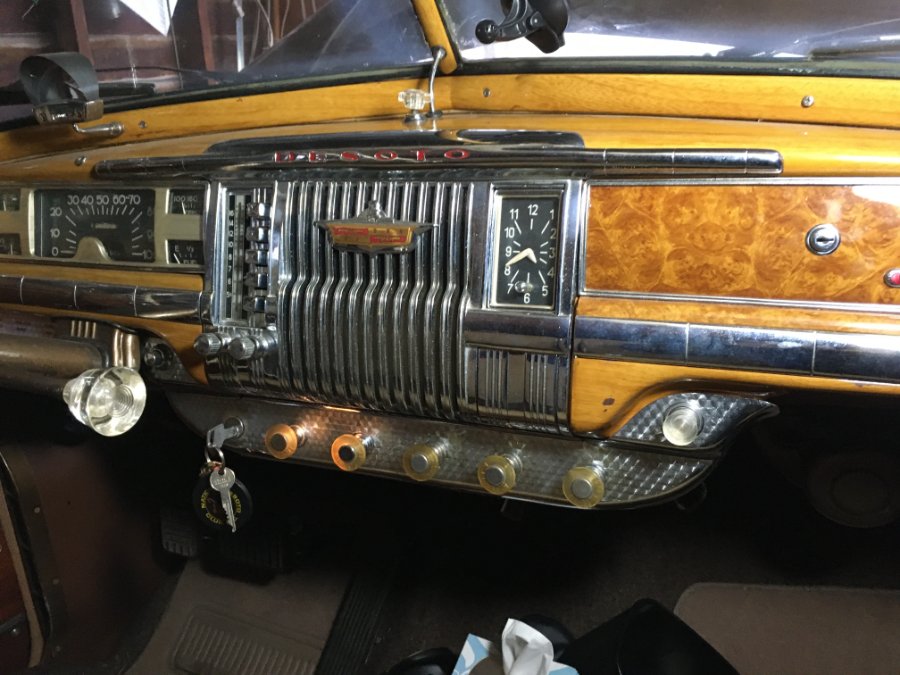
47 DeSoto dash - (Start Button high.) Ignition. Map Light switch. Parking/Head lights. Heat. Defrost. Fan. (Lighter on high) (Old dash)
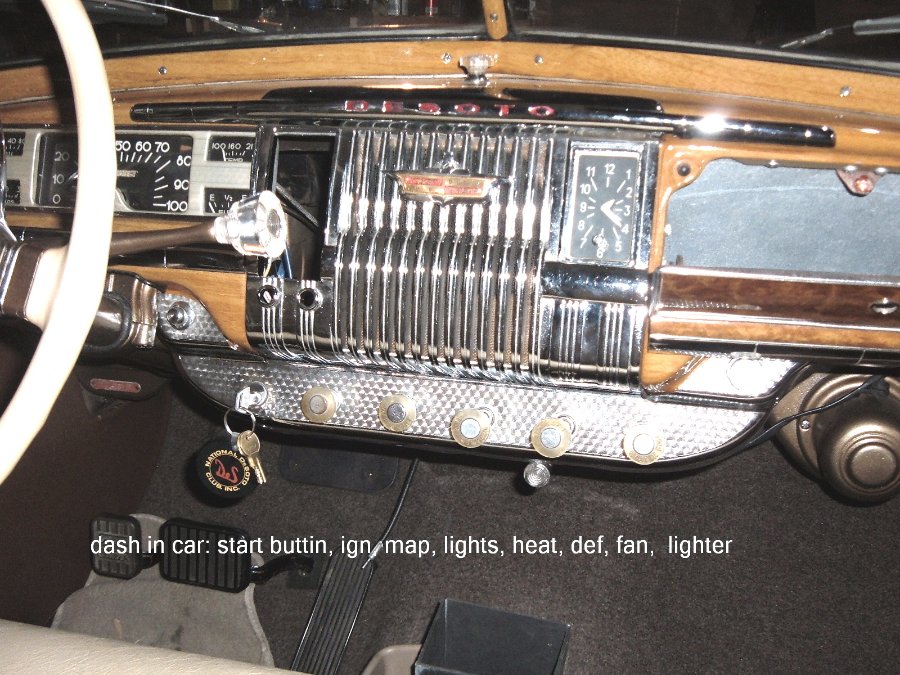
(New Dash)
-
At my advanced age, I can still do a day's worth of work. It just takes me a week or two.
Been working of the 47 DeSoto.
Pulled the Pertronix and installed new points and condenser, from Napa. A conservative approach.
Installed a Type 2 battery while I was at it. More cranking power for a few dollars more.
Verified TDC for No. 1 firing, and got the test light to shut off at a certain position of the distributor.
A day's work, over the past few weeks.
Double checked frequently, and found errors requiring frequent re-doing.
Light at the end of the tunnel? I'll find out tomorrow if the engine will start.
Then minor dizzy adjustment for maximum vacuum.
Then see of the engine still wants to lope, lope, lope. If so , I'll have another day's work to find the cause.
.
-
I understand that the Philips head screw had some advantages for production.
The "X" shape keeps the driver from slipping out, and the inherent slope kicks the driver out when the screw is torqued enough.
However, this is the bane of the design when we try to get a stubborn screw out.
I think that the development if drivers with torque limits allowed the development of screws such as those with a square recess and the Torx head screws with their star-like recess.
But what do I know.
-
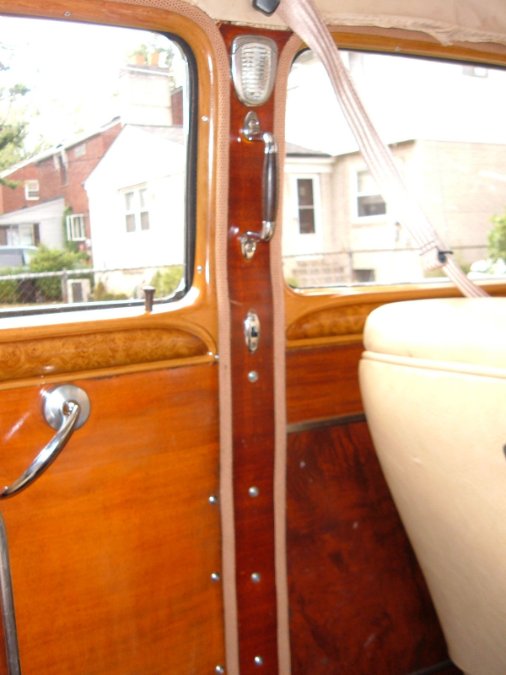
I have a series of photos of a 1942 Imperial limo. Of course, it has the 8: (Ignore the 39 in the photo title. It is my Photo 39.)
-
Ah, the Falls. In the '50's, we would visit our mother's family in Welland. We got to the Falls on occasion. And every breakfast we could see the image of the falls on the NBC (National Biscuit Co.) Shredded Wheat box.

-
Gee, that's what I just bought at O'Reilly's. I paid 2.99 each, but the store was close and had the order picked for me in short order.
(I could still load up on Walmart plugs. Thanks for the tip.)
-
But all seriousness aside...
I timed the dizzy to make the light go out, and tightened the major adjustment bolt.
Then thought I just might pull the cap and check the rotor - one hundred and eighty degrees off.
Back to the remote starter, to tunk around to the right mark. Oops, too far, go around again. On the mark. Rotor pointing to 7:00.
On-line tip for cleaning the sooty plugs - brake cleaner and then torching the residue. Too much fussing. Buy new plugs.
-
I couldn't find the 297 on Walmart online. There's a 2974, in a similar package, cross referencing to an RCJ6Y, and there's a 2976 and some others. Your photo of the display card does not show the model number, SKU, or other number.
-
Nice vintage touch. Note the former Canadian flag, with the Union Jack. Also note the 48-star U.S. flag. Ah, the old days.

-
Neutral, clutch in, fluid coupling. It doesn't matter now.
Maybe when I get to heaven (so I hope), the old mechanic will tell me what it was that made the engine near impossible to turn with the fan.
-
Final Report: I got the timing pointer at 2 degrees BTDC. I wanted 4, but this should be good enough.
For the record, this is fluid drive. Tried the fan belt trick with the wife pushing the clutch in. Did she shift in into power range? Tied the belt trick with the car in neutral.
The fan belt trick doesn't work for me. We may never understand the problem.
I was able to back off the crankshaft at the screen opening in the bell housing, but the geometry would not let me move the crankshaft forward. The manual insisted on moving forward after moving backward - to take up the backlash? Enough under the car.
Finally, I cranked with the remote starter. Quick tunks of the remote button. Very careful to take one full revolution before tunking toward the timing marks. (I don't want to get 180 degrees off, do I.) I tunked past the desired 4 degrees BTDC, to 2 degrees. "Good enough for gummint work."
Next, find my test light, and adjust the distributor to open points. Then see if it will start. Are we having fun yet?
Thanks, guys, for your input.
-
No go in either direction.
I have the car jacked up. There is no obvious inspection cover on the bottom of the bell housing, as there may be with a stick shift. The bell housing for the fluid coupling is a monster. There are brackets from the engine block to the bottom of the bell housing. Removal of the bottom of the bell housing, as for accessing the clutch, would be a process. (I vaguely remember doing it.) I have the screen out at the bottom right of the bell housing and I'm about to pry the flywheel, up first, to back up past TDC, and then down, to get it where I want.
But first, another break. The unwritten but time consuming part of most procedures is the preparation. Get the jack, jack up the car, get the stool out of the loft for reaching over the fender to see the timing marks, find the missing tool, and so forth. I'm too old for this (scatological expletive).
-
This morning, I loosened the belt for power steering pump that I added, just to eliminate it as problem, to "rule it out". I pushed a hammer handle against the fan belt, so that the fan did not slip. I pushed and pulled hard on the fan, but no movement of the crankshaft.
Tell me that I am not a wimp, and that someone else in he world cannot turn the crankshaft by the fan belt, with the plugs out, of course.
Thanks, Kilgore47. I'll take a look at the inspection plate. It may be easier to get at and remove, rather than the screen that I have removed in the past, for access to the flywheel teeth.
Stay tuned.
-
Yes the plugs are out! Nut on the generator(alternator)? That relies on adequate friction between the fan belt and the crankshaft pulley. I tightened the fan belt. Should it be super-tight?
-
Yah, right. Can everyone else do this?
I took out the Pertronix ignitor and re-installed the points. I tried firing up the engine, but got a backfire at the carb. Time to reset the timing.
Crank the engine with the thumb hole over No. 1,. TDC for Piston No. 1, but the engine moved way past TDC. I'll back it off and then go past TDC to 4 degrees advance, as recommended somewhere for our modern gas.
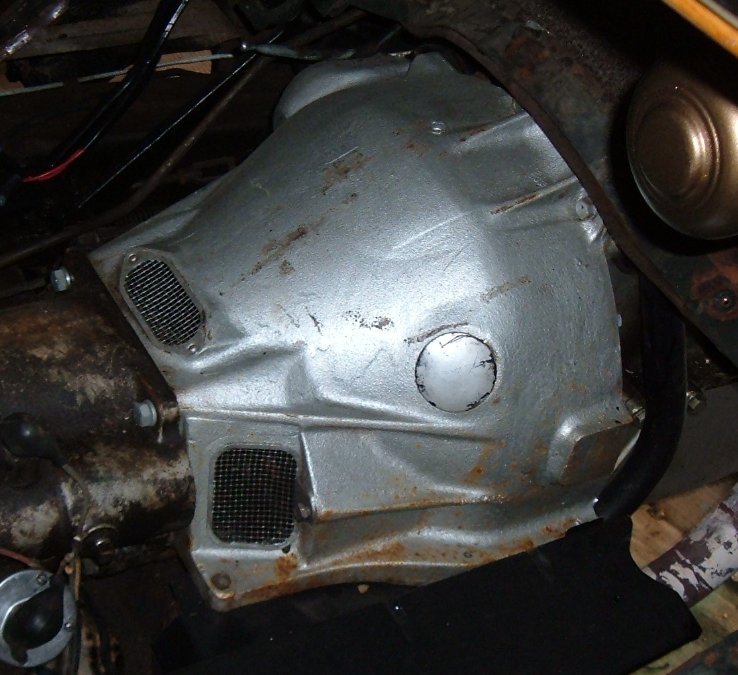
I was never able to turn this engine by the fan. Today I backed off my power steering belt (another story in itself) and tightened the fan belt, to now avail. I'll do what I've done in the past - remove the screen at the bottom right of the bell housing and pry against the flywheel teeth. Move teeth up, to back up the engine, move teeth down to advance it. Then the test light for when the points open. (Points open, coil fires.) What could be simpler?
(Screen off bell housing. Upper right is front of car.)
.JPG.1afab500b481b973e38138a41d028f73.JPG)
What's this square at the lower right? ? An access cover, or just a bump in the casting? Would that be closer to the flywheel teeth?
(The screen opening is out of the picture, below the ridge.)
-
Wheels chocked? In gear, no fluid coupling? Those jack stands look precarious.
I know you are just lubing, no cranking the engine. Ignition off.
Take care.
-
Yesterday sucked - today much better.
Battery run down yesterday and this morning. Trickle charger not enough. 10A charger this morning did the job.
This afternoon - car started right up. Battery condition? I'll have to keep an eye it.
Still loping intermittently, but on the bright side, the thing keeps running, and runs OK at speed. .
Wet at base of carb? - tightened carb-to-manifold nuts (Bless whoever invented the crows-foot!) But no change.
Staring at the neon light in series with the spark plug, I really couldn't tell if the notorious Pertronix was skipping a beat. Will try to get the big timing light working. (I haven't yet put the points back in yet, or decided to buy another P module. )
Got the stethoscope out and detected exhaust noise at the front of the manifolds and under the car. To-do-list to include hand-tightening the manifold nuts and checking the exhaust pipe connections under the car.
Yep, today much better.
-
How about the Holy Grail, the HEI module? Do these fail? Or do you just go to the local auto parts place and swap in a fresh one? or carry a fresh one in the glove box?
How much does a module cost? (vs a new Pertronix in the neighborhood of $150.)
I know you need 12 volts for the GM HEI. I haven't been paying attention to all the posts - why swap in the slant 6 distributor? Is this a weekend project?
-
I kept the guts. And I have a diagram on how to switch back. (Pardon the rotation. )
I always feared the day that I would have to do so. I had better do so now, while I am at home, with the car in the garage.
But first, the timing light, to see if I can detect any irregular pulse.

-
 1
1
-
-
Picky, picky, i guess. But I have real Bakelite on my car, as the interior facings of the doors pillars and the interior fenders . It looks like Bakelite has suffered the indignity of becoming a common name rather than a trademark, a fate suffered by Kleenex and the like.
Bakelite was invented by a guy named Bakel. It was a lamination of paper and phenolic resin, which was heated in a mold. It as an early plastic laminate, such as Formica, Micarta, and other trade names. It was a thermosetting material - once heated, it would never soften. "Plastics" become soft if reheated.
The high-class up-to-date, the latest for post-war Chrysler interior trim was plastic. Heat it, it softens. Bake it in the sun, and it deteriorates. My Bakelite panels only needed a clear coat to fill the Mini-scratches, to make them look new again.

-
1
-
-
Thanks, greg g. I'll try the stroke, pulse, squirt again, 6 per 15. And I should be able to do the vacuum gauge at the pump input. and see if it pulls 6 inches.
(My Shop Manual says to put a tee at the carb, and install a pressure gauge, and get 3-1/2 to 5 lbs. I have the vacuum/pressure gauge. but the tee presents a challenge getting the right fittings.)
-
Having troubles with the download - would have to add some app. (HVEC Video Extension - is it safe?)
-
Fuel pump test? 12 pulses, 8 fluid ounces.
I remember a humorous record, where God instructs Noah on how to build the Ark. So many cubits wide, so many cubits long. After the detailed instructions, Noah asks, "What's a cubit?" I'm asking "What's a pulse?"
Ok, the fuel pump works off the camshaft. One revolution per two crankshaft revolutions. I did the test. counting fan hub revolutions, 24 revolutions, about 4 ounces.
But how many crankshaft revolutions per fan hub?
I did a second test, watching the gas as it came out of the hose. I could see pulses, about one per three starter grunts. 12 pulses, only 4 ounces.
So, is my mechanical fuel pump faulty, or I did the tests wrong?
-
Adam, you may be right. (Wah!) So, I can live with my occasionally loping engine till it gets worse, buy another Pertronix module to get me through for a while, put the points parts back in the dizzy, or do that slant 6 mod/GM HEI module.
Popping in another module may show that the first module was at fault, and will give me time to chart a better course.
I'll have to sit back and think about it - and pop another Dew. (There i go, deflecting the thread again.)
It's not fun anymore.
in P15-D24 Forum
Posted
Update, of the continuing saga:
When I installed the points and condenser and bench-tested the distributor, at first the points would not complete the circuit. I pulled some paper between the points and got a closed circuit. So far, so good.
I installed the distributor, verified TDC for No. 1 with the rotor pointing at 7:00, tunked the starter till the 5 degree mark was under the pointer. Double-checked - compression, rotor near 7:00. Can't be too sure.
Next was the light bulb test. Distributor wire removed from the coil, and one lead clipped to the wire. Other lead clipped to a hot source. No light. Re-connect the battery, stupid. Ok, steady light. Turn the dizzy till the light goes out. Well, it just sort of dimmed for several tries, occasionally would go completely out like it's supposed to.
I took the distributor out, and checked it with the ohm meter.
Points closed, Zero. Good.
Points open, 1 (infinite resistance, open circuit, good).
I started the car, and it runs like stink; sounds like random misses. I could put the neon light in series with each plug, but I think it would only confirm the symptom.
This was all to rule out the Pertronix as a cause of the engine loping.
I'm beginning to fear that we'll have to go to the DeSoto Convention this summer without the car. Not much fun.