Redmond49
-
Posts
144 -
Joined
-
Last visited
-
Days Won
2
Content Type
Links Directory
Profiles
Articles
Forums
Downloads
Store
Gallery
Blogs
Events
Everything posted by Redmond49
-
anyone in Seattle area that can work on old Plymouths?
Redmond49 replied to Old Doll's topic in P15-D24 Forum
Hi Joe, You might consider attending meetings of the local Chrysler club. We meet the second Tuesday of each month (next meeting: Tuesday, August 8th) at the Park Deli: 19800 - 141st Place NE Woodinville, WA (425) 485-7143 We meet to chat and eat dinner at 6:00 PM and then at 7 we discuss club 'business' (usually event planning and story-telling). This is how I connected with folks locally to get help when I bought my p-15 in 2013. Speaking from the school of hard knocks, take your time to find the right people to help you. Tyson -
Vacuum tube and fittings on intake manifold for wiper motor
Redmond49 replied to Redmond49's topic in P15-D24 Forum
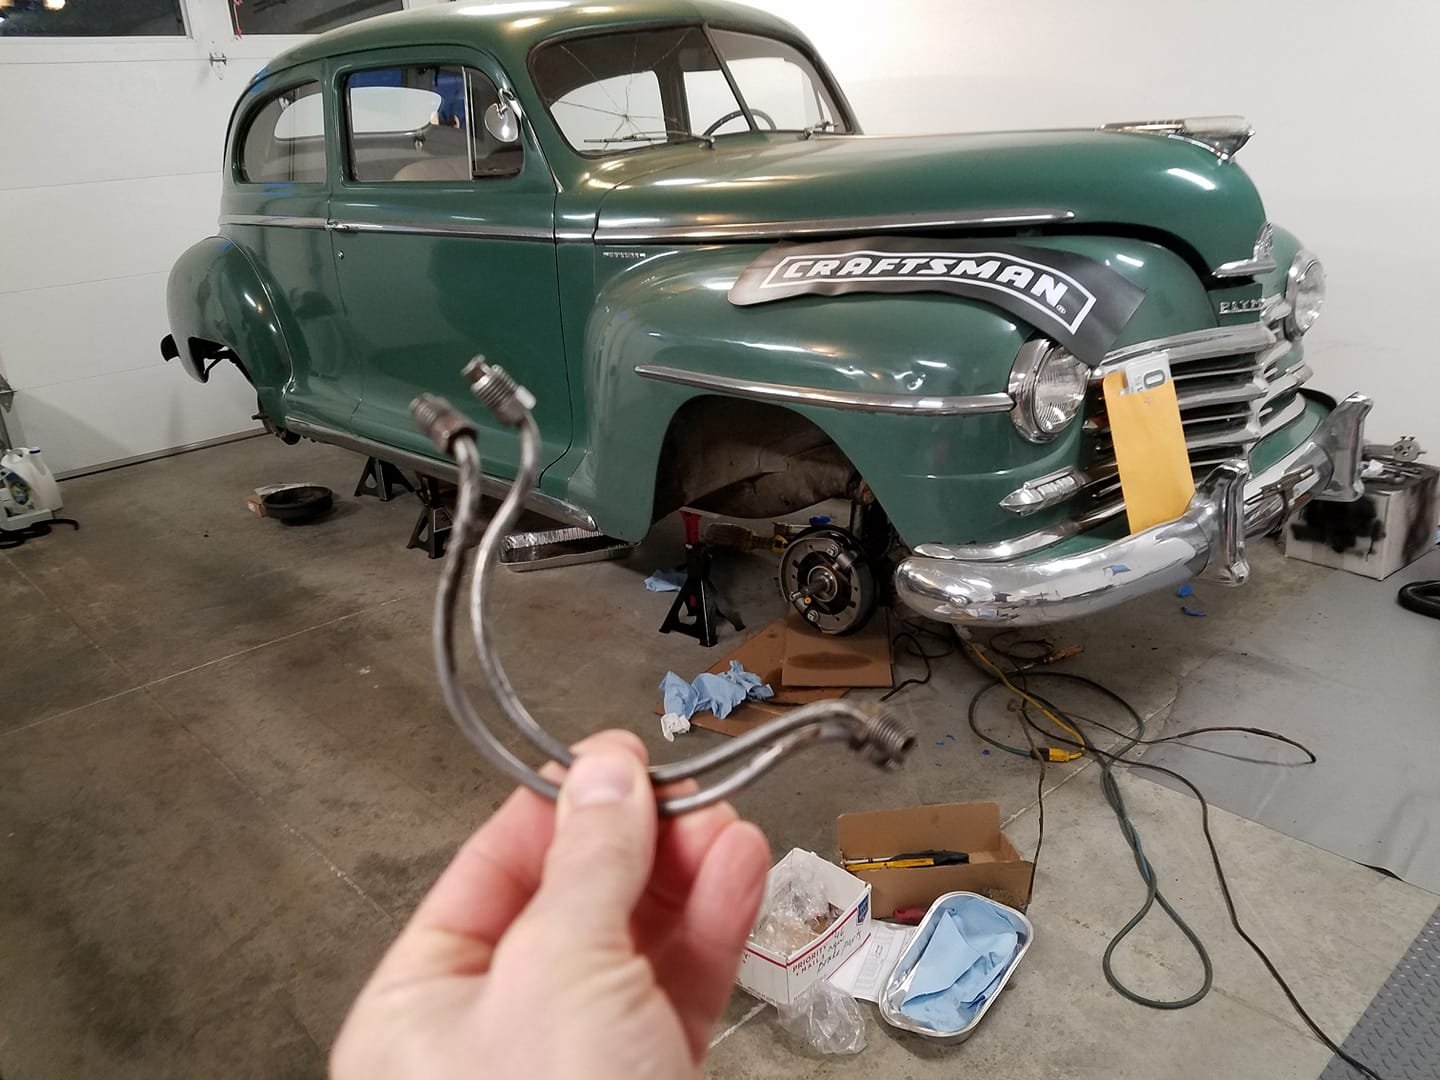
Great, thanks. That's exactly what I wanted to see. -
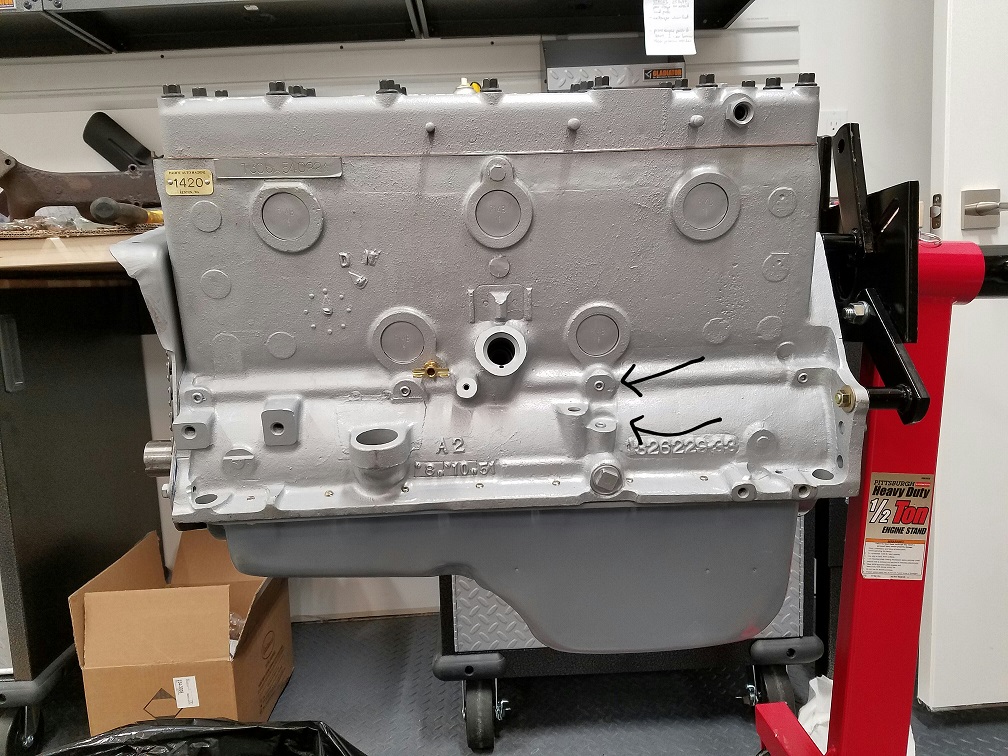
According to the parts book, there are two fittings that screw into the rear of the intake manifold, and a metal tube that then connects to the vacuum hose for the wiper motor. I'm interested in seeing the tube and how it connects to the hose. Does anybody have a stock setup for which you could post a picture? I couldn't find a prior post on this.
-
@Plymouthy Adams Were these the clips you used?

-
I've posted an event on the calendar - I'm hoping my project will be self propelled by then and no longer a zero-emission vehicle

-
untilThe Walter P. Chrysler Club 2017 National Meet is being held August16 - 19 in and around Tacoma, WA. We've got slow drags planned at Griot's Garage, driving tours of Mt. Rainier, tours to the Museum of Flight, Seattle Center (Space Needle and Chihuly Glass Museum), visits to the massive LeMay family collection and the extraordinary LeMay museum, where the show will be held. Details and meet registration are at http://www.chryslerclub.org/PDF files/2017 National Meet Info.pdf
-
How to fix seat sliders if I can't find replacements
Redmond49 replied to Redmond49's topic in P15-D24 Forum
Thanks, all, I'm going to work with what I've got, and have a resto shop fab some new legs and weld it up. The local hardware had the missing bearings. -
I've been looking around for replacement seat sliders and they seem to be scarce. Are these repairable? The passenger side is missing its bearings, and it was creatively repaired in the past. Both have cracks underneath.
-
Thanks for all the replies, all! Will do on the final assembly to motor. The machine shop that decked the two manifolds also told me to loosen the four bolts holding the units together and then tighten them after the manifolds are bolted to the engine.
-
It seems to line up nicely on the studs.
-
I got my cleaned up manifolds back today, and at the shop we noticed that the intake manifold "leans" to the right. It seems to have been cast that way. Is that normal?
-
The sealed filter was the only thing Bernbaum's had when I called them. I spent some time on the phone with Vintage Power wagons this week and they were able to source the rest of what I needed, including a canister style filter
-
Thanks all - very helpful. Don, where did the oil filter instructions come from?
-
Hello, I'm trying to assemble the parts for the oil filter. My block is a Dodge truck block. I've got a sealed canister-type filter I got from Bernbaums; I took it to the local fasteners and fittings shop (Tacoma Screw) to see if I could find the fittings, and we determined that the openings in the filter canister are 1/8 pipe. He's got 1/8 to 1/8 connections, but was questioning whether I needed 1/8 to something larger for the lines/hoses back to the block. The information in the parts book I've got doesn't specify the size of the lines. Any recommendations? I was planning to reconstruct the bottom connection as shown in the manual with one line going to the canister and the other to the pressure guage, but I've seen several pictures online that don't seem to have the line to the pressure gauge (as far as I can tell).


-
Picture of the oil strainer connected to the pipe assembly?
Redmond49 replied to Redmond49's topic in P15-D24 Forum
Thank you all for the replies, very helpful. -
Does anyone have a picture of the oil strainer connected to the pipe assembly, showing the cotter pin? I can't quite see how a normal cotter pin would work there and this detail is not shown in the parts or service manuals.
-
 The orange and blue colors are nice choices - are they personal choices or do they reflect original colors? Is the block painted or just clean and oiled? I think I've seen the oil filter painted red on some cars, black on others.
 -
It's definitely the gear oil I've been putting in the transmission. The engine oil is darker and tends to collect ahead of the transmission.
-
Hi, I finally got my brake job done, so now that the elation over a completed project has subsided, the oil slick on the garage floor under the transmission seems like the next most pressing issue to address. Gear oil leaks continuously from the transmission when the car is parked (and I assume it leaks under way!) The service manual has a pretty clear process for removing the transmission, but I'm wondering if you all have ideas to share before I start that would help me get started on the right path. Tyson
-
Thanks for the sources --
-
Thanks for the replies. I had this drum machined and shoes/pads fitted specially to it, so I'll probably try to save the drum. Not sure how to find a new matching bolt, the usual sources don't seem to have any. I perused the McMaster site, and I didn't see any with the tapered section between the threads and the top section of the bolt.
-
Yes - it's from a tap and die kit.
-
Hi, I managed to get my brake job finished, but along the way I unfortunately messed up the threads on one front left bolt and in the corresponding hole in the brake drum. I've rented this thread restorer kit from Autozone, and the blurb says you can use it on both left and right threaded items. I get how to use the file, but how do you use the nut and tap for left threads? It also seems like the bolts I have that are labeled L match the thickness and thread for the right-threaded bolts described in the parts book. For example, the parts book says the left hand threaded bolts are #18, but when I lay the file against the driver's side bolts (labeled L), the #20 file fits perfectly against the threads while the #18 file doesn't fit at all. Thanks for any help. T
-
Updating the brake overhaul technical topic?
Redmond49 replied to Redmond49's topic in P15-D24 Forum
@Bob - just to confirm, the washer goes on the outside of the brake backing plate and as you tighten down, the edges of the washer flare and create a seal against the backing plate - so this washer is both a seal for the hose against the wheel cylinder AND a seal to keep stuff from coming in around the hose opening. -
Attaching new paper air filter housing to carb
Redmond49 replied to Redmond49's topic in P15-D24 Forum
Great, thanks. That's exactly what I was looking for - thanks for the helpful reply and the pictures.