kitesurfjohn
-
Posts
31 -
Joined
-
Last visited
Everything posted by kitesurfjohn
-
nissan navara fuel tank to fit dodge b2b
kitesurfjohn replied to dontknowitall's topic in Mopar Flathead Truck Forum
I like the look of it. I am into the idea of utilising cheap modern parts - I recently used a 3.0 turbo diesel hilux radiator instead of the $1100 I was being quoted to re core the original. -
Sids Lowered Front Axel Any Body Use Them
kitesurfjohn replied to Drifter99's topic in Mopar Flathead Truck Forum
I would be interested to know how you go with one. I have been trying various options including removing a leaf or two but I couldn't get it low enough. At the moment I have fitted the axle above the spring which lowers it by approx. 4" but there are some clearance issues with the axle and sump pan i.e quite close. The main problem here in Queensland is that drop axles are apparently illegal and that the min lowest point of the vehicle must be no less than 4" from the ground. -
Anyone Fitted Front Axle Above The Springs
kitesurfjohn replied to kitesurfjohn's topic in Mopar Flathead Truck Forum
Moving the rear shackle mounts up on mine doesn't come in contact with the bed although I don't know about the original bed as mine has a F100 style tub so it may be different. There are several ways to lower the front end including flip the spring so the eyes are the other way up, reverse a number of leaves and clamp the ends to pull the curve flatter, press the spring curve flatter (as in the link), make single leaf spring, swap the axle over spring etc. I guess it is a matter of choosing what is right for you after looking at ride height, stiffness, amount of work involved, originality, legality, costs etc. -
Anyone Fitted Front Axle Above The Springs
kitesurfjohn replied to kitesurfjohn's topic in Mopar Flathead Truck Forum
The problem with getting a drop axle is that they are not legal in Queensland. Removing a leaf doesn't really lower it by as much as I would like, although I could get a single leaf spring made but they are quite costly. The only clearance issue is with the exhaust downpipe. I have made up a location plate for the centre bolt to prevent axle movement the result is a drop of about 4" which what I was looking for. So far as conventional wisdom is concerned well I guess I have very little of that but believe that where there is a will there is a way, infact it was a relatively common practice with other manufacturers to mount the axle above the spring. I just wanted to know if anyone else here had done the same thing? The rear is very simple - remove the 4 bolts in each spring hanger and move the hanger up. Two tops holes now have nothing to bolt into, just fabricate a mounting bracket which bolts or weld to the top of the chassis rail and drill 2 new bolt holes and bolt up. Job done and again approx. 4" lower, due to the shock angle there is still plenty of travel left on the standard shocks. -
Anyone Fitted Front Axle Above The Springs
kitesurfjohn posted a topic in Mopar Flathead Truck Forum
Just in the process of lowering my 51 and have moved rear spring hangers up a bolt hole and fabbed up mounting brackets for 'new' top bolts. Looking at the front I guess its either a drop axle, remove a few leafs, or possibly change axle from below springs to above. So far I have just swapped it over to check height which fairly well where I want it, just wondering if anyone else has done the same thing? -
No, drilling jets is really bad idea. When they are manufactured the dia is very close tolerance and just running any old drill through one will wreck it. You are trying to compensate for a problem which is nothing to do with jet size. Obviously check that you have the correct main jet to start with, assuming you have then check for a blocked accelerator pump. Its very easy to make sure it is working correctly remove the air filter look down the choke and work the throttle open and closed as you do this you should see a visible squirt of fuel. This 'extra shot' of fuel is what happens every time you accelerate away and change gear. If it isn't working pull the top of the carb off and you will see the plunger and operating rod, open and close the throttle again and the pump should move up and down. Assuming it is operating pull the pump out and you will see a small check ball held in by a circlip check that is all clear and so are the passages to and from it by blowing compressed air through. Having read your post again it could also be that the float is sticking, you shouldn't have fuel leaking out of the base gasket. If the float is stuck open there is no control of fuel level which will spill through the carb and run down leak out. The float level on the B&B single barrel DTE2 is 5/64 so check that and make sure the float operation is good.
-
Did You Pack Out Jeep Axle?
kitesurfjohn replied to kitesurfjohn's topic in Mopar Flathead Truck Forum
After thinking more about it I got the mig out again today and welded sections of tube on to bring up the Od to 3". It didn't take much work and I won't be always thinking is that plate going to move/twist. I guess if I had gone for a grand Cherokee axle it is probably 3" stock dia. -
Did You Pack Out Jeep Axle?
kitesurfjohn replied to kitesurfjohn's topic in Mopar Flathead Truck Forum
That's interesting because I don't think we could get a 2wd here in Oz, I certainly haven't seen one. Could you use the front axle in a Ph? I guess it has discs on the front. I think the 3:55 should be fine as I am also hoping to do an engine swap possibly for a 265 Hemi if I can find one. I am thinking I will tack weld half a tube onto the axle tube just to bring the O/d up to that of the original diff. I am not too keen on the shock mount only having a very small contact area with the axle tube. -
Just in the process of fitting a Cherokee axle which is the Lsd 3.55 and found that the tube dia is approx. 10mm smaller than the original Ph. The spring plate is fine as I just ground it off and refitted at the correct spacing to match the Ph springs. The only problem is that the lower clamp plate/shock mount is made to suit the larger dia original tube. Did everyone else weld on a sleeve to the jeep axle to bring it up to the correct dia to suit the plate? Probably should say the axle is from a mid 90's Cherokee with drum brakes, not a grand cherokee
-
Anyone Put A 245/265 Hemi In A Ph?
kitesurfjohn replied to kitesurfjohn's topic in Mopar Flathead Truck Forum
Pretty sure it wont match up with my original flat 6 box if that is what you are thinking. I did get a 4 speed with the hemi which hasn't got a transmission brake but I will be using the jeep Cherokee axle anyway so that wont matter. I liked the idea that the hemi 6 as it is still quite a basic looking motor, obviously ohv, but in keeping with the ph. -
I did get to drive a 1949 recently with a 265 hemi auto and it was quite impressive. I got a 245 hemi manual from a late 60's dodge truck just wondering how anyone else went for engine/gearbox mounts or clutch linkage. It looks a reasonably straight forward swap, but like most engine swaps it often looks simple until you start!
-
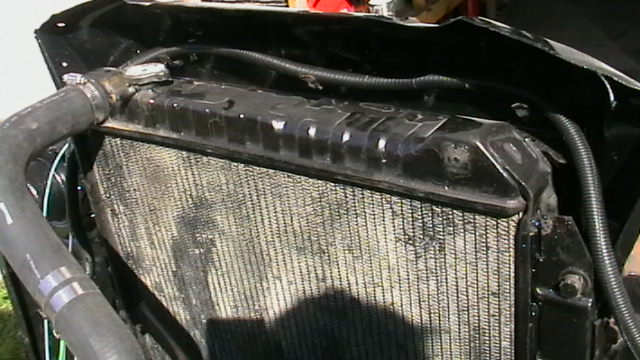
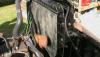
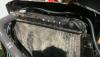
Hilux pick up, I could probably get hose part numbers but they are to suit Australian Holdens so the chance of finding them in the US is slim. But it was just a matter of searching through a box of hoses for correct dia and suitable bend - hence the join in top hose.
-
No sorry no part numbers only Toyota Hilux Surf 3.0L diesel 99 - 2005.
-
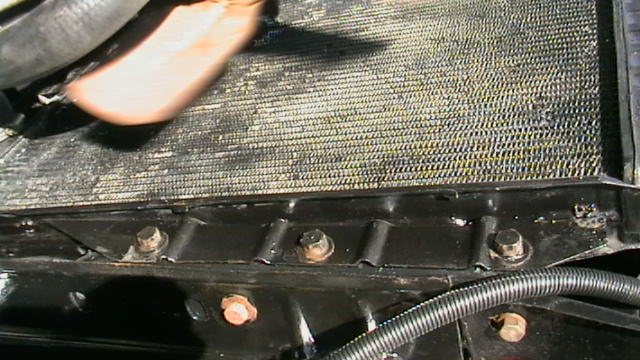
Hope this helps. Luckily the core width of the Toyota rad is exactly the same as the PH one. Just remove the spot welded brackets and re weld onto Toyota rad. I realize the top hose should be centered, but you could move the inlet from the LH to center if you wanted.
-
-
Just trying to sort out the radiator. Already had quite a major leak and to make matters worse it appears to be blocked to approx. half way, the top gets very hot and the bottom is almost cold. Anyway I took it to a couple of radiator shops close by and was told that they could re-core it but the cost would be approx. $1200! That's what I paid for the entire truck. I spent a morning on flee bay looking at possible alternatives and came across a Toyota Surf 3.0L turbo Diesel rad, luckily the width of the core is exactly the same as the original ph and the height is 10mm less. Outlets are the same dia. I have spent the last couple of hours drilling the spot welds off the old mounts and re welding them onto the Toyota rad. I did say 'purists look away now! Anyway it fits perfectly and been running for 1/2 hour or so with no overheating problems. Providing it continues to work properly when driving I am a happy bunny. $175 for the new Toyota rad and a couple of hours jigging around I can live with.
-
Do you mean by 'run a wire to the positive side of the battery' you put voltage through the sender? if so you will kill the sender unit, it is designed as a variable resistor in the gauge circuit. It varies the resistance in the earth side of the circuit to adjust the gauge accordingly. To check the sender is still working use a multi meter on ohms setting connect one lead to the sender body and one to the terminal. move the float arm up and down and you will see a change in resistance.
-
How well does the POR15 kit work? I guess it is painted on and fills the cracks. my wheel is quite badly cracked so I assumed it was scrap but I might think again if there is a repair kit.
-
Aussie Mopar Sightings In New Show
kitesurfjohn replied to Desotodav's topic in Mopar Flathead Truck Forum
I thought you told me that you were a busy man? you haven't got time to waste on dodge spotting the TV. Next think you'll be watching The Voice or even worse MKR! -
Snapped Off Steering Column
kitesurfjohn replied to kitesurfjohn's topic in Mopar Flathead Truck Forum
It broke at the top side of the dash mount. You would think if it was the cab mounts the break would be below that, between the two fixed points of cab mount and steering box to chassis. Anyway it is repaired now, I was just interested to know if it was common. -
New To The Site,thanks For Having Me!
kitesurfjohn replied to Gizzardsniffer's topic in Mopar Flathead Truck Forum
Well I would love to see some pics. I have only just joined I was also concerned that there seem to be lots of pristine restorations going on, I want to leave mine as close as I can to when it was dragged out of the farm! -
Anyone know if its a common problem for the steering column outer sleeve to break about halfway down, at the support bracket? Mine wasn't completely through, but very close. I have sleeved it and welded solid so I am not really concerned about it, but wondered what might have caused this. I did noticed the outer is very thin walled so probably wouldn't take a lot of continual movement to break it
-

-
Yep, Penatrol will stick fine. When you first rub it on its a kind of oily substance then dries to a hard lustre. I'm not sure where you buy it in the US but in Australia you can buy it in most hardware stores.
-
One thing I have noticed is people talking about applying clear over patina, which is fine of course. However for a more traditional look with several benefits try Penatrol, very easy to apply just rub it on with a cloth. The more shine you want just add another coat. It takes about 45 mins to do the entire cab. It does dull with age but you can give it a coat every 6 months if you want. There is no masking needed and will prevent any further rusting/patina. I have just re read this and it sounds like I sell the stuff, which I don't but at $20 which will easily do the whole truck - it is a bargain!