


tollertdi
-
Posts
42 -
Joined
-
Last visited
-
Days Won
1
Everything posted by tollertdi
-
P15 Air Cleaner / Air Filter Gasket (Inner Filter Can to Element)
tollertdi replied to tollertdi's topic in P15-D24 Forum
My original gasket was cracked and brittle, so I measured it and looked for a replacement. I selected a gasket that was very close to the original in terms of the inner diameter which is the most critical for sealing. Also, the selected gasket was 1/2 the necessary thickness, so I bought 2 gaskets and glued them together. The part I selected is built for Tractors and is available from a number of sources on the Internet. Part number is IHS2642 (Note: The first letter is an I not a 1 ONE). Here are the dimensions of the part vs the original IHS2642 Original Inner diameter 1.87 1.95 Outer diameter 2.6 2.45 Thickness .18 (2) .18 Here is a picture for comparison:
-
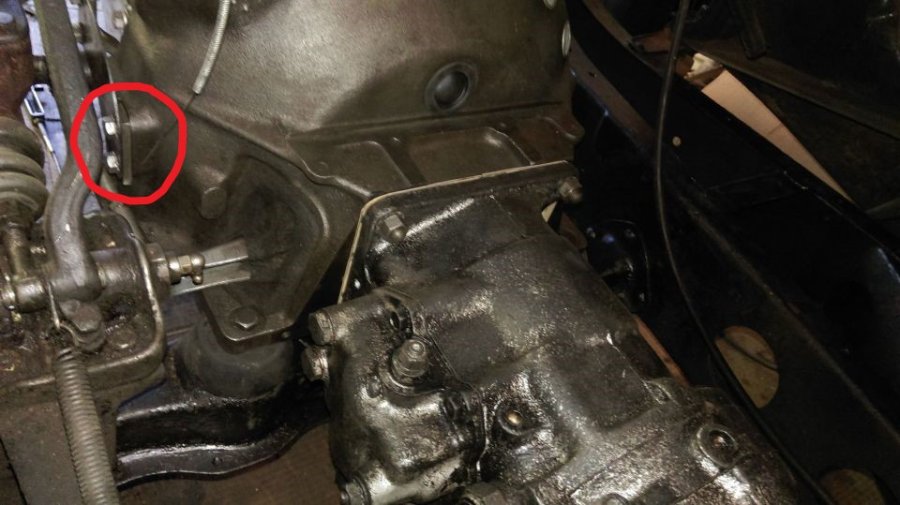
As many of you probably know, there is supposed to be a gasket inside the Filter Can that prevents filter oil from getting down into the carburetor. There is no Chrysler part for this. See below for picture of gasket location:

-
Found another post on our site with the same question. Seems at least 2 owners are pleased with the glue on style: Door sill / Running boards - P15-D24 Forum - P15-D24.com and Pilot-house.com
-
Thanks, Bob. How do they look now? Any problems since you've owned and installed them?
-
I'm willing to pay the price for a more original sill mat. Thanks anyway for the suggestion.
-
Has anyone bought the repro Sill Mats made of urethane plastic that do not have the metal backing? These are available from Plymouth Doctor and Bernbaum's and are a glue-on type installation. Any other options? Heard Hunley Acuff is no longer in business.
-
I'm trying to find a source for my P15 Floorboard Master Cylinder Cover which is missing from my car. The same part is used on 42-52 Plymouths and 42-48 Dodge/Desoto. Can anyone help me?
-
Dodgeb4ya - Loads of thanks for solving my problem. As you guessed correctly, the part was attached to my shift bellcrank assembly in another box. Just for completion below is the diagram from the parts manual showing the part that I thought was missing.

-
So let's look at the problem of building my own spacer. How are these things set up? Is the spacer sized so that the Flex/Spring plate hugs the bellhousing? Or is the Flex Plate supposed to be a certain distance from the bellhousing to allow for some flexure. I wish some folks could look at their P15's and let me know what they see or if they could provide some measurements that would be great.
-
Finally, here's the Mopar 46-54 parts manual below. That lists a spacer, but there is no spacer for 46-48 p15's.

-
Now lets look at the P15 parts manual. The first page shows the standard clutch parts picture. Note that there is no spacer pictured. The second page lists a part number 959134, but that is only for Right Hand Drive (RHD) models. Confusing or what ??? !!!


-
So I looked at the 36-48 parts manual. Below is what is has. Note the the spacers are cylindrical not a flat plate like the picture above. Also, note that it says "Not Used" for the P15. Confusing or what ??? !!!

-
I guess then that the spacer must have been lost at some time in the past. Does anyone have any information on what thickness the space needs to be? I can make one up if necessary.
-
I have an all stock original 48 Plymouth 4dr, family owned since new, that I'm restoring. Upon reassembling the clutch linkage I noticed that the clutch flex plate does not mate flush with the bellhousing. As seen in the picture below, the bellhousing appears to have been machined flat and "hogged out" by the factory. This creates a gap between the bellhousing and flex plate when installed. In addition the bolts can't be torqued down without distorting things. The second picture which I found on this site, is an installation where it looks like someone installed a homemade shim. I've looked at several different Mopar parts manuals and there appears to never have been a shim part built. Also, when I disassembled the clutch linkage there was nothing behind the flex plate, so I doubt a factory part exists. Can anyone give an opinion on this?

-
If you carefully drive the rivets out from the backside (behind the kick panel) the originals can be reused.
-
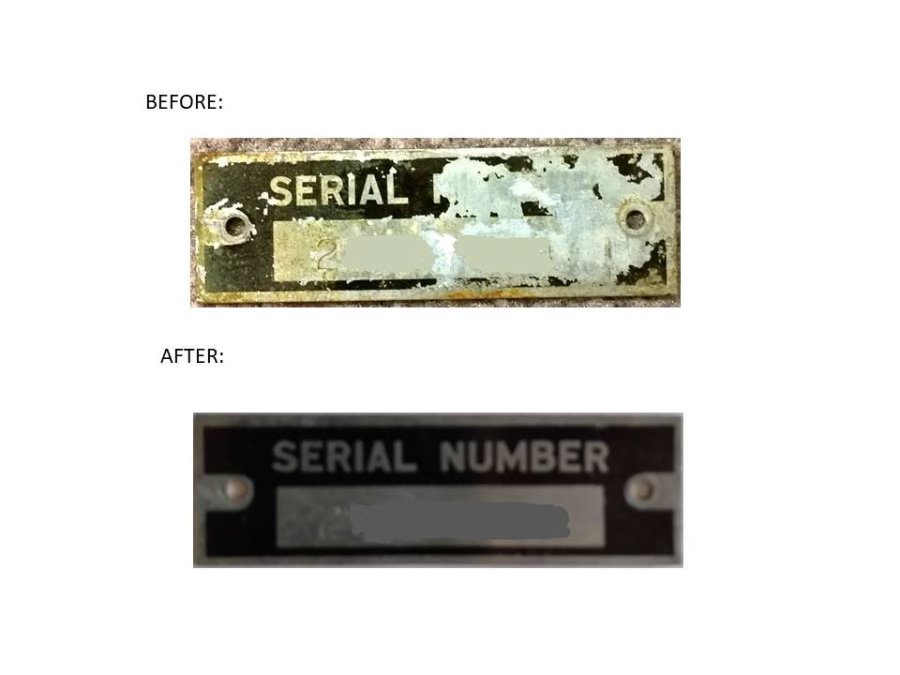
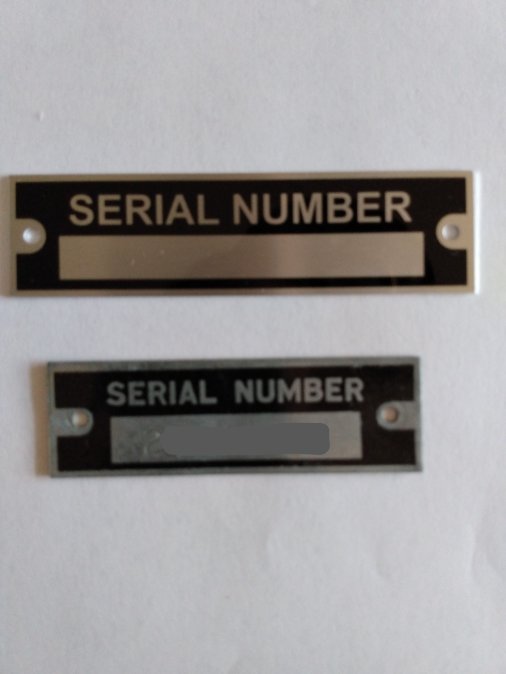
Here are before and after pictures of the P15 Serial Plate restoration:
-
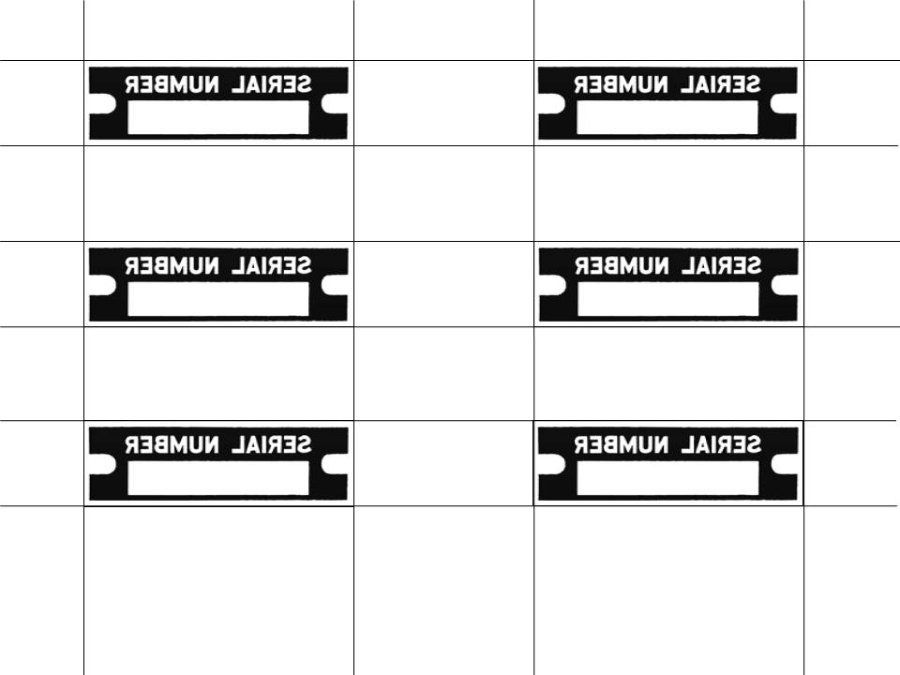
5) Use a paper cutter to cut out all the decals using the guide lines. The guides were designed to match very closely the size of the plate for ease of installation and centering on the plate. 6) Preheat oven to 300 F 7) Put decal in water for 10 seconds ? Leave decal out water for 45 seconds 9) IMPORTANT NOTE: Do not use the glue that came with the paper. For some reason the glue causes the decal to not bond properly to the plate when baked in the oven. 10) Place decal face down on plate 11) Remove paper from decal and carefully center decal on plate 12) Carefully rub the decal against the plate to remove any air bubbles that might have formed. 13) Place the plate in the 300 F oven for 2 minutes 14) Remove and inspect for bubbles in the plastic film. Carefully use a pin to puncture the bubbles which will allow the toner on the decal to “seat” on the metal plate when put back in the oven. Gently press down on the bubbles. 15) Place back in the oven for 12 minutes. It might be good to check the plate again after 2 minutes to recheck for bubbles. 16) Remove from oven. 17) Under hot running water, carefully remove the film from the plate. Peel the film up at 90 degree to plate at a moderate pace. 18) If the plate is not satisfactory, use Brake Clean to remove all the black toner from the plate. Repeat the above process. 19) If the plate came out OK, you must do a final cure of the plate. Preheat oven to 400 F. 20) Place plate in oven for 15 minutes. 21) Inspect the plate. Minor imperfections can be touched up with Testors Gloss Black paint (#1147)
-
4) Print below form on a Laser Printer. Make sure you set the printer for glossy heavy weight paper (120g to 185g) and manual feed. There are 6 decals so you’ll have extra’s if you make a mistake and need to do it over again. Note the image is reversed, since the decal will be going on the plate face down.
-
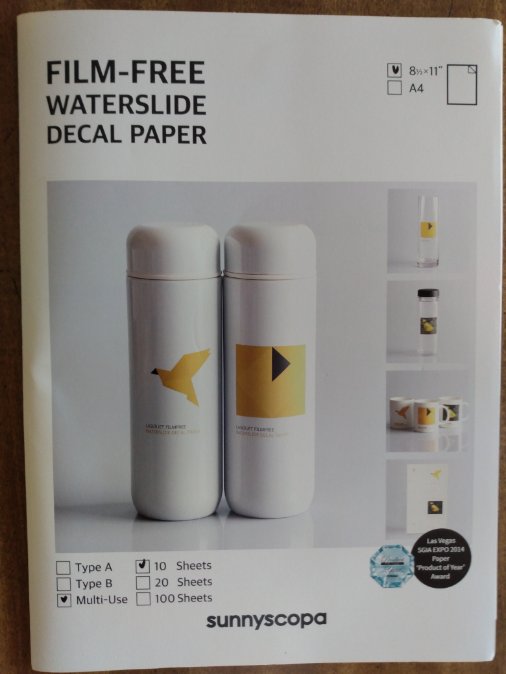
3) Obtain Sunnyscopa Film Free decal paper for Laser Printer. Unfortunately ink jet decal paper does not work, so make sure it’s for Laser. I bought mine from Amazon. Pictured below is the package.
-
Many thanks to member Mark D for providing me with excellent photos of his near pristine P15 serial plate from which I was able to build a decal. I originally ordered a reproduction serial plate as shown below and was very disappointed since both the size and font of the plate does not match the original. There are no P15 reproduction serial plates on the market that I could find. See below for comparison – top is repro, bottom is original (restored). PROCESS 1) You must remove the Serial Plate from vehicle, since the serial plate requires baking in an oven. This can be done by removing the side panel behind the emergency brake and then using a punch and hammer to gently drive out the rivets. 2) Thoroughly remove all the black paint from the plate with Brake Clean.
-
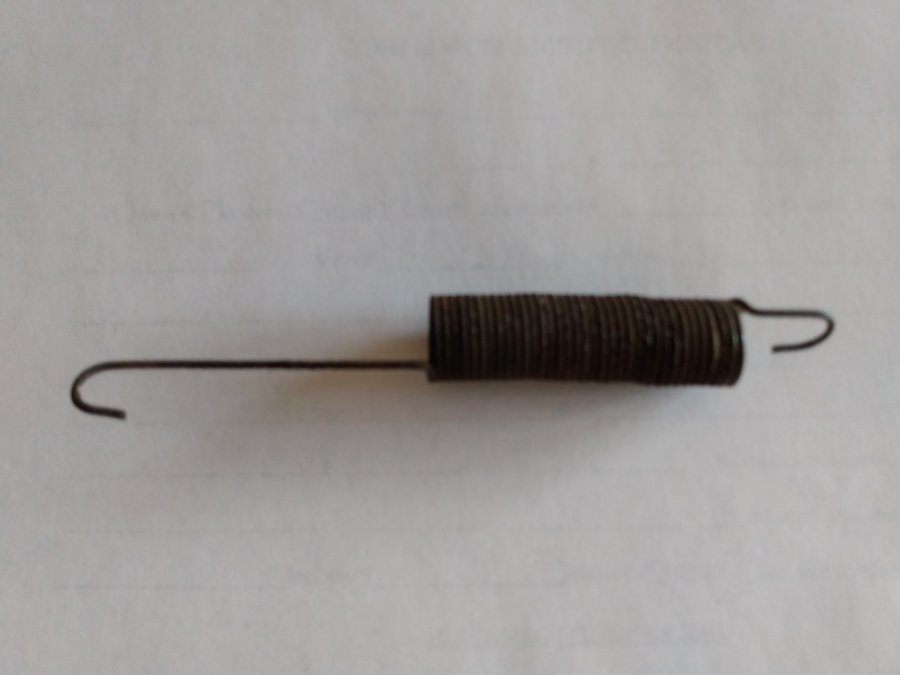
Need to replace my original Throttle spring for my '48 P15, part number 1120-847. Does anyone know of a close replacement for this spring? I taped it together, photographed it and measured it. All Dimensions in inches: Hooks are 90 degrees apart. Coil diameter: .565 outer diameter Coil Length: 1.935 Long Hook end: 2.075 Short Hook end: .610 Wire Diameter: .050 The first picture shows my spring. The second picture shows my setup from the parts manual.

-
I have a 48 Plymouth 218 and I'm missing the spacer for the heat riser that's located next to the spring. Does anyone know the dimensions for the spacer? The Plymouth Parts manual has it listed as part 644-876, with a spec of 21/64 ID and .050 thick. This spacer thickness doesn't match any of the pictures that I've seen posted in our posts - it looks to be quite a bit thicker.
-
I very painstakingly measured all the dimensions on my shabby serial plate with my calipers. Hopefully the last attachment from Sam can be modified to reflect the actual plate. Thanks all for helping me. Attached is the dimensioned P15 Serial ID plate.

-
My '48 has been in the family since new. I have what I believe to be the original factory exhaust, but the tail pipe is rusted out on the end and missing I would guess about 10 inches of pipe. Did the original tail pipe come straight out the back? Or did it curve down? Or go off to the right side?
-
Yes, looks good, thanks. I'll try it and see how well it matches.

