


sjaakslinger
-
Posts
61 -
Joined
-
Last visited
-
Days Won
1
Everything posted by sjaakslinger
-
Didn't have the chance to put the car on a lift today, but I checked the wiring to and from the relais. Seems 1 wire is clearly thicker than the rest (red one left of the relais). The wiring doesn't seem to be the issue though, seems the speedometer is telling an incorrect speed! I checked the speed with a gps app in mph and when the speedometer indicated around 35mph, I was actually driving around 29mph.... So it seems the overdrive is working correctly. Next Wednesday the car has it's inspection by the dutch 'DMV', so fingers crossed it passes. Can't wait to take the car on the road. Dennis

-
Good question, no idea actually. I bought the car a few months ago, couldn't find any info yet. I looked at the rear axle for an inscription, but couldn't find any. I'm thinking whatever was stock for a 47 Plymouth. Dennis
-
The car was completely rewired by a previous owner. Does look very professional, but I have no clue what gauge wire was used.
-
Thanks a lot. I will do that with the governor! Dennis
-
What determines the 28mph...the governor, the relay? Anything to clean or adjust?
-
I understood the activation speed was around 27mph. I'll check the speedometer first with a gps reading, could be it. Thanks. Though the RPM around 35mph seems pretty high in 2nd....
-
Question for the od experts. I have a r10g in my '47 Plymouth. All hooked up correctly, in general working fine except for 1 issue. It doesn't activate around the 30mph when going off the throttle. I have to accelerate up to around 35mph before that works. Sometimes it takes 2 or 3 attempts: decelerating and accelerating again. Is there anything to adjust there? Dennis
-
Short: Overdrive cable pushed in: overdrive system is engaged. Pulled out: disengegaged. Normal 3 gear operation. Engaged: drive. Shift to 2nd gear. No need to clutch! At around 30mph: take you foot off the accel. pedal. You should feel and hear a shift (small clunk). If so, od is active and the engine has less rpm. You have 3rd gear left (with od) for higher speeds. With od active: floor the accel. pedal. The kickdown should work and shift down to 'normal gear'. Dennis
-
Stromberg 97 adapter for the inline 6?
sjaakslinger replied to sjaakslinger's topic in P15-D24 Forum
I measured the stud distance on the intake and came to the same conclusies.😁 So it's the late GM style adapter, not the early one. I'm only gonna use the engine in my Plymouth as a test bed for a Stromberg 97 and some Holley 94s I rebuilt. So the linkage is not necessary. Dennis -
Does anyone know if there's an adapter to make a Stromberg 97 fit on the single barrel manifold? I saw this one by Speedway, but says 'GM'. Anyone know if this fits? https://www.speedwaymotors.com/GM-36-62-L6-2-Bolt-Small-Pattern-to-Stromberg-3-Bolt-Adapter,153284.html Dennis
-
rear axle seals and bearing replaced on my '47 Plymouth
sjaakslinger posted a topic in P15-D24 Forum
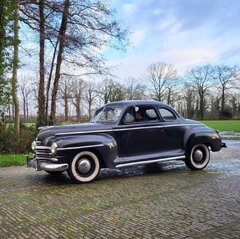
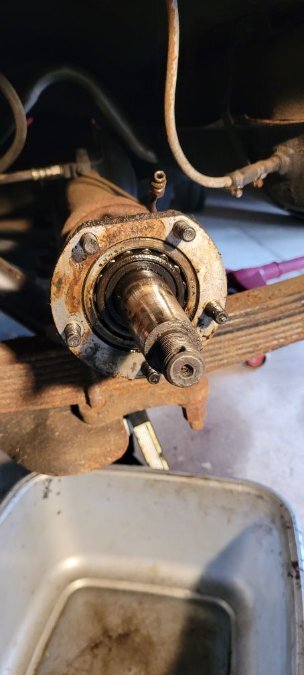
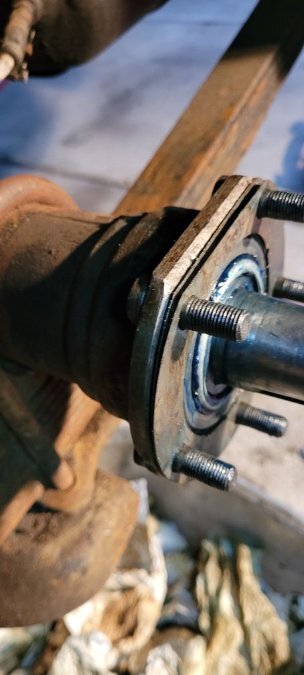
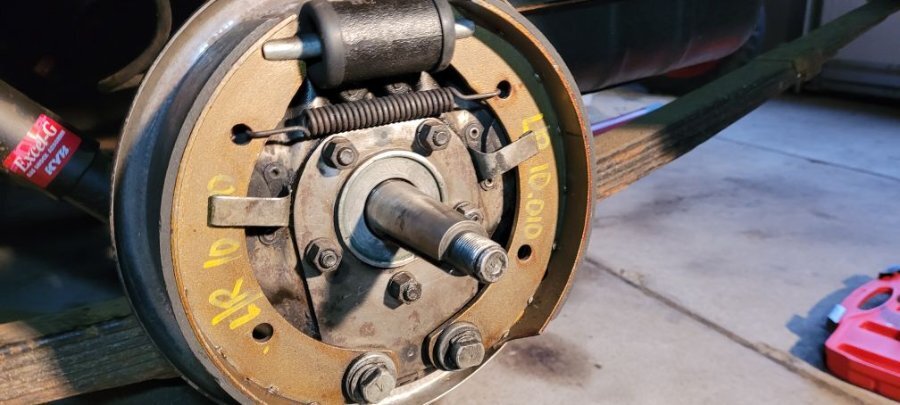
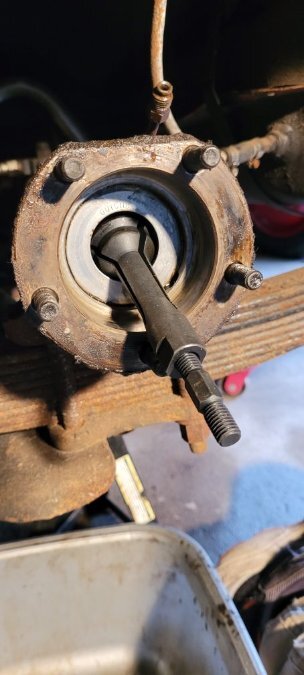
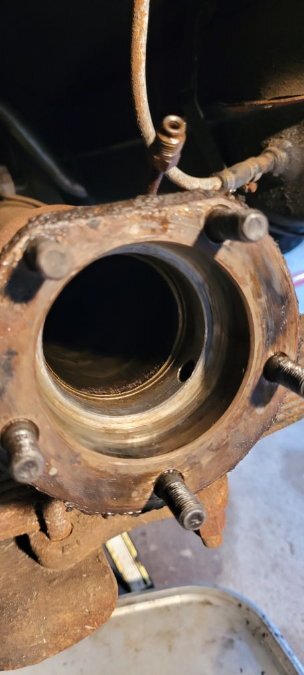
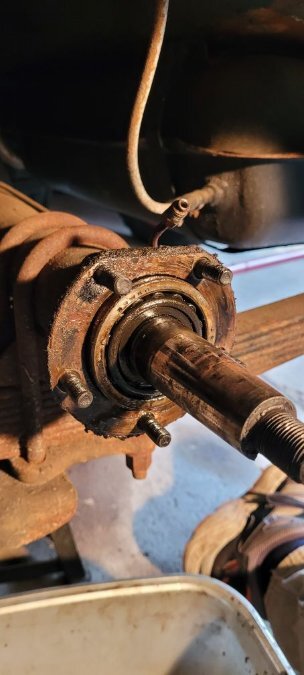
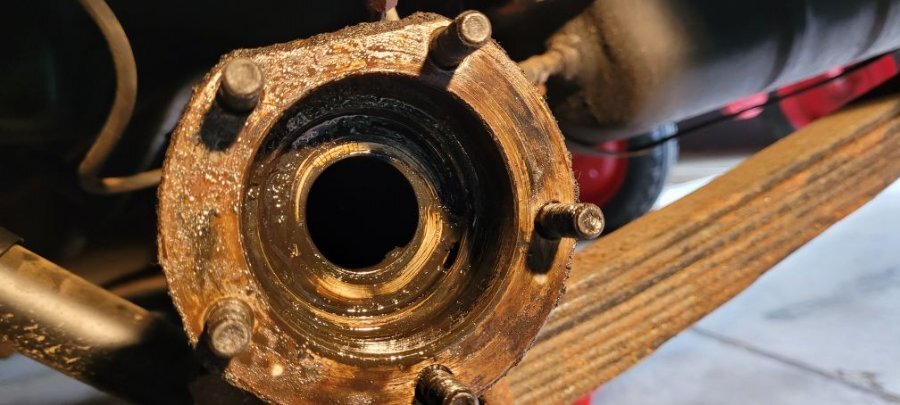
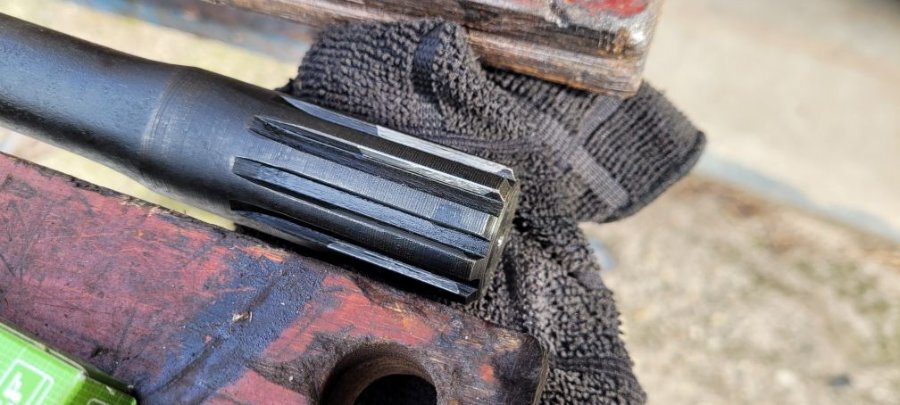
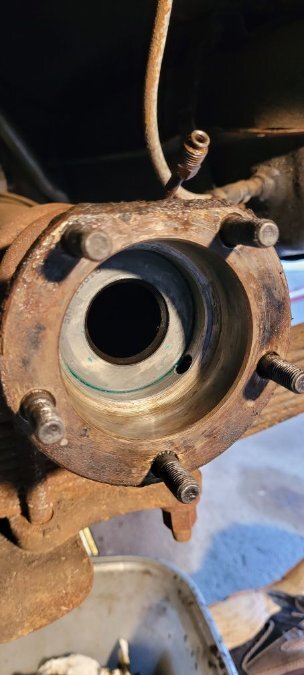
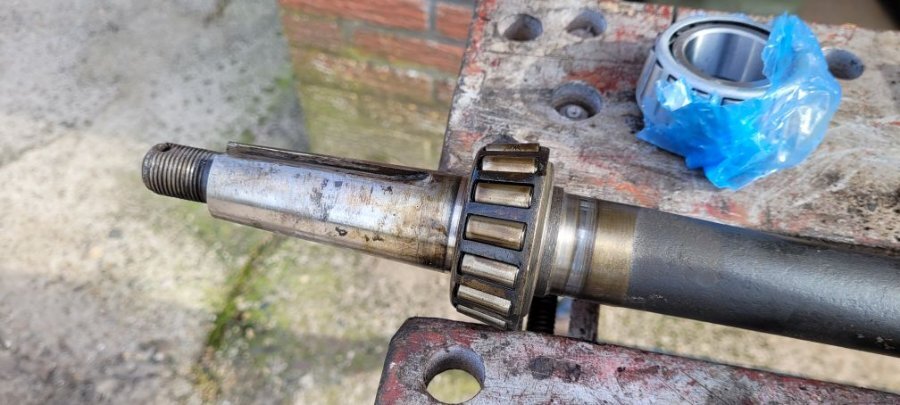
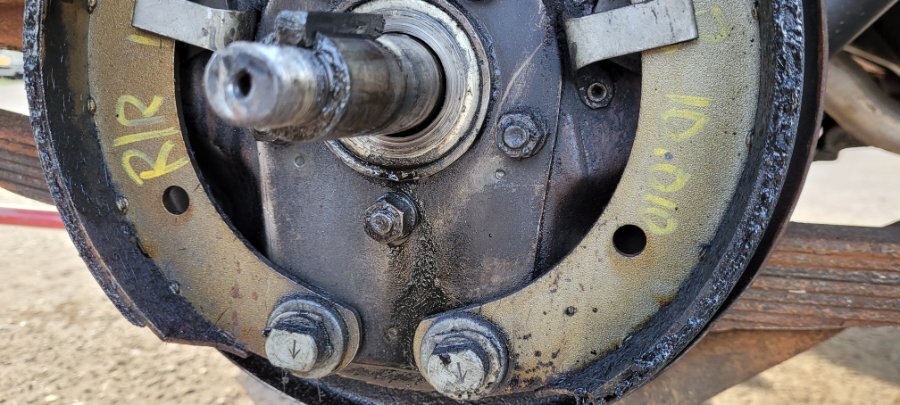
Thought I'd share a step-by-step on replacing the rear oil seals and bearings on a '47 Plymouth. Never done it before, so far I'm pretty happy with the results. There are probably better and quicker ways doing it, but I'm just a hobby 'mechanic'. 🤗 Reason for replacing them is that diff oil was visible at the rear off the backing plates. I jacked up the car on only one rear side, so later I'd have some stability when yanking on that axle shaft to get it out. Of course I put a jack stand under the rear axle. I removed the wheel and got the drum off witht this hub puller: https://www.amazon.nl/FreeTec-Wielnaven-wiellager-verwijderen-gereedschap/dp/B07MHTBLRV/ref=sr_1_5?__mk_nl_NL=ÅMÅŽÕÑ&crid=32K3JRCWBD2J1&dib=eyJ2IjoiMSJ9.1G2pXZJH6kiCywQxXIy6TSnIwhuWoTbfyudqcur_Wg9Tel0a0F1_KePL0hNWpuJbR7MeV58x3c_0JPuDT_B_eWwBpqvbdymA8Fngf9KumE6xK21S2x1AZjJ084q9jqWqqwTV0jlY0ScJcEosZrmoUrHSL5arf-Lsaf0iFjmoPdsOPyKWFAchaJpLsXCvCROeWA8EUmU2qGLT3eSLTljbIGeMDubDa0JYHFqJTdACMpgyZTgGCYWGswgV71bM74QQ4ksv-2WUm4bpVZpmmtJxHCdOHAru9oh0FraZb1yPLr2JyhJGdREPb6Esnkihhx0tkpmoKrI_YndEnuSEdvMwH_7O_5sobvNmF7I_aBTU0wluI1aB__3ABefZ2MGyy9U2RMLWYOA9zDPMAVPWOm8pYVLYL5mEdQF38_a0acPj1wxzFvgy6WMI_1TiF3xBF6bn.TGy7zy8idvNNwsuvBokGPaiF6qCkfDvwOMeTyT2G0YA&dib_tag=se&keywords=wielnaaftrekker&qid=1740901331&sprefix=wielnaaftrekker%2Caps%2C86&sr=8-5 Definately not the best one around, I wouldn't order it again, but it did the trick eventually. I'd order one with those 'legs', a nice and heavy one. The brakes look pretty nice, seems a previous owner had the brakes done not long ago and also had the drums turned. Disconnected the brake line and took the backing plate off. Could have been the original bearing, not sure. No grease left, all washed out by the diff oil I guess. The 2 shims were removed and set aside and cleaned later. With the help of a great video by forum member keithb7 (I'll put the Youtube link below) I put the drum back on, put the nut back on a few turns and 'yanked' the shaft out. In this picture the race started coming out. The shaft with bearing and the race are out. You're looking at the inner oil seal. The bearing on the shaft. Directly on the right of the bearing is a ridge which functions as the 'stop' for the bearing. Right from that you see a more shiny part on the shaft, that's were the old inner seal sat. I was a bit surprised by the orientation of the bearing, with the tapered side outwards and the race being put into the axle housing at last. Guess that's the way they designed it, so the race sits against the backing plate locking in the shaft. I got the bearing out by putting a large pipe over it and whacking it out. Same goes for putting the new one in, only with a smaller diameter pipe which sits on the inner part of the bearing. Unfortunately I forgot to take pictures. Replacement bearing part nr. is SKF BR25877 and race SKF BR25821 or National 25821. The shaft was cleaned, especially the part where the new inner seal sits. The old inner seal cleaned up. Original part nr. Here's where the confusion was in my case. Apparantly there was a changeover in part nr. for this inner seal, depending on car serial number. I think the changeover was around 1947. Depending on your serial nr., you need one of these seals: Seems the 'after' has a larger ID (thicker axle shaft?) and slightly wider seal. Mine is a 'before'. I decided to go with a narrower seal than stock, so it would take up a 'fresh' part on the axle shaft. In hindsight the original type would have been ok, since there wasn't that much wear on the shaft. I used SKF 13810 as inner seal. I took the old inner seal out with a seal puller: The housing cleaned up: The new inner seal in. What sucked was that the round spring popped off when driving the seal in, so that took me 20 minutes to get it back on with the seal already in place: A bit fast forward. The shaft with new bearing in place and the race driven in almost completely flush with the shims installed. I guess the trick here is not to drive it in completely, so later, when installing the backing plate, you'll drive it in completely, with the race sitting tight against the backing late. Which is important later for getting the end play right: The backing plate cleaned and installed. The new outer seal installed (in the center, around the axle shaft). The backing plate doesn't have a stop for the inner seal, so you have to make sure to get it centered in the backing plate. I think it was orginally peened in place. For outer seal I used SKF 13797, which is in fact listed as the correct replacement for outer seal: Now the trickier part starts, which I haven't done yet cause first I have to finish the other side. There are some valuable posts here on the required 'end play' for the axle shafts. You want the right amount of play in the bearings so the bearing doesn't sit too tight or too loose in it's race. This play should be between .003 and .008 inch, measured by pulling/pushing on the shaft and measuring the play with a gauge on the end of the shaft. It's better described in some threads here on this forum: Forum member Keithb7 with his Youtube video on removing the drums, backing plate and axle shaft: I'll post some more pictures after doing the other side and trying to get that end play addressed. Dennis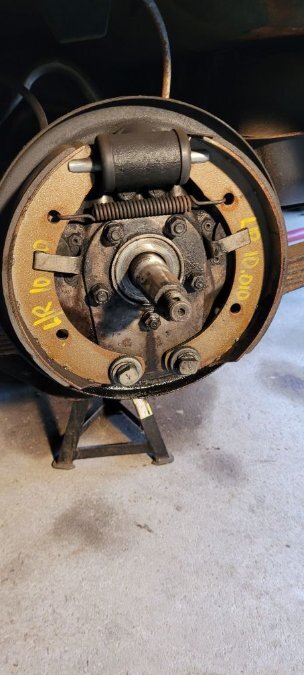


2.jpg.64f9722c6c3c6964c26dc33e6f9c98e7.jpg)
-
Small oil drops from clutch housing pan
sjaakslinger replied to sjaakslinger's topic in P15-D24 Forum
Good question. I did just drain and refill the trans and overdrive oil. Guess I have to do some sniffing.😕 -
I noticed drops of oil coming from a very small hole in the bottom of the clutch housing pan. Is this hole supposed to be there? Am I looking at an issue here? Can't tell if it's transmission or engine oil. Leaking rear crankshaft seal?? Dennis

-
Coolant leaking out of the clutch housing?
sjaakslinger replied to temecularevev's topic in P15-D24 Forum
Do you a picture of this drain hole? Dennis -
Comfort Master 53 - 3 fan speed positions?
sjaakslinger replied to sjaakslinger's topic in P15-D24 Forum
Thanks. I'll check the switch first. If it's a simple switch like the headlight switch it should be repairable I guess. Resistor would be different... -
I have a model 53 Comfort Master heater in my '47 Plymouth. The fan only works when fully pulled out. Should it have 3 speeds, like the switch does? If so...am I looking at a faulty switch or fan resistor wire? Dennis
-
'47 Plymouth axle seals replacement - correct seals
sjaakslinger replied to sjaakslinger's topic in P15-D24 Forum
Thank. Sounds easier than it probably is. So you don't need to disassemble the differential in order to remove the shaft? After removing the backing plate, the shaft can be pulled out?? -
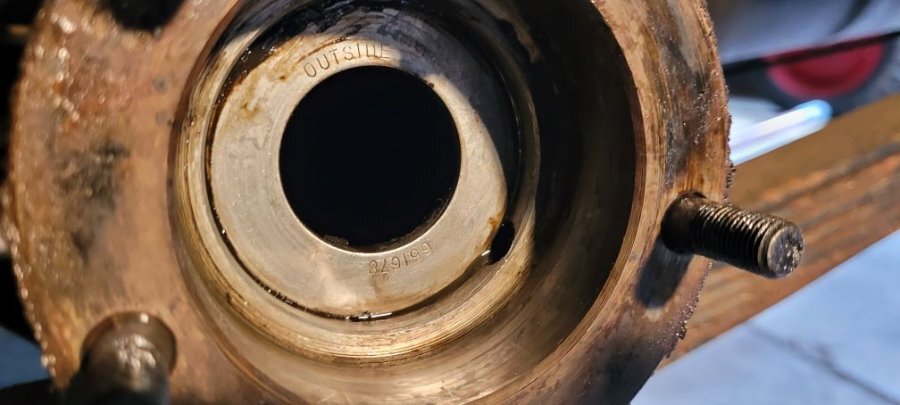
I have diff oil leaking through the axle into the brake hubs.☹️ I measured the outer seals in the backing plate and could cross reference the part nr. 859164 from the parts book to SKF 13797. Inner seals 651678 lead to the same SKF nr 13797 though.🤔 Can anyone confirm the inner and outer seals are indeed identical for a '47 Plymouth? I saw an older thread about this, but didn't see a solution. The parts book shows a larger ID for the inner seal than what pops up on different car part sites. I can't pull the seal and measure (and then order the seals) cause I can't leave the car standing like that for a long time. And how do you replace the inner seal? I have the TSM, but find it really poor. It shows a puller to pull the shaft out. You remove the hub and then you can pull the shaft out??? Then how is it held in place? And what if you don't have a puller like this? Thanks. Dennis
-
Wilwood Dual Chamber Brake Master Cylinder
sjaakslinger replied to Sam Buchanan's topic in P15-D24 Forum
I think disc pistons. They do have a larger volume chamber on master cylinders. I guess the 1" bore should work fine on my stock drums/drums. If I reason correctly, a smaller bore mc means more force at the wheel cylinder (at same pedal force). Apparantly not so wise when using bias ply tires I read, but I'm running radials. I did some research on the tandem master cylinders. Seems the one you have has built in residual vaves for drums. The more expensive ones in variabele sizes would need external residual valves when using drum brakes. -
Wilwood Dual Chamber Brake Master Cylinder
sjaakslinger replied to Sam Buchanan's topic in P15-D24 Forum
Ah, ok, thanks. Yeah, I'm inclined on using the 1 1/8" bore from Wilwood, but $300,- is a bit steep. I'll give it some more consideration. Dennis -
Wilwood Dual Chamber Brake Master Cylinder
sjaakslinger replied to Sam Buchanan's topic in P15-D24 Forum
@Sam Buchanan I read your first post again. I'm considering this same setup. I wrote Wilwood for advice on the 1" and 1 1/8" bore. The 1" bore version you used is, acc. to them, an oem mc used on multiple applications. That's why that mc is around 188 dollars and the 1 1/8" version 300. According to them the 1" should work fine indeed, also on drum/drum. They also adviced looking at an underfloor brake and clutch pedal unit from classicperform (CCP). That would eliminatie the stock mc and pedals, but will probably need some fabricating. Do I understand correctly you initially had this setup with drums/drums and switched to discs at a later stage? If so, any recollection on the braking with this setup with drums/drums? Did you use the built in residual valves or external ones? Thanks. Dennis -
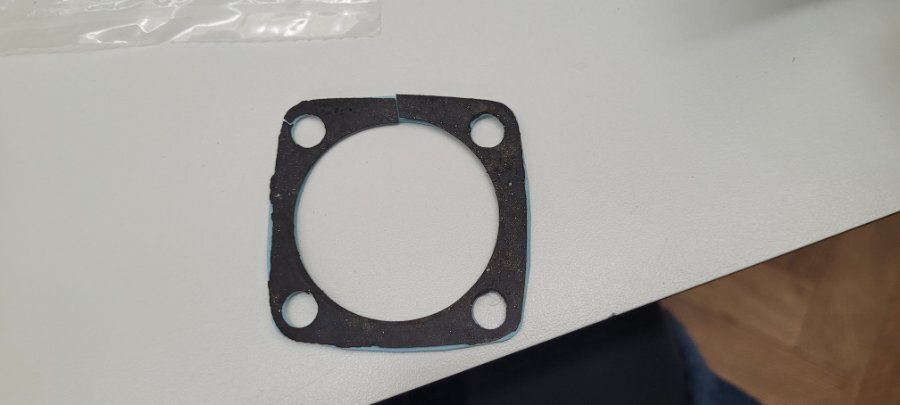
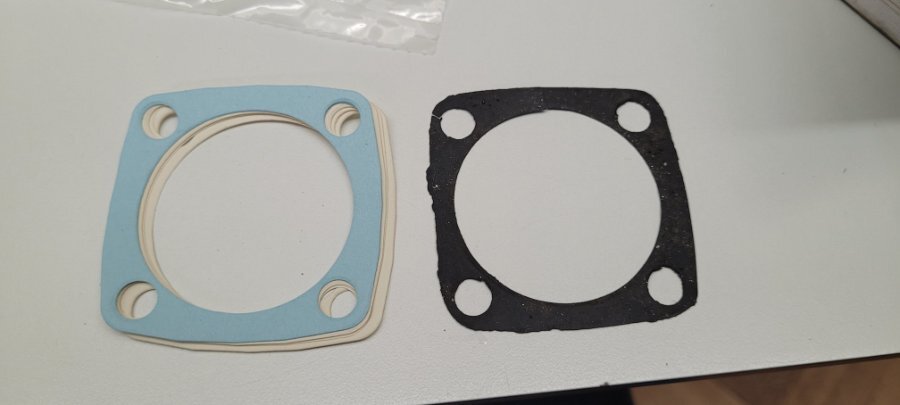
I just found out that '32-'36 Ford steering box shims are exactly the same as on a '47 Plymouth. I removed shims from my '47 to reduce the play in the worm gear. I ordered a gasket kit for the '36 Ford I'm also working on and figured, let's compare them. They happen to be the same size. So, in case anyone needs new shims, I've included some pictures. Dennis

-
Do you have all the wiring for the overdrive? Governor, solenoid, kickdown switch, relais on the firewall with circuit breaker?
-
What door seal/weatherstrip replacement for a '47 P15?
sjaakslinger replied to sjaakslinger's topic in P15-D24 Forum
Thanks. I think the difference is in softness. It looks the same profile seal that Metro offers and they have a softer material as well. Do you have any pictures of the seal on your door? Does it go al the way around the door? -
The door seal on the inside edges of my doors are shot. I noticed the bottom has some metal strip with rubber? Or what's left of it... What's a good replacement? I saw some generic door seal, I think from Metro. Is that a good replacement? Can you use it all the way around the door? Thanks. Dennis

