Franklyn49
-
Posts
28 -
Joined
-
Last visited
Everything posted by Franklyn49
-
In reading up on all the many posts here about disc conversions, I see multiple postings that suggest removing the residual valve from the original M/C, AS WELL as adding a 2 lb and 10 lb valve if retaining rear drums..... My question is, isn't this a redundancy? or an extra step, for at least one of the valves that is being added? If the residual pressure valve in the MC is 2lbs.... why not then just leave it in, and then go ahead and add ONLY a roughly 8lb-10lb valve to the rear? The maths line up.... therefore, I am either missing something or understanding these valves incorrectly. someone straighten me out?
-
wow that's a great resource. Thanks Tod Fitch!
-
Searched around a bit and cannot find the answer. Can anyone tell me the size of the rear outer axle nut on my 1949 plymouth? I'm at work now and hope to remove the drums with puller etc this eve, but must gather tools from here prior, and I'm forgetting what the size is.
-

1949 Plymouth - trouble removing master cylinder
Franklyn49 replied to Franklyn49's topic in P15-D24 Forum
thanks for the guidance folks! even with the frame mounted clutch pivot, I did have to remove the floor pan. M/c is now rebuilt and all is coming back together slowly -
1949 Plymouth - trouble removing master cylinder
Franklyn49 replied to Franklyn49's topic in P15-D24 Forum
well as an update.... I attempted removal from below (without removing floor pan) It turns out this has proven to be geometrically impossible in my setup. due to the shape of the brake pedal arm, and location of the m/c, there isn't enough clearance to "thread the arm down out of the floor and drop the m/c at the same time. So removing floor pan. Have removed all floor pan bolts, brake & clutch pads. Now just to somehow get at the throttle linkage bolts from below... and holy **** wow they are hard to get at. that's a tight spot! I'm giving it a rest for the night. -
1949 Plymouth - trouble removing master cylinder
Franklyn49 replied to Franklyn49's topic in P15-D24 Forum
Hi Earl, Yes that's going to be my set up on this 49 ply also. I think I'm going to attempt what you and a few other have done here. Leave the brake pedal "arm" on. But remove the foot pad. And pull the M/C out from below with brake "arm" attached. I understand that removing the floor would give me a way better view of everything. But I see now this isn't nessecary with the frame mounted clutch. Can't wait to get home! -
1949 Plymouth - trouble removing master cylinder
Franklyn49 replied to Franklyn49's topic in P15-D24 Forum
Yes shel_ny that what mine looks like. I guess I assumed I could remove the pin and pull the master cyclist out from below the car without having to take the brake pedal arm with it. While I WAS able to get the pushrod part of the brake pedal arm off, the larger pivot point isn't able to be slid out horizontally due to no clearance between the frame. Haven't managed to get back to the car to get the floor out. But I'm sure all will come out easy one the floor pan isn't in the way. So much help here thank you forum! -
1949 Plymouth - trouble removing master cylinder
Franklyn49 replied to Franklyn49's topic in P15-D24 Forum
AH, I read 1949! this will explain the differences I'm sure! Although soth122003 may be right. I guess I'll find out once the floor is off Thanks! -
1949 Plymouth - trouble removing master cylinder
Franklyn49 replied to Franklyn49's topic in P15-D24 Forum
this is such great help folks. thank you! ALTHOUGH... strangely enough, Im certain my linkage looks slightly different. The clutch linkage and/or clutch pivot point seem to have no relation to the master cylinder on my car. I have "blanked out" (in yellow) what IS NOT present in my car in the attached picture. Maybe the fact that this is a Canadian 49 Plymouth presents a few small differences? Ill get to work on taking the floor off regardless, this eve. thanks again
-
1949 Plymouth - trouble removing master cylinder
Franklyn49 replied to Franklyn49's topic in P15-D24 Forum
oh this helps a lot! well thank you. I don't know why my shop manual doesn't mention this anywhere?? it has beautiful descriptions on how to disassemble the master cylinder itself , but no mention of getting it out/removing floor pan etc. I guess id have a question regarding removing the floor pan... I cant picture it now, away from the car, but will I have to disconnect the throttle linkage and remove the actual foot pads etc to get the pan out? -
1949 Plymouth - trouble removing master cylinder
Franklyn49 replied to Franklyn49's topic in P15-D24 Forum
Hi Don, I have indeed read up on servicing yes. My intentions are to inspect my m/c and determine if I should rebuild or if a new one is in order. Regardless, gotta get it out of the car first of course I don't see anywhere in my shop manual where it outlines how to get it out of the car. -
Hey guys, Lost my brakes on my car a few weeks ago! so of course parked it till I address the issue. Cant seem to figure out what to do next to get my master cylinder out. Just need some small pointers I'm sure... I'm working from below the car Here's where I'm at: Jacked car up Removed brake lines from M/C Removed the three mounting bolts Removed pedal return spring from pushrod Removed brake pedal arm from pushrod now the master cylinder is loose up in there, but cant determine what needs to come off next to drop this thing out. Brake pedal "pivot" is still attached to the m/c cant see how to disconnect this with such little space.. Thanks in advance
-
I guess I was confused a bit, because it is also present "near" the ignition switch on the diagram. (a lead going from the switch TO the circle with an X) I guess just a bit deceiving as it seemed "separate" from the switch itself. (rather than, in my case, a position of the keyed switch) Thanks that seems to make sense now based on what I'm looking at under the hood. Yours is different eh? do we have the same car? my wiring diagram seems to line up pretty good for me so far.
-
The wiring diagram for my 49 Plymouth special deluxe (p18) Shows, in a few spots, a "circle, with an X through it" what does this refer to? I'll add a link to a pic of what I mean... Thanks in advance
-
Decided to tear into my turn signal switch on my 49 plymouth, As it had stopped working awhile ago, and recently started smoking while ignition was on!! I'd rather have a car WITH turn signals, as opposed to a car without turn signals and burnt to the ground. My beginner soldering skills produced a success this time Dont know how to make thse pictures smaller.... they look pretty large in my browser. two of these wires are hanging on by just a strand, causing all kind of shorts etc. the black one (power lead?) isnt even connected and was grounding to the body. the finished product before intallation
-
I guess even a stupid question can spur some interesting conversation! I like where this thread went:)
-
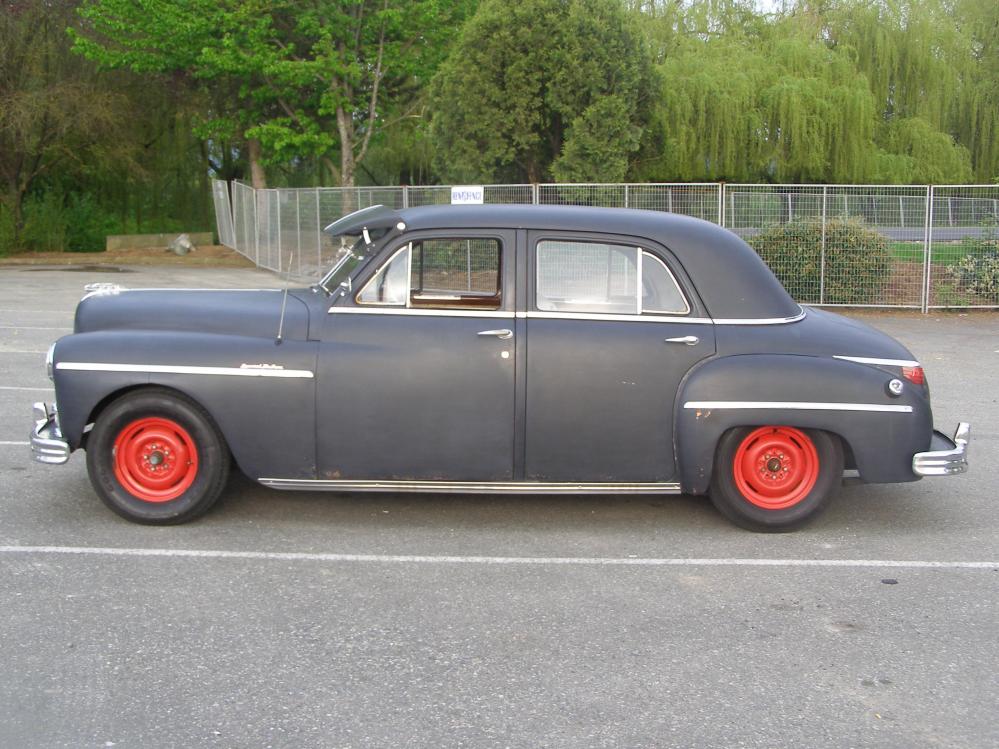
 A couple shots after lowering 3 inches front and rear.
 -
 A couple shots after lowering 3 inches front and rear.
 -
A funny question guys:o While sipping on a beer and staring at my car today after doing some rewiring of light sockets etc., I came across a funny/naive (and maybe stupid) question. While troubleshooting a dim bulb, I determined that bad grounds were the culprit. I found this out by running an extra 14 gauge ground wire from the housing of the bulb socket to different bolts/frame/bumper etc. (the lights became as bright as one could ever want:) ) My car is a 6 volt positive ground system of course. But this got me thinking... If my bumper (which appears definitely to be a part of the ground circuit in the 6v system) were to touch another bumper of a car that had been converted to 12v NEGative ground, wouldn't this create some serious problems for my electrical system? and/or possibly for the other car's system??? Maybe not? maybe so? just got me thinking is all (over some beers keep in mind ) ps. I also don't plan to be touching bumpers with any other cars anytime soon, but seems that it could easily happen in a packed garage/shop by accident.
-
I've been driving the car very regularly for the past 2 years and the motor has never run. I'll try giving it a few knocks while hooked up to power and see if that does the trick. If it DOESNT work, does anyone know how to rebuild a small motor like these?
-
sounds fairly simple to add new leads and clean the unit up, but mine isn't responding at all to power. Wondering if the motor is in fact burnt out? and if so is it repairable? some have mentioned "re winding" their original 6v motor to 12v. I dont want to switch to 12v, but is it possible to do this to refurbish as 6v?
-
I did a number of searches with no definite results... Is it possible to rebuild a dead 6 volt motor at home? I read that some people have "rewired" theirs etc. what does this entail? would love to get get some heat and air flow into the plymouth if there is a fairly cost effective solution.
-
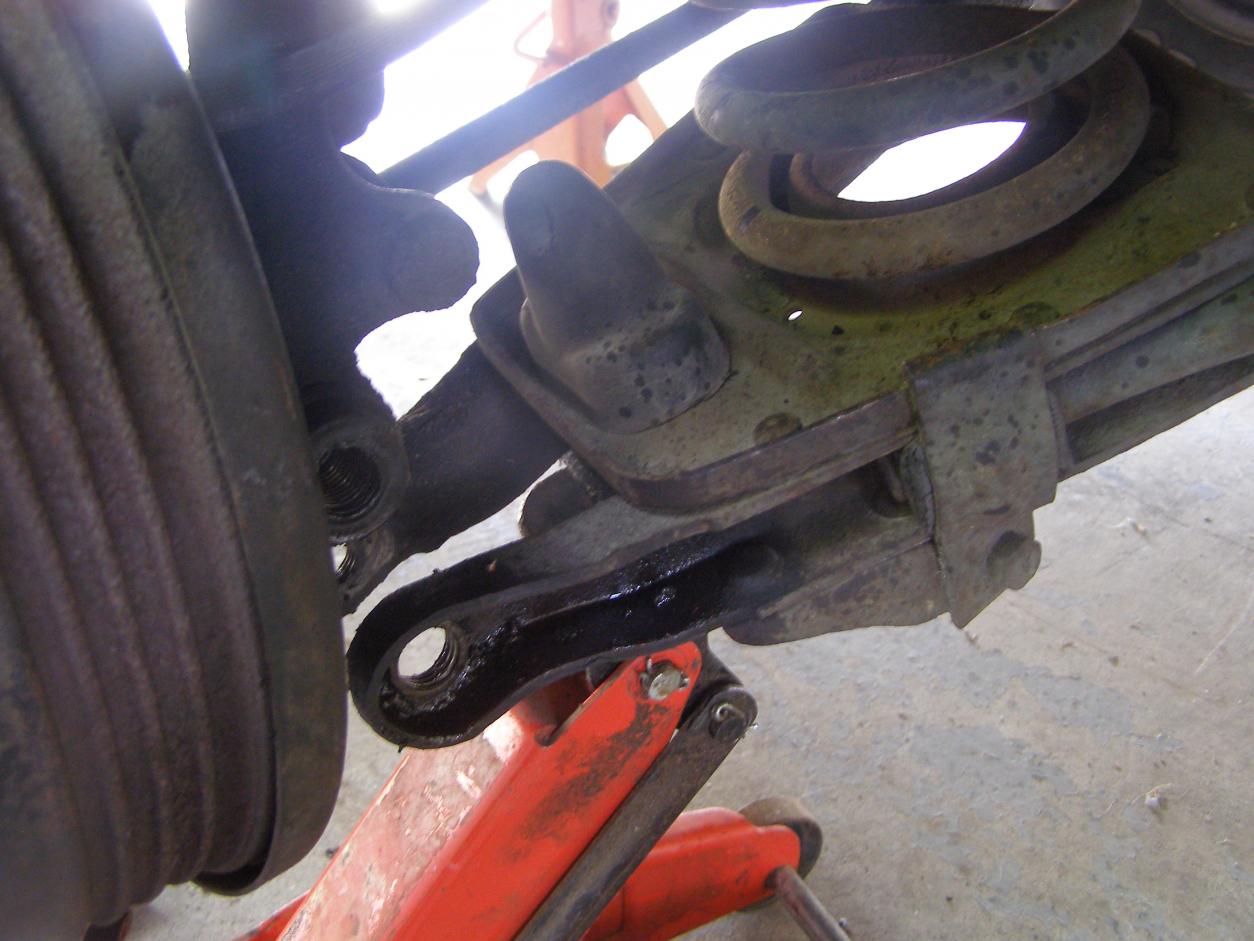
Yep what Andydodge said is basically all it takes, Except I dropped the middle sway bar mounts to allow for further "lower control arm" drop. I did find however that when the lower control arm was unpinned and lowered out of the way as far down as it would go, there still wasn't enough clearance to drop the coils out. what helped was a good old pry bar and a push with my boot normspeed's note on cutting coils was my guide.

-
Just cut one coil off my front springs, and seems to complement the 3" blocks very nicely. site basically level all around.


-
did you ever get around to cutting coils up front? how did it go?