


Shaman
-
Posts
16 -
Joined
-
Last visited
-
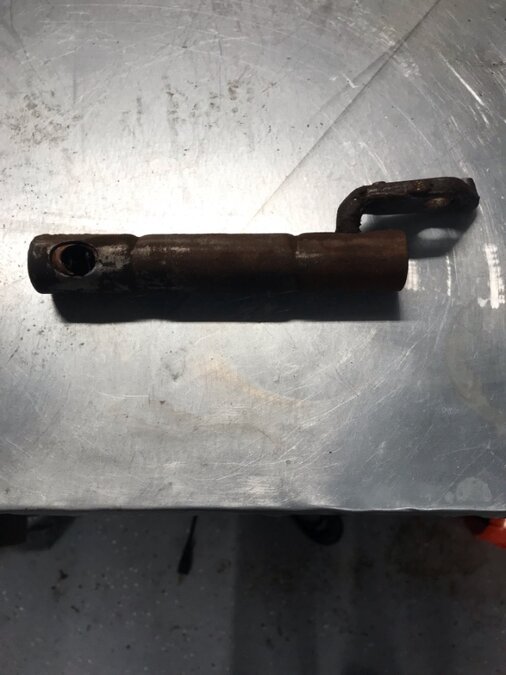
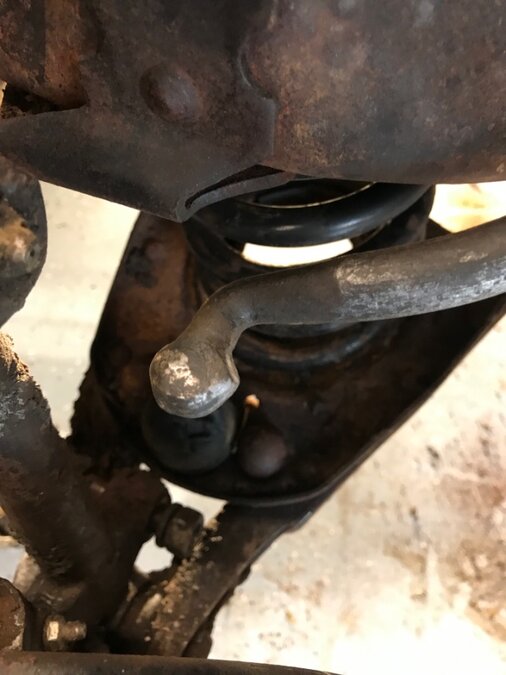
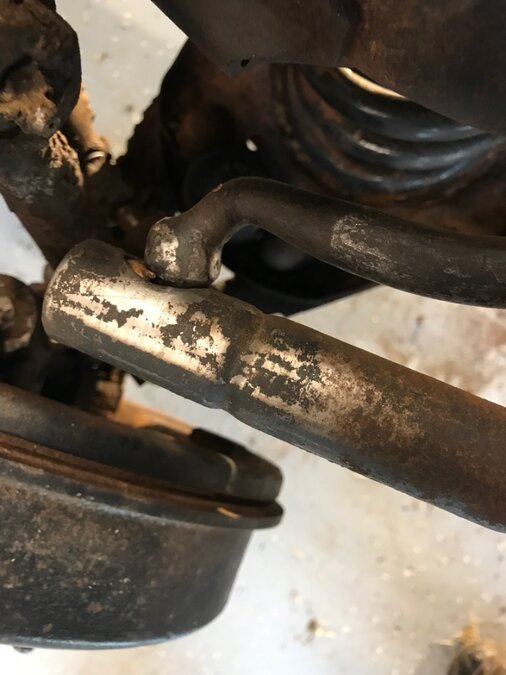
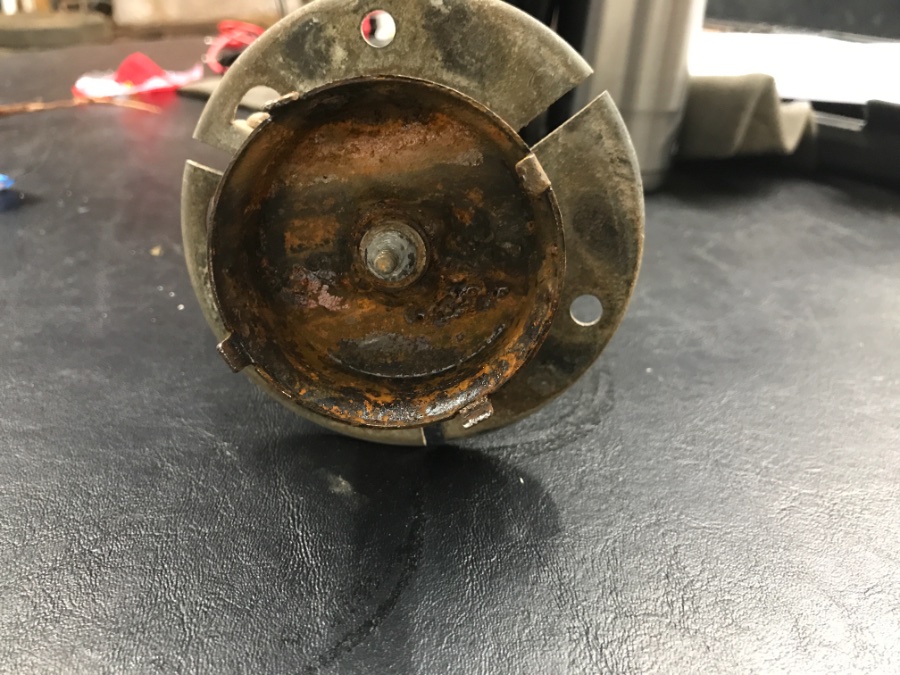
So I thought I’d put an update out here for others to see. I was able to get the bushings replaced. With the advice here, I was able to get everything apart. I ended up just taking one of the links off on one side. I just rotated it parallel to the sway bar and worked it off. It messed up the metal a little because I didn’t have the right angle, but it still looks ok. I may replace both of them later because the rubber was definitely not great, but it did hold when I put it back. I only took one side off because I didn’t want to mess up the other link at all. I then took the brackets off the bushings and pulled the bushings off. Took at little WD-40 to it as it came over the end of the sway bar. To get the new bushings on I ended up using a little bit of gear oil after sanding down the entire bar to get the old rust and dirt off. It was still a challenge to get the bushings pushed into place. I ended up using a large washer and either tapping them along or using come squeeze clamps and a vice grip to slide them along. Once I got past the last curve, it actually moved all the way to the other side, so that way I didn’t have to remove the link on the other side. Here are a few pictures of the link and the end of the sway bar, in case anyone else is trying to figure out how they came off. I know I was sure wondering how they came apart. Thanks for the advice.

-
Right now I’m focusing on the bushings that are under the bracket that is connected to the frame. If they have those cuts in them, that will make it easy, if not, then I’ll end up getting into end of the sway bar. I didn’t realize those were rubber inside as well. As usual, always fun to find things as you work on the cars. AndyDodge, that looks really nice, what you’ve done. I haven’t done any upgrades and right now, I’m not planning on it. So far, I’ve been fortunate in finding what I need. I’ve been using oldmoparts.com for most everything. Every once in a while I run across some parts on e-bay or other places, but the oldmoparts.com seems to be competitive with the pricing I’ve found. Thanks for the advice.
-
I’m working to cleanup the front suspension and was looking at changing out the bushings and springs. One thing I haven’t been able to find is a way to disconnect the sway eliminator shaft so I can change those bushings. Does anyone have any advice on the best way to do that? I haven’t really started removing things yet, but I plan on tackling it this weekend. On another note, if you have suggestions on changing the springs, I’d take advice there too. I’ve at least found instructions in the shop manual for that, but if someone has some gotcha’s to watch out for, that would be great.
-
1949 dodge wayfarer automatic choke wire..
Shaman replied to Wayfarer311's topic in Technical Archives
So I wasn’t exactly sure how to wire it into the starter, so I ran the wire through the hole on the side of the switch and used the copper piece inside to pinch it down. Works like a charm. The chock didn’t look like it was in good shape, but after some cleaning with some degreaser, it works pretty well. I was pleasantly surprised to see it work because there is not telling how long it had been since it was wired in. -
1949 dodge wayfarer automatic choke wire..
Shaman replied to Wayfarer311's topic in Technical Archives
I’m in the process of working on my choke as well. How did it go with the wire going to the starter? I was seeing that it’s supposed to go there as well. The wire diagram I have doesn’t show what gauge of wire. I’m not even sure the choke I have is any good. -
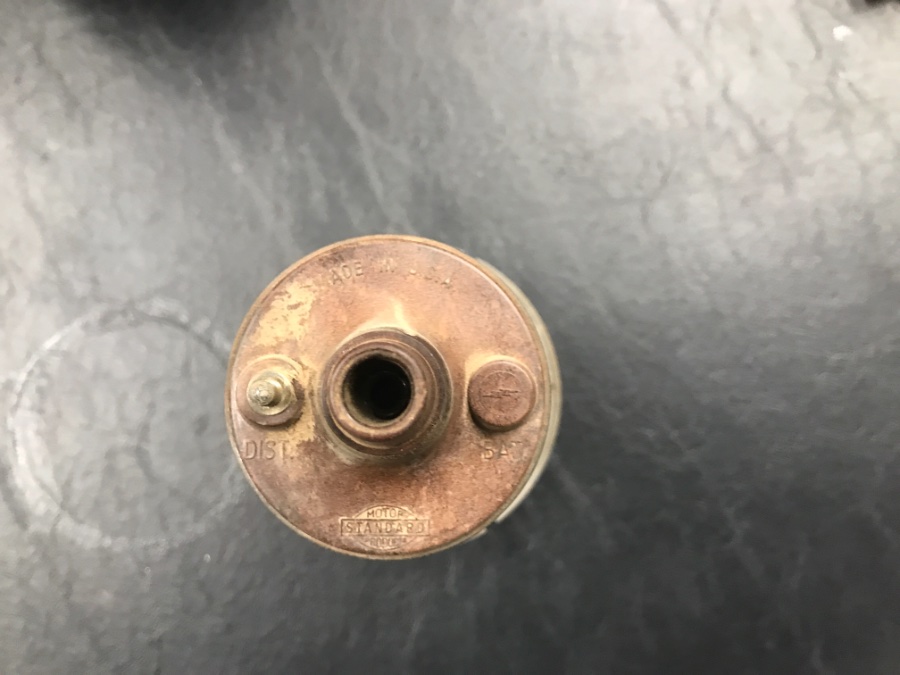
So I have a new question that goes along with the coil. Quick update first, she’s running pretty well now. Got the carburetor cleaned up, flushed the lines, and a new fuel filter and running well. In fact, I’ve been able to drive around the block a few times and only had to pull her back once, which was some issue with the fuel. I’m pretty sure it was just some old trash I didn’t get flushed good. Ok, so now for the question. Does anyone know what this piece is that goes into the top of the firewall coil? I can’t find it anywhere, except when I find a new firewall coil. I think my old coil is good and I’d like to use that one, but I don’t like the fact of the tension wire just sitting in there and not seated into anything. The picture I’m attaching is from a site that is selling a new coil. Thanks for the help.

-
So, with the answers here I had success. I actually had several things going against me. First off, the coil was wired backwards. I thought I had it right, but when I didn’t get spark early on, I changed it. The odd thing with the voltage being at 3v. I’m pretty confident that was the points. I filed those a little and that voltage ended up dropping below 1v. With what was said above about it would probably be close to 0v that told me that I needed to find out why when the point was closed I had higher voltage. So after all of that I tested for spark and had it on the high tension wire from the coil. Then I tested to the spark plug and I had it on the wire, but not on the plug. The plugs were a little old so after getting new plugs I had good spark. Then I was able to fire her up and she ran. Now I just have to get the fuel pump working. I ran it by pouring fuel into the carburetor. Thanks for all the help.
-
I’ll double check and run this test. I guess I may have a bad coil that I just purchased. Thanks for the advice on the test. I do have one question. Should I be concerned that on the positive side of the coil I get 3 or so volts when the points are closed and 6 when they are open? If I read what you wrote correctly, it should go to 0 instead. If it’s supposed to go to 0 when the points are closed, I’m guessing that I have a bad ground in the distributor, but I’m not real sure. Anyway, I’ll do this test and make sure that the coil is in good shape. Thanks again.
-
Ok, so I put a new coil in. If I tested the resistance on the old and new coils correctly I did have some issues with the old coil. So now as I progress through, I’m still not getting a spark past the distributor. So I cleaned up the points a little and tried to follow the voltage a little at a time. When the coil is disconnected from the distributor, the lead to the coil test 6v. When I attach it to the distributor it sometimes tests 6v and sometimes tests around 3. I’m assuming that there is a short causing this drop or inconsistency. So I pulled the small wire out that is inside the distributor and cleaned where it screws in, that then tests 6v through it. When I connect that wire back to the distributor, which connects to the point breaker arm I get the drop in voltage again. Interesting is when I open the points it reads 6 volts, but not when they are closed. I’m assuming that when they points are closed it should read 6v also, but can anyone tell me for sure? If it is, then I feel like I’ve got some type of short going on. It just seems odd that I’d be getting half the voltage when the points are closed, but I’m so new to all of this that I really don’t know. I even disconnected the condenser in the distributor, just to make sure it wasn’t grounding it, but that didn’t make a difference. I may be describing this incorrectly, so please let me know if I need to clarify anything or if pictures will help. I’m kind of at a loss as to how continue testing the distributor. I just know I’m not getting consistent spark, if I get any at all. Thanks.
-
Thanks for both of those replies. AndyDodge, nice looking engine. So clean. These will help. I’ll do some more testing, after reading Sniper’s comments, I’ll go back through and see what I can test again. If I still have the same issues, I’ll go pick up and a new coil and see if I can get it to work. I do wonder if I’m getting a good connection going to the distributor cap because of how the that cable is seated in there.
-
I was using the post and then where the high tension wire that goes to the distributor cap. I found a video that showed to do that to test a ignition coil. It was a 12v system instead of the 6v. I did get the ignition coil out of the car and I do have good voltage to the ignition coil. Before I removed it I did the test with the wire going to the distributor cap and I didn’t get any spark. I do know the cable from the distributor to the ignition coil is not the exact one. It was black taped to the end and it wasn’t inserted into the coil very well. Even after trying to get it in the best I could and re-taping it, no spark. The coil was very corroded on the end where the wire goes to the ignition switch. So now I’m not sure if the coil is bad or if I’ve got some other issue. I’m just going to work through trying to get spark, but I don’t know how to test the coil anymore than what I’ve done. Here are pictures of the coil so you can see the post and where I tried to get resistance. I did get resistance when touching the bottom post and the top post. I’m honestly not sure what I’m supposed to get, but I did get some results there. I get nothing, no matter how I try, with the connection inside where the wire that goes to the distributor cap connects.
-
While trying to get my car started, I’m leaning towards some electrical issues. I believe I have a bad cable that I’m replacing now. When doing a voltage drop test it shows that the positive cable is bad. Anyway, while doing some research I ran across how to test the ignition coil. I figured it was good to test as many things as I can during this process, but after testing the external post to the internal connection, on the ignition coil, my meter didn’t show anything with a resistance test. So I’m assuming the coil is bad. I’ve been looking for a replacement, but the ones I’m finding locally don’t have the cable on the back side of the coil. Instead it has two posts on top, beside where the wire going to the distributor cap goes to. Has anyone replaced an older coil with one of these without the cable going to the ignition switch? It seems like I should have to have some type of connection back to the switch, but I’m probably wrong. This is my first real attempt at any type of rebuild, so I really appreciate all the help.
-
That’s impressive.
-
That’s interesting. I knew when I read that it was called a bypass filter somewhere and that the oil didn’t have to pass through it I thought that was odd. I guess not odd, just different. Thanks for the reply.