ktb
-
Posts
73 -
Joined
-
Last visited
Content Type
Links Directory
Profiles
Articles
Forums
Downloads
Store
Gallery
Blogs
Events
Everything posted by ktb
-
I did this and have sprayed PB Blaster on the exposed valve stems. Some of them you can see the oil seep down through the valve springs, others you can't. I'll try compressing the springs and if no crankshaft movement will remove the head.
-
Rgr, thanks!
-
True, but if I could borrow a spring compressor for free, wouldn’t it make sense to get each valve moving and eliminate “valves stuck in guides” from the list?
-
Would it help to get a valve spring compressor tool and manually lift on the valves? It looks like all of them are closed except the two that opened yesterday.
-
Thanks, it was time for me to get smart on freeze plugs. Since I cleared everything off on the right side of the block, might as well clear everything off on the left. I suppose I should get the engine turning and manifolds reinstalled before messing with coolant flushing?
-
Thank you, I wasn't even aware of the water distribution tube - I'm sure it's toast as well. And I'm guessing it's best to flush from top to bottom. so thanks also for pointing out the block drain valve.
-
I'm still working on getting the engine to turn over but looking ahead to getting the coolant system flushed out. The radiator is bad, so getting an aftermarket aluminum one. Old water pump is bad, new one ordered. All hoses and gaskets will be replaced. I found a lot of hose debris and coolant sediment throughout the system and would like to get rid of that before installing new components. Is there a good way to flush the engine block without the rest of the coolant system installed? Could I connect a hose to the heater connection at the back of the head and flush out the block through the front? Would you try to use any kind of detergent or just garden hose water? The heater core I will probably flush out separately in a similar manner - attach a hose to outlet and flush through the inlet. Thanks!
-
Thanks Dave72dt, The tappets/lifters all spun without too much coaxing, so I'm guessing the problem is valve stems stuck in valve guides as several folks have suggested. I'll keep at it.
-
Update: I sprayed about half a can of PB Blaster on the valve lifters 2 days ago and tried to turn the engine over today. Two of the lifters moved up (from the front, they are the 1st and 3rd valves, which should be #1 exh and #2 int), revealing a shinier layer beneath. But the crank is nowhere near spinning. Picture below. I’m having difficulty rotating the crank in reverse, because the hand-starting nut loosens first, and I can’t get any movement with a pry bar on the ring gear. But at least a couple valves moved. Question: the tops of the lifters have two flat sides that could be turned by an open end wrench. Should I try to rotate the lifters with a wrench, or would that be bad? For now I just sprayed more PB Blaster and will try turning the crank again in a couple days.
-
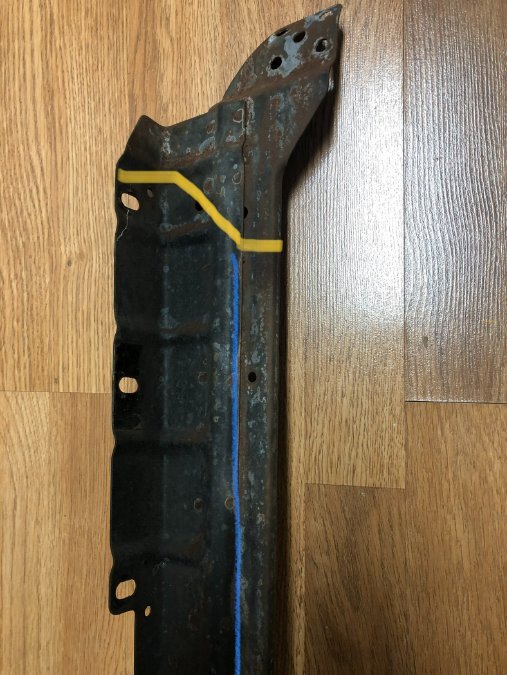
The Oil Soup, Digging into the details of your factory radiator bracket modifications... It sounds like you separated the spot welded sections of the bracket on each side, giving you 4 long pieces. You trimmed the outer pieces (with 3 bolts holes) so the new radiator tank will fit. And it looks like maybe you trimmed and welded the inner pieces back to the outer pieces, keeping only a flat section from the inners? I'm not a welder and am wondering if I can leave the spot welded part of the bracket intact, but bend the inner piece back 90-degrees to bolt to the new aluminum radiator. It's pretty thick sheet metal, so I'm not confident it will bend easily, but can hopefully avoid breaking welds and rewelding. In the picture below, the yellow line is what to trim off and blue line is where to put the long 90-degree bend.
-
Thank you for the encouraging assessment! Is the valve lifter what you can see through the viewing window above the fuel pump cutout? Do I need to spray PB Blaster through those windows and all over the valve springs? Edit: Sorry, the valve lifters are the cylinders underneath each valve spring, right? And the lobe I was looking at through the viewing window is part of the camshaft?
-
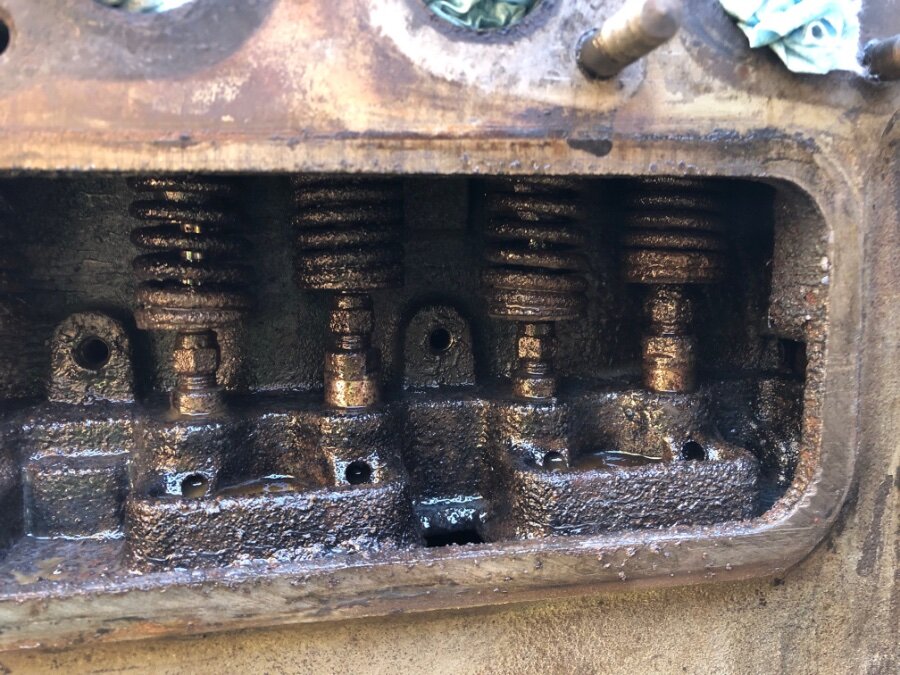
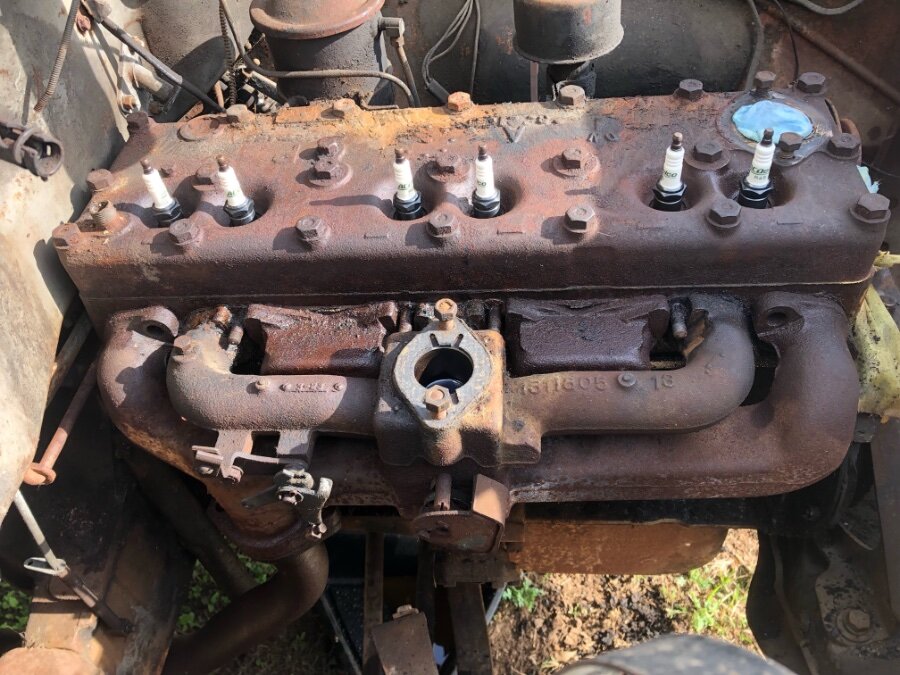
Thank you all for the helpful advice. Yep, I had missed the hidden center nut (#13) under the intake manifold too. Today I finally got the manifolds removed. I had to separate the exhaust flanges with a hacksaw because the center edges were stuck together (almost like welded). With the manifold out of the way, I spent a while scraping gunk off the right side of the block. I'm noticing some water intrusion/corrosion issues. Three of the exhaust manifold studs came out of the block, and the furthest rear exhaust stud hole leaked a good amount of coolant - not sure if this is a head gasket issue or something else. Also looked like water had gotten into the valve spring areas - small puddle of water in the rearmost part, and lots of rust flakes throughout. The front part of the camshaft(?) looked rusty through the viewing window, and there were many rust flakes on the insides of the valve covers. I will need to go back and read previous advice about freeing stuck valves. It's looking like I will need to remove the oil pan and head as well. Some photos below. By the way, what is the pivoting drain tube for in the lower right rear corner of the block? I also need to learn what a heat riser is.
.jpeg.3e96f90a704a3366d761f281b044c049.jpeg)
.jpeg.b731fbf4670f71b05e19df3416ccf1e5.jpeg)
.jpeg.f8bf980d1152b757da395d70208f81bf.jpeg)
.jpeg.8a1d6fa70c04ce28e14238e47120e06f.jpeg)
.jpeg.b40634ca69a0d61bd0ba3541bd4a16f0.jpeg)
.jpeg.563fc31e95e6c2e0986d887fd79152bf.jpeg)
.jpeg.51602f3465f92af0fd5b1732e8362f61.jpeg)
-
Thank you Bobacuda, I was indeed oblivious to those two bolts (it’s almost as if you can see my mistakes remotely 😱). Now we’re getting somewhere! It looks like two of the four bolts connecting the manifolds together underneath are sheared off, so I’m trying to pry them off as one. But the exhaust pipe gasket is not letting go just yet.
-
Here’s where I’m at getting to the valve train. I assume I just whale on this manifold and pry it off? Or should I leave it alone and try to remove the valve covers underneath? I let the ATF/diesel concoction brew for a week, but the crank is no closer to turning. You can see the red juice level in the intake manifold where the carburetor was.
-
Thank you very much - it looks great! It looks like you trimmed off the top and bottom of the original bracket and bent the rear edge 90 degrees to bolt to the mounting tabs?
-
Thanks all, I filled the spark plug holes with about a gallon of 50/50 ATF/diesel on Saturday, so I’ll give the crank another try in a couple days before resorting to disassembly. Happy Thanksgiving everyone!
-
Thank you very much - this is great news! As long as it’s possible to clear the fan, I’m sure I can find hoses to make it work.
-
Thanks again Merle, yes, I should probably count my blessings!
-
I’m still struggling to get the engine to turn over by hand. Trying to turn the FD coupler ring gear with a prybar bent the prybar. Turning the hand crank starting nut with a 1-3/4” socket, 1/2” ratchet and extensions, and a 5-ft cheater pipe turned the crank nut slightly but finally broke one of the extensions. I have poured 1-qt of Marvel’s Mystery Oil into the spark plug holes over a couple weeks. Now I’m thinking I’ll get some better penetrating oil (maybe Kroil; I’m open to suggestions), a beefier 1/2” extension, and a true breaker bar to use the cheater pipe on. It may be that I need to open the valve covers to see what’s going on there. As far as I know, the engine wasn’t seized before it sat for 26 years, but this has been discouraging.
-
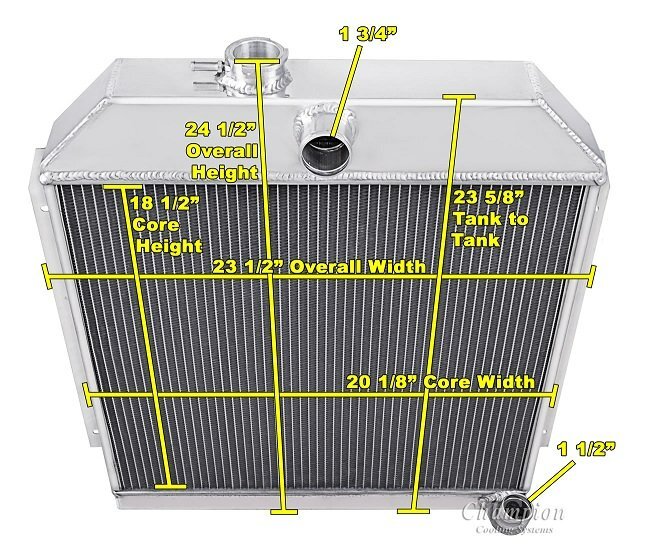
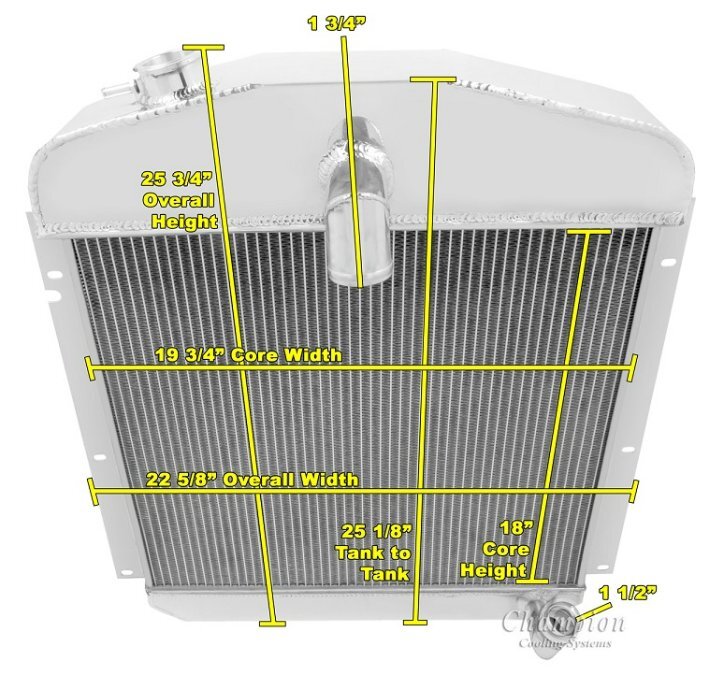
I'm also concerned about the difference in core height, and if that will cause upper and/or lower hoses to interfere with the factory fan. The Champion radiators have a 4-4.5" shorter core height than factory. Champion core width is about 1-1.5" narrower. If the bolt-on radiators weren't $650-$750, this would be a much easier decision.
-
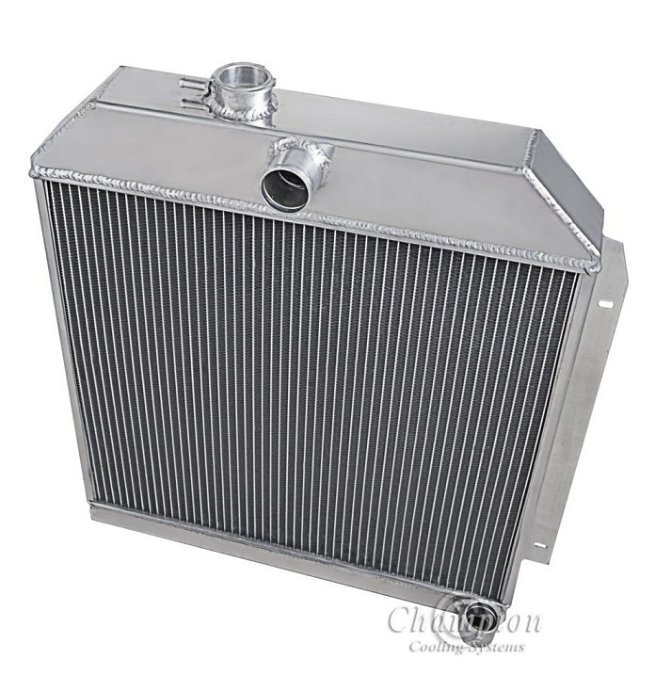
Thank you Merle, that's an excellent observation. I will have to talk to them about making a CC4749 with a straight upper hose connection.
-
Thank you Brian, those look really nice, but probably out of my price range. Thank you L_C, looking good!
-
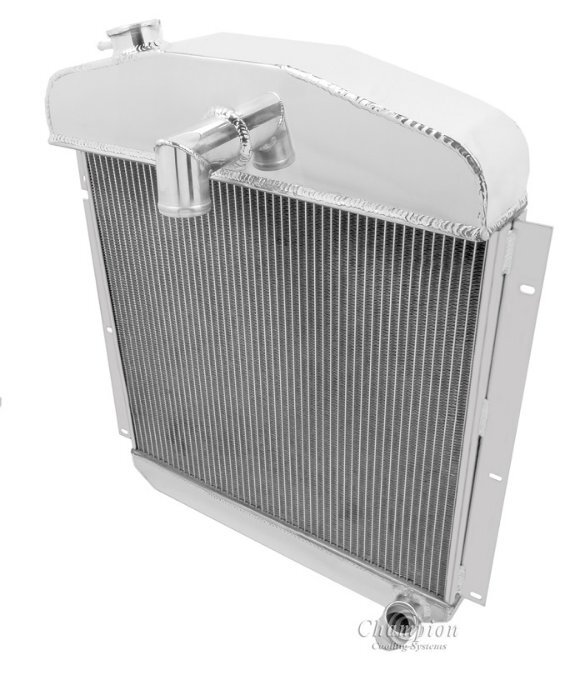
Thank you Los_Control! I found the previous forum topic about having issues with fan clearance, and it looks like CC4749 was the one that interfered. So I am leaning toward EC52PLY or CC52PLY with the horizontal outlet upper neck. As for mounting bracket modifications, I just meant attaching the original radiator brackets to the aftermarket aluminum mounting tabs. https://p15-d24.com/topic/32233-after-market-radiator/
-
OK, just found another topic here suggesting this one (CC4749 for Plymouth Coupe 1947-1949). It has a downward angled upper neck that may or may not work better than the horizontal one above. https://www.championradiators.com/product/CC4749
-
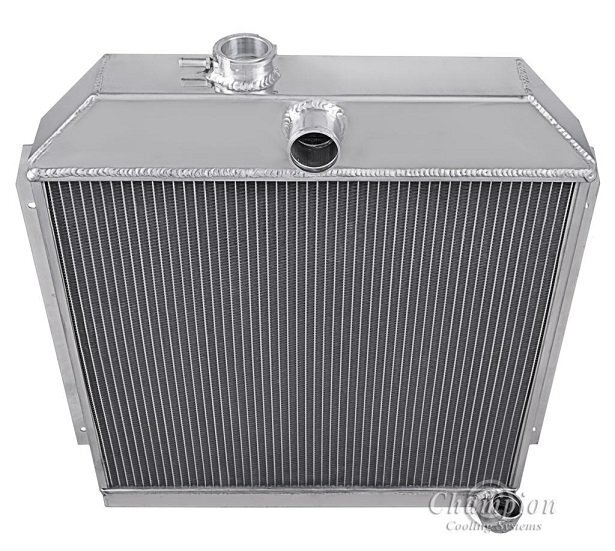
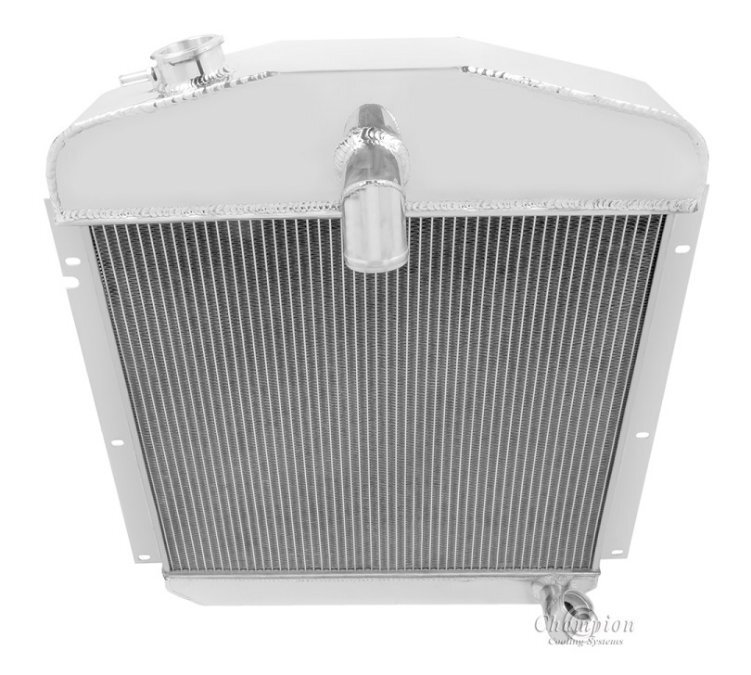
I'm afraid my original radiator (part number 1272446 D) is beyond reasonably-priced repair - upper tank thin and cracked; leaking at upper core seams; lots of debris inside. I will look around a bit for an original in good shape, but probably leaning toward a cheaper aftermarket radiator. I've seen Champion Radiators mentioned a few places on this forum. Has anyone tried this particular radiator (EC52PLY) with mounting bracket modifications? I'm concerned with fan clearance as mentioned by another member who had to go with an electric fan. Any other concerns? Thanks! https://www.championradiators.com/dodge-coronet-radiator-1949-1952