


buck0wens
-
Posts
29 -
Joined
-
Last visited
Everything posted by buck0wens
-
Been working on the truck an hour at at time but work has kept me off the computer. New gas tank is in ... truck runs on its own now but won't rev up like it did pulling from the aux tank in the engine compartment ... might just be a coincidence. Installed a fuse/relay box but have only hooked up the ignition so far so I can start/stop the engine from inside the car ... it's the little things right?? LOL. Replaced the squished brake line and the "T" block (what a PITA). I have pics of all and will document my woes soon. After I got the brake lines hooked up, I found 2 leaking wheel cylinders. Decided I should just bite the bullet and redo all the brakes and bearings. Entertained the idea of axle swaps/body swaps/brake conversions but I think just fixing what I have is my best bet right now. So I found wheel cylinders for a decent price and have them in hand and they match but if I'm taking everything apart, I was thinking I may as well put in new bearings and wheel seals. Tried 3 places locally and have almost no confidence in their recommendations LOL ... and they're looking at me like I'm crazy when I say I want USA or Japan made bearings ... kids these days! I'm hoping someone has documented the part numbers I need for the bearings and seals. I searched for an hour and got lots of good info about brakes and bearings but no parts numbers. I'm sure when I take them out I can get part numbers off of them but I'd like this to be a weekend job if possible. As far as I know, everything is stock. It's a 1950 B2D. If anyone has info or if there's a reference out there someone can point me too, I'd greatly appreciate it. THX, Buck
-
I hear you ... that's why I thought maybe it was some sort of dampening happening at first ... letting the tank drop a little slower than the truck. This tank has definitely been off before because someone painted over the JB weld that didn't stick LOL. I think the factory had it mounted on top (from the pictures of what look like originals JBNeal pointed me to) but maybe people are too lazy or forget how it went and just do it the easy way. I reached out to a couple of people who do power wagon front disk conversions. From what I'm reading/seeing, it seems that they machine the hubs down ... or at least make a flat spot ... and then weld a rotor to the hub. Seems like they could do that with any diameter hub if there's enough meat and a rotor with an ID close enough to the hub OD ... this truck does have a lot meat everywhere I look. So hopefully they can help me. The little driving I did do confirmed that I do have a 4 speed so I might get a rear axle that'll give me a better top speed and I'll be able to change the rears out as well and have something that I can easily maintain and stop fast when I need to. Although I was able to lock up the back tires so something good is happening out back.
-
Thanks for the info JB and Merle. When I took the tank off, the tank was mounted below the frame rails and springs on either corner which was causing most of the confusion. Knowing that the tank is supposed to sit on top of the frame rails and that the springs go on the back together makes the stock setup make way more sense. New tank is on the way. Since the tank supports it and if I end up going with an electric pump, I'll probably install an in-tank pump with a return system for that reliable cool gas ... but for time/convenience/budget's sake, looks like I'll be using the stock setup with a mechanical pump until I have issues/time/money. Didn't get to drive it because it looks like one of my front brake drums is hooped. There is one spot that it's dragging really bad ... like need a pry bad to turn the wheel/wheel nearly skids when driven bad ... even with the minor adjustment all the out. I won't know until I get it apart but not looking good. I really like the idea of front disk brakes. Someone mentioned earlier that I should look into dodge power wagon front disk conversion. Are the front hubs on the 1 ton the same as the power wagon? I also read about someone swapping out 1/2 ton hubs and using a conversion kit? I don't think I'll need the capacity but would I be able to use my stock rims with the 1/2 ton hubs?
-
Had some time to work on the 'Ol girl today. Got the master cylinder and the new brake line in and I now have a super solid pedal ... finally something that went better than planned ?. I'm going to have to track down the dragging wheel and figure out what the deal is but I might get to take her on her maiden voyage tomorrow (with my remote gas tank ?). I'll put up a vid if it happens. Dropped the gas tank and it's going to be a problem. Crazy rust, JB Weld falling off that's covering holes, sending unit corroded and seized (and the arm is green?!). I could probably get crazy and make it work but it would be a lot of work and probably a constant battle after so I'm going to resist the urge to repair and just get a new one. Buying it will officially put my parts total over the amount I originally paid for the vehicle but I'm sure it's just the tip of the iceberg LOL. Probably cut this one apart and see exactly what is plugging the pickup and what it looks like in there unless anyone has a good use for it. I can't see what's going on from the sending unit hole and it would be good to know for future reference ... the manual has jack on it. So I have a couple questions. The gas tank was mounted on some long bolts with springs ... I guess to absorb big bumps? There were only 2 of the spring bolts mounted kitty-corner and the others were bolted solid to the frame with a newer looking nut and bolt. One of the spring bolts had a sleeve in it that was welded to the tank which seemed like it was limiting travel to almost nothing? Should I try to mount my new one with 4 spring mounted bolts, put it back with 2 springs, or should I just put 4 solid bolts on? Seems like a suspended tank might make for squeakiness in the cab from the filler neck? The other question is about the accelerator pedal. I bought a cheap ebay one and it was a plastic POS that barely worked and bent almost immediately ?. I bought a new, metal one from DCM classics but haven't put it in yet so hopefully it'll be better. My question is about the linkage between the stud that comes out of the pedal and the rod that's mounted to the firewall and goes to the other side of the car. There seems to be a lot of side to side play in that linkage. I'm not sure what the linkage is supposed to look like and if what I have is original ... probably not lol. I'm thinking some of the play is wear and I could probably get a better fit if it needs it. I found some pictures on here but it's not really clear to me. It looks like I could put some washers on the rod to eliminate SOME of the play and I could definitely tighten up the joint with a bushing or longer sleeve welded to the pedal stud but I was wondering if there's some sort of guide that goes through the firewall or if the system just relies in the rigidity of the pedal to keep it straight and nothing else is required. Any help, as always, is greatly appreciated.
-
Hi Merle. Thanks for the reply. This engine is a '55 Plymouth 230 with an internal bypass that still has the plumbing from the old, non-internal, bypass motor attached. I would just keep the bypass if I needed it but the plan is to get a thermo housing from a later engine at a future date. The thermostat opened and the water in the radiator got nice and hot. Thanks for looking out for me though. ?
-
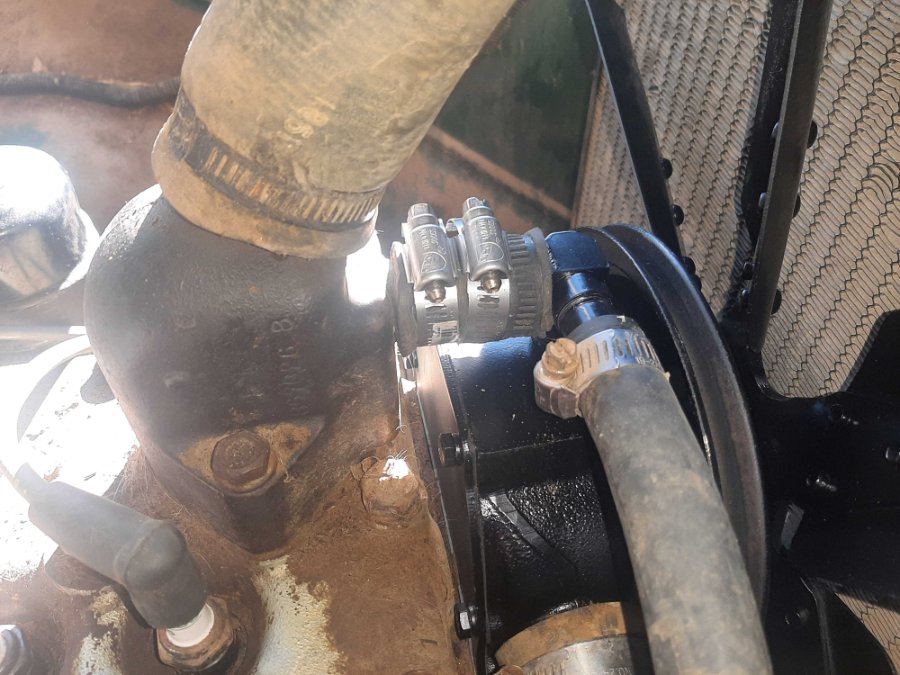
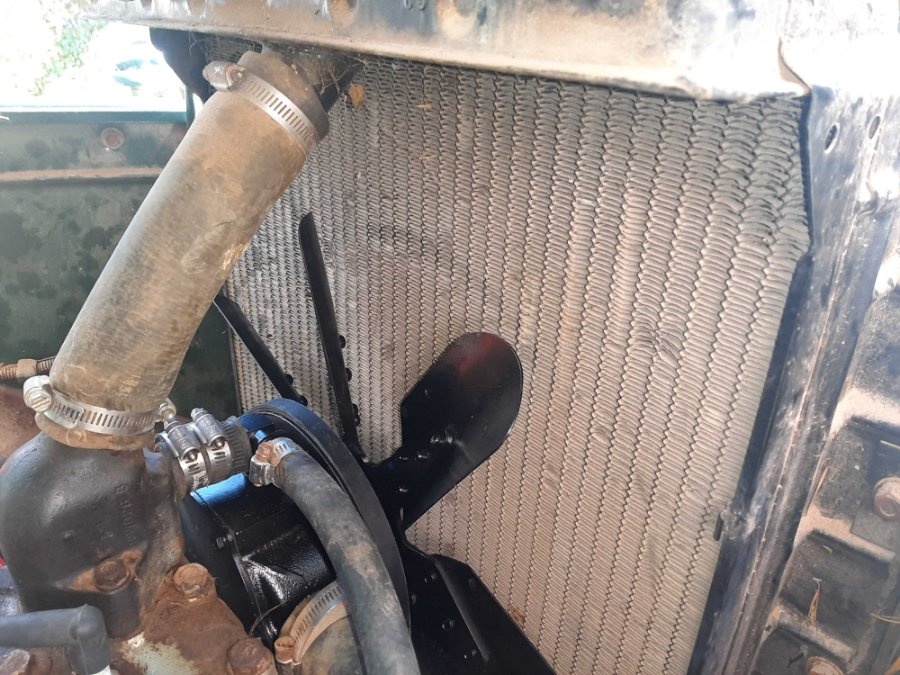
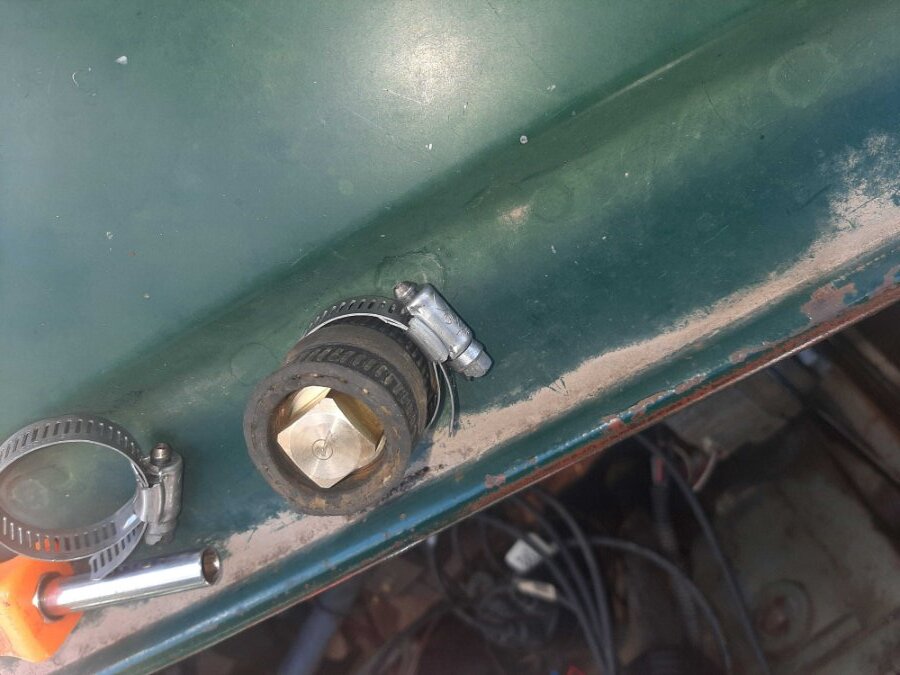
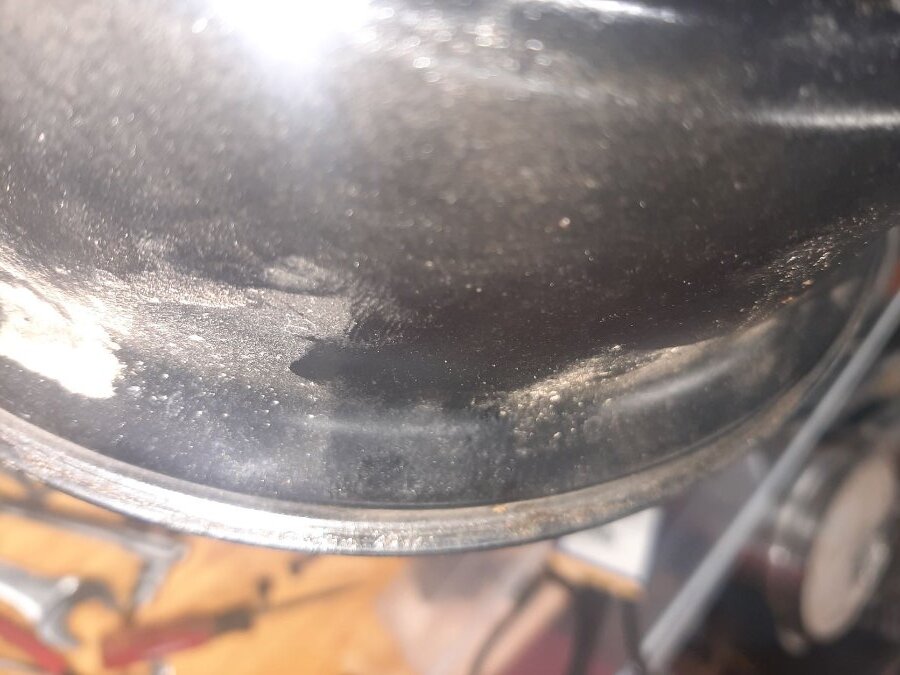
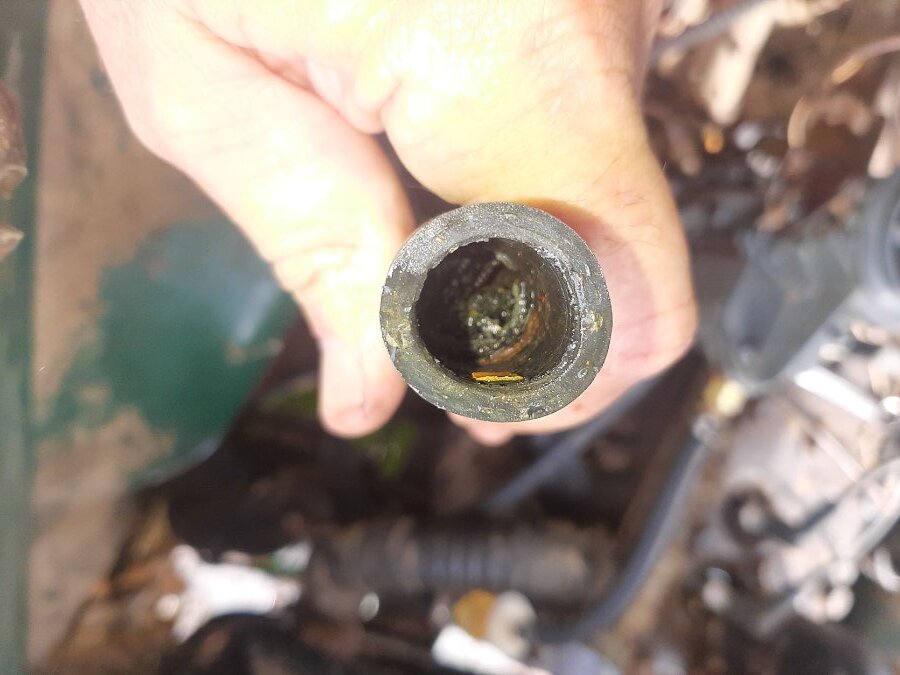
Pretty good day today. Got the water pump in and ran her for about 45 min from the temp gas tank. Smooth running, not much noise, No water leaks. ? Smoke coming out of the tailpipe at idle but I put a lot of oil in so we'll see if that clears up with a couple more heat cycles. ?Who am I kidding LOL. Put a brass plug in the bypass and clamped her down. Should be good for now. I hear there's nothing more permanent than a temporary solution so I guess we'll see LOL. The bypass hose isn't connected on the water pump side ... just butts up against the "T". I never really paid attention but is this the stock radiator? Sorry it's not a great pic. I'm thinking it's a re-core with the original tanks?. Still in total disagreement with duplicolor's idea of "semi-gloss" but I guess I just need to drop it. HAHA Freeze plugs on order but I'm encouraged by the lack of leaks and how the engine warmed up. Decided to spend the rest of the time on the gas supply to hopefully have an autonomous vehicle ... brakes later. Forgot to take pictures. The restriction in the system looks to be somewhere between the inside of the tank and the fuel outlet. I blew compressed air from the outlet and I pressurized the tank and nothing was getting through the outlet ... good solid plug. ? I put a probe into the outlet and it only went in about an inch and then felt solid so I'm thinking there's some sort of pickup in there. The outlet is about 3 inches above the tank bottom so it makes sense there's something that goes down to the bottom after the bung. I didn't see anything about the tank in the manual and I'm pretty sure I that's not the original tank anyway so I'll just have to drop the tank and see what I can see. ? Fun!! ?? My dad got inspired and decided to shine her up a bit. Not sure that's the direction I was going but hey, he's having fun and I guess there's no changing it now.? Wonder if he's going to do the whole thing. I have a feeling I'll be the one spending the quality time with a buffer LOL ... but at least it's a group project now which is freaking awesome. My dad Just turned 87 and has been an import guy since his 20's ... We'll get him converted yet. ?
-
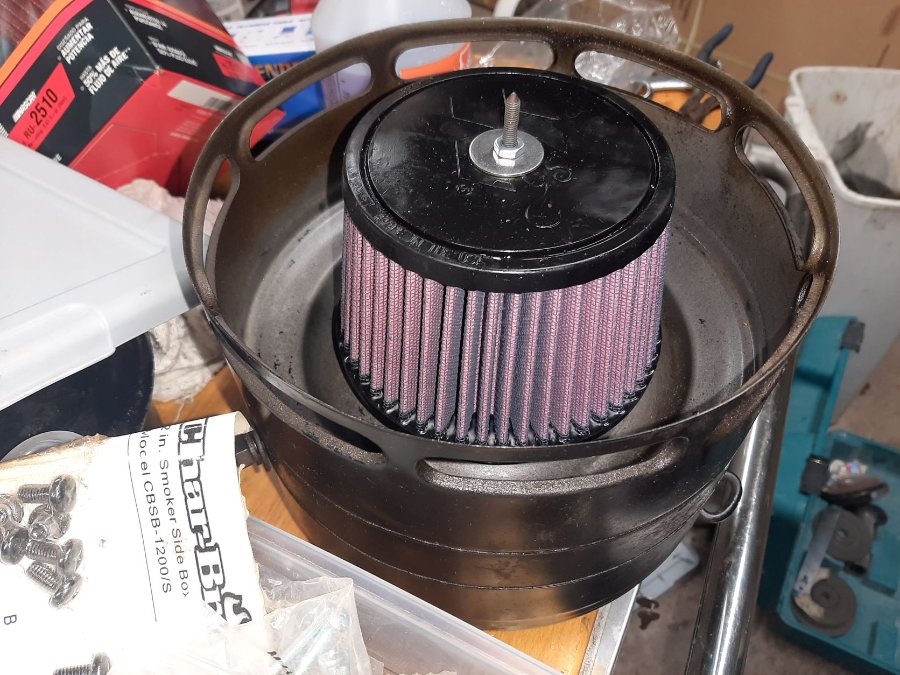
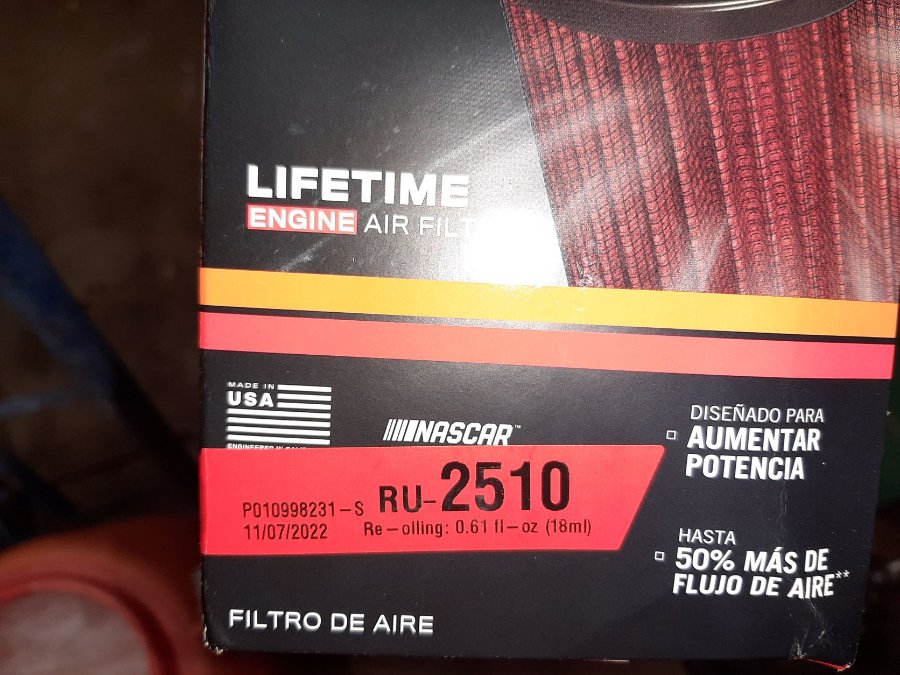
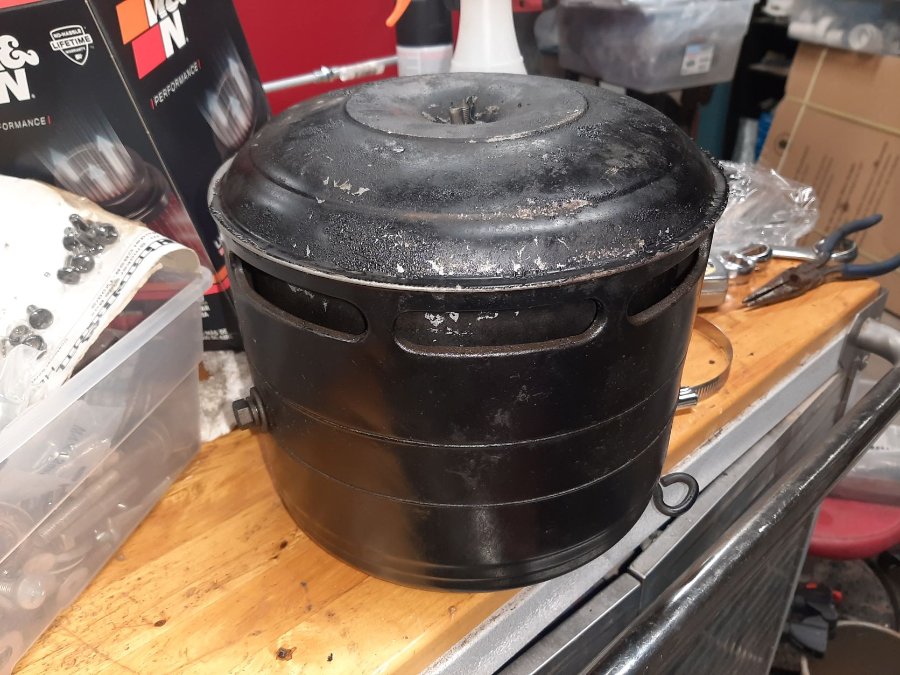
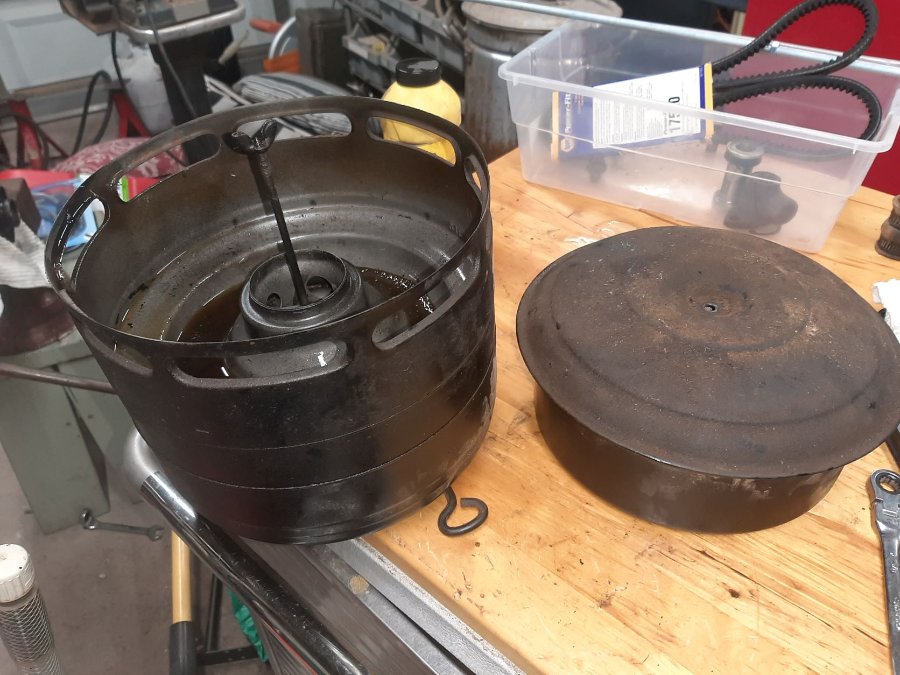
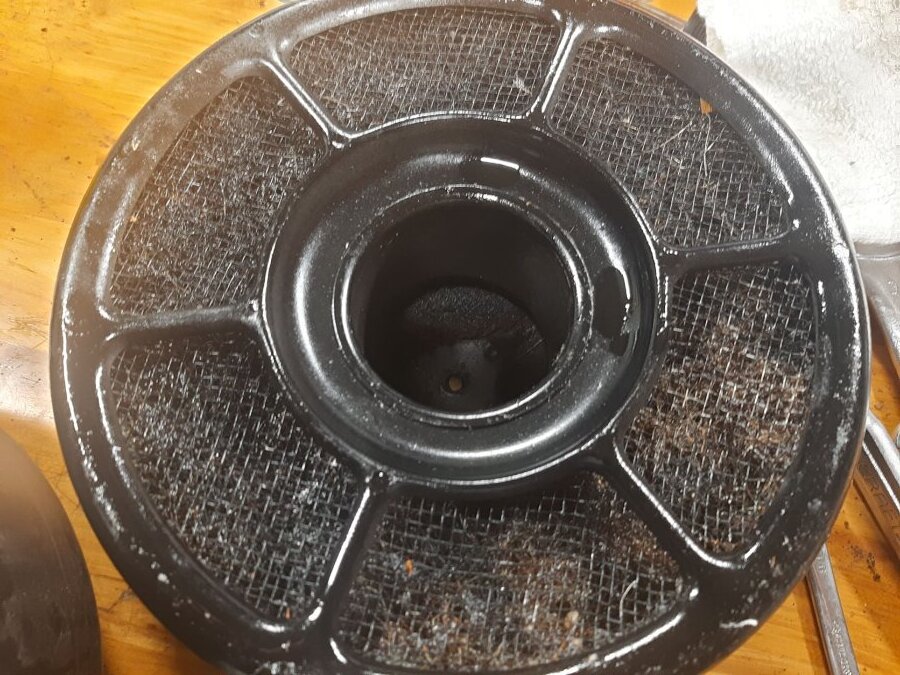
So the air filter install went great. I cut out the bottom of the top piece and got all the stuff out ... I can't believe how much filth was in there. The filter was a little shorter than expected so the top piece isn't going to hold it down but I found a nut and washer and there's enough threads on the center bolt to hold her down snugly. Used a K&N RU-2510 if anyone is interested. $50 off amazon. Guess I'm going to paint the housing as well ... don't think I can get away with not sanding it like the other parts ?. I hate sanding. Here's the inside with filter installed and the hold down nut in place. I figured a nut was way better than a stack of washers or a spacer to hold it down which was my first thought ?♂️. The filter looks square in the pic but it's trapezoidal. I drilled the hole through the top a little small so I could get a good seal. The bottom of the filter hugs the expanding contour of the bottom of the housing and the nut is pretty snug so I don't think there will be any leakage. The rubber at the top is quite thick and stiff but I'll have to check in a couple months and if the rubber is starting to sag, I'll have to fabricate a bigger hold down. No idea how hot it gets in there but I'd assume the rubber is designed to handle it. Not going to go 1 million miles without good, heat resistant rubber LOL. No one's the wiser. Here's the filter box if anyone needs it. Going to tackle the water pump/cooling system tomorrow and maybe run her for more than 3 minutes. ?
-
THX for the info LazyK. Makes sense that yours is the same because I suspect mine is the cleaner off the '55 Plymouth 230 that's in it. I saw your thread but it was one of many that had an air cleaner that looked like mine but no part number listed for the filter. The filter I bought has a rubber top so if my calculations are correct, all I'm going to have to do is possibly trim a little rubber off the bottom flange, poke a small hole in the middle of the top rubber part for the hold down stud to go through and be off to the races. ??
-
A grinder and some paint makes me the welder I ain't ? ?. Flap wheels with rounded edges have really upped my welding skills lol ... or at least helped me see the porosity I was leaving underneath ?. I got the air cleaner all cleaned up and decided that the oil bath is gonna have to go :(. I kinda wanted to keep it but it's just not gonna happen with what I've got. I looked at a bunch of threads here about the conversion but from my measurements, the elements people listed are going to be too tall for my housing. There's a big, empty chamber under the bottom of where the oil sits (with some sand in it that looks like I'm never going to be able to F'N get out ?) and I only have about 5 inches top to bottom. Anyway, I found a universal K&N that looks like me and a razor blade can make fit. It looks a bit small but I can't imagine I'll be pulling much air so I'm sure it'll be fine. Should be here fri so hopefully I'll have exciting things to post by then.
-
Thanks for the info guys. People sure do like their abrasive wheel grinders lol. I'm surprised there's not more garage fires now that they've become the duct tape of DYI metal fabrication. I think the original air cleaner just looks cool so I was trying to keep it ... at least short term. IMHO that guy's conversion takes all the coolness out of the stock housing but he seems to like it so to each their own. What I think looks even more badass and old school hot rod is a dual carb setup so that's the long term plan for fuel delivery ... if I keep the truck long term. I think I'll try to needle nose that pad outta there and then throw her in the ultrasonic cleaner and make a decision from there. I have a suspicion that that dual carb $$ will be needed to get my brake and fuel supply issues sorted. Worse case scenario, I'll grab 2 new air matching air cleaners and use one for now. I considered a paper filter early on but I'm trying to keep chrome under the hood to a minimum ... air cleaner manufacturers apparently don't share my sentiment lol.
-
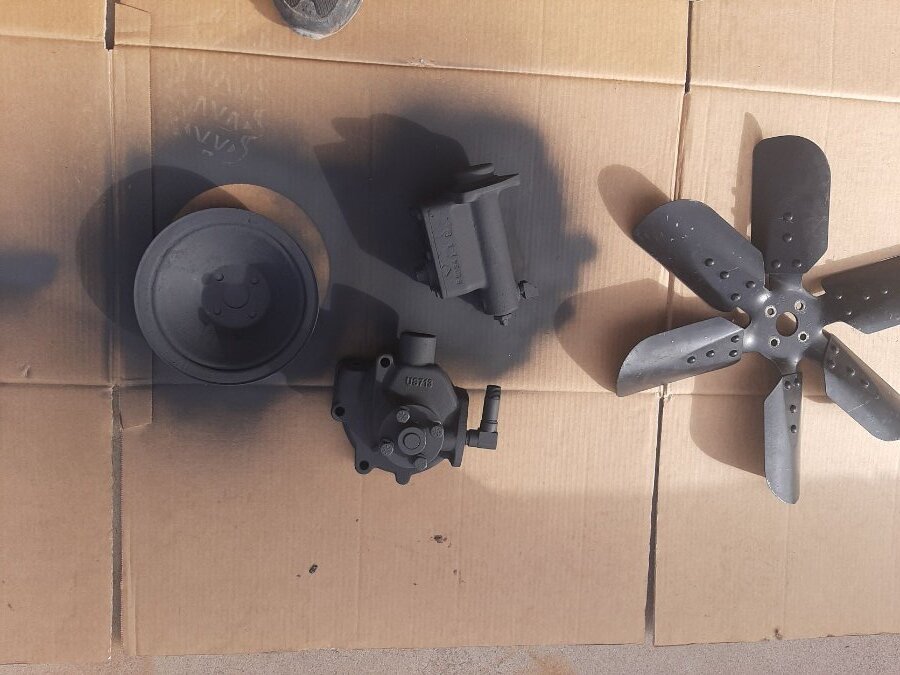
Thx for the info JB ... I wish my dual horns were that cool ? Got a couple hours in today ... decided to paint the parts. Thought flat black might be cool. I was wrong LOL. I'm posting this pic as a PSA to help anyone thinking this is a good idea. ? There were about 4 layers of paint on everything so I really I should have sand blasted them but I need to get up and running fast so that's going to have to go on the do it someday list. I grabbed some "semi-gloss" duplicolor engine paint and got them black and shiny again. I have a much different idea than they do about what constitutes semi-gloss but it'll do for now. Hopefully I'll have time to get the parts on tomorrow and get a better idea of what the cooling and brake situation is. Speaking of the brakes, my master cylinder kit was missing a piece that's in the manual's exploded view ... but it wasn't in the master cylinder when I took it apart either. There is a "piston washer" between the piston cup and the piston in the drawing in my manual. I can't tell if it's rubber or steel but it looks flat in the drawing so maybe a thin steel washer? Since it wasn't there before, I put the MC back together the way I found it and it's squirting fluid and not leaking so I guess we'll see but I'm hopeful. Ran into 1 more problem ... the air cleaner. So I'm assuming this is from the Plymouth engine because the one in my manual looks different. I'm just talking about the top part here. The one in the manual looks like it comes apart easily. The bottom part (of the top piece) of mine looks to be 1 stamped piece with a sleeve pressed in the bottom and a lid crimped on the top ... there's a seam on the top that looks folded over to me so I didn't want to pry too hard and break it but it certainly could just be stuck. Anyway, I wouldn't have a problem just soaking it in some kerosene and going on my merry way but if you look in the center hole, there is a fibrous pad at the top that is deteriorating. I definitely don't want to send that 1 bit at a time through my engine. It looks like I can probably get it out (in a few pieces) but first, I wanted to see if anyone knows if there's a way to get the top apart so I can clean and inspect it properly. Here's a close up of the top and what looks to me like a crimp. As always, thanks for reading and any help would be appreciated. Buck
-
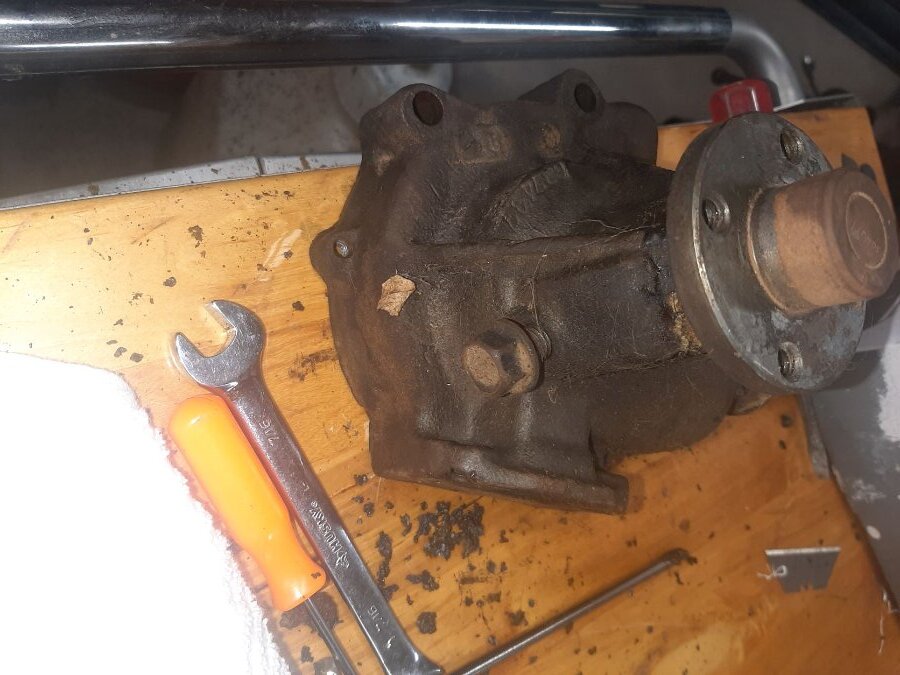
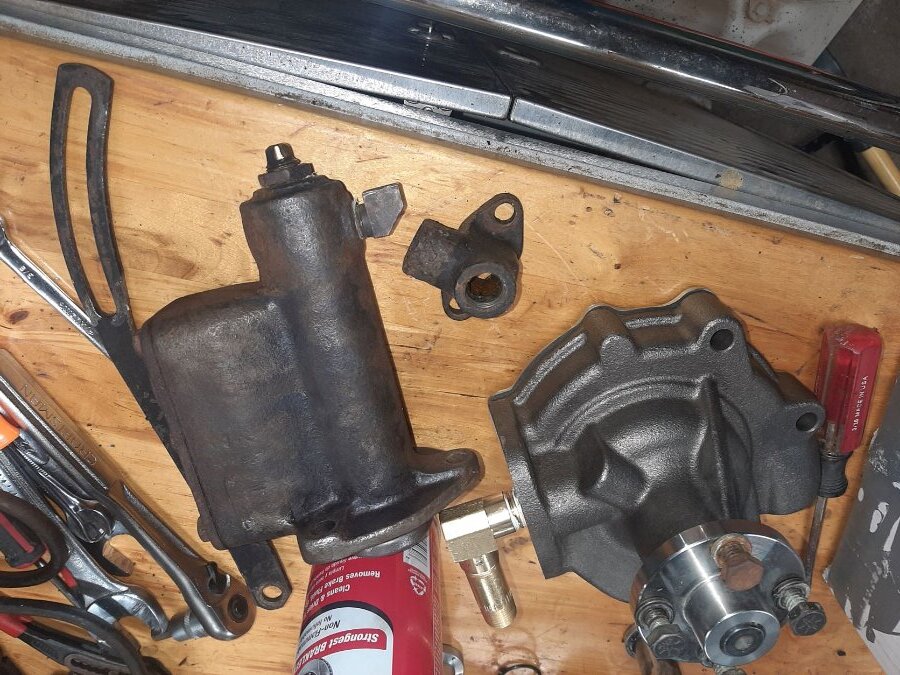
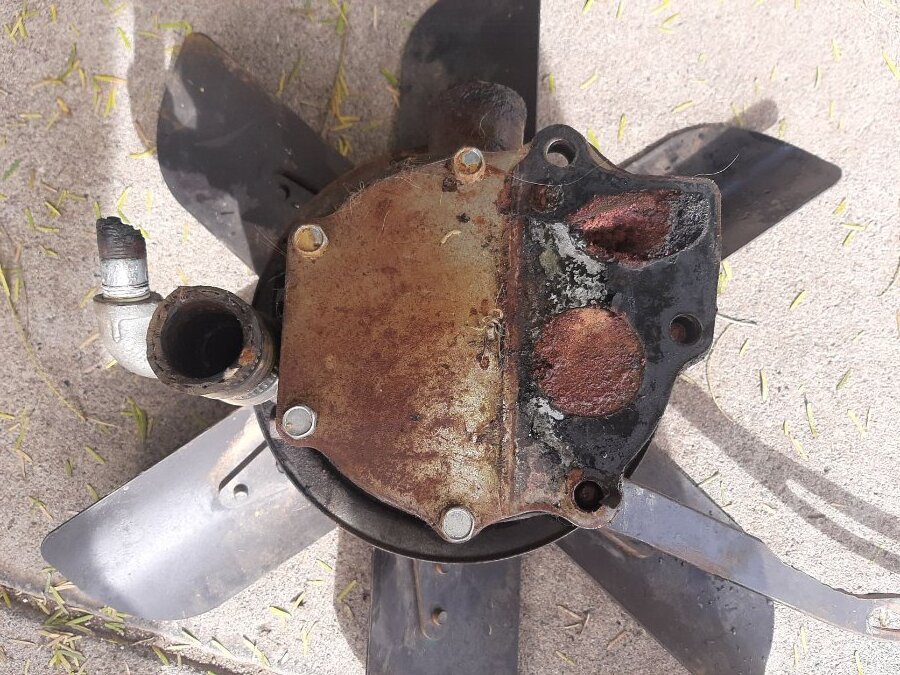
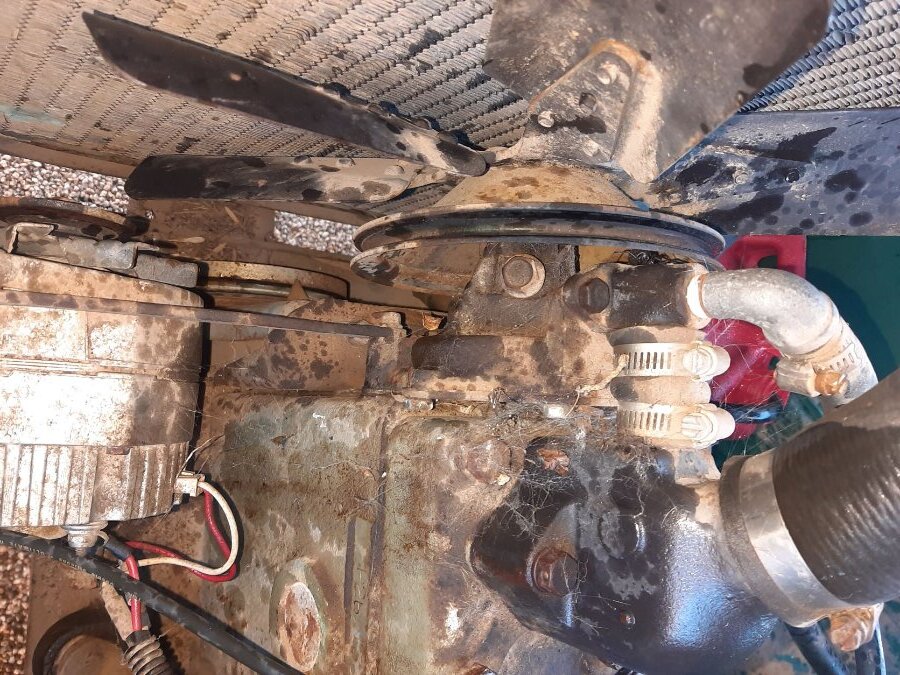
Did a little bench work today. Can't imagine why the water pump froze ?. Kinda glad it froze before I pumped all that shmoo into my engine. Hopefully a lot of that crap in the lines is chewed up impeller and corrosion that stayed local. Someone was wondering about this big bolt near the water pump shaft. I took it out and there was a bunch of grease in there so I'm assuming it was there so you could grease the water pump bearing? Gotta keep the inside clean for that grease to be effective. ? When I bought this vice my girlfriend told me I already had too many vices and said "you'll never need a vice that big" ... WRONG! LOL Buck ?'s Ultrasonic cleaner ... true love 4 EVA!! To paint or not to paint ... thats IS the question. So the water pump had threads in the pump body on the heater output port so I'm going to ditch the heater distribution housing and go straight to the heater from the pump threads. Then plug the thermostat housing bypass hole until I can get a new housing. Looks like one of the distribution housing bolt holes goes into the chamber where the water will be but I'll put a couple short ones in the threads and seal her up. I had to hone the brake master cylinder a little bit more than what I wanted but them's the breaks. We'll see if it leaks of if I'm going to start strapping Toyota parts to my truck LOL. I was thinking about when I ran the brake lines in my caddy and I was broke and had really crappy tools. I bought me a new bender and a sweet flaring tool so hopefully it will be better this time. Also got some copper nickle tubing some maybe that will help. My main line is 5/16 and the rest after the "T" look to be 1/4. I just need a few feet of 5/16 and it was going to be a week and $60 with no fittings for the good stuff so I went to napa and got some stainless. That old line was pretty beat up so I think I'd feel better with the stainless there anyway. Interested to see your fuel tank thread Los-Control ... I'm sure I'll have a thing or 2 to say as well when I get into mine. Honestly, I'll probably get a new one unless mine is spotless because I don't want to deal with fuel supply issues ever once I redo the lines and pump. I already bought an electric pump in case I needed it but ended up not needing it to get home ... but I will be using it. Hopefully get the rehabbed parts installed in the next couple of days and see what happens ??
-
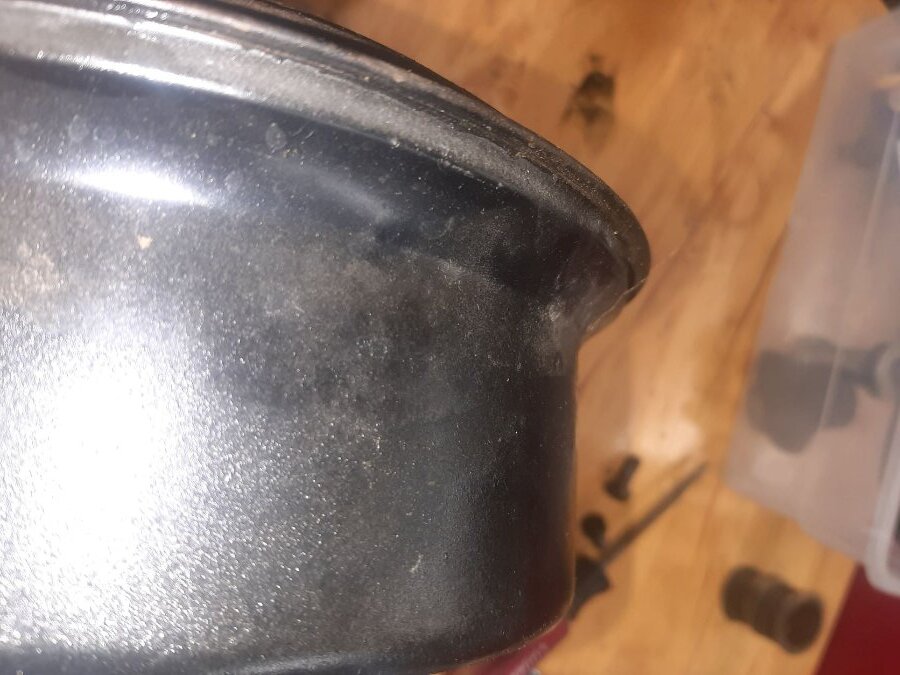
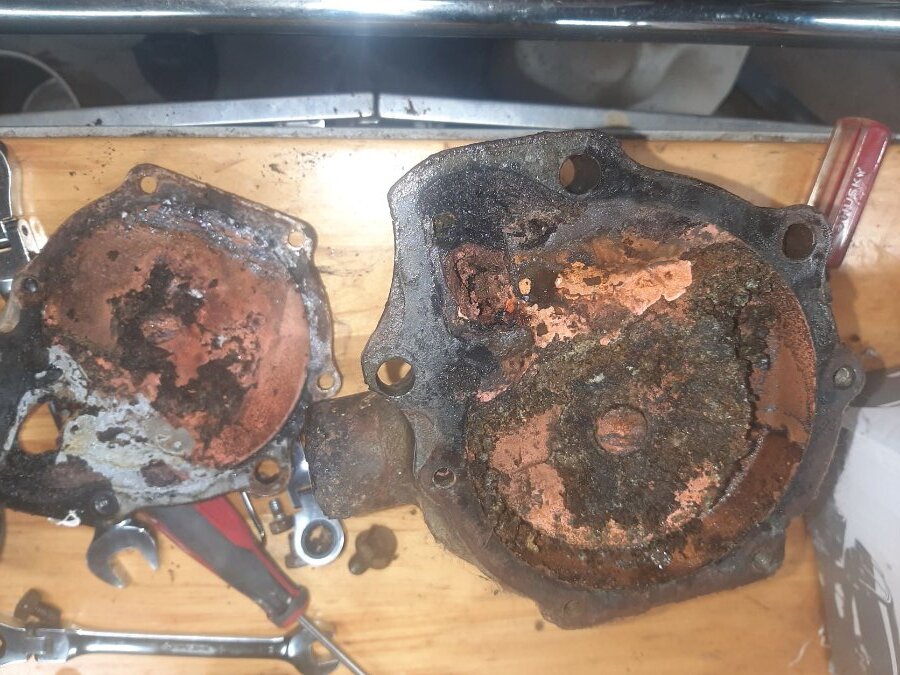
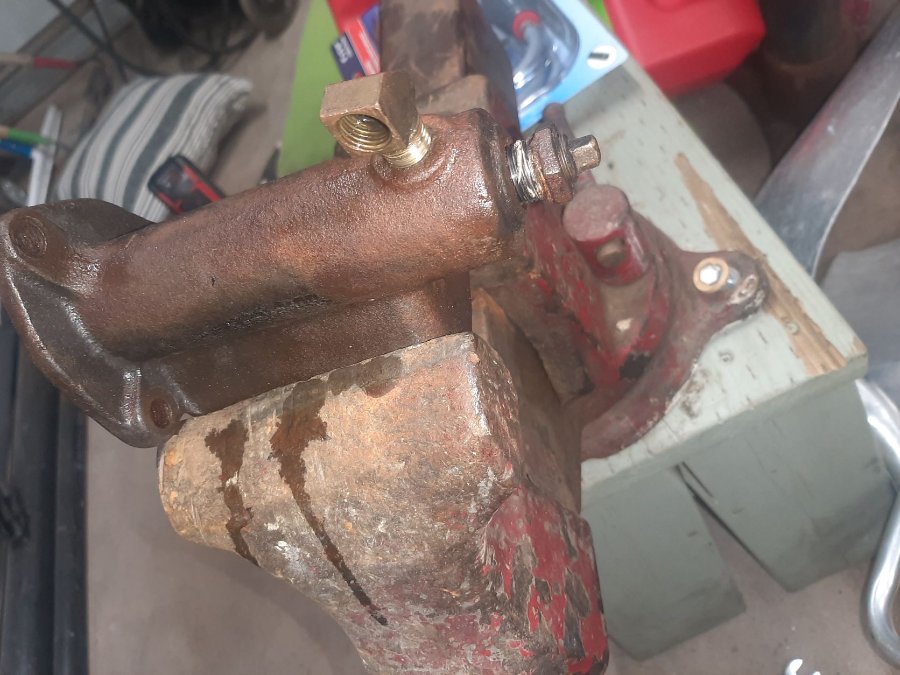
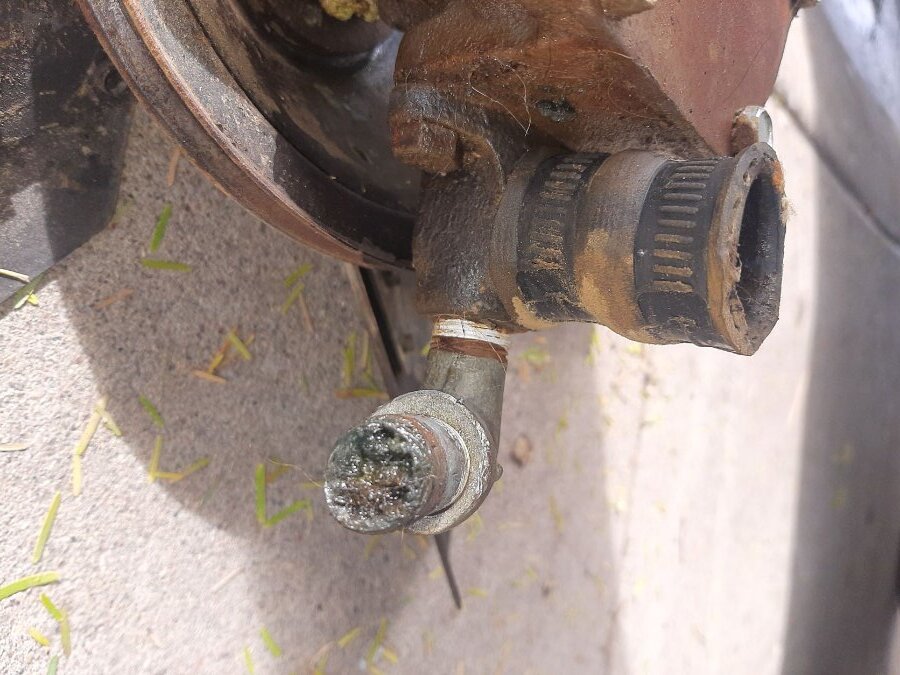
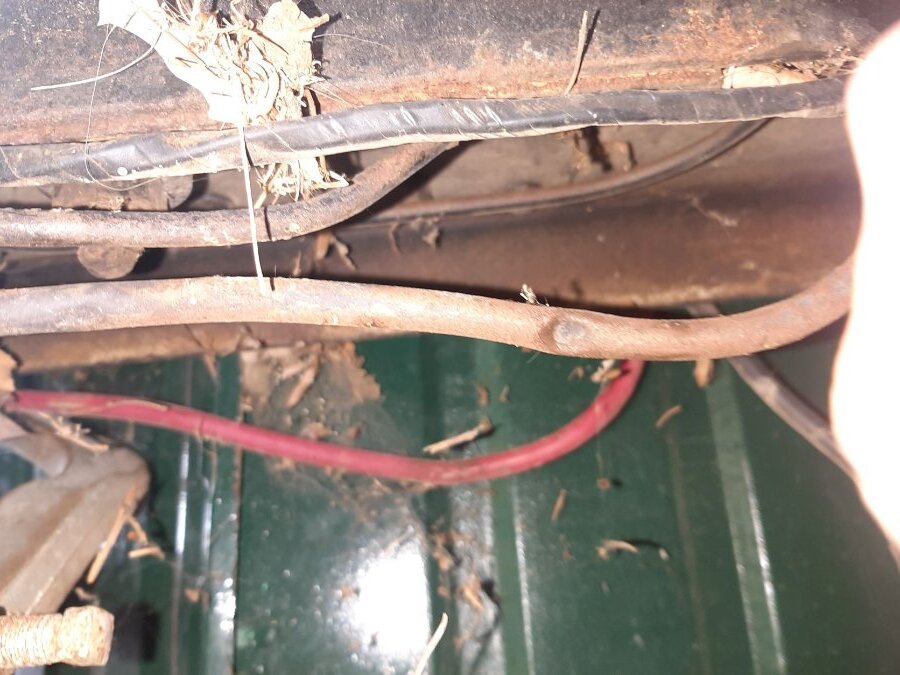
Did a little work today ... things not looking great LOL. Pulled the water pump. Galvanized pipe? Are these fittings usually galvanized pipe because that seems like a recipe for getting a bunch of crap plugging up you heater line lol. Feels like there's a 2" slug of crap in the heater hose as well. I'm not sure if this is copper stop leak or part of my distribution tube but this can't be good. Hard to tell from the pic but I bet the copper buildup is at least 1/8" thick. I had limited time and tools today but I have a feeling there's a hole in the radiator they were trying to magically fix with Goo. Don't get me wrong, Goo has saved me a couple times but I always get it out and properly fix the leak when I get home. Hopefully it worked but it seems to have been plugging up the engine as well as the leak ... awesome. I'll put some pressure in the radiator this weekend and see what happens. Hopefully the radiator shop I used to use is still in business. I'm going to pull the radiator and take a look at the distribution tube as well because I can't imagine it's not just as plugged up and I'm going to need every bit of cooling I can get in the summer here. Hopefully there's enough room in front after I pull the radiator to get the tube out without messing with obstructions in the front. I have enough on my plate as it is. Speaking of the cooling system ... so I have a '55 Plymouth motor which I'm told has a internal heater bypass. I don't have the thermostat housing and heater fitting to bypass the external bypass (so to speak). I plan on getting the correct housings at some point but for now, is it OK to have both bypasses working? If not, I was thinking I could get a brass plug, shove it in the bypass hose, and capture it with a hose clamp to plug up the bypass ... or maybe try to find 2 rubber caps and clamp both sides off? Also tried to pull the brake master cylinder. Mounting bolts weren't too bad but the brake line fitting to the MC isn't budging. I didn't have a tubing wrench so I didn't give it the 'Ol full pull but I doused it with PB blaster and I'll bring a torch and see if I can get it out later ... but I'm not too worried about the nut because it looks like I'll be replacing that brake line. I found this ?. Yeah, that's the brake line that goes from the master cylinder to the front/back distribution "T". WTF? I can feel an equally gnarly, similar sized indentation on the other side. This seems to have been intentional?? It's very symmetrical. Just weird. Anyone know why someone (who's not your enemy LOL) would do this? So I guess it's time to gear up and put my big boy pants on and start the plumbing "fun". Possibly my least favorite thing to do.
-
continued here
-
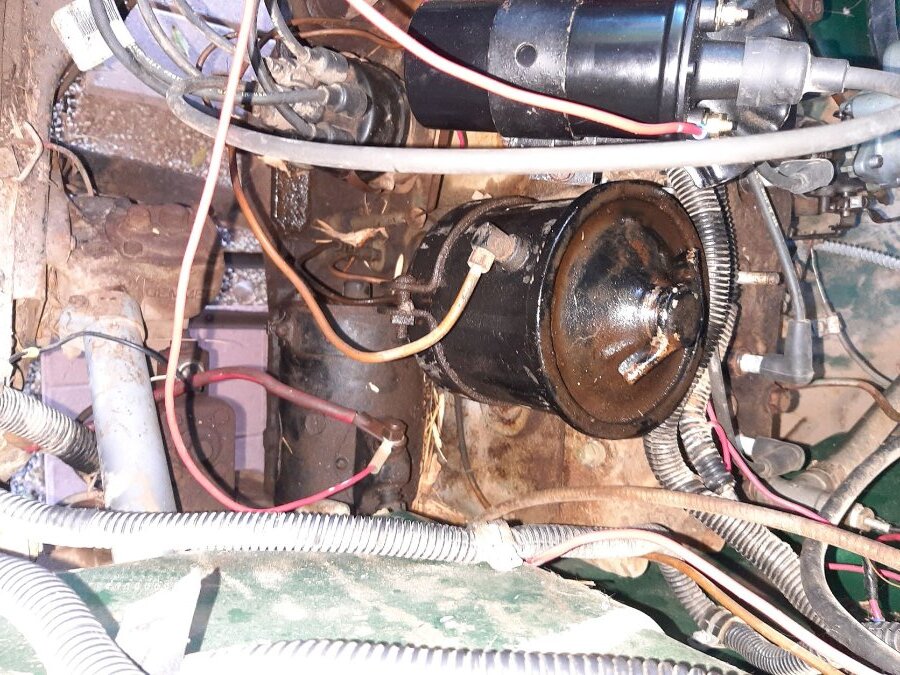
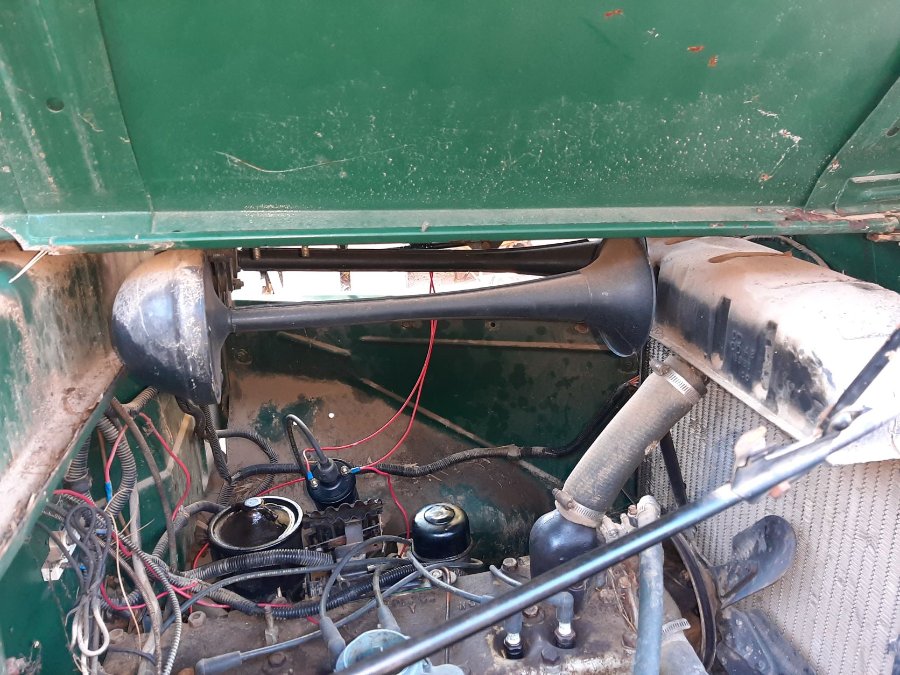
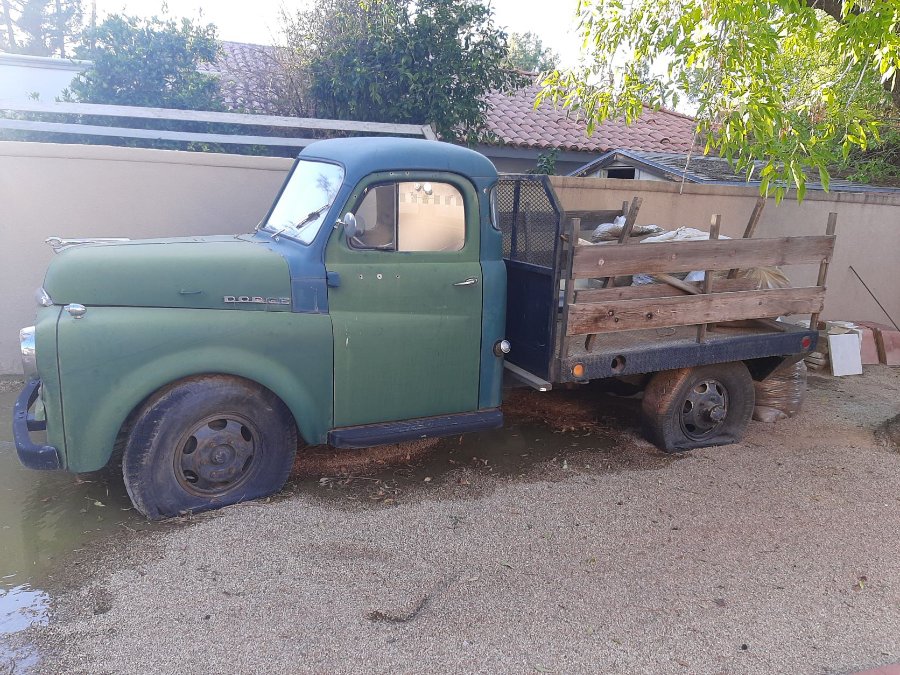
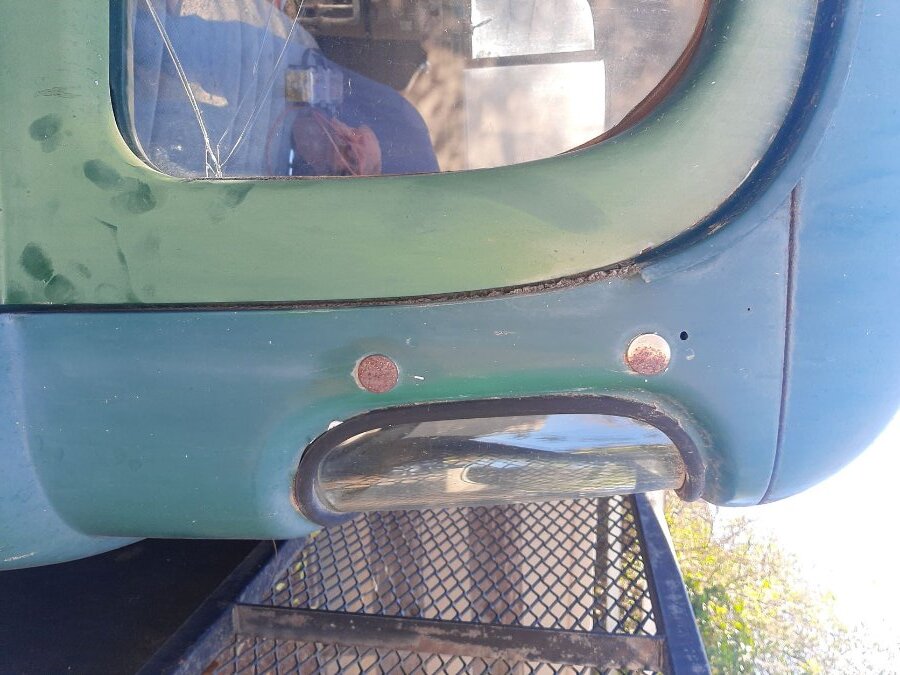
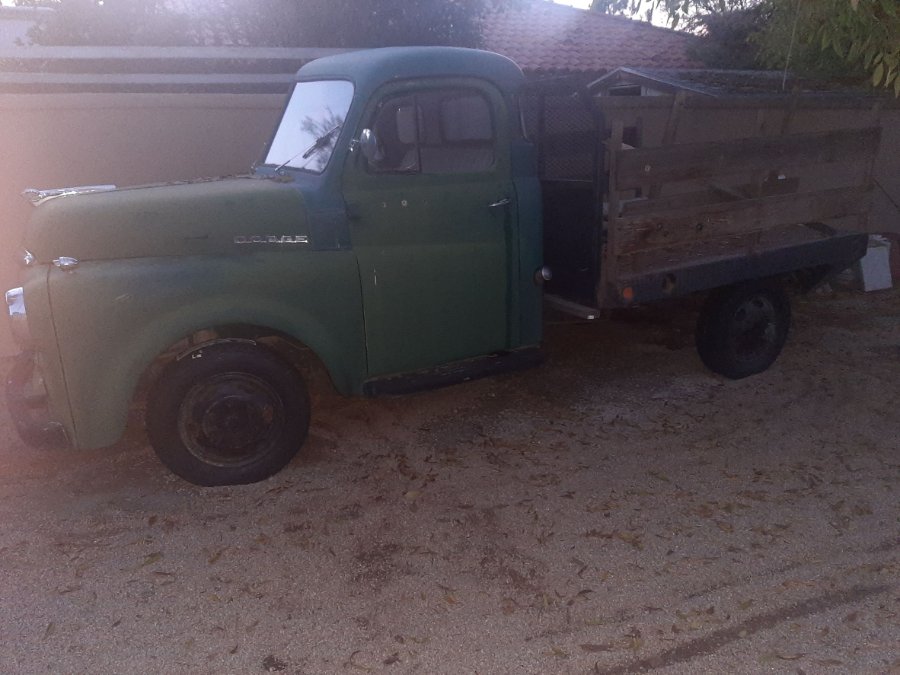
Hi all. Been posting a bit about my new truck and figured I'd better start a new build thread and keep all my ramblings all in 1 place LOL. So I bought a 1950 B2D flatbed with a '55 Plymouth 230 in it. Body is in really good shape. Was last registered in '06. This is a customer's truck so I saw it running a while back but it's just been sitting there collecting dust ... and rust in the gas tank lol. If I had have only known it would be mine 15 years ago, things would be different ... but I digress. Here she is. So first thing it needed was tires. Had a hell of a time trying to find someone to work on them and the customer was pressuring me to get the truck out so I bought some cheap tires/tubes/flaps off the 'ol interwebs and just changed them myself. Not the easiest job but good to know I can do it again when the time comes. A couple of the rims are not in great shape so I left them as-is. A forum member pointed me to a junk yard in the state that had a 2 ton wrecker with the rims still on it. I snatched 'em up and I should have enough good rims between the 10 I have for a full set of duallys and a spare. The electrical situation is a total mess. There was a 6v battery and 6v coil (not hooked up) in the truck but there's also a ballast resistor and a trailer light hookup that's wired in so who knows? There's an unmarked alternator installed but the water pump is frozen so I haven't been able to fired it up and check the voltage off of it. I've decided I'm going 12v and once I get it roadworthy, I'm going to change out all the wires and have a fuse/relay/junction box and make her all nice and purdy. The gas tank looks newer and is painted awful nice LOL but the cap was barely on and leaking and there was rust on the drain plug and in the fuel pump bowl but there wasn't any water in the tank that I could see when I drained it. There's no gravity flow from the tank to the pump inlet so at the very least, I'm going to run new lines and clean the tank but I have a feeling a new tank is in my future. I rebuilt the carb, put in a new battery, dropped some oil in the spark plug holes, put the wires on in the right order, gapped the points, wired up the coil, filled her up with oil and water, shoved a gas line in an aux tank, and after a few mishaps, got her running under her own power. The brakes in the back moved but were very tight. After I backed off the minor adjusters and went forward and back a cope times, they loosened up enough to get her on a tow dolly. Brake pedal hits the floor right now but I don't see any evidence of wheel cylinder leaks. The master cylinder was bone dry. I put some fluid in but it looks like the seals are totally gone. So here's where I'm at now. I need cooling, brakes, charging, and gas from the tank to have a truck I can use to go buy more parts LOL. I bought a new water pump so hopefully the cooling system is not a huge issue but we'll see when we get pressure. A couple of the freeze plugs look a little weep-y but it looks like there's good access. Once I get that in, I can get the belt on and figure out the alternator situation. Plan is probably to run new wires and re-use them when the big wiring job happens. I bought a master cylinder rebuild kit. I'm hoping it's just the master cylinder that's holding everything back but with the dragging back brakes, I'm not super hopeful. I've been reading a lot about master cylinder conversions and I'm probably going to put in a 3 hole Toyota cylinder (unless I hear bad things about it) and new brake lines if the one I have is totally gone but I'm hoping I can worry about the brakes at a later date. Going to drop the tank and blow out the gas lines but I'm pretty sure I'll be spending some quality time with the tubing bender ... So I do have a couple questions. #1 does anyone know what size the bolts on the top of the carb are? The carb is a Ball and Ball. One of my bolt is buggered up and chewing the body every time I have to remove it. I haven't been able to find a bolt that fits. The guy at Napa was trying to convince me it's a metric bolt LOL. #2 Brakes. I did a front disk conversion on my caddy and it was the best upgrade I did. From what I understand, the front disk kits won't work on the stock 1 ton axle. I'm thinking I'm just going to repair what I have if I can but if I have to do a full rebuild and it starts getting expensive, would the money be better spent on a new rear end with disks and an upgrade path for the front later? I've read about a lot of options but it's hard to say which is best ... or good enough. I would like to road trip in her eventually. #3 are these the stock horns? #4 my oil canister is leaking around the middle screw. I can't figure out how to get the screw out to figure out a way to stop the leaking. I read a thread about the oil filter canister but I think mine is from the 55 Plymouth motor because the screw is stamped. I'm thinking I might just get a thread on filter but that canister is pretty cool. Anyway, I can't really see in there to see what I need to do to get the screw out. I was just going to stab some needle nose in there and start unscrewing but I figured I'd better ask first LOL. #5 What is the purpose of these chrome/rust buttons for? Thanks for reading. This site and members are the best!

-
Got sick but I'm back in the saddle now. The truck is now at my dad's house. He's retired so I figured I'd leave it over there so he can tinker when he has the energy. I knew something was up with the carb float. The carb was both overflowing and not filling ... seemingly randomly ?. I decided to grab the old float and needle valve and see if the new parts were the problem. Since I disassembled the carb before I got the kit, I didn't remember that the float was a loose fit on the pivot pin. The new float was a tight fit around the pin so the pin had to move with the float and was sticking wherever I last left it. It's funny when something like a carb that has no gas sometimes and too much other times makes absolutely no sense until you find the problem and then it makes prefect sense. Anyway, just a quick PSA about how the socket for the pivot pin on new floats need to be opened up a bit. Once that was solved, I dropped a gas can in the front corner of the engine bay and hooked that to the mechanical fuel pump. Turned her over and the float bowl started filling. Looking good. As for the coil, I had put a switch on it so I could turn it off ... for the exact reason that I didn't want it constantly on and then overheating and blowing up ... but then I got busy and forgot to turn it off ?. I suppose it's a good lesson to learn now instead of finding out when I'm on the road and forget to turn off the key. Once I got the carb fixed, gas supplied, and the new coil installed, I flipped the ignition switch, pressed the gas pedal nub a few times and she fired right up and ran under her own power from the tank. Sweet! I loosened the rear brake minor adjusters as suggested and she moved well enough to get her on a tow dolly. A bit nerve racking to drive her up without brakes and a working gas pedal but got her loaded without incident. I bought a new water pump, master cylinder rebuild kit, and a new gas pedal. Hopefully I'll be able to get her to the point of being able to make a quick trip down the road soon. I'll attach a couple pics. I'm at the point where I think I should start a new, better named thread. I'll reply with the link once I start it. Thank you again everyone for the advice, it's been invaluable.
-
Well, a mixed bag of results this weekend. The good news ... I filled her with oil, gapped the points, put the wires on the right way, connected the coil, strapped on the carb, shot some gas in the air horn and she it fired up 1st try (well second try ... 1st try with the coil wire plugged into the distributor LOL). Filled the float bowl, jumped in and I got her moved forward about 5 feet. The brakes were still dragging but enough movement to get her outta there. Things were going so well that, instead of grabbing the trailer and hauling her home, I decided it do more work there LOL. That's when the problems started. Decided to tune the carb a bit and after about a minute, I noticed oil was overflowing around the sides and top of the filter housing. Took the lid off, no gasket. Decided to call it a day. Today, I bought some thin rubber mat and made a gasket for the oil filter housing and I put a switch on the coil wire and fired her up. Water pump instantly freezes. Scared me because that last belt squeal before I turned her off sounded pretty scrape-ey but once I realized it was the water pump, things were good again. I was having a hard time turning the engine over by hand with the plugs out which was concerning but now I think it was the water pump all along. So I decided to see if I can get fuel from the tank. Put new gas in the tank and notice there's a lot of rust in the neck. Pull the glass bowl on the fuel pump ... even more rust. Get her started with gas in carb and I can feel the pump pumping but nothing coming from below. I figure the gas line between the tank or the pickup is plugged. Not fun but not a killer. Get her running from a tank in the engine bay but she's struggling. Seems to be a float issue. As I'm working on the carb, the coil goes pop and blasts oil everywhere. UGH! So that's where I'm at. I'm not going to dick around anymore over there so I'm just going to focus on about 3 minutes of run time to get her lined up for the trailer. So I have a few questions if anyone cares to answer ... I'm going to go on a google/forum search but I'm always up for advice. First off, the coil. What should I put in there? I really don't want a ballast resistor hanging off the wall so is there a coil I can get that's 12v that I can just plug in and not worry about? I have zero experience with coils ... I converted my caddy to electronic years ago. I kinda like the thought of keeping the points in there. Oil filter canister. SO the rubber gasket worked well but oil is still seeping out of the top. I'm assuming there should be a gasket there. IS there an easy way to get the screw out of the lid? I didn't see anything obvious. Water pump. Not sure which one to get. So the truck is a '50 but the engine ID came back as a '55 Plymouth 230. I guess this question goes for all the engine parts. Should I be looking for parts that fit the engine or parts that fit the truck? ... or are they all the same? Pic attached of what's in there right now. . Fuel pump. I'm thinking I'm going to, at the very least, put in an aux electric fuel pump. It gets really hot here and it's be nice to be able to fire it up if the gas boils out. It's going to be so much easier to strap one on for now but I want something that'll be good for later too. So if I get one, what should I be looking for? Gas pedal. So all i have right now is a nub sticking out of the floor board. Can I find a pedal easily? how does it mount? does it float? I don't see any obvious holes but I haven't had a chance to do a proper cleanup inside. Once again, thanks for any help ... this forum has been great!

-
The electrical situation is a mystery right now. It looks like they might have been in the middle of a 12v conversion and gave up. Lots of wires flapping in the breeze. I've decided I'm going 12v and I'm going to replace all the wires ... I do electrical work by trade so not a huge deal for me. There is an alternator in it right now. No markings anywhere on it but it's silver and a 3 wire. ? The voltage regulator is LONG gone ... there aren't abandoned wires or even faded paint where it should be ... I'm assuming the regulating was happening in the alternator now. There is a balast resistor on the firewall. Weird. The coil is 6v. The battery I took out was 6v. It has newer probably 2 gauge battery cables. I was afraid of damaging/burning things so I disconnected everything except the big cables to the starter and ground when I tested the starter. When I try to get it going, I'm going to run a wire straight from the battery to the coil and leave everything else disconnected until I get a better idea of what was done and what needs to be done to the wiring. Thanks for the specs!
-
OK, change of plans. Since I need to move her forward, I figured I might as well get her going and take her easy ... parking brake is sticky but appears to work. My Dad told me to put her in gear and fire up the starter but I think that's a last resort. He used to own a bunch of Plymouths an Dodges in his 20s when they were new so maybe he knows the capabilities more than me? He was telling me some stories of abusing his parents cars today lol ... but I digress ... I Got all the crud out of the spark plugs holes and got the plugs out ... #4 needed a bit of the 'ol in-out-in-out to come out all the way but I think the threads are good. 1-3 were hand tight and the others were pretty loose but the hood has been down and it doesn't rain here much so probably no water inside. Dropped some oil in the holes. Disconnected the electrical monstrosity that was once a wiring harness. Dropped a 12V battery in, connected the cables, pressed the switch and blew oil all over the inside of the hood. SWEET! Took off the distributer. Pugs were on there 1,5,2,6,4,3 ... can't imagine why she wouldn't start for the last guy. Points and condenser look brand spankin' new ... didn't have a feeler gague but the gap looked reasonable. Cap and rotor look used but serviceable. Pulled the plug on the gas tank, 4 gallons of America's purest varnished gas came out but no water that I could see ... WINNING! There was some rust on the plug but that plug looks to be original and I'm pretty sure the tank isn't. Not a drop of rust or debris that I could see came out so that's good. Looked in the oil filter canister ... no filter :(. Oil in the canister was dirty but I've seen worse. Checked the dipstick, Nothin! Went to drain the oil to see exatly how much is in there and the drain plug is directly over the front crossmemeber? WTF? I didn't have all my tools anyway and there's a bunch of leaves so left it for now. Tomorrow, heading over with some oil, some feeler gauges, a 12v internally resisted coil, a rebuilt carb, a can of gas, some wire and connectors, and an outboard gas can in case the fuel pump took a dump. We'll see what happens. Took a bunch of pics but no time to upload. I'll do a better post Sunday ... maybe a new thread or I'll try to rename this one. I question about spark plugs ... there were Delco R45s in the engine and I found the old Delco 45s on the floorboard ... rusty on the outside but the electrodes still look really good. Does it matter which ones I use? I was thinking I'd use the 45s for maybe a bit more spark but IDK with this whole 12V swap. Also, is there supposed to be a washer on the plugs. R45s didn't have one, 45s do.
-
Don't go to the the site ... read the thread and a way down are links to some of the files that used to be on the site including a wiring harness one I believe you're looking for. I have the files if you're still having issues but I downloaded them from the links on that thread not 2 days ago.
-
Just saw this the other day. Should have what you're looking for.
-
OK, OK the tires look absolutely terrible on the truck but they were $60 each and I just needed something to move her ... first problem solved. I'll be putting 7x16 duallys on in the future but that'll have to wait. So I was planning on trying to get her started and drive her out but in true "it was running when we parked it" fashion, the brakes are out and the previous owner wants it gone. The tires spin but are dragging terribly. Unfortunately, the truck is in gravel and there's tons of debris under it so not great access. I'm going to try to back off the shoes as much as possible and hopefully get it out without too much trouble. There's a tree directly behind it between the gate and the truck so I need to get it forward ... but there's also a huge tree in front and I was going to try to winch it forward enough with a comealong to get a good enough angle to drag it backwards onto a trailer so the better she rolls, the better for me (and the yard cleanup). I didn't have a chance to take a good look at the brakes because it was getting dark and my service manual is on its way so I don't know what I'm getting into with the brakes. I read a very good article about brakes on this forum but I'm wondering if the brakes on the 1 ton are the same as the other cars/trucks. The rear axle definitely has bigger studs. I'm going to try to get it in the next couple of days so if anyone can shed some light on how to loosen up the shoes a little more, I'd really appreciate it. Also, now that I see the condition of the truck, I'm thinking I'm going to be doing a lot of work and have a bunch of questions and pictures to share. Should I start a different, more appropriate titled thread?
-
Also, a HUGE thanks to Mr. 9 foot box. He pointed me to a junkyard fairly close that had a full set of (almost matching) dually rims. Not sure what's going on with the one 3 hole ? but the '48 2 ton had a homemade wrecker bed and a V8 in it so I'm sure she's seen a thing or 3 over the years. I shot down there yesterday afternoon to grab them and they look to be in better shape (from the outside) than the ones I have ... gotta love the desert. Now I can take my time to get 'em cleaned up (aka wait till the wife is gone to fire up the sandblaster lol) which is super nice and I'll have a spare when I'm done. ?

-
Tires came yesterday and I got 'em on in less time than I spent looking for someone to do it LOL ... about 45 min. Got some talcum powder and a jug of RuGlyde from napa and had zero problems. I don't understand all the resistance I ran into and honestly, I'm kinda wishing all my wheels were like this so I could work on them myself. That being said, I didn't make it out unscathed. I scratched my thumb with another fingernail while stuffing in a tube so maybe all the warnings about the dangers were warranted LOL. Anyway, thanks for the help everyone. Time to get 'em on and get the old girl home for some electrical work.


-
Thanks for all the advice guys ... I really do appreciate it. After another frustrating day, I went ahead and ordered some shiny new 195/75-16 radials and I'm going to give it a shot myself. I can clean and assemble them here and take them over to my bro in law's tire cage to do the deed . Since I don't have a spare, no hope for one near term, and all the tire guys seem to be scared cowards, I'm thinking this is going to be a skill that I should have in my bag anyway. I really do just need to get the truck out of this guy's yard right now but we'll see where I go with this. $800 doesn't sound unreasonable for a nice set of rims so I'll definitely keep the wheel smith in mind. I do think these used to be dual wheels because some of the countersinks on the lug holes of the back rims are going the wrong way (and I see the very beginnings of a cracks on the raised part YIKES!) ... or maybe they just all shipped that way. I'll post back on my progress. If you don't hear back ... well ... ?️... LOL

