-
Posts
62 -
Joined
-
Last visited
-
Days Won
1
Wood and Steel last won the day on December 8 2022
Wood and Steel had the most liked content!
Reputation
27 ExcellentProfile Information
-
Gender
Male
-
My Project Cars
1951 Plymouth Cranbrook
Contact Methods
-
Biography
I'm a doofus with a fun old car.
-
Occupation
Historic window restoration
Converted
-
Location
Lafayette, IN
-
Interests
Music, travel, food, history
Recent Profile Visitors
The recent visitors block is disabled and is not being shown to other users.
-
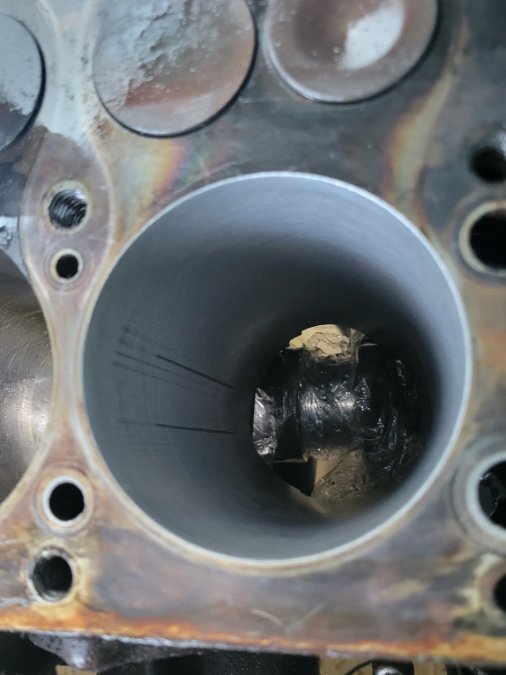
Sorry for such a long delay on updating this thread. A medical emergency pulled me away from it for a while. I'm back to work on it now. I've lapped all the valves and I'm starting on honing the cylinders now. Unfortunetly one of the valve keepers from cylinder #6 vanished on me. I'm hoping it turns up, but I've spend quite a bit of time looking for it already. It was indeed a loose wrist pin. Here's a picture of the damage after quite a bit of honing: I think I'll be able to remove the smaller scratches that are faintly visible, but there's no way I can grind it enough to get rid of the two large gouges.
-
A hair over 40 at idle, 50+ at anything above idle. It's rare that it sits more than a day or two. It's my daily driver unless I need my truck or weather prohibits. The gouge is on the front of the cylinder (towards the radiator). It seems like it might be a little worse at the bottom, if that's relevant. It's honestly a project I've been looking forward to eventually. Thanks in large part to your videos, by the way. The timing is just never right, of course. What rings would you guys recommend? It looks like I can get Hastings or Sealed Power from RA for a reasonable price. Is there a better source? I assume I'd just want plain old cast rings, given the circumstances? How much over can I hone the cylinder? I know honing is a slow processes, but I could order some coarse stones. Right now the piston is marked .03 over but I haven't measured it. The cylinders all measure right around .281+/-.
-
Hi all, My '51 has been running rough lately, so I figured it was as good of a time as any to do some delayed maintenance. I haven't polished the valves since I've owned the car (7 years or so), so I figured it was definitely overdue. I started by checking the vacuum, and sure enough it was low (16+/-) and fluttery. I also checked compression for the first time while I was at it, and was disappointed to see how low it was. Dry they mesured 85, 90, 77, 50, 75, 80. unfortunitly 50 is not a typo. Wet they all measured between 80-90. Not great news, but it does explain some things. I popped the head off and found a pretty gnarly gouge on cylinder 4. All things considered, it looked pretty clean inside other than that. The motor was replaced at some point in the past. The serial number indicates it's from '56. I have no history on it, but the pistons are marked .03 over. I busted out the micrometer and measured the top, middle, and bottom of every cylinder both in line, and perpendicular. The measurements were surprisingly consistent. The largest deviation was less than .0015. There is virtually no taper on any cylinder. I have no experience with engine cylinders, but that seemed pretty good to me. I can even still see the cross hatches from the last hone job on the front and back of each cylinder, but it is worn off on the sides. I'm sure cylinder 4 really needs a fresh bore, but I just don't have the time or money for that right now. What are my options aside from pulling the motor and having it machined? Would a fresh hone job and new rings help much? I'm sure the gouge is deep enough I won't be able to remove it completely. If it is worth honing, would it be worth honing all the cylinders and changing all the rings, or are the other 5 probably good enough? I also have a spare (locked up) engine from a '53. Would it make sense to get the car back on the road with a weak cylinder and rebuild the spare motor as I have time, or would I be better off investing my time and money on the working engine?
-
It seems to be shorting, but I don't see any carbon buildup or broken plastic. It still fit tight onto the shaft. I will get a pick when/if I can, but I'm not sure what I did with it. Hopefully I didn't pitch it already.
-
Last December I had an ignition issue that this forum helped me trace down to a rotor short. I replaced it with an old spare I had around, and haven't had an issue since. Well, I was out running some errands yesterday, and I lost all spark again. With some troubleshooting, I determined it was the rotor yet again. Luckily I had a new spare, so I was able to get back on the road, but I wouldn't think a rotor would fail that quickly. This was a rotor off a spare engine I picked, so I'm not sure when or where it was manufactured. I didn't see any carbon buildup on it, or cracks in the plastic. So, what would cause two rotors to fail in such a short amount of time?
-
Nope. It's in an empty carport that's 80% covered on three sides, and has a concrete floor. There's nothing near it, but it is only about 12' from a somewhat busy road (speed limit 35).
-
Hi everyone, I've been noticing some rapidly worsening rust on my '51 Plymouth, particularly on the bumper guards, but also evident a couple of other places such as the part of the door handle that screws to the door. I've had the car for about 6 years now, and, although the chrome isn't perfect by any means, I've never had this problem. It's all developed within two months (with very little use since it's winter here in Indiana). The car is stored in a south facing car port. I don't drive it if there's any visible salt on the road, and I avoid driving in the rain. I haven't done anything to try to remove it yet because I didn't want to accidently cause damage. I haven't applied any sort of polish or wax to the chrome since I've owned the car, but it's always shined up nicely from a normal soapy wash. So, what might be causing the rust, what's the best way to clean up what's already accumulated, and what can I do to prevent it in the future?
-
I had to wait for parts to come in, but it was officially the rotor shorting to the shaft. I couldn't visually see anything wrong with it, but it fired right up once I switched them out. I'm not sure I would have ever thought to check that without the help of this forum, so thanks yet again! This is the first time the car has stranded me, but I definitely learned a lot about the ignition system because of it.
-
I think we have a winner! It seems the rotor is shorting through the shaft. I think I have a spare rotor at home, so I'll update tonight or tomorrow after I get a chance to test it. Thanks!
-
I have indeed tried that. That's how I know I'm getting spark plugged directly into the coil, but not plugged into the distributor.
-
The points seem to be opening and closing properly. There was too much spark when I first checked it, so I changed the condensor. It has a small bright spark every rotation now. I set the points and checked dwell not too long ago, and don't have the tools to double check with me, but I don't think that's the issue.
-
I wouldn't have thought to check for a rotor short. The cap looks dry and free of carbon, assuming that's what carbon traking is.
-
That is correct. I already changed the condenser. I assume that would take care of any short. To answer Sniper (sorry, i cant figure out how to double quote on the phone: I already suspected that. I just happened to have all the stuff to make new wires in the car (I was planning on doing some major maintenance while I was up anyway). Made a new one, no luck.
-
I get spark with wire one if I plug it directly into the coil, and that's the one I'm using for testing. I checked all the wiring I could think to check with the multi meter, and got what I expected. No shorts, good voltage. I definitely could have missed something though. None of the wiring has been changed for several months, and the car is used as a daily driver.
-
The cap looks new still. Button is intact.


