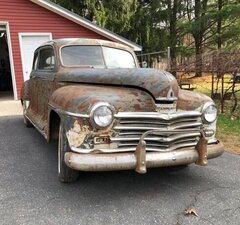
Scott Knecht Posted October 8, 2021 Report Share Posted October 8, 2021 I found this site about a year ago looking for rack and pinion advice and have enjoyed reading the many topics ever since. Here’s a few pics of where I’m at. I was hell bent on going with a 6.0 LS just because I had it in the shop. A hemi would’ve been neat but that would’ve broke the budget. Had the motor fired already for a test run. So far so good. Got the rack and pinion working just right. Went with a conventional master cylinder setup. Fabbed up a bracket and brake pedal from scratch. I also converted the “3 on the tree” to work the turbo 350 trans and that was surprisingly easier than I expected. Inside still looks stock. The swapped disc setup up front seems like it will work okay. Just started the rear end project. Installing a Dana 44 from a Grand Cherokee. 3.73’s and posi. It too has disc brakes. Impala driveshaft will be fitted after the rear. Long way to go yet including the Painless wire kit and other small things. But it’s getting there. Learned many things along the way from some of the folks on here. It’s been a fun project so far. If anyone has any questions please feel free to ask. I don’t everything but I’ve learned a lot. 3 Quote Link to comment Share on other sites More sharing options...
knuckleharley Posted October 8, 2021 Report Share Posted October 8, 2021 43 minutes ago, Scott Knecht said: I found this site about a year ago looking for rack and pinion advice and have enjoyed reading the many topics ever since. Here’s a few pics of where I’m at. I was hell bent on going with a 6.0 LS just because I had it in the shop. A hemi would’ve been neat but that would’ve broke the budget. Had the motor fired already for a test run. So far so good. Got the rack and pinion working just right. Went with a conventional master cylinder setup. Fabbed up a bracket and brake pedal from scratch. I also converted the “3 on the tree” to work the turbo 350 trans and that was surprisingly easier than I expected. Inside still looks stock. The swapped disc setup up front seems like it will work okay. Just started the rear end project. Installing a Dana 44 from a Grand Cherokee. 3.73’s and posi. It too has disc brakes. Impala driveshaft will be fitted after the rear. Long way to go yet including the Painless wire kit and other small things. But it’s getting there. Learned many things along the way from some of the folks on here. It’s been a fun project so far. If anyone has any questions please feel free to ask. I don’t everything but I’ve learned a lot. Seems to me you are a talented fabricatior/mechanic. 1 Quote Link to comment Share on other sites More sharing options...
Booger Posted October 8, 2021 Report Share Posted October 8, 2021 You sir are badxxx 1 Quote Link to comment Share on other sites More sharing options...
Andydodge Posted October 8, 2021 Report Share Posted October 8, 2021 Scott......I like the engine,brakes & steering swap, just would hope that you treat the old girl to a nice set of clothes, it doesn't have to be a show winning paint job but a nice tidy up so that she feels loved...........lol.............you can guess I'm not a crap rod fan but do appreciate the mechanical upgrades.........but your car so its all good......lol...........andyd 1 Quote Link to comment Share on other sites More sharing options...
Scott Knecht Posted October 8, 2021 Author Report Share Posted October 8, 2021 Thanks everyone. I’ve restored several muscle cars in my life but that was just bolting back together what came a part. This is really my first big adventure with so many modifications. I just take my time and there’s still some trial and error. As for dressing it up Andy, she’s really rough. It will eventually probably have a single coat of hot rod black and some pin striping at some point but it’s really too far gone in many areas to be worth a full on restoration. The bank account won’t handle it, or the wife for that matter. Hahaha 2 Quote Link to comment Share on other sites More sharing options...
knuckleharley Posted October 8, 2021 Report Share Posted October 8, 2021 (edited) 2 hours ago, Scott Knecht said: Thanks everyone. I’ve restored several muscle cars in my life but that was just bolting back together what came a part. This is really my first big adventure with so many modifications. I just take my time and there’s still some trial and error. As for dressing it up Andy, she’s really rough. It will eventually probably have a single coat of hot rod black and some pin striping at some point but it’s really too far gone in many areas to be worth a full on restoration. The bank account won’t handle it, or the wife for that matter. Hahaha Not true. Things like rust repair and paint are mostly labor. We have all seen cars as rough,or rougher than yours with all the bodywork done and a nice coat of paint to protect them in the future. Hell,my 37 Dodge 1.5 ton pu truck even had the chassis rusted in half,and the only body part that didn't need patch panels was the hood and grille shell. It now has a 96 Dodge half-ton 4x4 chassis under it,complete with a crate 318,aod,ps,and pb. The body work is in process now,and it will look as good as anyone eles's by the time it gets back on the road. I honestly had no freaking idea it would be so rusty under the paint the guy I bought it from had sprayed over rust and body plastic,or I would have never bought it in the first place. ALL rust is being sanded or cut away and replaced with new patch panels. The ONLY plastic going on the truck is to smooth out the grind marks from the welding. As you can see from the new unfinished patch panels along the bottom of the cab,the whole damn bottom of the cab looked like Swiss Cheese. Not to mention the top of the cab that originally had a siren and light mounted because it was originally a pumper truck for a fire department,and the holes "repaired" with body plastic without even sanding the rust away. Even the running boards were so rusty it was easier to fab new ones than repair the old ones. BTW,it was sitting on a 1972 Ford F-250 4X4 chassis when I bought it. I drove it for 3 or 4 years that way before it started getting so bad I had to blow it apart to save it. That was when I discovered how thin the chassis was and how crappy the body "repairs" made by the previous owner were. I found a deal on the rolling Dodge chassis,so I bought it. Happier with a Dodge chassis under it,anyway,and unlike the Ford chassis,this one has ps,pb,and an auto transmission. The most important thing to me is is the knowledge that it will look so good that no future owner would ever consider crushing it. Hell,chances are it will never spend a night outside again. Attached is a file of the mock-up to make sure everything fits right before the body work and final assembly. Edited October 8, 2021 by knuckleharley 2 Quote Link to comment Share on other sites More sharing options...
YukonJack Posted October 8, 2021 Report Share Posted October 8, 2021 Couple of questions. Where did you get the shorter steering arms or did you make them? How much shorter are they than stock. Also what brake kit did you use? It looks like you are using stock hubs, are you using Explorer rotors? Outer tie rods from Explorer? Thanks in advance. Quote Link to comment Share on other sites More sharing options...
Scott Knecht Posted October 9, 2021 Author Report Share Posted October 9, 2021 I agree Knuckleharley, it is just my labor to restore the car so yeah it may happen at some point. For now though I want all the mechanical things to work and be reliable. Yes Yukon I made the shorter arms from bar stock. They are pretty much mandatory if you want to keep the turning radius tight with the Cavalier rack as it doesn’t move nearly as far as the stock steering box. The rack is mounted with a kit I got from Fat Man Fabrications. I basically just did a little trial and error measuring to come up with 1-3/8” shorter. I used two right side cavalier inner tie rods to keep things even. The outside ends are 05 Explorer connected to the inners with sleeves included in the kit. I bought a 7 degree tapered reamer from eBay. It worked great for $60 and it lived to see more action in the future. I got the cheap kit from Scarebird Classics for the brakes. It includes the backing plates, and hardware. I did use the stock hubs but I had to turn down the outside diameter slightly and remove a little lip from the hub center to rotors to sit flat. The rotors are Ford Probe pieces. The calipers are from an Eldorado. The Scarebird kit gives you a parts list to get in addition. Also I drilled out the wheel bolt threads and installed standard wheel studs. There’s some pics and video on here somewhere when I was working on the steering. Quote Link to comment Share on other sites More sharing options...
greg g Posted October 9, 2021 Report Share Posted October 9, 2021 2 door sedans are the least or second least produced body style. Hope you keep that in mind when you do your daydreaming. Quote Link to comment Share on other sites More sharing options...
Young Ed Posted October 9, 2021 Report Share Posted October 9, 2021 10 minutes ago, greg g said: 2 door sedans are the least or second least produced body style. Hope you keep that in mind when you do your daydreaming. Surely they are third behind convertible and wagon? Quote Link to comment Share on other sites More sharing options...
Scott Knecht Posted October 9, 2021 Author Report Share Posted October 9, 2021 You know I actually was wondering that myself. I really wanted a club or business coupe when I was looking but I picked up this sedan for a song and dance. I don’t know actual production numbers but I surmised the sedan was somewhat rare just from what I see out there. Yeah I’m changing my mind a bit about keeping it a rat rod. I may do some quality body repair in the future. Thanks for the input guys! 2 Quote Link to comment Share on other sites More sharing options...
Vin's 49 Plymouth Posted October 12, 2021 Report Share Posted October 12, 2021 Scott, I started with the same mindset and seven years later I have something different. It's funny how thangs change so fast. You can see my project, which is the 4 door version of yours in my profile albums. I teach a fab class and I can see that you have some talent. Keep up the good work. Quote Link to comment Share on other sites More sharing options...
Scott Knecht Posted October 12, 2021 Author Report Share Posted October 12, 2021 Wow Vin that’s awesome! I really dig all the little touches. Especially the rolled fender lips. It sounds fantastic! I’m sure mine will eventually morph into more than just the rust rod it is now. I need continued inspiration from all the fine folks on here! 1 Quote Link to comment Share on other sites More sharing options...
Vin's 49 Plymouth Posted October 14, 2021 Report Share Posted October 14, 2021 Yes, very knowledgeable folks here and love their stock 40's & 50's Mopar's. But don't speak much about hot rods and rats. I get a kick reading all the stories and experiences. Love these guys. ? 1 Quote Link to comment Share on other sites More sharing options...
Scott Knecht Posted June 19, 2022 Author Report Share Posted June 19, 2022 Well the day finally came yesterday when I could give it a flogging and see how things worked. I’m delighted to say the rack and pinion works flawlessly! Steering radius is factory spec with the shorter arms and the 2-1/2 turns lock to lock are effortless. Zero bump steer too! This whole project took longer than I expected and there’s still things left to do such as finish installing some trim and interior items but all in all I’m very happy so far. And yes knuckleharley I spent some time and effort and repaired all the rust but I am leaving the black primer for now. Lol I’ll probably start a new thread at some point so for now I’ll leave a few pics and say thank you to all who joined the conversation and shared thoughts and opinions. This is a great site! 1 Quote Link to comment Share on other sites More sharing options...
Boody Posted June 19, 2022 Report Share Posted June 19, 2022 Looking good! Dave 1 Quote Link to comment Share on other sites More sharing options...
Scott Knecht Posted July 17, 2023 Author Report Share Posted July 17, 2023 Just an update on my ‘48 project. After seeking out a visor for my car and discovering the out of sight prices, I decided to build my own. I fabbed up the frame work from 1/2” aircraft tubing (which bends nicely in my Harbor Freight pipe bender) and some 1/8” by 1/2” flat stock. Some 24 gauge sheet metal stretched over it all welded around the edges and smoothed makes it look like one stamped piece. Found an old piece of stainless trim I had laying around the shop to cover the center seam. I made some clamps to hold it to the rain gutter held on with 3 stainless button screws on each side. Easy to remove if need be and no holes needed to be drilled to mount it. Finally I added a few small pieces of thin rubber glued under the 1/8” flat stock where it meets the roof to prevent damage and provide a vented area for air to pass through. 7 Quote Link to comment Share on other sites More sharing options...
MikeMalibu Posted July 17, 2023 Report Share Posted July 17, 2023 I like your idea for a removable bracket to attach the visor to the gutter. Do you have a hold-down bracket at the center of the visor? Quote Link to comment Share on other sites More sharing options...
Scott Knecht Posted July 17, 2023 Author Report Share Posted July 17, 2023 5 hours ago, MikeMalibu said: I like your idea for a removable bracket to attach the visor to the gutter. Do you have a hold-down bracket at the center of the visor? 5 hours ago, MikeMalibu said: I like your idea for a removable bracket to attach the visor to the gutter. Do you have a hold-down bracket at the center of the visor? No center support or mount. It fits perfectly snug as is. Does not flop even at 100. Lol Quote Link to comment Share on other sites More sharing options...
andyd Posted July 18, 2023 Report Share Posted July 18, 2023 Scott......o/k so its not a ballroom dress but I'm sure that the old girl appreciates its new clothes and will be proud to show off her lines in public....lol......you are to be commended with your work and the visor shows some style, well done.........best wishes & regards from Oz.....andyd Quote Link to comment Share on other sites More sharing options...
Scott Knecht Posted July 18, 2023 Author Report Share Posted July 18, 2023 (edited) Thank you andyd! I am going to continue further massaging the body and yes maybe one day I’ll spent the time and coin to put a quality paint job on it. I actually enjoy spending more time with her than my Harley. Lol Edited July 18, 2023 by Scott Knecht Quote Link to comment Share on other sites More sharing options...

Recommended Posts
Join the conversation
You can post now and register later. If you have an account, sign in now to post with your account.