Veemoney Posted May 20, 2021 Report Share Posted May 20, 2021 It was last August, middle of the month and a beautiful day. I picked up some groceries in my old truck that morning, offloaded those and then started cleaning up in the garage. I looked over at a kayak I use for fishing standing up in the corner and thought I need to get out fishing again. I only thought about it for a second or two maybe at the most. I went back in the house and then noticed the sky got dark, I mean dark and it was only 4pm by then. The wind started howling and rain came down sideways, I heard tornado sirens in the background and I mean the wind was really blowing now to where I thought glass was going to blow out of the windows. The cat sprang up and dashed for the basement and almost simultaneously with the precision of a tiger I matched her every stride. In a matter a minutes the winds subsided to what I would call a normal rain storm and I headed upstairs to check the news. As I listened to the weatherman on the TV the wind picked up again. I looked out the East window and could see my yard and what looked like a battlefield littered with smaller and larger branches and 1 large one hanging in front of the window as if to block the view. That’s when I heard the sound. You know the sound you never want to hear in a storm, when you’re in a house with a yard full of large trees. Yes, the howling wind was deafening again but the sharp high-pitched scream of a branch Crack-Rip-screach-Craaaack-Swoosh-scrape-on-metal-Kabaaam Sound was clear as a bell. I didn't feel it hit the house but I had the shop and some vehicles in the driveway. I found out later 15 tornados passed through the area. Well shame on me for thinking about fishing I guess but it could have been a lot worse. 1 Quote Link to comment Share on other sites More sharing options...
Merle Coggins Posted May 20, 2021 Report Share Posted May 20, 2021 Was that the only serious damage? If so you had some good luck. 1 Quote Link to comment Share on other sites More sharing options...
Veemoney Posted May 20, 2021 Author Report Share Posted May 20, 2021 Merle, I consider it pretty lucky as well. No other damage at my place. Another large tree limb on the other side of the house also came down but just brushed the gutter on the way down. My neighbor one house over had a limb break through his roof. No one hurt so all is good. Quote Link to comment Share on other sites More sharing options...
JBNeal Posted May 20, 2021 Report Share Posted May 20, 2021 that oughta buff out 1 Quote Link to comment Share on other sites More sharing options...
Los_Control Posted May 20, 2021 Report Share Posted May 20, 2021 Mother nature is unforgiving. 5 years ago while sitting in WA state and searching for houses I could afford. I chose West Texas. I really like the prices, the greenery of further east, then getting into Tornado alley. I ended up with West Texas because of the weather. We still have weather problems, here seems to be hail. I think every area has there own weather issues ... WA is rain 200 days a year. 3 days ago we had a hail storm, destroyed the wife van windshield, has to be replaced but lucky is just cracked and not a zillion pieces. Then driving my daily driver truck today I see I have 2 small hits on that windshield, they can be fixed. I found some damage in the garden broken branches ... nothing important. Just glad you are safe. That fender looks like a fun project to fix, when fishing season is over 1 Quote Link to comment Share on other sites More sharing options...
Veemoney Posted May 20, 2021 Author Report Share Posted May 20, 2021 1 hour ago, JBNeal said: that oughta buff out I sent a pic to a local shop that fabricates panels and does ground up restorations. Web page is pretty impressive. He replied $300-$500. I like your idea better? 1 hour ago, Los_Control said: That fender looks like a fun project to fix, Mother nature, you gotta take the good with the bad and keep smiling. I pulled the fender and will grab a hammer soon.? Quote Link to comment Share on other sites More sharing options...
Young Ed Posted May 20, 2021 Report Share Posted May 20, 2021 1 hour ago, Veemoney said: I sent a pic to a local shop that fabricates panels and does ground up restorations. Web page is pretty impressive. He replied $300-$500. I like your idea better? Mother nature, you gotta take the good with the bad and keep smiling. I pulled the fender and will grab a hammer soon.? Take care of it those 39-47 pass rear fenders are hard to find 1 Quote Link to comment Share on other sites More sharing options...
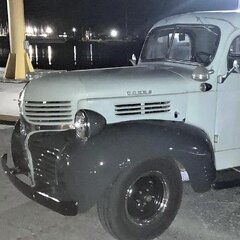
Veemoney Posted May 21, 2021 Author Report Share Posted May 21, 2021 8 hours ago, Young Ed said: Take care of it those 39-47 pass rear fenders are hard to find Agree, It is a solid California fender that had no previous damage that I can see. Gray paint is over the original factory blue and it is coming along. 2 Quote Link to comment Share on other sites More sharing options...
billrigsby Posted May 22, 2021 Report Share Posted May 22, 2021 On 5/20/2021 at 1:08 PM, JBNeal said: that oughta buff out With the right Hammers and Dollies yes it will. ? 1 Quote Link to comment Share on other sites More sharing options...
Veemoney Posted October 25, 2021 Author Report Share Posted October 25, 2021 Follow up on my fender repair I pulled the rear fender off the truck and did most of the work on the fender in the garage using these 2 hammers and a piece of Laminated beam flipping the fender over and rolled it on the board as I hammered. Worked from the outside edge of the dent to the inside, 1 hand hammering and the other hand rolling the fender to position it so the board would give the fender support. I was surprised when probably 98% of the dent was removed with this process in about 30 minutes. I use the orange dead blow hammer as much as I could to coax it back. At the deepest point of the dent the metal had a sharp crease where it had folded, I choose to weld a bead along the crease and then filed that weld flat by hand with a flat file. This added strength and helped shrink expanded metal in the area. I had a small area on the lower skirt that was flexing (oil Canning), I welded 4 short beads ~1” long on the inside of the fender in that area to tighten it up and shrink the metal there. When I did the welding, I kept the fender on the board to allow me to tap the welded area directly after to keep things flat. I used a hammer dolly kit from HF to tweak any low or high spots after that My truck was a dark blue from the factory in lacquer paint and somewhere during its life was painted the 2-tone gray which seemed to be enamel the best I could tell. paint always chalked up quickly giving it a dull primer look so matching that would be a challenge. I ended up pulling a headlight bucket that had some blistering started and took it to a local for the paint match. I used paint from most of the big suppliers and name brands with success over the years and found this local tool/paint family owned shop as my go to. Picked up ¾ pint of BC color premixed ready to use for $23. Matched the paint using the paint chips with the holes in the center of the chips laid over the headlight bucket and it was almost perfect. When I Sprayed and cleared the fender and headlight bucket, they were nice enough to not require any buffing but they were to shiny for the rest of the truck. I wet sanded the fender with 800 grit and did a light buff and that matched the other fenders nicely when I walked it out to the driveway where the truck was sitting. Quote Link to comment Share on other sites More sharing options...
Veemoney Posted October 26, 2021 Author Report Share Posted October 26, 2021 I knew my wheel cylinders needed some r&r from the wet spot visible under where I pulled the fender. The truck sits outside mostly and it was time for some TLC. As I pulled the brakes, I figured it was time to change the gearing, the 4.10 ratio was limiting with the stock 4speed. About 8 years ago I bought a 3.54 ratio rear from a 47 car the PO swapped out for an 8-3/4 model. Checked out the brakes at that time, cut the spring perches off and left it in the corner with some spare parts and a bucket of catfish bait. It was time to drag it out and do the change. I’m thinking that bait may be pretty ripe too but not messing with it for now. Quote Link to comment Share on other sites More sharing options...
Veemoney Posted October 26, 2021 Author Report Share Posted October 26, 2021 (edited) I have a cheap Dent puller kit I used to pull my axles and seals. Most kits come with accessories. I drilled and tapped a portion of the bushing ID shown in the picture to 3/4-16 to screw on the end of the axle and mate to the puller shaft. Used the L shaped hook on the end of the shaft for pulling seals. Edited November 8, 2021 by Veemoney Quote Link to comment Share on other sites More sharing options...
Veemoney Posted October 26, 2021 Author Report Share Posted October 26, 2021 When I pulled my truck axles and pig all looked good with the exception of the leaking pinion seal. When I pulled the doner axles and pig I found the axle bearings lacking grease and spalling on the axle bearing cups. Soft copper washers were used on the pig studs I assume to stop leaks. Washers were deformed and cut off to allow the removal of the center section. After cleaning and checking everything I assembled the 3.54 pig into the truck axle housing with new style seals. And serviced the u-joints. Some observations here: · Both the car and truck axles and pinions were 10 splines and interchangeable · The car axles were slightly longer as was the car housing and bearing surfaces were smaller by ~1/16 so bearings and seals do not interchange between them though the housing could take either with the proper length axle and matching bearing/seal/race components based on first observations (car axle top, truck axle below). Spalling in car race shown · I had trouble pulling the driveshaft with the u-joint binding on the pinion side yoke. I remember reading here where someone used a heavy backhoe bucket to load the rear springs and allow more clearance to remove the joint. I loaded toolboxes, a small welder and other items to facilitate loading the rear springs to allow removal. · I purchased a Moog387 u-joint after reading here where others used it in place of the original cross type u-joint. It did fit but I worried it would spin in the yoke. · I have an 8-3/4 pig from a 60s b-body that has a matching 10 splines on the pinion. I looked into swapping the u-joint yoke from it onto the 8-1/4 pinion to allow using this newer style u-joint yoke with the Moog 387 u-joint. The Moog 387 has the same diameter as the original cross u-joint used in my truck. It looks like the newer yoke could work by opening up the bore ~.040” to accommodate the Moog 387 joint. A spacer with a thickness ~.350” would also be needed in between the yoke and bearing on the pinion shaft. I ended up using the original yoke due to time but thought it was worth noting to be able to use a more available u-joint and not have to preload the truck springs to pull or install the driveshaft. Something I may try if my pinion seal leaks in the future. Quote Link to comment Share on other sites More sharing options...
Veemoney Posted October 26, 2021 Author Report Share Posted October 26, 2021 During R&R on the brake components I found the drivers side wheel had a small amount of play in it. Further inspection identified the king pin locking bolt was loose. Tightening the bolt took the play out so the fit of the pin in the bushings was good. I checked the passenger side with the king pin bolt loose and it was good and tight. I pulled the pin on the driver’s side and the worst spot I could find showed the axle bore .002” oversize and the pin good. While looking into oversized pins or bushing I came across repairs done on other axles with similar condition using a punch across the top and bottom surfaces perpendicular to the pin to tighten up the hole. Given my particulars I was willing to give it a go. I used a blunt low stress punch working in a “C” pattern on the same side as the locking bolt so as to keep the fixed side of the bore opposite the bolt from being manipulated. I did this on the top and bottom surfaces ~half way between the OD and ID with the pin in place and it tightened up quickly without raising the surfaces. I tapped the pin out and dressed the top and bottom surfaces where I tapped with a file. Was able to use the same shims for assembly and pin went in tight. Locked it down with the king pin bolt and will keep an eye on it to see how it holds up. Quote Link to comment Share on other sites More sharing options...
Veemoney Posted October 26, 2021 Author Report Share Posted October 26, 2021 (edited) Nothing special with the R&R on the brakes and I did change over to Dot 5. My rear brakes on the truck use the 2 divorce wheel cylinders per wheel which I did not see in the parts manual for my year so not sure if this was stock. I purchase a cheap pressurized bleeder off the bay and I must say that is some of the best money spent. It has a unique fitting/coupler that I was able to utilize and adapt to the master cylinder lid. I purchased the 3/4-16 bolt to fit in the stock MC cover and the shut-off valve from Ace or Home Depot and cut all but 3 or 4 threads off the bolt. Drilled thru and tapped the bolt center to accept the valve and used an O-ring originally for the seal between the cover and bolt. I cut a rubber gasket for in between the master cylinder and cover and later cut another to replace the O-ring. I pressurize to 12lbs during bleeding and had no leaks. I left the unit installed on the cover to bleed off any trapped air in the lines and couple and uncouple the tank as needed. Edited November 8, 2021 by Veemoney 1 Quote Link to comment Share on other sites More sharing options...
Veemoney Posted October 26, 2021 Author Report Share Posted October 26, 2021 As I worked on the axle and brakes I noticed all the scratches and small dings in the other fenders and the lower section of the grill. I mentioned earlier that the paint chalked up quickly and I had almost the full 3/4 pint of base coat I had started with. The truck was still sitting outside on stands with the wheels off so I started prepping the fenders. I just wet sanded quickly and dollied out some dings in a day for the dark gray fender areas and the lower grill. I wasn’t looking to make it exceptional, just clean it up a bit and protect the metal that's there. I masked it off the same day and shot it that evening. I had to go back for an additional 1/2 pint of color to do the lower grill that was light gray but worn thin over the years and 2 spots on the fenders the next morning then clear. I did all the work outside and surprisingly had very little dust specs, a bug or 2 but the clear laid down nice and flat so I left it as sprayed. I use it like a truck so better than expected. Since I had all the materials except color I spent $38 on my paint repairs. After looking at the new paint I figured I should touch up the wheels with a coat of chassis black from the paint cabinet and then the bumpers called out for some single stage black also from the cabinet. Front bumper is off the rear of my 41 coupe. The light gray will remain as is for now and I have been running it for about 2 months now. Quote Link to comment Share on other sites More sharing options...
Veemoney Posted October 26, 2021 Author Report Share Posted October 26, 2021 Oh yah, Long read here but if you made it this far the old fishing truck hauled a nice on e in. 39 inch beast 2 Quote Link to comment Share on other sites More sharing options...

Recommended Posts
Join the conversation
You can post now and register later. If you have an account, sign in now to post with your account.