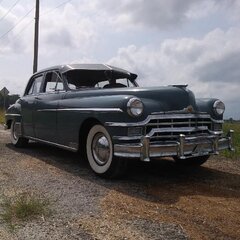
Bryan G Posted June 26, 2021 Author Report Share Posted June 26, 2021 Dodgeb4ya, that's my intention soon! My goal remains early August. I've had a couple busy nights: I dropped the gas tank last night with plans to clean it out but I quickly determined it was leaking at the seams on both sides. (the several gallons of varnish inside were below the seams so the issue didn't show until I tilted it.) After I drained it I could hear/feel quite a large amount of wet crud in there. Considering tanks are readily available and not really that expensive (at least if you're in the states!) I decided to order a new one. I'm curious about the difference between the 20 gallon tank in my "big" Chrysler and the 17's used in everything else. The sellers just list one size fits all and the photos sure look identical to what I have. Who knows, maybe mine got swapped to a smaller tank at some point? Judging by the dent on a top edge it's been off before. The sending unit is also shot but again, easy enough to find a new one. I hooked up a resistor sub box to the lead in the trunk and the gauge works fine. A previous owner installed an electric pump as a backup, right ahead of the tank. They installed it almost exactly as I have in other vehicles except for some reason they had it wired to something that is hot all the time, with a switch. I'll change it to something that comes on with the accessories. The Airtex pump they installed looks 70s vintage (goes with the Kmart shocks installed in the rear!) but it's dead. I plumbed in one of those inline pumps that are pretty common these days; I had one I'd pulled from another project and had been using it to test run the engine but it apparently is going intermittent. I also have a 12v pump which I tried on 6v and was pleasantly surprised at how much it still flowed. Tempting to go with that rather than buying one, but I'm not sure if it's the type that will pass fuel through without running. After playing with that I pulled the "real" fuel pump and rebuilt it, which went fairly well except that one of the new one-way valves flew apart. Hopefully I put it together so it will stay-not as robust as the old ones. Another 30 minutes or so and I could have had it running off its own pump (assuming I put it together right) but my wife said I'd played enough for one night. Quote Link to comment Share on other sites More sharing options...
Dodgeb4ya Posted June 26, 2021 Report Share Posted June 26, 2021 The straight 8's come alive from 40 mph on up to 70 mph. The rear axle ratio should be a 3.54. After you have thoroughly road tested it oil pressure stays at 45-50 above 15-20 mph drive it at 60+....have fun with it! Slow around the corners though? 2 Quote Link to comment Share on other sites More sharing options...
Bryan G Posted June 30, 2021 Author Report Share Posted June 30, 2021 I've been spending 2-3 hours a night on the car; more progress. I tried the electric fuel pump (a 12v Facet) again on 6v but found it didn't have enough oomph to get the flow going. I also found trouble with my rebuild of the mechanical pump as it wasn't working. I tried swapping out the valve that came apart, putting one of the old ones back into place, and it seemed to be okay though I noticed the next day when I tried firing it up it had leaked down and took a lot of cranking to get going. Tonight I noticed a drip at the bottom so I tightened up the bolt that holds the lower bowl in place (it did seem too loose.) I'll keep an eye on it. My new water pump arrived quicker than expected so I swapped it. Yes, it would have been a fair amount easier with the radiator out of the way but it was okay and really didn't take that long. The little bypass "doohickey" doesn't come with the pump so I swapped it over but wasn't sure if it needed a gasket. There were no signs of one on the old pump so I just used a thick coat of Permatex #2. Well, it leaked. So, I made a gasket from some paperboard. As I was tightening up the bolts I decided it needed just a bit more and I felt, oh shoot! A crack. At first I thought it was the new pump but it was the bypass. Guess that's why new production ones are readily available! I notice the new one comes with a gasket so hopefully no leaks. Now, I admit, I couldn't help myself. Even with that gaping hole in the cooling system I just had to hear it run for a few second with that new water pump, as confirmation that all that terrible noise I was hearing really emanated from the pump. Yep, sure was! Much better now. It was funny watching the water come out of the bypass hose-if the flow was a tiny bit less it would have perfectly flowed right into the hole in the top of the pump While I had the pump out I checked out the damper to see if I could find those timing marks again. What I found is that someone long ago had taken something very sharp and made a ragged gouge at what appears to be TDC. They also made a mess of some of the other hash marks. At least I have some idea now. (I can at least read +10.) Tonight I pulled the old master cylinder. Yes, I did this on my back in the driveway. It should go back on a lot easier, now that I've cleaned up the bolts. I have the pedal swapped over and the assembly ready to install. I removed it through the access panel in the floor and that was easy. This all brought me to the next chapter in the book, "things Bryan has never dared tackle before." As some of you may know, on these cars with the power booster, there is only one brake line leaving the master...and while it doesn't look too bad, I couldn't get it to come loose without cutting it. While some of the other lines were changed in "modern times" some are looking pretty crusty. I need to change some lines. I spent some time tonight researching the matter and I feel fairly confident I can handle it. Lastly, while I was crawling under the rear the other day I noticed that there are drain holes in the spare tire pocket and through them I could see an old receipt. I pulled the spare and came up with a repair bill from 1994...and now I knew who owned it back then! I googled him and we talked today. He bought it from his former supervisor, then sold it after a few years. He said it was a great running & driving car during the time he had it. The buyer was someone who intended it for his teenager. I suspect that's where things went awry for the car as I had an old Packard with the same story: teenager decided they didn't want the car so it just sat and sat, going downhill. The good news is, it will drive again...and at this point it should be weeks, not months. (Oh...over the weekend I let it run for about 15 minutes or so, no drama aside from the noisy pump...I firmly set the parking brake and shifted into the gears. Not much of a test since I couldn't move the car but it seems raring to go.) 1 Quote Link to comment Share on other sites More sharing options...
Dodgeb4ya Posted June 30, 2021 Report Share Posted June 30, 2021 The water pump /aluminum bypass on a straight 8 is bigger than all the six cylinder flathead six engines.... Didn't know anyone made the eight cylinder bypass... Quote Link to comment Share on other sites More sharing options...
Sniper Posted June 30, 2021 Report Share Posted June 30, 2021 (edited) Nice work going on here. My suggestion, FWIW, on the electric fuel pump wiring is this. Wire the power from a switched source so that there is only power with the key in run and wire the power to a relay, normally open contacts. At the relay jumper that switched power to one side of the coil as well. Run the ground side of that coil to an oil pressure switch so that the relay only works if the engine is running, a safety measure to kill the pump if the engine is not running. We don't want a potential fire being fed by gasoline if there is an issue. Finally, take that manual switch, make it a push button switch, ground one side and wire the other side to the relay coil ground so that you can manually prime the carb if need be. Once you release the button the pump will shut off until you have oil pressure. If you run it this way make sure your relay is rated for the proper operating voltage, 6v in your case I believe, as well as sufficient continuous current, continuous is the key here. Also make sure that switched power is from a fused source. Also, the reason for running a relay, especially on a 6v system, is that the oil pressure switch is probably not going to like the current a fuel pump is going to draw and will fail at some point. For an application, my 87 Dodge Diplomat used an oil pressure switch to feed the electrically assisted choke and it should be fine for this job. I used the power and ground terms because some of us are 6v positive ground and others are 12v negative ground. As long as we all understand that when I use ground I am talking about whatever polarity is connected to your engine block and power is whatever polarity is NOT connected to your engine block. Ensure your fuel pump is wired correctly in regards to polarity and that you use wires big enough to handle the current flow and on a 6v setup they will be bigger than a 12v one. Here is a handy calculator to help you figure it out https://www.wirebarn.com/Wire-Calculator-_ep_41.html Finally, your relay is likely polarity sensitive as well, so remember your polarity and wire accordingly. Edited June 30, 2021 by Sniper clarification Quote Link to comment Share on other sites More sharing options...
Bryan G Posted July 3, 2021 Author Report Share Posted July 3, 2021 Sniper, that's a slick setup for wiring the pump. I'll have to work towards that. Some other activities this week: the bypass tube showed up; I thought there were multiple people making these but when I looked again it seems Moparpro might be the only one. Sadly, the quality is very poor (and I'm not picky at all.) There was so much flashing inside one of the openings that it was almost totally closed off. I had to cut away at it with a hole saw to clean it out (rough on the saw!) The other problem is the threads where the pipe screws in are so poor that it just won't go. (screws into the old one like nothing.) I asked the fellow at the hardware store in our small town but he didn't have the right size pipe tap. He suggested I try screwing a nipple in there so I bought one, forced it in a good distance, but found all I did was strip the threads off the nipple. I put a note in to the seller but haven't heard back-maybe they have a better one. Either way, they need to know. In the meantime I decided to try JB Weld on the old one. Not sure how confident I'd be driving it that way, but it seems okay right now. The trouble is getting it to seal. The new bypass was supposed to come with a gasket but didn't, so I cut another one from paperboard and used Permatex #2. I very gingerly tightened the bolts and let it sit a while but it seeped after running a few minutes. Maybe I didn't let it sit long enough. What to try? Real gasket material? I stopped by an auto parts store but they were sold out except for some extremely thick stuff or some embossed rubber sheet (nitrile?) Brought home enough to try it if I needed to. Or, the dreaded RTV? The gas tank also arrived; I ordered it from Van's via eBay and am impressed by how well it matches the old one. I spent some time tonight trying to get it in place. Really, the only challenge is getting that filler hose around both the tank and filler. I found that some lubrication helped but still it's stubborn. One way or the other, by the end of the long weekend I think I'll have the fuel system buttoned up so that I can say the car will run off its own tank. As for the brakes, I determined that the booster had been bypassed by someone in the past, so for now I'll copy what they did until I can get the unit redone. One thing that has me puzzled is the service manual shows a line from the master to the booster, then a return line back to the master. The manual doesn't specify but I'm guessing it would get plumbed into the second output port on the master? Thing is, the old one (a crusty old Wagner Lockheed) has one looks like a factory installed plug pressed into the second port. Perhaps it was a rebuild that came that way? Anyone else with this setup that can confirm proper plumbing? Quote Link to comment Share on other sites More sharing options...
Sniper Posted July 3, 2021 Report Share Posted July 3, 2021 On that bypass, did you call Bernbaum about it? He doesn't list everything he has on the web. https://www.oldmoparts.com/ Quote Link to comment Share on other sites More sharing options...
Bryan G Posted July 6, 2021 Author Report Share Posted July 6, 2021 I haven't checked with Bernbaum yet; my results there have been mixed. I might give them a ring. I tried not to work on the Chrysler too much through this good long weekend; my wife keeps saying, "guess you're going out to work on...the CAR again." She asked me again this afternoon when she gets to ride in it. Soon, soon. I finished wrestling the gas tank into place Sunday. Only the rubber filler hose makes it tricky, but it's done. The old sending unit was totally spent; there seems to be more than one manufacturer of new ones and I chose the lower price mostly because I liked that it has a copper float vs plastic. (Old fashioned? Well, heck, look what I'm working on!) Bad choice, maybe, as it 1) reads 1/4 tank on empty, though full is right on the money. 2) Less forgivable, it's intermittent, and I've been able to pinpoint that it's the sender and not the wiring or gauge. So disappointing to spring for a new part only to have this kind of trouble. I was talking to a friend tonight and he asked if I was going to Carlisle. Well, I didn't realize it was this soon, but regardless it doesn't fit my schedule. Never been to any of the big swap meets. Maybe that's where the good NOS parts are hiding for me? Guess they'll have to hide a little longer. Today I finally started tackling the brakes, beginning with the RF since the wheel was already off. It was already spinning free and with just a tweak of the adjusters the drum came off. Wow, I thought at first, this is easier than those goofy adjusters on everything else that you can never seem to tell which way they're going, etc. Sure, I would learn! Swapping the cylinders was easy enough. Amazing how bad they can get just from sitting, "rust and corruption" as my grandfather used to say. The shoes look great, and everything seemed it order and clean enough. I thought I had everything back the way it was before but darned if I could get that drum back on. After much fiddling I finally got it on there but I'm feeling too much resistance. The brake lines are dry right now so I'm thinking I'll revisit once I have it ready to bleed. Yes, I've read the excellent articles on here regarding the challenges of adjusting these. I'll brush up some more. On to the right rear, and the infamous drums of doom! I had enough trouble removing the castle nut: had to put the tire back on and set it back down on the ground so it wouldn't turn, then put a l-o-n-g piece of pipe on the wrench. I've played with the adjusters and it seems free as far as the brakes go. (I tried undoing the lower bolts but they just spin. I moved them to the spot where the drum turned the easiest.) And...I hammered, squirted penetrating oil around the hub, came up with a homebrew puller of sorts but I don't know that it will be enough. I left it on overnight and will revisit. To show my level of faith, I ordered a real puller tonight. In the meantime I have some lines I can change and I still need to reinstall the master cylinder. Oh...almost forgot, I tried the trick of putting the wheel on loosely and moving the car. Limited in what I can do considering I have only the parking brake and only about 10 feet I can move fore or aft. It felt very much like a brake was stuck on but I didn't think that RF was that bad so maybe it's somewhere else. Anyway, it didn't do anything for the drum. Maybe you need to be able to slam on the brakes to do anything? I tried the turn signals a few days back and was surprised that they came to life. Very slow at first but it woke up. Maybe the points in the flasher just needed some self-cleaning? I was shocked at how dim the taillights were, an accident waiting to happen. I was thinking of how I'd have to run new grounds, paint the reflectors white, change to LED's...then I pulled the lens. Well...someone put 12v bulbs in here! Odd, nothing else I've found had been converted. Proof again, start with the simple things! I had a pair of 1128's that were just waiting for this project and after cleaning everything up I'd say they're bright enough. More to come...despite the occasional frustrations I'm very much enjoying this. Quote Link to comment Share on other sites More sharing options...
Dodgeb4ya Posted July 6, 2021 Report Share Posted July 6, 2021 On 7/2/2021 at 6:58 PM, Bryan G said: Sniper, that's a slick setup for wiring the pump. I'll have to work towards that. Some other activities this week: the bypass tube showed up; I thought there were multiple people making these but when I looked again it seems Moparpro might be the only one. Sadly, the quality is very poor (and I'm not picky at all.) There was so much flashing inside one of the openings that it was almost totally closed off. I had to cut away at it with a hole saw to clean it out (rough on the saw!) The other problem is the threads where the pipe screws in are so poor that it just won't go. (screws into the old one like nothing.) I asked the fellow at the hardware store in our small town but he didn't have the right size pipe tap. He suggested I try screwing a nipple in there so I bought one, forced it in a good distance, but found all I did was strip the threads off the nipple. I put a note in to the seller but haven't heard back-maybe they have a better one. Either way, they need to know. In the meantime I decided to try JB Weld on the old one. Not sure how confident I'd be driving it that way, but it seems okay right now. The trouble is getting it to seal. The new bypass was supposed to come with a gasket but didn't, so I cut another one from paperboard and used Permatex #2. I very gingerly tightened the bolts and let it sit a while but it seeped after running a few minutes. Maybe I didn't let it sit long enough. What to try? Real gasket material? I stopped by an auto parts store but they were sold out except for some extremely thick stuff or some embossed rubber sheet (nitrile?) Brought home enough to try it if I needed to. Or, the dreaded RTV? The gas tank also arrived; I ordered it from Van's via eBay and am impressed by how well it matches the old one. I spent some time tonight trying to get it in place. Really, the only challenge is getting that filler hose around both the tank and filler. I found that some lubrication helped but still it's stubborn. One way or the other, by the end of the long weekend I think I'll have the fuel system buttoned up so that I can say the car will run off its own tank. As for the brakes, I determined that the booster had been bypassed by someone in the past, so for now I'll copy what they did until I can get the unit redone. One thing that has me puzzled is the service manual shows a line from the master to the booster, then a return line back to the master. The manual doesn't specify but I'm guessing it would get plumbed into the second output port on the master? Thing is, the old one (a crusty old Wagner Lockheed) has one looks like a factory installed plug pressed into the second port. Perhaps it was a rebuild that came that way? Anyone else with this setup that can confirm proper plumbing? Chrysler frame mount booster cars are supposed to have only a single 1/4" brake line from the booster to only a single rear port master cylinder...NOT A DOUBLE PORT cylinder. Also it is correct to see the smaller 1/8" brake fluid return line from the booster to the top of the master cylinder reservoir. Your 1949 Chrysler has the internal valved "Vacu-Ease" booster. Rebuild parts as far as I know are not available. I have never found parts for mine. Quote Link to comment Share on other sites More sharing options...
Sniper Posted July 6, 2021 Report Share Posted July 6, 2021 If you are going to try the move the vehicle trick to loosen up tapered axle flanges it need to be driveable. What you do is loosen the nuts, back them off maybe a thread put the cotter pins back in and drive it around the block a couple times, making turns in both directions. Last time I did my rear brakes the PO had the nuts maybe finger tight, took them off by hand, and all I had to do was loosen them and with the tires on the ground shove the rear of the car back and forth a few times and they popped free. Scary Quote Link to comment Share on other sites More sharing options...
Bryan G Posted July 16, 2021 Author Report Share Posted July 16, 2021 Okay, plenty of updates: I've been busy! I received my hub puller, purchased from a vendor that lists on walmart.com. I knew it was the right one when I read the feedback; I think every single one mentioned owning a late 40's Chrysler product! It comes with 3 legs but you can order extra. It was tempting to order the extras but not needed. https://www.walmart.com/ip/TruePower-20-2029-Universal-Hub-Puller/648512550?comm-msg-vehicle=EMAIL&comm-msg-id=c7414232-f248-499f-b872-e6006ad6ebc1 I'd read all the old threads but misunderstood where I was supposed to be using the hammer, thinking I should be whacking the drum...that couldn't be right! The light bulb finally went off and I started hitting the "dogbone" handle. I knew my old heavy duty ballpeen wasn't quite enough but the steam & gas show was running last weekend and their flea market was the perfect place to buy a cheap old 4 pound hammer. After about 28 whacks (enough to drive my wife inside) I heard a crackle similar to a dry leaf being crunched. 2 more hits and there was a sound like a small firecracker; it actually made my ears ring for a second. Once in there the shoes looked healthy so I just cleaned everything up and swapped cylinders. The other side went a bit smoother, taking only 11 whacks. I moved on to the brake lines, something else I'd never dared tackle myself. I decided to spring for the nickle-copper and was very, very impressed. That stuff will put the makers of tubing benders out of business. At times it seemed to read my mind as far as which way I wanted it to bend. Tonight I bled the brakes and that went well. The feeling of that pedal when I was finished was yet another milestone for this car, and gave me a good smile. I had tried moving the car earlier in the week but found it really struggled. It could manage to creep a bit in reverse or low but in high it just seemed to load the engine down and even stall it at high throttle. I decided to check the fluid drive and couldn't see any fluid (not that you can see much in through that opening.) I decided for now to go with AW 32 fluid to top it off, and maybe later order some of the Light Circulating Oil. I contacted a distributor that covers this area, that I knew carried Mobil. The salesman called me back to tell me they've switched to Chevron who had an equivalent product. The price didn't sound too bad, maybe $85/5-gal pail, assuming it really is the same. He seemed pretty familiar with the product and said he has several customers that use it. I thought you might get a kick out of my method of filling: I didn't have a really good funnel for this job but, I have a spare electric fuel pump and plenty of pre-ethanol fuel hose that I'll never use for anything else. I rigged it up with an old power supply and have to say it worked pretty well. Before trying this I played with a funnel and may have spilled some down the outside of the unit. Hopefully it doesn't mess anything up. It took about a gallon to fill it. My hope is it just has a slow leak. Considering this car may not have been driven since the late 90s, it had plenty of time to sneak out a bit at a time. After the fill I tried it again and this made a huge difference. It still seemed a bit "off" in high range but I've been reading about carb adjustments, etc., and think it may be related to that kind of thing. I noticed that the vacuum line for the brake booster is still connected though the unit is out of service. I need to plug that off. I haven't rebuilt the carb but have a kit at the ready. Over the next couple days I'll be bolting back the grille and shrouds and reinstalling the front bumper. I believe the first shakedown run will take place Saturday or Sunday. Lots of little gremlins to go after to keep me busy for a while, which is what I wanted all along! 3 Quote Link to comment Share on other sites More sharing options...
maddmaxx1949 Posted July 16, 2021 Report Share Posted July 16, 2021 Do yourself a solid and undo the drain plug/clip thing on the lower bellhousing for your fluid drive. You will be able to discern if your unit is leaking much faster. I pray yours is not becuase it sucks if it is. I can't speak about the properties of the chevron fluid but the 5 gal that I got of mobil Light circulating fluid ran me about 160 so if it is the same additive and viscosity wise, that's some good savings Quote Link to comment Share on other sites More sharing options...
keithb7 Posted July 16, 2021 Report Share Posted July 16, 2021 (edited) Slow steady progress is perfect. Keep it up, you’re doing well. Taking time to study and understand each system you troubleshoot is very rewarding. I found several interesting things to address in my carb and ignition system. Each one was like finding a little treasure. Slowly, surely things improved. It was so much fun. You’ll have a big warm grin when you proudly drive your car around town. Edited July 16, 2021 by keithb7 Quote Link to comment Share on other sites More sharing options...
Bryan G Posted July 18, 2021 Author Report Share Posted July 18, 2021 I spent this morning bolting the grille/valance/bumper back together and a lot of other little odds and ends required to be mobile. After lunch the Chrysler was ready for takeoff; I knew some issues would rear their head. It was just around a short block at about 20 mph, and was almost comical due to the cloud of smoke. It turned out the parking brake was too tight (I'd been monkeying with it while working on the rear drums; I based the adjustment on how hard it was to turn them with a wrench.) I loosened it up and tried again, and found that problem solved. I'd tried adjusting per the manual but no matter what I did I couldn't get the shoe loose enough to match the book. Maybe this episode helped as it now appears loose enough so I'll try again. After a few miles I turned on to a main road (no 4-lanes around town, just a quiet state highway.) It was okay for a minute but then seemed to jump into neutral, then bounce in/out of gear. I creeped it home in low range then pulled out my phone and typed "P15-D24" and some keywords into the Google search bar...after a few tries I found a discussion from a few years ago with the same issue on a DeSoto. His issue: the fluid was low in the transmission. Well, I'd topped off the Fluid Drive but hadn't bothered checking the "Presto-Matic". Nothing at the fill plug so I drained it. By my calculation it was maybe a pint low, not too extreme I thought, but maybe enough? I refilled it with fresh oil. While under there I noticed a drip of brake fluid at a connection, one that had proven difficult to tighten. I gave it another try and will have to keep an eye on it. I also readjusted the RF brakes which I knew were a bit tight. I wanted to wait until I'd exercised them just a bit. In time I either need to fabricate an adjustment tool or buy one of those that MoparPro is now selling. One upside I thought of to driving a mile in low range is it may help a bit in seating the rings. Don't worry, I didn't rev it that hard. My wife wanted me to run up town for something so I used that as a chance for third test, no more than 30 mph. Used high range, behaved fine, no funny business. I'd expected the brakes to pull violently one way or the other but I haven't noticed anything, though I haven't really stomped them. That last trip was a good way to end the day. I'm looking forward to some additional runs over the next day or two to make sure it shifts okay now at (local) highway speeds. Quick observations: I expected the sound/feel of the shifts to be more significant. It's quite mild and I can hardly detect the shifts. Something I wasn't expecting, and I'm assuming is normal, is a subdued "whir" from the Fluid Drive. I really like it, to tell the truth! Makes me think a bit of the Chrysler Turbine Car I suspect once I have the carpet back in place I won't notice it. A real positive is that the engine continues to start on the first try every time (have to crank a few seconds when hot) and I don't have to touch the accelerator. It also appears I may have finally burnt off all the MMO I'd dumped down the spark plug holes when this adventure began. I'm no longer noticing a huge cloud, anyway. No, you might not catch me buzzing along the streets of your hometown this week, but I think it's safe to say, another old Chrysler flathead is amongst the living! 2 Quote Link to comment Share on other sites More sharing options...
Dodgeb4ya Posted July 18, 2021 Report Share Posted July 18, 2021 Keithb7 has designed and was selling the brake tool.. that Mikey aka moparnopro now sells. Bummer.... 1 Quote Link to comment Share on other sites More sharing options...
Bryan G Posted July 25, 2021 Author Report Share Posted July 25, 2021 When bad news is good news? An elaboration on an issue I mentioned in my last post: I've been putting the car through its paces on some longer drives. 4-5 times now it has done the same thing and I've tried to pin down the cause. Under light to moderate acceleration things are fine but if I give it more throttle, like when pulling out into traffic, it does okay for a couple second then feels like it's in neutral. No noises or "thumps", just empty revs. I slow down to about 30 and it picks up and is okay. I'd been studying this quite a bit, reading old threads, etc. I changed the transmission fluid after already topping off the Fluid Drive. I took the top of the governor and cleaned it up (a tiny bit of oil and the points were a little dirty) and checked the fork screw that is under the upper access port on the side. I couldn't find any mention anywhere of what type of screw to expect, and the angles are such that I couldn't see in there from above and I don't think I could if I crawled under. So, I dug out my cheap borescope and took a photo...so now you know! Only a short stubby screwdriver would fit, and it was tight. My thoughts kept turning to internal damage but then, after another test drive this afternoon I did a bit more research and now I'm convinced: I have an old-fashioned worn-out clutch. More money, sure, and it's the one thing on this car that I'm going to have to farm out. (Everything I've done has been in my gravel driveway.) But, I can drive it to the shop (with a light foot) and I feel confident that will remedy the problem. I'll call a mechanic I know Monday, who doesn't mind working on my oddball older stuff, and see if I can talk him into another project. I'll be sure to hand him the shop manual plus print out online discussions explaining how to avoid damaging the Fluid Drive seal. 1 Quote Link to comment Share on other sites More sharing options...
Dodgeb4ya Posted July 25, 2021 Report Share Posted July 25, 2021 Have you checked/adjusted the clutch free play to 1" as explained in the shop manual? No free play can cause clutch slippage. Quote Link to comment Share on other sites More sharing options...
Bryan G Posted July 26, 2021 Author Report Share Posted July 26, 2021 10 hours ago, Dodgeb4ya said: Have you checked/adjusted the clutch free play to 1" as explained in the shop manual? No free play can cause clutch slippage. I'm glad you prodded me to check that as I'd been too lazy to give it a go; unfortunately that didn't seem to be the magic bullet. I shortened the rod 1/8-1/4" as it certainly seemed it needed play. Shortening it kept the pedal from bouncing back to where it should rest so I used my foot to pull it back up while testing. While there were no adverse effects from having it so adjusted, it didn't cure the slipping either. 1 Quote Link to comment Share on other sites More sharing options...
Bryan G Posted September 6, 2021 Author Report Share Posted September 6, 2021 Okay, an overdue update...and a story that might have you laughing (or shaking your head): I ordered a clutch kit from Roberts and handed it off to my mechanic friend; this would be the first time I had to drop the car off with someone else but a man has to know his limits. It didn't give him any special trouble; I was surprised when he told me he hadn't test driven it. If given the chance I'd jump at piloting something as oddball as this! I did find that the pedal wasn't bouncing back up but between adjusting the spring and just working in the new grease he has pumped in there, it came around. And...no more slipping! Indeed, that was the problem. I'd been having more and more trouble with hesitation and stalling. I kept holding off the rebuilding of the carb since it started and idled so nice, but the time had come. For a tiny bit of practice I cleaned up the carb on an old lawn mower...not much practice! The B&B wasn't too bad inside, just some black gunk in the float bowl and the pumps were shrunken. The biggest trouble I had was installing the accelerator pump: I oiled it, then folded it back a bit and I guess I shouldn't have done that. Pushing it in the cylinder caused the leather to fold back and jam-up. I kept fiddling with it but couldn't get it to act right. Possible aggravating factor? I found the passage was clogged and wasn't squirting. I pulled the little aluminum plug out and squirted through it a few times with carb cleaner which took care of the clog but the new pump was shot. I ordered a replacement and that seems to work very well, though a hesitation remains. I'm not yet sure if this is fuel or ignition related. More on that in a minute. I asked my friend to take a look at the parking brake but he took a pass. This week I looked at it yet again and I believe I finally have it adjusted "good enough". I kept having trouble with it either not tightening enough with the brake set, or not loosening enough with it released. My solution, as it is, was to drill another hole through the turnbuckle where the cable attached to the brake assembly. This allowed me to take up some of the slack from cable wear, more than the turnbuckle adjustment would give me. And now, the adventure. I've been taking the car, which we've taken to calling "The Whale" on progressively longer drives. For Saturday we'd planned a long day trip to a town 75 minutes away. I had visions all week of smooth sailing, and the trip down was indeed uneventful. As we pulled into town the traffic was very heavy; this is a small, rural community but they were preparing for a big Labor Day weekend parade which really clogged things up. The Whale wasn't too happy with the situation and kept stalling from the heat, but at least it started right back up. It never boiled over, at least. Finally we got to where we were going. Hours later, back on the road, traffic all gone now. My wife asked me about a new noise from under the hood. Well, for some reason the belt keeps getting more and more loose. Brand new NAPA/Gates, correct for this car, and fit fine when I installed it but I've had to adjust is several times and now I'm out of adjustment. Oh, well, it still works, and no fear of bearing wear! But now it was flopping enough to make noise. I stopped for gas and popped the hood. This uses that wide belt, but now it had worn down to the width of a narrow belt, was way down in the groove, and bits of rubber are shed all around! In thinking about it just tonight, I wonder if one of the pulleys is wrong? They all line up fine. I'll worry about this soon. Far from home, I nervously watched the amp & temp gauges. It wasn't charging quite like it should, and was running a bit warmer than usual. On a wing and a prayer, onward, Whale! I reached an intersection where I had to merge from the state highway into the fast lane of a busier 4 lane. As I gave it gas there was a sputter-sputter-POW!-sputter-sputter. (The backfire did not impress my wife!) I could only manage about 25 mpg so got over to the right shoulder. I was coming up on a red light so stayed in the turn lane as the Chrysler stalled. It would crank just fine, but nothing more. Had we picked up bad gas, my wife wondered? Maybe. We started pushing it onto the side road, and a good Samaritan helped. Up went the hood, I glanced around, and there it was: never seen this before. The distributor cap had popped loose! The front spring clip didn't have enough grip. I squished it a bit (technical term) and snapped it back on...and it started! Away we went...except it was still sputter-sputter. I could manage about 48 mph. Not that much traffic along there early evening on a Saturday so I just kept on keeping on. The next town has a limited access bypass; not the place for a car in this condition. I took the fork to go through town, willing to risk stalling at another stop light vs being stuck on a shoulder somewhere. I decided to take my wife's suggestion and pull in to the next auto parts store. I knew better than to expect much as I wheeled in among the other amateur mechanics rebuilding their jalopies in the Auto Zone parking lot, 6pm on a Labor Day Saturday. Up went the hood again, off came the cap. Oh. The little button at the center, that makes contact with the rotor? It was gone. Broken off way inside. No wonder! That was quite a gap it had to jump! Hmmm...if I had aluminum foil I could try sticking a ball of it in there. Instead I decided to try bending the contact on the rotor so it was closer. I put it back together and reached in to give it a crank; I could see the cap bounce around. Too much interference, and unfortunately my actions had just resulted in the rotor cracking. I pulled it off and had a handful of broken bakelite. There's a little metal clip inside to help it grip the shaft tighter and even that cracked in two! Oh, no. I should have left well enough alone. I pulled out my phone and started searching for the cap and rotor. Were they also used on something more common, something worthy of this store carrying it? No. No, they do not. Dejected, but not done, I ventured in. The counterman confirmed he couldn't help me, not even if I gave him a week to order it. Auto Zone can't get me those parts, period. I was not the least bit surprised. I was not done yet. "Do you carry Krazy Glue". Aisle 5, he said. I dug out all the little bits of bakelite. Wow, I even found the cracked button! Yes, I did. I glued the button back together. I glued the rotor together the best I could but I had very little confidence in it due to missing pieces. I was going to hate myself for this later, I just knew it, but I did it anyway. I glued the rotor to the shaft. Moments prior my wife and I had said a prayer. The cap went on. Crank-the engine started. Onward, Whale, onward! As I turned on to the backroad home dusk was falling. The amp gauge was at dead center with the parking lights on but fell below with the headlights. I sure don't like it when others drive that way, but that's what I did, turning on the beams when others were in site or at intersections. And...we made it home. After church today I took another look. I found another big piece of the cap button; I had no idea they were that long. In case you don't know, it is spring loaded and made of a carbon of sorts. Designed to wear down but still keep pressing tight, I gather. Then I was walking around back and noticed something else. I've been meaning to order a new chrome exhaust tip to replace the rusty one that came with the car. When that backfire occurred it blew the old one right off the tailpipe! (I'd have loved to seen it.) I peered underneath and the muffler looks just like you'd expect-it blowed up real good! Even busted a seam, but it was still quiet last night. In case you're wondering, I don't consider this a bad day. I have another story to tell, and didn't have to pay a rollback. Rock Auto should have me the cap, rotor & belt by next weekend. With them installed I'll back up an try again! 3 Quote Link to comment Share on other sites More sharing options...
Bbdakota Posted September 6, 2021 Report Share Posted September 6, 2021 Glad you made it back! There's a few spare parts (not many) I carry with me in my trunk. Cap, rotor, points and belts along with enough tools to change them. Mainly because I know I can't get the ignition parts at most local parts stores. To condense space, I put the rotor and points inside the cap box. While ordering your parts, might think about ordering a spare set. Quote Link to comment Share on other sites More sharing options...
keithb7 Posted September 6, 2021 Report Share Posted September 6, 2021 The cap, rotor and points are quite common among these old Mopars. It would sure be nice local parts stores stocked them You are quickly learning the fine art of maintaining these old cars. When my wife is present for these little episodes, the pressure to fix it is certainly higher. To get us back home in the car under its own power. It takes time to work out all the little bugs in sn old car. Just driving it, the bugs appear. The more you drive it, and deal with these issues, the better and more reliable the car becomes. I find it challenging and rewarding. I have certainly had a few mechanical issues out on the roads. Every time, the car still got us home. As I learn all these little mechanical lessons, I’ve also learned to spend more time proactively maintaining my cars. Before I head out. Every little thing, I try to get to and sort out. Quote Link to comment Share on other sites More sharing options...
Dodgeb4ya Posted September 6, 2021 Report Share Posted September 6, 2021 You have a great attitude putting up with all the issues that always occur reviving an old car. A great story! One thing to know about The Chrysler 323 STRAIGHT "8".... Every thing is unique to that engine except the wide fan belt. Including the distributor parts. No six cylinder parts parts fit the eight! Very strange that you fan belt is shredding and sinking in the pulleys. Quote Link to comment Share on other sites More sharing options...
Bryan G Posted September 12, 2021 Author Report Share Posted September 12, 2021 (edited) Well, gang, a new belt, cap & rotor in the mail Friday thanks to Rock Auto, so I climbed back on the horse We planned another long Saturday drive, 1 hour 20 minutes one way. Yes, it took some arm-twisting to talk my wife into letting us take "the Whale". She gave me a dirty look as I had the hood up moments before I left; I explained I was adding suspenders to my belt as I put a wire tie around the distributor cap on the odd chance those newly tightened spring clips might fail again. How did it do? All good! Like my old Ford it's a bit cranky (pun?) when re-starting hot; maybe I'll try adjusting the float. I found some relief with that car by adding a gallon of diesel or kerosene with each fill-up. I had a strange burbling sort of noise from the beginning which got worse after last week's backfire-just a bit of an exhaust leak somewhere. Meanwhile, I pulled the radio a few days ago (easier to get out than I thought) and have it on the workbench. That's a hobby of mine so I look forward to waking it back up. A 9 tube built by Philco which should be a fine performer. More to come... Edited September 13, 2021 by Bryan G spelling/grammar 2 Quote Link to comment Share on other sites More sharing options...
Harvie Posted January 8, 2023 Report Share Posted January 8, 2023 Hello Bryan - I have a 1947 New Yorker and I just spent a very enjoyable moment on a very cold January day here in Winnipeg reading this thread. You certainly did an awesome job! Any updates? I am always interested in the adventures of the Chrysler straight 8 guild. Quote Link to comment Share on other sites More sharing options...

Recommended Posts
Join the conversation
You can post now and register later. If you have an account, sign in now to post with your account.