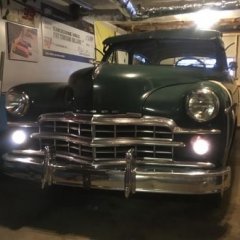
rtferguson39 Posted July 2, 2020 Report Share Posted July 2, 2020 Hello all, I've been a ghost on this forum ever since June 1st of this year, when I acquired this fairly awesome, well-documented, mildly famous 1949 Dodge Wayfarer: Some members who have read quite a bit on these cars may recognize this car from a certain Mopar reference website. This is the oldest vehicle I have owned (newer notables include a 1967 Dodge Coronet and 1958 Plymouth Belvedere), and therefore came with a new set of challenges for me like 6 volt positive ground electrical systems and the wonderful tapered rear axles, and Fluid Drive. So thank you all for making this forum what it is today. I've gained the info I've needed to get going on this awesome car. As of today, front brakes and master cylinder have been replaced/overhauled, and the rear axle is to be reassembled in the next couple of evenings. She should be safely on the road for a neighborhood cruise-around this Independence Day. Stay tuned for updates. Glad to be a part of this forum. PS - It's a shame to say that this car was actually under a carport within the debris field of a tornado about three years ago, so the driver's side isn't as pretty as the rest of the car. That will be fixed later. It may need a door. You can see so many ripples in the metal around the large bondo spot. The whole door skin just looks "pissed off" for lack of a better way to say it. I feel like I can fix the fender myself. Also - I DID NOT PERFORM the Bondo "repair" you see pictured below. That would have been a PO. 7 Quote Link to comment Share on other sites More sharing options...
sidevalvepete Posted July 2, 2020 Report Share Posted July 2, 2020 Nice car. As a bit of a newbie myself it is great that you have come aboard. Have found it a fantastic place to learn and get inspired. Some great threads on car builds. Look forward to updates. Quote Link to comment Share on other sites More sharing options...
rtferguson39 Posted July 2, 2020 Author Report Share Posted July 2, 2020 2 hours ago, sidevalvepete said: Nice car. As a bit of a newbie myself it is great that you have come aboard. Have found it a fantastic place to learn and get inspired. Some great threads on car builds. Look forward to updates. Thank you! About to head down to the basement to get on that rear axle. Yes, many great things to see here. Spent quite some time reading through NickPickToo’s 47 Plymouth Deluxe build. That was a great one. 1 Quote Link to comment Share on other sites More sharing options...
MarcDeSoto Posted July 5, 2020 Report Share Posted July 5, 2020 Your Wayfarer looks great in dark green! Good luck on it! 1 Quote Link to comment Share on other sites More sharing options...
greg g Posted July 5, 2020 Report Share Posted July 5, 2020 One of these in a light blue was the first car I have a memory of. Was the family car till 1956 when it was replaced by a 1954 Meadowbrook. Saw a lot of movies from the back seat of that car. Good luck with yours. There is no real mystery in positive ground system the only thing different is the battery hook up and the ignition wire to the coil goes to the neg terminal on the coil, positive terminal to coil. Clean tight connections and grounds flowing through good thick wires are the keys. There should be no place for 16r gauge wire in your car. Heavy loads like lights horn heater fan should have 10 gauge, dash lights courtesy lights should be 12, minimum 14. When in doubt go thicker. Battery cables should be 0 gauge 00 if can be found. Quote Link to comment Share on other sites More sharing options...
Sniper Posted July 5, 2020 Report Share Posted July 5, 2020 5 hours ago, greg g said: ignition wire to the coil goes to the neg terminal on the coil, positive terminal to coil. That's confusing. On a positive ground setup the positive terminal of the coil goes to the points. On a positive ground setup the negative terminal of the coil goes to the ignition switch (should have switched voltage on it). 1 1 Quote Link to comment Share on other sites More sharing options...
greg g Posted July 6, 2020 Report Share Posted July 6, 2020 Yes, ment neg coil to dist points terminal. Proof readers day off... Quote Link to comment Share on other sites More sharing options...
Booger Posted July 6, 2020 Report Share Posted July 6, 2020 On 7/2/2020 at 12:58 PM, rtferguson39 said: Hello all, I've been a ghost on this forum ever since June 1st of this year, when I acquired this fairly awesome, well-documented, mildly famous 1949 Dodge Wayfarer: Some members who have read quite a bit on these cars may recognize this car from a certain Mopar reference website. This is the oldest vehicle I have owned (newer notables include a 1967 Dodge Coronet and 1958 Plymouth Belvedere), and therefore came with a new set of challenges for me like 6 volt positive ground electrical systems and the wonderful tapered rear axles, and Fluid Drive. So thank you all for making this forum what it is today. I've gained the info I've needed to get going on this awesome car. As of today, front brakes and master cylinder have been replaced/overhauled, and the rear axle is to be reassembled in the next couple of evenings. She should be safely on the road for a neighborhood cruise-around this Independence Day. Stay tuned for updates. Glad to be a part of this forum. PS - It's a shame to say that this car was actually under a carport within the debris field of a tornado about three years ago, so the driver's side isn't as pretty as the rest of the car. That will be fixed later. It may need a door. You can see so many ripples in the metal around the large bondo spot. The whole door skin just looks "pissed off" for lack of a better way to say it. I feel like I can fix the fender myself. Also - I DID NOT PERFORM the Bondo "repair" you see pictured below. That would have been a PO. Most excellant. I'm curious what sort of work you're doing to rear axle. Quote Link to comment Share on other sites More sharing options...
rtferguson39 Posted July 7, 2020 Author Report Share Posted July 7, 2020 On 7/6/2020 at 9:26 AM, michaelmarks697@yahoo.com said: Most excellant. I'm curious what sort of work you're doing to rear axle. Nothing major. While the drums and brake assemblies were off, I went ahead and pulled the axles and replaced inner/outer wheel seals and bearings just to be on the safe side. Also replaced gear oil. The car has only had 2k miles put on it since 2007, But I figured if I had the drums off, might as well get to the bearings... Quote Link to comment Share on other sites More sharing options...
rtferguson39 Posted July 7, 2020 Author Report Share Posted July 7, 2020 On 7/5/2020 at 9:43 AM, greg g said: One of these in a light blue was the first car I have a memory of. Was the family car till 1956 when it was replaced by a 1954 Meadowbrook. Saw a lot of movies from the back seat of that car. Good luck with yours. There is no real mystery in positive ground system the only thing different is the battery hook up and the ignition wire to the coil goes to the neg terminal on the coil, positive terminal to coil. Clean tight connections and grounds flowing through good thick wires are the keys. There should be no place for 16r gauge wire in your car. Heavy loads like lights horn heater fan should have 10 gauge, dash lights courtesy lights should be 12, minimum 14. When in doubt go thicker. Battery cables should be 0 gauge 00 if can be found. Thanks! Sounds straightforward enough. Hadn't researched on my own yet, you saved me some time. Wiring and a carb rebuild are next on my agenda. Quote Link to comment Share on other sites More sharing options...
Booger Posted July 7, 2020 Report Share Posted July 7, 2020 15 minutes ago, rtferguson39 said: Nothing major. While the drums and brake assemblies were off, I went ahead and pulled the axles and replaced inner/outer wheel seals and bearings just to be on the safe side. Also replaced gear oil. The car has only had 2k miles put on it since 2007, But I figured if I had the drums off, might as well get to the bearings... I'm thinking about an axle swap next year. Or if I could change primary gear to get a little better highway speed (a little less rpms would be nice) I found a r10 tranny for my 49 biz coupe many moons ago, but that's a pipe dream these days. I swear we have the same cars mines just a plymmie. Quote Link to comment Share on other sites More sharing options...
rtferguson39 Posted July 7, 2020 Author Report Share Posted July 7, 2020 As of 9:30 pm, July 3, this car stopped with use of the brake pedal for the first time in approximately three years from info the previous owner gave me. And crazier yet, I now have a functioning parking brake. Haha. She made it into my neighborhood's July 4th Parade. This was technically it's first formal drive other than a quick blast around the block the night before. I'm quite pleased with my stopping performance. I feel like I got pretty close on my brake adjustment. I've got about 1/2 pedal throw before she comes to a firm and straight stop. She's pictured below off jack stands upon completion of the brakes, and post July 4th parade in my front yard with my good friend/neighbor's 1953 Olds Rocket 88 and 1966 Ford Country Sedan. Quote Link to comment Share on other sites More sharing options...
rtferguson39 Posted July 7, 2020 Author Report Share Posted July 7, 2020 7 minutes ago, michaelmarks697@yahoo.com said: I'm thinking about an axle swap next year. Or if I could change primary gear to get a little better highway speed (a little less rpms would be nice) I found a r10 tranny for my 49 biz coupe many moons ago, but that's a pipe dream these days. I swear we have the same cars mines just a plymmie. Very cool! Yes, I had her up to 60 mph for the first time and really thought that's about all she'll do comfortably without imparting some premature wear on some engine/driveline parts. I can certainly understand your want/need for less highway rpm. Quote Link to comment Share on other sites More sharing options...
greg g Posted July 7, 2020 Report Share Posted July 7, 2020 (edited) Just a reminder. Cars with fluid drive need a properly functioning parking brake and or wheel chocks. There is no compression braking with engine off. They like to wander if not parked on level ground. You don't want them disturbing the neighbors, park and restrain accordingly. Edited July 8, 2020 by greg g Quote Link to comment Share on other sites More sharing options...
rtferguson39 Posted July 8, 2020 Author Report Share Posted July 8, 2020 14 hours ago, greg g said: Just a reminder. Cars with fluid drive need a properly functioning parking brake and or wheel chocks. There is no compression braking with engine off. They like to wander if not parked on level ground. You don't want them disturbing the neighbors, perk and restrain accordingly. Correct. The parking brake has new band material and has been adjusted properly. I still do carry a chock for back-up/safety reasons. Quote Link to comment Share on other sites More sharing options...
rtferguson39 Posted July 16, 2020 Author Report Share Posted July 16, 2020 Small Update for Small Progress: I started going through the electrical system on this fine machine, and noticed that some PO had previously done a half-ass polarity swap. They swapped the battery leads is all. I was suspicious this was the case, or the ammeter was wired backwards because the generator definitely...generates. My lights get brighter upon increasing engine RPM, but my ammeter read discharge. Anyway me, wanting to conform with the more modern vehicular world, left the negative ground oriented battery leads and swapped the ammeter wiring. For those concerned about the radio - this car was not equipped with one. On a wonderful note, the underdash harness is in incredible condition - great news for me. All insulation is still pliable, and doesn't fall apart. Upon completion of my polarity swap, an unexpected thing happened. My headlights now work instantly with the turn of the knob (no fiddling), and so do my parking lights! I didn't mess with any of the engine bay/light harnesses to accomplish this. The only question I have is, can a polarity swap excite some circuits that may have been dead for a while? I don't know if that is possible. I'm not an electrical genius, but not completely incapable of performing electrical work, especially on a car this simple. The car also starts easier, leading me to believe the coil may have been wired backwards (from stock) as well. Picture of functioning parking lights for the first time in who knows how long below: 1 Quote Link to comment Share on other sites More sharing options...
Sam Buchanan Posted July 16, 2020 Report Share Posted July 16, 2020 (edited) My guess would be that in the process of swapping ammeter wires you removed corrosion on the terminals that had been causing low voltage to the entire system. Edited July 16, 2020 by Sam Buchanan 1 Quote Link to comment Share on other sites More sharing options...
rtferguson39 Posted July 16, 2020 Author Report Share Posted July 16, 2020 1 hour ago, Sam Buchanan said: My guess would be that in the process of swapping ammeter wires you removed corrosion on the terminals that had been causing low voltage to the entire system. Wish I would have taken some readings before I swapped them... Quote Link to comment Share on other sites More sharing options...
greg g Posted July 16, 2020 Report Share Posted July 16, 2020 Normally the gauge will show a very minimal charge assuming the battery and Genny and be are working in concert. For example if your battery is fully charged and your car starts easily, as you start to drive your ammeter will show a charge rate of 15 to 20 amps. As some miles go but, the VR will sense that the battery is back to full charge and will cut out the field coils, idleing the Genny, the gauge will reflect this by dropping the carbs rate down to 0 or barely positive. Stepping the brake might drop the needle into the neg but the a bit positive as that current draw is recognized and accounted for. This all indicates a healthy system. One thing you may want to do is power the brake light switch from the battery side solenoid terminal. Run a 12 gauge wire through an inline fuse holder (15 amp fuse) and go directly to the switch. The original wire you can cap odd and abandoned it in place. This takes the load of the brake light out of the general light switch circuit, taking the circuit load off the switch fuse. Quote Link to comment Share on other sites More sharing options...
rtferguson39 Posted August 19, 2020 Author Report Share Posted August 19, 2020 Well, I did a thing. Hate me for it or not, I'm open to some opinions. Due to slow cranking, I upgraded the car to an 8V battery (still negative ground as I set it up that way based on my own preference) and 1/0 battery/starter cables. The voltage regulator is outputting 8.1V, so I believe I am good to go after completing this small project. All I can say is that I am super impressed with how quickly and efficiently this car turns over now. It starts like a semi-modern 12V car. My headlights work brilliantly. There is no dimming at idle speeds anymore, and I've also got a nice bright gauge cluster. Anybody have any negative experiences, or frown upon a modification like this? Quote Link to comment Share on other sites More sharing options...
rtferguson39 Posted October 29, 2020 Author Report Share Posted October 29, 2020 (edited) Another Progress Update: A couple weeks back, I was perusing Facebook Marketplace, where I happened to stumble upon a "motherload" of D29 NOS sheet metal, including (2) RF Fenders, (1) LF Fender, and (2) sets of rear outer fenders. These came to me for a very decent price, and I would be willing to part with a few of them if anyone is interested. I will likely make a classifieds post soon. Anyway, I have test fit the NOS LF fender to replace the tornado-damaged, Bondo-ridden piece that was on the car. One mess on its way out...one to go. If anyone has a lead on a decent '49 Wayfarer 2dr sedan driver door, I would be interested. Stay tuned for some body work. Edited October 29, 2020 by rtferguson39 1 Quote Link to comment Share on other sites More sharing options...
rtferguson39 Posted October 29, 2020 Author Report Share Posted October 29, 2020 The Small Things: Instrument Panel Lights A small progress update I failed to mention. I now have working panel lights, and boy are they beautiful. Absolutely wonderful Deco styling. I won't lie, I sat in this car for a bit longer than usual after a short evening drive. A very satisfying fix. 3 Quote Link to comment Share on other sites More sharing options...
Adam H P15 D30 Posted October 30, 2020 Report Share Posted October 30, 2020 Love driving mine at night because of this ^^^^^ view Quote Link to comment Share on other sites More sharing options...
rtferguson39 Posted November 9, 2020 Author Report Share Posted November 9, 2020 Fender Progress Update: I have since sanded, primed and undercoated the backside of the NOS LF fender. I'm not going to lie, it was a bit sad to remove the original grease pencil part numbers from this piece, but hey it had to be done. Before all that I had hammered/dollied a few small dings out of the panel. I've applied a minimal amount of filler in those areas. Onto endless hours of priming and sanding.... Quote Link to comment Share on other sites More sharing options...
rtferguson39 Posted January 4, 2021 Author Report Share Posted January 4, 2021 Finally In Color: Hi all, After about 20 hours of bodywork, and the construction of my own at-home, collapsible paint booth and ventilation system, I have finally laid down some color! for single-stage aerosol, I'm quite happy with the results (I'd grade it a solid B). Still much color-sanding and buffing to do, but a little closer to getting this car back together with one less glaring imperfection. Of course I also decided to begin work on a 3-wheel Harley Davidson golf cart, while finishing a basement/shop bar room, during the holiday season, while being a gigging musician and working my day job. Shew. Seems like a lot when I actually write it down. This is why progress on my Wayfarer has been a bit slower than I would like. But it'll get there. Quote Link to comment Share on other sites More sharing options...

Recommended Posts
Join the conversation
You can post now and register later. If you have an account, sign in now to post with your account.