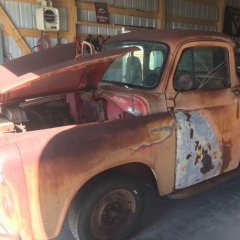
CO54 Posted October 25, 2019 Report Share Posted October 25, 2019 Well, after passing my 1 year anniversary on the forum, I decided to finally start a build thread for this long-term family project. We're plugging away, but as always life gets in the way. Just wanted to show progress so far and start the journal here. My amazing wife and I have a plan to update this truck on safety stuff, with some comfort stuff too. Our plan is to try to keep as many original parts as possible and enjoy it as a driver moving forward. Plans include: RustyHope front disc conversion, rear axle swap to a 3.73 with disc brakes, seatbelts and other misc items. Ultimately we want to keep the era showing outside and under the hood. I know some purists maybe upset, and I formally apologize at this time. Our extremely slow progress so far: 4 1 Quote Link to comment Share on other sites More sharing options...
bkahler Posted October 25, 2019 Report Share Posted October 25, 2019 I like your plans. Are you planning on a mostly stock interior as well? 1 Quote Link to comment Share on other sites More sharing options...
CO54 Posted October 25, 2019 Author Report Share Posted October 25, 2019 Planning to keep stock interior, and do a 12v upgrade. Are this pics showing for others? 1 Quote Link to comment Share on other sites More sharing options...
bkahler Posted October 25, 2019 Report Share Posted October 25, 2019 Well, the pics are showing for me! When I did the frame on my 51 I opted to have a sandblaster do the job. Made it a whole lot easier for me ? Quote Link to comment Share on other sites More sharing options...
CO54 Posted October 25, 2019 Author Report Share Posted October 25, 2019 Thanks for letting me know pics are coming up, guess this network I'm on right now doesn't like the hosting site. Quote Link to comment Share on other sites More sharing options...
tanda62 Posted October 25, 2019 Report Share Posted October 25, 2019 I also sandblasted my frame - had to do a lot of tilting to get all the sand out before paint. Your pics are showing up fine and look good. Lots of good information on this site for a 12v conversion - sure helped me. 1 Quote Link to comment Share on other sites More sharing options...
CO54 Posted October 25, 2019 Author Report Share Posted October 25, 2019 I agree, there's a ton of info on this site, has definitely been a huge resource for planning and learning of what hidden items to watch for with these old trucks. Quote Link to comment Share on other sites More sharing options...
Radarsonwheels Posted October 31, 2019 Report Share Posted October 31, 2019 The frame is looking great! Is that all elbow grease and scotchbrite pads soaked in gasoline or are you getting in there with the twisted wire cup on a 4” angle grinder or something? Doing suspension work and motor work on a bare frame is a treat. I wish I had a 2 post lift to pull the cab or bed any time I want. Enjoy the access and get it all as done as you can while she’s bare! How’s the sheetmetal? Is that just some orange that’ll DA off in a few minutes or is there a lot of swiss cheese? Quote Link to comment Share on other sites More sharing options...
CO54 Posted November 2, 2019 Author Report Share Posted November 2, 2019 I definitely prefer doing frame, suspension, fuel, and brake work without the body and engine there. So much easier to get at it really good. I've been using 120 grit flap discs and 3" wire cup wheels on the grinder. Makes a mess, but gets it done on budget. The sheet metal is all pretty solid with some expected areas on the cab front floor boards, and some areas on the bottom of the doors. Otherwise in great shape. The orange will come off with a DA and get smoothed out. I do have a couple areas of concern with farm life cutting it here n there, along with some dings that will get hammered out on the rear fenders. For most part though, very solid. 1 Quote Link to comment Share on other sites More sharing options...
CO54 Posted November 22, 2019 Author Report Share Posted November 22, 2019 (edited) Got some progress done on the frame. Spent a day on my back getting the underside and inside of frame cleaned up, following day was primer till it got too cold. Managed to get all the parts ordered and delivered for the front disc conversion from Rusty Hope..... Now for finding time with the holidays, work, and kids competing on the weekends in sports and NJROTC stuff.... Slow progress, but progress is always good. Edited November 22, 2019 by CO54 Added photo of VIN on frame..... 3 1 Quote Link to comment Share on other sites More sharing options...
bkahler Posted November 22, 2019 Report Share Posted November 22, 2019 Gotta love progress! I'll be following your front disk conversion closely. 1 Quote Link to comment Share on other sites More sharing options...
CO54 Posted November 22, 2019 Author Report Share Posted November 22, 2019 1 hour ago, bkahler said: Gotta love progress! I'll be following your front disk conversion closely. I'll be taking pics as it moves along, might be able to help with insight to Rusty Hope on directions provided. We all don't have a drill press, or ability/need to remove spindles from king pins......No offense intended either. Right now, it"s a choice of either finding roller wheels from CL that will fit after conversion is done, of just getting the wheels to use when it's ready to run...... Quote Link to comment Share on other sites More sharing options...
bkahler Posted November 23, 2019 Report Share Posted November 23, 2019 53 minutes ago, CO54 said: I'll be taking pics as it moves along, might be able to help with insight to Rusty Hope on directions provided. We all don't have a drill press, or ability/need to remove spindles from king pins......No offense intended either. Right now, it"s a choice of either finding roller wheels from CL that will fit after conversion is done, of just getting the wheels to use when it's ready to run...... I wasn't aware the Rusty Hope's disc conversion wouldn't work with stock wheels. If that's the case then I'll probably stick with stock. Quote Link to comment Share on other sites More sharing options...
CO54 Posted November 24, 2019 Author Report Share Posted November 24, 2019 On 11/22/2019 at 5:43 PM, bkahler said: I wasn't aware the Rusty Hope's disc conversion wouldn't work with stock wheels. If that's the case then I'll probably stick with stock. The Rusty Hope will work with all 1/2 ton trucks that have the standard 5 x 4.5 lug pattern with 16" wheels, and I believe also 15" aftermarket. With mine being a 3/4 ton, I have a factory 5 x 5 lug pattern with 15" wheels, so it creates a problem with my stock wheels. Quote Link to comment Share on other sites More sharing options...
Radarsonwheels Posted November 24, 2019 Report Share Posted November 24, 2019 I drilled the spindles on my 3/4 ton on the truck. When I did my kingpins a few years later I had them rippin hot and my 12 ton press still couldn’t budge em. I ended up taking them to a machine shop to have them changed and align honed. They said it was a b itch to press out the old ones and they have a kabillion ton press. Anyway, I bought some 37/64” or whatever the size was to drill and tap my spindles and worked my way up through smaller drill bits first, sitting indian style with a dewalt 18v drill. They came out just fine and the rusty hope conversion was nice. I think I already had 16”s on? Funny I had two or three different offsets of wheel but never knew for years because I never had more than one wheel off at a time! A set of american racing ‘soft 8’ 15” steel wheels looked stockish and fit great. She’s gonna be a nice truck 1 Quote Link to comment Share on other sites More sharing options...
CO54 Posted November 24, 2019 Author Report Share Posted November 24, 2019 Got the rest of frame primed, time for a run to get the correct "new and sharp" drill bits. Not sure if I'm going to pull king pins or not yet. Also got a line on some roller wheels, for the new pattern. 1 Quote Link to comment Share on other sites More sharing options...
CO54 Posted December 16, 2019 Author Report Share Posted December 16, 2019 Update: I have the correct drill bits and all parts for the Rusty Hope conversion. Kids weekend activities, and holidays have taken over though. I'm look for insight from folks at this point. I'm building the truck for my wife(important one) and I. She really wants to hear the original engine run before dumping money into the rebuild/upgrades. Engine is currently on a stand, but I need to finish tear down, a dip and then rebuild, with a fab'd running stand.......... My questions: 1. Complete the primer/top coat on frame (without completing disc conversion and rear axle swap now) and put outside(under tarp) to get into engine work for a running engine? 2. Stay focused on frame, front brakes, rear axle swap, brake lines, fuel lines, fuel tank, shocks etc then move it outside, and continue to engine work? Open to all suggestions. Thanks, Eric Quote Link to comment Share on other sites More sharing options...
JBNeal Posted December 16, 2019 Report Share Posted December 16, 2019 get engine running first in case something comes up that requires long lead times such as machine shop attention or special parts...when the engine is done, it takes up way less space than body work...I have rebuilt motors and put them on roll-around stands then sorta crated them, kinda like a residential radiator cover...that way I could have the engine sitting in the corner but use the flat space of the crate to work on or have parts drying or whatever...stacking things safely in the shop to maximize floorspace takes time and practice but well worth it... if the engine has to wait at a machine shop for attention, then you can shift gears and work on the rolling frame while you wait...this keeps the project moving forward while having different tasks being completed in parallel 1 Quote Link to comment Share on other sites More sharing options...
ggdad1951 Posted December 16, 2019 Report Share Posted December 16, 2019 Engine first. You can always end up with a bad block or some other issue that might take you in a different direction on the frame. I was sooooo close to doing a crate motor when I got the call from the engine shop the flux found cracks they didn't know if they could fix. Would have took FEF in a WAY different direction. 1 Quote Link to comment Share on other sites More sharing options...
bkahler Posted December 16, 2019 Report Share Posted December 16, 2019 Ditto what JBNeal and ggdad1951 said, engine first. Make sure your engine is viable before dealing with the frame. The only caveat to that approach is don't do like I did and wait 20 years before starting the rest of the work or you could have a frozen engine! (I was lucky in that mine wasn't frozen) There are lots of different methods to building something that will allow you to test run your engine. Here's the Engine test stand I built for the 454 that I installed in my motorhome. Brad 2 Quote Link to comment Share on other sites More sharing options...
CO54 Posted December 16, 2019 Author Report Share Posted December 16, 2019 Thanks for the insight! On a RDO today, however it snowed so kids are outta school and it's not the greatest outside to be moving a frame. With already having the primer on the frame done, I'll work on getting a top coat of flat black on it, then pushing it outside so I can get into the engine tear down. Waiting on doing the front brake conversion and rear axle will be beneficial this was way. I won't have to worry about any light surface rust forming on new parts while sitting outside. Fortunately rust is extremely slow forming here in CO. Might bring the cab inside to start assessing the overall repairs needed there while waiting on engine stuff. The engine stand for running will definitely be built so that after it's running, I can start it periodically before it goes back into the frame. No point in making it run then, letting it sit for extended time to have it not start when needed. Quote Link to comment Share on other sites More sharing options...
CO54 Posted December 22, 2019 Author Report Share Posted December 22, 2019 Had some great weather this weekend, moved the frame outside, brought the cab inside onto a rolling stand. Pulled the engine from the corner and started knocking off the gunk that's been there forever. Got the oil pan pulled and found the inside of engine to be extremely clean. Tear down will start after the valve spring tool arrives. Yes, I know there's some dirt and grime inside the valve train, but still in tear down so it's a clean as it goes. We really think that someone accidentally drove this truck into a mud pit and let it sit before dragging it out. We've found nasty clay mud everywhere on this thing. I still gotta figure out a way to get the stubborn steering wheel off the shaft though....... 1 Quote Link to comment Share on other sites More sharing options...
Merle Coggins Posted December 22, 2019 Report Share Posted December 22, 2019 On 11/24/2019 at 10:28 AM, CO54 said: The Rusty Hope will work with all 1/2 ton trucks that have the standard 5 x 4.5 lug pattern with 16" wheels, and I believe also 15" aftermarket. With mine being a 3/4 ton, I have a factory 5 x 5 lug pattern with 15" wheels, so it creates a problem with my stock wheels. I have a Rusty Hope conversion on my 3/4 ton truck. I’m using 5 X 4.5” to 5 X 5” adapters so I could use my stock 15” wheels. Been working great for over 10 years. 1 Quote Link to comment Share on other sites More sharing options...
CO54 Posted December 22, 2019 Author Report Share Posted December 22, 2019 6 minutes ago, Merle Coggins said: I have a Rusty Hope conversion on my 3/4 ton truck. I’m using 5 X 4.5” to 5 X 5” adapters so I could use my stock 15” wheels. Been working great for over 10 years. I only have 3 of the original wheels and they are rusted pretty bad. I plan on sticking with a 15" wheel when the time comes, unless wife says use the old ones. LOL. Quote Link to comment Share on other sites More sharing options...
CO54 Posted December 22, 2019 Author Report Share Posted December 22, 2019 So, I love my family. My brother-in-law had the correct 1-11/16 socket to pull the crankshaft nut. What's the best way to pull the pulley? Please advise. Quote Link to comment Share on other sites More sharing options...

Recommended Posts
Join the conversation
You can post now and register later. If you have an account, sign in now to post with your account.