Gnomeworks Posted May 6, 2017 Report Share Posted May 6, 2017 (edited) Hello everyone. I'm new to the site, and don't have any auto repair experience. I'm kinda diving in blind into the hobby, and might be asking a lot of dumb questions, so I hope you'll have patience with me. I purchased a 1951 Dodge Coronet with the Gyromatic transmission. It's been sitting in a barn since about 1984, 25,000 original miles. Interior is in pretty sad shape. It starts, runs and stops, but almost ALL the wiring insulation has been eaten by mice. A lot of the electrical things aren't working on it, and I hope most of that is due to the wiring being bad. The battery drains overnight while parked, so I know I have at least one major short somewhere. Breaks are ok, manual shifting works, but I'm not hearing the "Click" or "Clunk" for the Gyromatic. Running lights, horn, and the heater motor work, but the headlights, interior lights, panel lights, and the windshield wipers aren't working. One thing I can't seem to find a consensus on is what gauge wiring to buy. I found an online store that sells cloth covered wire for about a buck a foot. https://enginebarn.myshopify.com/search?q=Cloth+Covered+Wire&x=0&y=0 Some people have told me that for the best performance I should use 10 gauge for everything on these old 6V positive ground systems, but I worry about not having enough room for the wires to fit through the firewall. I have a service manual on order, but I'd like to buy the wire now so I have it ready when the manual comes. Any recommendations or tips about the wiring? Edited May 6, 2017 by Gnomeworks 1 Quote Link to comment Share on other sites More sharing options...
knuckleharley Posted May 7, 2017 Report Share Posted May 7, 2017 Looks to me like you made a major score,but the first thing you need to do is COMPLETELY rebuild the brake system,including new copper-nickel brake lines,new rubber hoses,new wheel cylinders,and a new master cylinder. The brakes might be good now,but I can guarantee you after sitting this long they will end up leaking like a sieve and you will run into something or someone if you rely on them. The bores on the wheel and master cylinders will be rusty inside,the rubber seals will be shrunken and hard,and then soft as butter and oversize after using the brakes for a short period,the brake likes will be rusty inside and out,and the brake hoses will be dry rotted. As for the wiring harness,unless you are experienced at rewiring cars,don't even think about rewiring it. Buy reproduction wiring harnesses for 6 volt systems. They don't have to be cloth if you are not restoring the car,but I'm not sure you will save enough money buying modern wires to be worth your while. Best I can tell you here is to price them and buy whatever suits your budget and you inclination. BTW,in case you don't know yet,these were POSITIVE GROUND SYSTEMS,and chances are you are going to have to take the generator and starter off to clean and lube them,and when you put them back on you may have to polarize the system to get them charging. Buy a Motors Auto Repair Manual that covers 1951 cars from ebay,amazon,abesbooks,or some similar source. You will be glad you did. It will tell you everything you need to know about minor and major maintenance and repairs,and give you plenty of sharp photos to illustrate what they are writing about. Best money you will ever spend on the car. Quote Link to comment Share on other sites More sharing options...
DrDoctor Posted May 7, 2017 Report Share Posted May 7, 2017 Gnomeworks, Welcome to the site, and welcome to a very rewarding pastime. First of all, never be afraid to ask a question, because I was taught that the only stupid question is the one you didn’t ask. And, don’t guess—ask the question, because if you guess, the results may not be at all what you want. Most everyone here won’t mind assisting you with answers. For example, knuckleharley is one whose information should be taken to heart, so when he offers suggestions, heed them. As for wiring, there are as many opinions as to what/who to use as there are people on the planet—everyone’s got an opinion. That being said, I used Ron Francis Wiring Company, specifically their “Git It Runnin’” kit, and it was incredibly simple. Further, their support is second to none. That’s my recommendation/opinion. Knuckleharley’s correct about the polarity of your car, it’s 6-volt/positive ground. However, our car (’46 Plymouth) is 6-volt/negative ground. How the polarity got switched, whether an accident or deliberately, who did it, when it happened, are all questions with answers lost in history. But, the car runs fine, so I’m leaving it negative ground. The only casualty to the polarity switch was the radio—the tubes in it were literally fried, since the radio grounds thru the case, and with the switch in polarity, the power went thru the case, and “that was that”. He’s also on target about your acquiring the service manual, and other related factory manuals and reference books. They’ll prove to be priceless in your project. Speaking of your project, it looks like a good, solid candidate for you to work on, and if you’re patient, you’ll wind up with a car that you’ll be incredibly proud of. Again, Welcome!!! Best regards . . . . . Quote Link to comment Share on other sites More sharing options...
Young Ed Posted May 7, 2017 Report Share Posted May 7, 2017 If you get a shop manual it will have the wiring diagram including wire gauge. Doing everything 10 is completely overkill. Most of it should be 12 and 14. Actually a lot of the lighting stuff is OEM at 16 but I upgraded all of my lights to 14. Better lighting and saved me on buying another size wire. 1 Quote Link to comment Share on other sites More sharing options...
DonaldSmith Posted May 7, 2017 Report Share Posted May 7, 2017 (edited) Dodge mated a three-speed transmission to the Fluid Drive coupling, at least for the post-war models. Shift into third, let out the clutch, and drive all day without shifting or clutching. You may have an access panel on the transmission hump. If so, you can see whether there is any wiring to the gearbox, and if there are protrusions such as a governor and solenoid, which are required for the semi-automatics. Edited May 7, 2017 by DonaldSmith Quote Link to comment Share on other sites More sharing options...
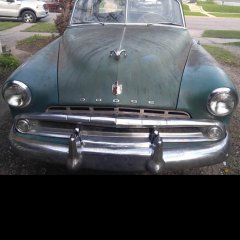
greg g Posted May 7, 2017 Report Share Posted May 7, 2017 (edited) If you have the gyromatic semi auto optional trans, a good resource is the Imperial Club website. A lot of info on the m6 trans gyro matic in the dodge, tiptoe in the desoto and presto matic in the Chrysler all basically the same trans. Most of their problematical seem from poor wiring contacts between the governor the shifting solenoid and the connection you pictured mounted to the air cleaner support. Stuff on the inside of the case very seldom has problems. Looks like a solid car good luck, use the search function of this website to find lots of answers to newbie questions. There I s also a good section on various transmissions on the all par web sight. Edited May 7, 2017 by greg g Quote Link to comment Share on other sites More sharing options...
rb1949 Posted May 7, 2017 Report Share Posted May 7, 2017 Looks like a good start. Lots to consider, they call them project cars for a reason. You'll be busy reading, studying, evaluating, checking, chasing, tracing, and figuring out how things work, and why some things aren't working. Take your time and tackle each one. Not all are "easy". I hate that cloth wiring. The copper inside was so oxidized it was hard to solder. Some ambitious souls have pulled the dash and did a wire by wire replacement. Quite tedious but possible. Share your findings, efforts and progress. 1 Quote Link to comment Share on other sites More sharing options...
Pete Posted May 8, 2017 Report Share Posted May 8, 2017 Hi Gnomeworks, Welcome to the forum and the hobby. Below is from a document on wire and fuse sizes I used to rewire my '38 truck. Hopefully it copied and pasted okay. Pete Guide to Wire and Fuses Wire Size vs. Amperage Applications of Wire Plug-in Fuses Fuse Listing Guide Ford flathead hotrod street rod hot rod chrome restore car classic vintage antique Ford flathead hotrod street rod hot rod chrome restore car classic vintage antique Wire Size vs. Amperage Wire Size: 8 10 12 14 16 18 20 Amperage: 35 25 20 15 7 5 3 Ford flathead hotrod street rod hot rod chrome restore car classic vintage antique Ford flathead hotrod street rod hot rod chrome restore car classic vintage antique Applications of Wire Wire Size 6-Volt Wire Size 12-Volt Item 8 10 Amp meter gauge 8 10 Alternator or generator and regulator large terminals 12 14 Electric fuel pump 12 14 Alternator or generator and regulator small terminals 14 16 Gauges, fuel, oil, temperature 14 16 Ignition, distributor, coil 14 16 Directional signals, parking and tail lights, and radio 12 14 Headlights Ford flathead hotrod street rod hot rod chrome restore car classic vintage antique Ford flathead hotrod street rod hot rod chrome restore car classic vintage antique Plug-in Fuses (Type ATO) Amperage: 3 5 7-12 10 15 20 25 30 Color: Violet Tan Brown Red Lt. Blue Yellow Natural Lt. Green Ford flathead hotrod street rod hot rod chrome restore car classic vintage antique Ford flathead hotrod street rod hot rod chrome restore car classic vintage antique Fuse Listing Guide Use: Radio Lighter Stop Lights Gauges Overdrive Heater Tail/Parking Interior Lighting Wipers Accessory Amperage: 5 20 20 5 30 20 20 20 20 20 2 Quote Link to comment Share on other sites More sharing options...
Dan Hiebert Posted May 8, 2017 Report Share Posted May 8, 2017 Welcome to an excellent Forum, and to the old car hobby. You'll get all the info you need here, and then some. The most valuable resource you need for working on these old cars is...patience. Everything else comes along as long as you have that. You've got good car to start with. I would echo previous responses about the wiring, if your car's wiring is universally bad, I think it would be more prudent to get an entire wiring harness, several companies make then. Check the resources section of this site. As long as you can follow directions and have no compunction against asking questions, it will not be that difficult. Personally, the added cost of a complete harness is worth it if you are completely rewiring the car. 2 Quote Link to comment Share on other sites More sharing options...
John Norlien Posted May 8, 2017 Report Share Posted May 8, 2017 I am also in the St Paul area. A big tip on brakes- ABC Rental in South St Paul has a drum puller as a rental item. I told them that if they ever want to sell it, I would buy it, but the said it gets enough use that they keep it in service. Using the correct tool is the only way to get the rear drums off without damaging them or getting really frustrated. Quote Link to comment Share on other sites More sharing options...
Young Ed Posted May 8, 2017 Report Share Posted May 8, 2017 13 minutes ago, John Norlien said: I am also in the St Paul area. A big tip on brakes- ABC Rental in South St Paul has a drum puller as a rental item. I told them that if they ever want to sell it, I would buy it, but the said it gets enough use that they keep it in service. Using the correct tool is the only way to get the rear drums off without damaging them or getting really frustrated. Welcome guys! I'm just over from you guys in Minneapolis. Quote Link to comment Share on other sites More sharing options...
48ply1stcar Posted May 8, 2017 Report Share Posted May 8, 2017 Welcome, and good luck. Brakes are a good start as stated above. Wait for your manual before buy wire, and it's a good idea to increase the the gauge of the wire by a size, remember that a manufacture of any product is going to use the minimum size to save cost. I replaced all of the wires in my 48 one at a time as necessary. I used plastic covered wire because my car will never be a restoration project. Restore, upgrade, modify are all questions. 12 volt, disc brakes, modern transmission, there are lots of things to keep in mind. You can make yourself a reliable daily driver and keep the car looking original. Again good luck, ask questions, I'm in Blaine, MN if you have any thing you want to discuss. Quote Link to comment Share on other sites More sharing options...
dale Posted May 8, 2017 Report Share Posted May 8, 2017 (edited) This would be a great time to convert to front disc brakes and installing a one wire 12 volt altinator which would eliminate half the wiring and most all the potential charging problems. 99% chance the radio is shot so I see no problem of switching to negative ground for the altinator. IMO Edited May 8, 2017 by dale addition Quote Link to comment Share on other sites More sharing options...
Gnomeworks Posted May 8, 2017 Author Report Share Posted May 8, 2017 Thanks to everyone for the advice so far. I wanted to keep things as original as possible, so I guess this project would fall under the restore category. I know the guy who sold it to me made a few repairs so it was moderately drivable before I bought it. It has a new master cylinder, new break lines, and new break shoes. Quote Link to comment Share on other sites More sharing options...
RobertKB Posted May 8, 2017 Report Share Posted May 8, 2017 2 hours ago, Peter1938 said: Hi Gnomeworks, Welcome to the forum and the hobby. Below is from a document on wire and fuse sizes I used to rewire my '38 truck. Hopefully it copied and pasted okay. Pete Guide to Wire and Fuses Wire Size vs. Amperage Applications of Wire Plug-in Fuses Fuse Listing Guide Ford flathead hotrod street rod hot rod chrome restore car classic vintage antique Ford flathead hotrod street rod hot rod chrome restore car classic vintage antique Wire Size vs. Amperage Wire Size: 8 10 12 14 16 18 20 Amperage: 35 25 20 15 7 5 3 Ford flathead hotrod street rod hot rod chrome restore car classic vintage antique Ford flathead hotrod street rod hot rod chrome restore car classic vintage antique Applications of Wire Wire Size 6-Volt Wire Size 12-Volt Item 8 10 Amp meter gauge 8 10 Alternator or generator and regulator large terminals 12 14 Electric fuel pump 12 14 Alternator or generator and regulator small terminals 14 16 Gauges, fuel, oil, temperature 14 16 Ignition, distributor, coil 14 16 Directional signals, parking and tail lights, and radio 12 14 Headlights Ford flathead hotrod street rod hot rod chrome restore car classic vintage antique Ford flathead hotrod street rod hot rod chrome restore car classic vintage antique Plug-in Fuses (Type ATO) Amperage: 3 5 7-12 10 15 20 25 30 Color: Violet Tan Brown Red Lt. Blue Yellow Natural Lt. Green Ford flathead hotrod street rod hot rod chrome restore car classic vintage antique Ford flathead hotrod street rod hot rod chrome restore car classic vintage antique Fuse Listing Guide Use: Radio Lighter Stop Lights Gauges OverdriveHeater Tail/Parking Interior Lighting Wipers Accessory Amperage: 5 20 20 5 30 20 20 20 20 20 This is very helpful. Thanks for posting. If it has been posted previously, I must have missed it. 1 Quote Link to comment Share on other sites More sharing options...
knuckleharley Posted May 8, 2017 Report Share Posted May 8, 2017 1 hour ago, John Norlien said: I am also in the St Paul area. A big tip on brakes- ABC Rental in South St Paul has a drum puller as a rental item. I told them that if they ever want to sell it, I would buy it, but the said it gets enough use that they keep it in service. Using the correct tool is the only way to get the rear drums off without damaging them or getting really frustrated. You can buy them at NAPA stores,as well as from places like Eastwood,Northern Tools,and Amazon. Here is one from amazon. https://www.amazon.com/TruePower-20-2029-Universal-Hub-Puller/dp/B012P0QV5K/ref=sr_1_1?s=automotive&ie=UTF8&qid=1494255044&sr=1-1&keywords=drum+brake+puller Go to the amazon home page and type in "drum brake puller" and you get several pages of brake pullers to choose from. For those of you who may not know which is the correct style for old Mopar,IHC,Ford,and who knows what others,the style in the hot link I posted is the one you need. In fact,it is the only style that will work. Quote Link to comment Share on other sites More sharing options...
Ernie Baily Posted May 8, 2017 Report Share Posted May 8, 2017 Hello, Your car looks like its in pretty good shape! When I rewired my 55Dodge I used a new loom from YnZ wiring it worked out great and took two weekends to intstall with the help of a friend. They include great instructions and along with a original wiring diagram it was fairly easy. There is another company to check out also, Rhode Island wiring. Good Luck and Have Fun! 1 Quote Link to comment Share on other sites More sharing options...
casper50 Posted May 8, 2017 Report Share Posted May 8, 2017 I used Rhode Island wiring. Easy install. Quote Link to comment Share on other sites More sharing options...

Recommended Posts
Join the conversation
You can post now and register later. If you have an account, sign in now to post with your account.