Booker T
-
Posts
119 -
Joined
-
Last visited
-
Yep, 12v sometime last year. The pic was just me messing around trying to figure out how to link everything with the new objects. I think 90% of the car is done with 12ga except for the stuff that was 10ga when it was 6v. Also still running my 2/0 battery cables...figured why swap out for smaller wires / cables just because I went 12v...
-
Luckily I have used it a bunch for process mapping at work...so I don't hit the desk nearly as hard as I used to when that happens!!!
-
My first two re-wires were DIY and even though I am adding a bunch of stuff this go around there is enough of the original wiring that I did that will stay to make it an easy decision for me. I am pretty anal about wiring and connectors, etc. so I am happy with the job I did thus far...heat shrink, solder or good crimps and decent connectors. I just want to add on and re-organize a little...not start from scratch. Plus, even though I am not using the "correct" color combinations I really like the look of the cloth covered wire (Rhode Island Wire, Brillmans, several others). That said, this time I am adding in a bit of complexity with the turn signals, reverse lights, horn, interior lights, gauges and gauge lights as well as an iPod jack hooked to a hidden amplifier, hidden volume knob (glovebox) and hopefully some fairly well concealed speakers plus terminal blocks and fuses for everything...thus the reason I am trying to come up with a good way to plan and document what I am doing!
-
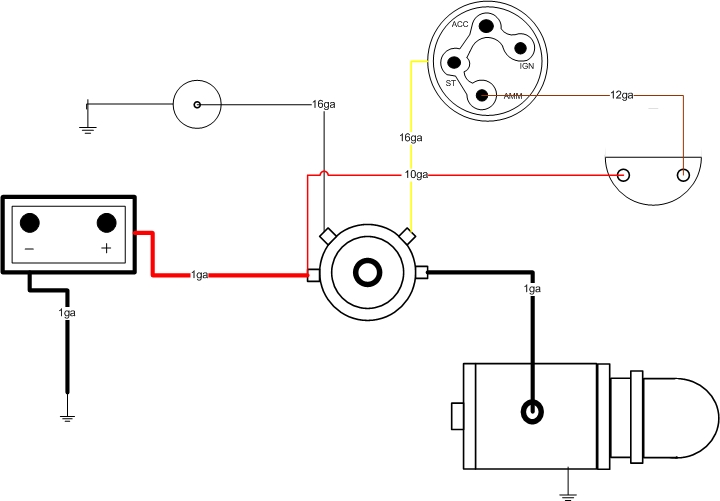
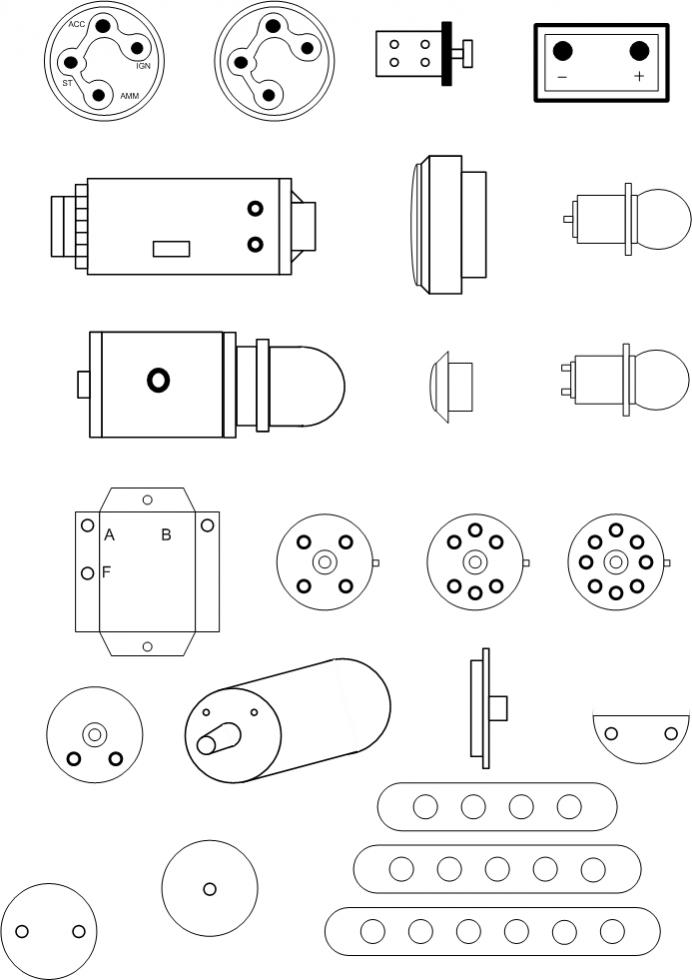
My friend did all the wiring for his 1/8 mi drag car on AutoCad...kind of my inspiration behind this except using a software that I am familiar with. Those wiring schematics look good! I am still messing with labels and trying to figure out a way to format wire sizes and be able to drag and drop colors with the right gauge and representitive width of line. I know it can be done but just need to play around a little more with it. Anyway, here is an example of testing out the connectors and some labels as well as more of the shapes I put together.Visio lets you resize the shapes as needed so I tried to make them big for the example...

-
I am about to start the 3rd rewire on my car. First was to fix what the previous owner did. Second was because I went 12v and HEI as well as added some aftermarket gauges in the glove box. Now I am going back to try to get all the original gauges in working order, fix the turn signals, add back up lights and hook up the horn. Each time in the past I have used the factory wire diagrams and then drawn my own to keep track of what I was doing. My hand drawn diagrams are alway a mess! In addition to the rewire on the 54 Savoy, I have a 61 Unibody that i am going to start working on this summer so I will have more "wiring duty" in my future... So, I decided to use a program that I use a lot at work to do business process mapping and re-design...Microsoft Visio. There are some decent templates that come with the software but I recently learned that you can customize and draw your own shapes. So, as I wait for all the parts to arrive for the rewire, I have been creating some shapes to create a more factory like wiring diagram to show how I am hooking everything up. Because I have made modifications and because I have used aftermarket wires (cloth covered) that didn't adhere strictly to the factory colors I want to keep track of what wires do what and what I have done (will do). The program has some neat featues as far as connecting the shapes (label for size of wire and assign colors) and even lets me designate the connection points on the shapes to keep things organized. I am just figuring this stuff out but so far so good... Anyway, attached is a jpeg of some of the shapes I have created. I still have a lot more to do but I am getting pretty quick at it. If anyone else uses Microsoft Visio or would be interested in the templates I could share. Supposedly since I created these from scratch and did not use existing shapes as a basis there is no copyright problem and I should just be able to save and forward... Let me know if anyone else has tried this or something similar...or even just what you think about it.
-
Well, darn it! Are you telling me all that art I bought was a bad investment!?!?!?!?
-
I've found that it is hard to get a good idea of a car's stance until all the parts are put back on. It may just be me but things like the bumper, hood and even tailights seem to make a difference when looking at the car. I guess it is how all the lines flow together... My car had all but 2 leafs removed...drove me crazy. I recently put leafs back in. I liked the way it looked before but it drives 100 times better now. I have never checked into it but if you are looking for a way to go lower you might check out having the springs de-arched instead of removing springs. They may keep more of the ability to do their original job that way...not sure. Either way, looking good!
-
Thanks for the info. I should have been more clear in my first posts. When I got the car the turn signal wires were cut behind the dash and were badly frayed leading up to the steering wheel. I used these to test as best as I could at the time and determined they didn't work. At the time I checked for a replacement switch and was put off by the prices I found. At that time I wanted to clean up the wiring and cut the wires off and pushed the ends up into the switch. Now, I have been getting all my gauges, horn, dome lights, reverse lights, etc. back in working order and got the notion to fix the turn signals. The only reason that I was asking if I could get to the internals without removing the steering wheel was to do some additional tests to see if I could determine what was wrong with the signals and if it was something that I might be able to fix instead of replacing the switch itself. Now that I know that I need to take the steering wheel off that is next on my list. Hopefully I will find some bad wiring / connections and I will be back in business!!!
-
I was afraid of that! Guess I did things in the wrong order and should have waited on fixing the horn button / ring until I pulled the steering wheel. Just one more question...when I originally tested the turn signals they were not functional. Now, if I pull the steering wheel and get to the internals of the switch is it possible that I will find anything in there that can be repaired? Or is it pretty much a situation where it will need to be replaced? The switch moves fairly smoothly to each position, my hope was maybe the wiring was just worn out and could be replaced. I have seen a couple replacement switches in the past but they were a little pricey for me so if it is not something that I can repair then I will probably keep rolling with the hand signals out the window! Thanks!
-
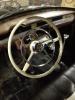
Yet another question... My 54 came with factory turn signals. When I rewired I did not hook these up but now that I am going back through everything I am wanting to see if I can get them hooked up and working. Does anyone know if I can get to the internals of this switch without pulling the steering wheel? I can move the case around a little but that is about it. I didn't know if there was a trick to getting this open / where I can work on it or if I needed to take my newly rebuilt horn button off and then pull the steering wheel... There are no screws, etc. in the housing... Sorry for the poor picture...
-
I'll make one more pass through my giant bucket o' fittings and see what I come up with. I had the male end of a compression fitting that would thread in quite a way. As long as it seals I guess I am good to go. Problem is that even though I have 2 working gauges I am not sure how to test it for leaks at the moment because I just started re-wiring my car and have no way to start it. I guess I could used compressed air and see if it holds pressure to test for leaks?
-
I may take you up on that offer. Struck out at another two places locally. At this rate (I live a little bit out in the sticks) I will have $100 in gas invested in finding this thing!!! Quick question...does the one you have thread all the way in and then mate up to the little flared part inside? Or does it just thread enough to seal the fitting?
-
Yeah, that looks like it would work! What exactly is that? Is it a standard fitting or a specific part for the gauge? Do you know the thread on that? Or I guess the real question is where could I get one and what would I ask for? I took the gauge to the local Napa and a fitting supplier and they couldn't find anything... Thanks for the help!
-
Does anyone know what fitting was used on the factory oil pressure gauges (specifically for my 54)? When I purchased my car it did not have anything hooked to the oil pressure gauge. I added an aftermarket gauge in the glovebox when I did my rebuild. I now want to go back to the factory gauges. It looks like 1/8 pipe but none of my fittings will thread in past about 1 turn. I thought the threads might just be buggered in the gauge I have but I recently acquired another gauge and it is the same deal there. It looks like the factory fitting would mate up with a flare of some sort once bottomed. My hope was to just use an aftermarket copper line and fittings and mate it to my factory gauge. Even if it did not mate to the flare I figured I just needed it to seal and not leak... Thanks in advance for any help!
-
Well, it seems that the original fuel sender that everyone was talking about (this forum and others) is no longer available from JC Whitney under the original part number (ZX128525U). Below is what I can come up with doing a search. It is a little more pricey but imagine it will work the same for my application using the suggestions that have been made. Is this the same model with a new price (others had mentioned $19.99)? If not, does anyone know of a source for the other parts (specifically at the lower price as I am cheap!). http://www.jcwhitney.com/adjustable-fuel-level-float/p2005714.jcwx?skuId=162409&filterid=c2072j1