


Theturtle
-
Posts
17 -
Joined
-
Last visited
Content Type
Links Directory
Profiles
Articles
Forums
Downloads
Store
Gallery
Blogs
Events
Classifieds
Everything posted by Theturtle
-
Parking brake with T5 transmission conversion
Theturtle replied to Theturtle's topic in P15-D24 Forum
In the last day or so I had a note from Russell Nardi of 5speedadapters.com that they are working on a solution. So I am hoping that works out. I do not understand the comment above that dual master cylinders would not help. My impression was that would amount to two independent hydraulic systems. Loss of fluid from one would leave me with half my normal braking, far better emergency braking that even the OEM set-up. Still the possibility of a mechanical break in the pedal linkage, but a big improvement it seems to me. -
Parking brake with T5 transmission conversion
Theturtle replied to Theturtle's topic in P15-D24 Forum
I understand that the hydraulic valve method does nothing in the way of an "emergency" brake. I think a dual master cylinder would go a long way toward this and have been following the recent thread on this. -
Parking brake with T5 transmission conversion
Theturtle replied to Theturtle's topic in P15-D24 Forum
Thanks for the comments. It had not occurred to me to mechanically pull the brake pedal on using the hand brake mechanism. I am going to see if I can figure out how to do that. I see the Line-Loc is still for sale. I have looked a lot at valves on Amazon along the lines of the JEGS item mentioned by DJ. If the brake pedal does not work out will probably do something using a valve like the JEGS one, but with a lever. On the airplanes I learned that copying someone else's idea works out better than my design attempts. Hoping I can find something to copy. If I do it myself, will be sure to post if it is not too ugly. I have learned so much from this forum over the years. Thanks again to all of you. -
My P19 fastback came from prior owner with a T5. I would have preferred an overdrive equipped car but this was the best P19 fastback I could find locally. On balance, I like the transmission. First gear is too "low" but fifth is real great when keeping up with traffic. Someday I will check into changing to a first gear closer the the stock Plymouth ratio. What I don't like is loss of a parking brake. I am hoping someone has come up with a solution simpler than swapping in a rear axle that has provision for a parking brake. Years ago I built two home built airplanes. A common approach with those was an on/off hydraulic valve. You would press the brake pedals and then use the valve to hold pressure. (Handy to temporarily to hold the plane on a slope until you could get wheel chocks.) I am thinking of something similar that would be operated with the regular parking brake control which is still present on my car. Has anyone here worked out a good parking brake solution along those lines? (I am not seeking an emergency brake. Just something to hold the car temporarily such as when it would stall on a slope.)
-
I have a P19 (1950 fastback) that I have been bringing back from "junker" status to look like a well used old car. The dash was really rusty with just a trace of wood grain. I removed it and used the Grain It process. The pictures show how it came out. The comparison picture is with a better P19 I have which has the original dash. The color is different than original - less brown. I think the angle of light makes my repro look lighter than if it were at the same angle as the original. I found the process easy and enjoyable to do. Back when I did this I had no experience in finishing the clear coat. If I had wet sanded and polished it I think the results would have been great. As it is, they are certainly not that good, but good enough for this project. IMG_0623 2.HEIC Compare.HEIC
-
When I disassembled my P19 the tail light sockets were too far gone to reuse. The housings are usable (barely) but I need sockets. Is there an easy workaround with modern parts or must I start looking for the real thing? The socket is 1 inch. Also wondering about the internal parts (disc with two contact points and a spring, as I remember). Any suggestions appreciated. Thanks,
-
Greg, thanks for the comment and the picture. Your's is the look I am going for - black car, black wheels, hub caps and beauty rings, no right side mirror - but 4 years newer fastback instead of coupe. Sad to say mine will not be so nice. For now, I am going to make do with the original paint with lots of touch-ups. I'm hoping the 205s will be about right. I think the 1950 P19 Deluxe used 640/15 tires and had a lower (numeric) rear-end ratio than the Special Deluxe, which used 670/15s to get the same final gearing. I'm seeing a 27" wheel diameter specs on both the 640 and 205. Time will tell.
-
Thanks, Bob and Soth for the replies. Good to hear that the size will work. I have decided to go with the 205 size. Both of your cars look great! Still a long way to go with mine. Rewiring starting next week.
-
I have done a frame-off, clean up, engine rebuild and am into reassembly. Have decided to keep original paint and touch up the bad spots. So no glamour here. It will be my around town driver. Original wheels are off to be cleaned, blasted, painted. Looking for low cost Blackwall tires. Thinking of 205/75/R15 from Discount Tire. Has anyone had success with this size on a car like mine, or do you have other suggestions?
-
I used the Grain It Technologies (GIT) http://woodgraining.com for my 1950 dash and the window and windshield garnishes. I found it easy and fun to do. I'm happy with the results. Not show quality but fine for my purposes. Wish the rest of the project would go as well as this.
-
I wonder if the remanufacturers did anything about the engine numbers. The engine in my 1950 Plymouth is red. The numbers stamped in the usual spot are nothing like the Plymouth factory engine numbers I have seen. The car was with one owner (and later his grandson) on a NW Iowa farm its entire life. I think the engine is one of these "remanufactured" engines. But I do not understand why they would have bothered to come up with a different engine number. I wonder if it could have originally been installed on some kind of farm equipment and then swapped into this car.
-
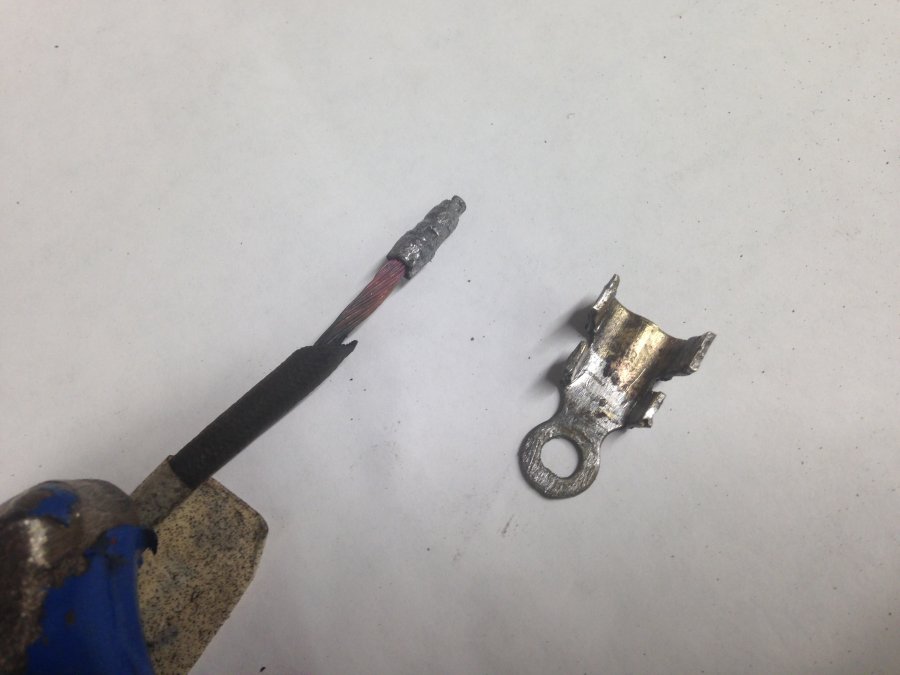
Thanks to all for the comments. I have lots of time and with the encouragement from Dodgeb4ya will try to reuse the old terminals. Started with first wire this afternoon. The original harness is beautifully made. Perfect crimping plus solder. I can remove the ring and spade connectors (photo). But I am stumped with the bullet ends which seem to be soldered and crimped at multiple points. Melting the solder does not help. Do I drill out the wire and then expand the bullet? How do I crimp the bullet back on when the time comes (weeks away...)? Could use some suggestions and tips.
-
I am starting to rewire my 1950 Plymouth fastback, hoping to match the original as best I can using wire from Rhode Island Wiring and reusing the original terminals. The service manual seems to match the car with just a few exceptions. I have the dash out of the car (redid the woodgraining) and the body off the chassis, so everything is easy to access. I have tinkered with cars a lot but never attempted a full rewire. Some first questions: 1. How do the rear turn signals work? I see just two inputs - the brake and the tail light filaments. The turn signal wire appears to tie into the brake light wire. Does one loose the flashing when the brake light is on? (The turn signal switch is clamped to the steering column and looks to be dealer installed.) 2. The wire from the coil to the ignition switch is badly deteriorated, especially where it enters the armored cable forward of the firewall. Is there a way to renew that wire inside the armor or must one replace the switch and wire as a unit? 3. Is it practical to reuse the old terminals? Thanks for any suggestions.
-
Headers or stock exhaust manifold
Theturtle replied to Dennis46PU's topic in Mopar Flathead Truck Forum
Thanks for the reply, Reg. Guess I did not ask my question very well. I figure it is going to be more difficult. I just want to get a sense of how tough it will be and that there is enough room behind the headers to get in there and do it. -
Headers or stock exhaust manifold
Theturtle replied to Dennis46PU's topic in Mopar Flathead Truck Forum
I too am thinking about headers instead of repairing a cracked manifold. Do the cast headers make valve adjustment more difficult? -
Using Panel Bonding Adhesive for Floor and Rocker Repair
Theturtle replied to JerseyHarold's topic in P15-D24 Forum
I'm facing the same question. I am using West System epoxy bonded to steel supplemented with steel pop rivets for some of the rusted floor and rocker areas of my 1950 P19 project. I have done some tests and it certainly seems to stick to both steel and Rustoleum Rusty Metal Primer. Also, my experience with this has been positive. I have built two airplanes that included West System Epoxy bonded to aluminum. The first was finished in 1999 and the second in 2012. I have been flying both regularly and have experienced no issues. On the airplanes we bond thick plexiglass windshields to sheet aluminum, using an epoxy/fiberglass fairing about 2 inches wide. We also bond it to aluminum for fairings in several other areas. So far (16 years) it has held firmly, looks perfect and shows no signs of cracking dispute experiencing a lot of stress, temperature changes, etc. Based on the airplane experience I used the West System epoxy in parts of a 1958 Volvo (PV444) project five to ten years ago (I am slow at these). There I used MIG welding in some places (mostly floor and part of the trunk) and the epoxy in others (mostly fender lips and flanges). Both have held up well. But the Volvo is not a real test because I have not driven it on salty roads and only a few times in the rain. I do pay attention to shielding the repaired areas using paint, seam sealer and undercoating. Driving modern cars and seeing how well they protect the fragile underparts makes me want to do more shielding for these two old cars. Both have their clutch linkages exposed to everything that comes their way. On the Plymouth, 30 years of driving on gravel roads (driven 30 and parked 35) caused part of the clutch linkage to be almost worn away at the pivot point. As the previous posters point out, this is not a "quality" repair for resale purposes. But that is not a factor for me. I have no intention to sell the cars. I just like to work on them, drive them and share them with the grandkids. Please do not take this as a recommendation - it is just a data point. I have no idea if this is actually a good idea for car repair. But it really works on airplanes! Keith Williams 1950 Plymouth P19 Fastback Milan, IL
