Charles Furman
-
Posts
221 -
Joined
-
Last visited
-
Days Won
1
Content Type
Links Directory
Profiles
Articles
Forums
Downloads
Store
Gallery
Blogs
Events
Classifieds
Everything posted by Charles Furman
-
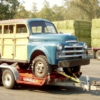
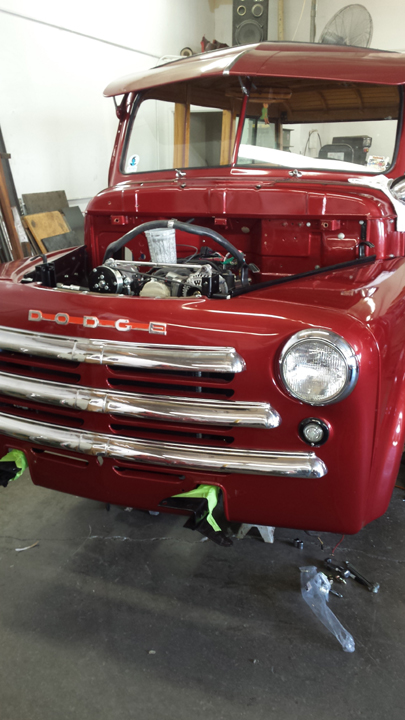
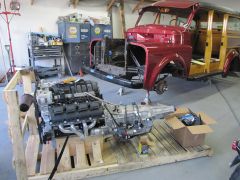
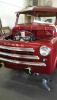
01 28 14 01 5.7L Hemi & Transmission
Charles Furman commented on Charles Furman's gallery image in Individual Member Photo Albums
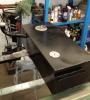
 I had all of my gauges converted to electronic. (speedo, oil, fuel, amp, and temp). I even had a spare speedo converted to a tach and installed it where the speaker was mounted.
 -
01 28 14 01 5.7L Hemi & Transmission
Charles Furman commented on Charles Furman's gallery image in Individual Member Photo Albums
Street and Performance in Mena AR. -
Here are a few NOS and a couple of used parts I have gathered over the years. Now that I am culling out my spare parts bin, I wonder how best to determine their value in today's market. Any Ideas? Original Equipment Dodge 48-53 Truck Parts Parking light lens – NOS (2) Fog light brackets – NOS (1 pair) Under Hood Light – NOS (1) Cigarette Lighter – NOS (2) Heater Water Valve (mounts on top of cylinder head) – NOS (1) Engine Compartment Light – NOS (1) Glove Box Light – NOS (1) Spotlight Bracket Kit – NOS (1) Radio Antenna – Original used (1) Radio Antenna Mounting Kit – NOS (1) Ash Tray – NOS (1), Painted (like new) (2) Taillight Lens with DODGE – NOS (1) Glove Box Liner – New aftermarket (2) Amp Gauge – NOS (1) Misc. Dash Knobs – used Passenger Side Mirror Bracket (small) – Used (1) – extremely rare
-
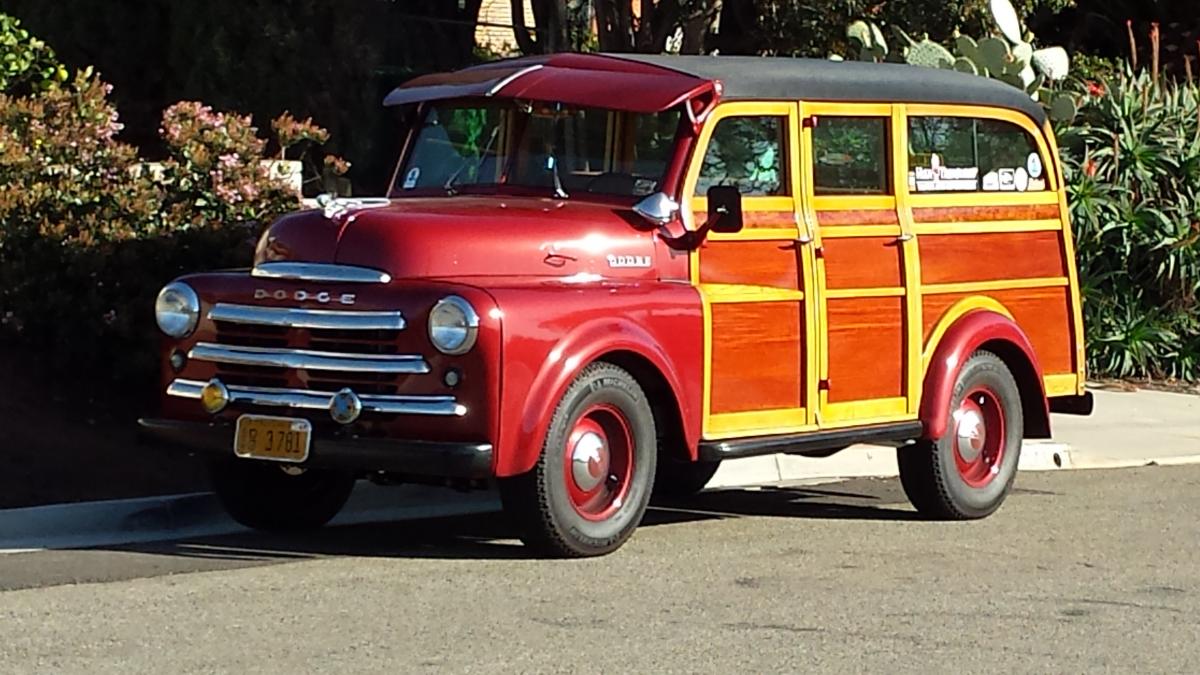
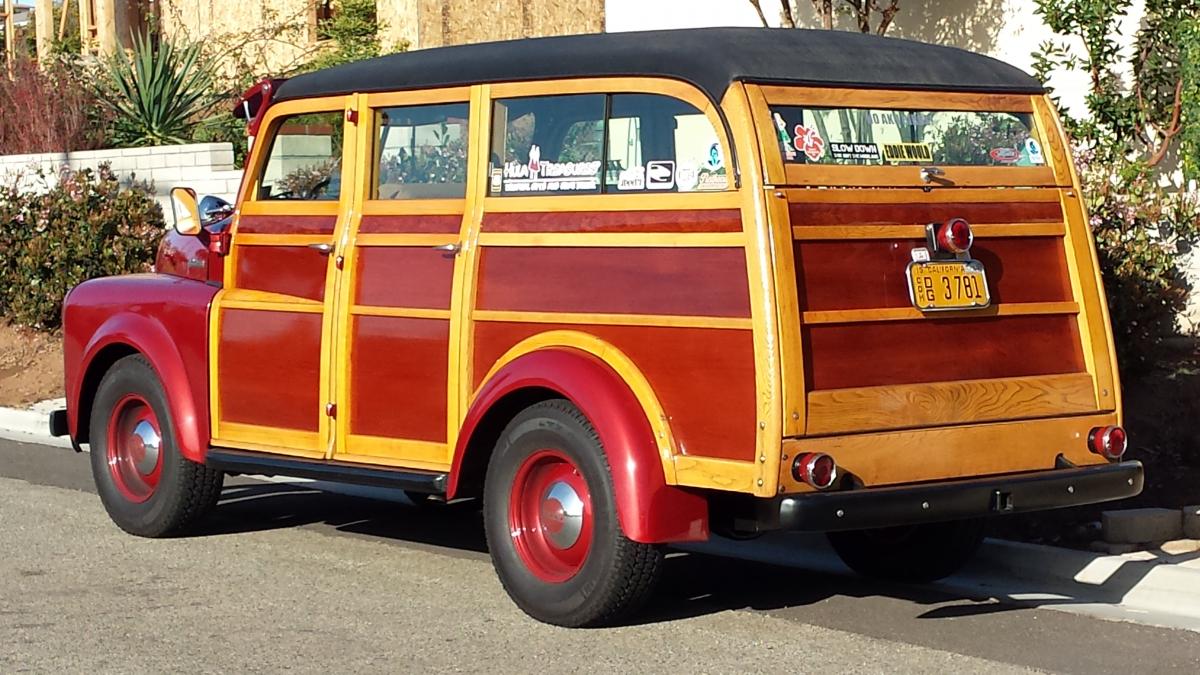
1949 Dodge B1B Woodie Makeover
Charles Furman replied to Charles Furman's topic in Mopar Flathead Truck Forum
Here is how it looks now. I still have a few bugs to work out, but I am very pleased with the outcome. The process was a nightmare. When I get time I will write it all up so that the next person that takes a project like this on will be able to benefit from my mistakes.

-
Can anyone help me with two paint questions? 1. What color primer did Dodge use on the Pilothouse trucks in 1948? 2. What is the name/number of the Dark Blue (almost black) color used on the Pilothouse trucks in 1948? Thanks for any help you can provide. Charles
-
I am selling two horns (single cone) and a driver's side mirror bracket (small stamped version) to a friend and I want to be fair on the price. Can anyone give me thoughts on what a fair price might be for these items? Both horns work. One is rough with one of the terminals broken so it only has one nut left. The other horn is in nice shape with good paint. The mirror bracket is rough with a little ptting. Thanks for any help you can offer.


-
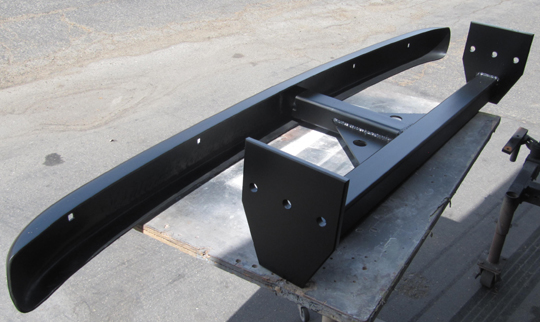
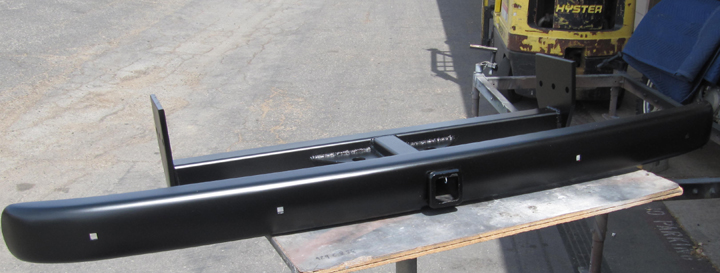
I put the receiver through the stock bumper. It's a lot more work, but I like the way it turned out.

-
1949 Dodge B1B Woodie Makeover
Charles Furman replied to Charles Furman's topic in Mopar Flathead Truck Forum
It wasn't too far away, but far enough that we are safe. Everyone had some level of discomfort because over the past three days there have been over 15 fairly large fires in North San Diego County, and close to 40,000 people have been evacuated from there homes. Our fire crews and the residents handled things really well, in part, because we learned so much from the 2003 and 2007 fires. So far only one fatality, a transient who had a camp out in a brushy area. -
1949 Dodge B1B Woodie Makeover
Charles Furman replied to Charles Furman's topic in Mopar Flathead Truck Forum
Sorry I haven't posted much lately, but a lot has been going on down here in the San Diego area. (see picture). We are safe, the trucks are safe, so I have a lot to be thankful for. Others are not so lucky. At times like this, your priorities get a reality check. I'll post more truck upgrade pictures next week.
-
1949 Dodge B1B Woodie Makeover
Charles Furman replied to Charles Furman's topic in Mopar Flathead Truck Forum
Thanks Rod. -
1949 Dodge B1B Woodie Makeover
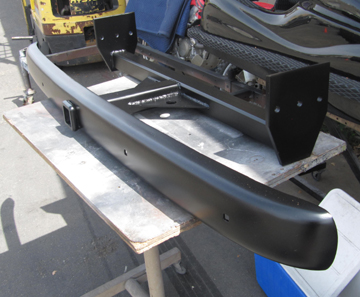
Charles Furman replied to Charles Furman's topic in Mopar Flathead Truck Forum
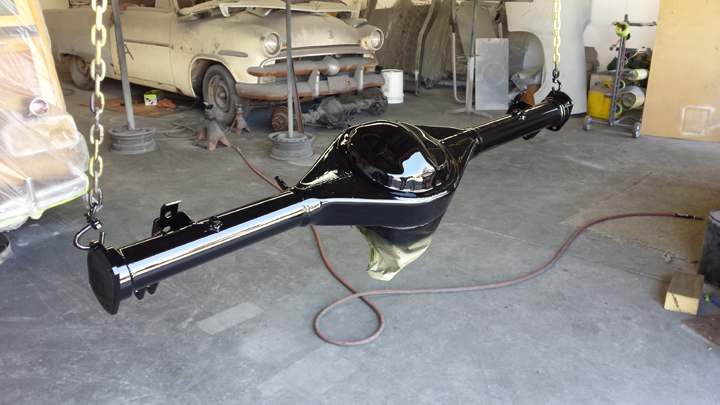
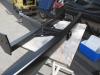
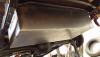
5/5/14 Update Well, we got the trailer hitch all fabricated and painted. I want to thank everyone for all the ideas, especially Gerald (GTK). We kind of copied GTK's design and I am thrilled with how it came out. Here's a couple of pictures, plus one of the gas tank painted and mounted: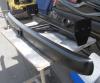


-
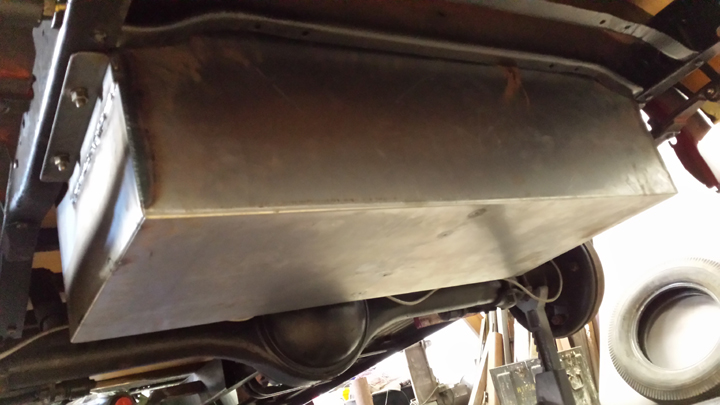
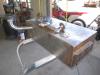
Since you have a spare tire mount on the passenger side fender, you could put a new tank behind the rear axle where the spare usually went. There is enough room back there you have a lot of tank options. You can buy off the rack or make one. Here are a couple of pictures of the tank we just built for my 49 B1B.
-
1949 Dodge B1B Woodie Makeover
Charles Furman replied to Charles Furman's topic in Mopar Flathead Truck Forum
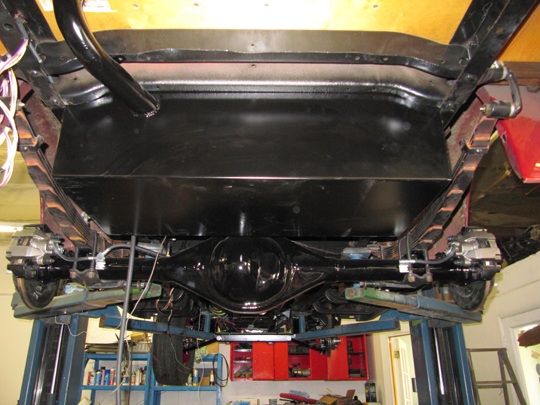
04-24-14 Update Rear axle housing is drying and the gas tank has been reassembled, so they will be reinstalled tomorrow. We hope to have the truck on the road by mid-May so we can get a couple of hundred miles on it locally before we head up to Santa Cruz, CA in mid-June.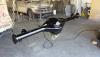

-
Not everyone's cup of tea
Charles Furman replied to ruff1148kr's topic in Mopar Flathead Truck Forum
I love what you're doing, and I agree with the other comments that you're both creative and talented. I can't wait to see it when it done. -
1949 Dodge B1B Woodie Makeover
Charles Furman replied to Charles Furman's topic in Mopar Flathead Truck Forum
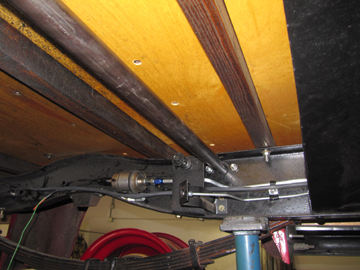
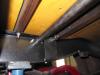
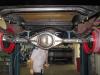
4-18-14 Update The rear-end in mounted and the work on the rear sway bar system is in progress. Here are some pictures. The sway bar is installed between the frame rails ahead of the axle and will be connect to the axle on both sides outside the frame rails. You can see the bearings in the pictures. Because of the weight of the wood body, we are using the same design and components that are used in open class off-road racing trucks.


-
1949 Dodge B1B Woodie Makeover
Charles Furman replied to Charles Furman's topic in Mopar Flathead Truck Forum
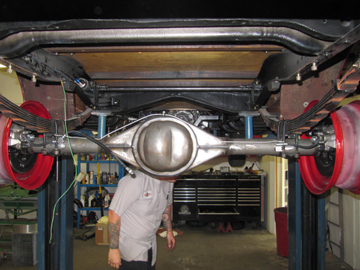
pflaming ..... I see you are from Reedley, CA so I don't think it is necessary to clarify that grass = (hay). Now, if you were from Oregon or Colorado it might be a different story. To answer your question, the rear-end housing will be painted the same semi-gloss black as the frame, gas tank, suspension components, etc. I have intentionally stayed away from chrome and polished parts as much as possible. In fact, the only parts that are polished or chrome are ones that gave me no option. When I originally restored this truck many years ago, I stayed with black bumpers, blackwall tires, etc. to try to maintain the commercial character of the truck's roots. These truck chassis woodies were purchased as mini-buses for boarding schools, shuttle vehicles for resorts and hotels, and other commercial uses. They rarely had upgraded features. In this new upgrade, I am trying to do all I can to preserve the original look inside and out. I am even going with a super quiet exhaust system to eliminate the rumble of a 345 h.p. "Hemi" motor. -
1949 Dodge B1B Woodie Makeover
Charles Furman replied to Charles Furman's topic in Mopar Flathead Truck Forum
The entire rear-end is made by Currie Enterprises in Corona, CA and it has a ratio of 3.70. -
Great info Don.
-
1949 Dodge B1B Woodie Makeover
Charles Furman replied to Charles Furman's topic in Mopar Flathead Truck Forum
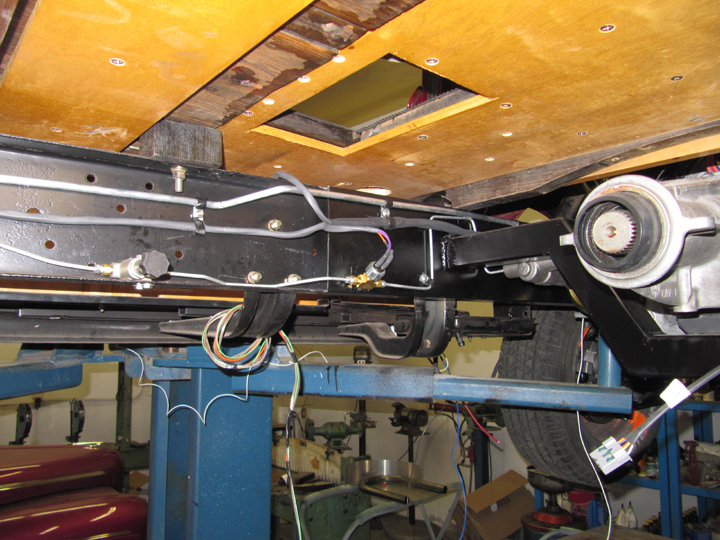
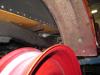
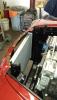
4-13-14 Update The truck was up on the rack so I got to take a couple of pictures from below. Today the rear-end will be going in and most of the wiring, brake lines and fuel lines are roughed in. The fuel tank is now complete and will get painted today.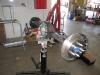

-
1949 Dodge B1B Woodie Makeover
Charles Furman replied to Charles Furman's topic in Mopar Flathead Truck Forum
Todd, They make people walk their bikes in the area where the cars are displayed which is good. It still gets crazy sometimes when people want to sit on or in your car to take pictures or let their kids run wild around them. If a parent asks nicely and seems responsible, I will often let their kid sit behind the steering wheel. I think it's my way of trying to generate some interest in vintage cars with the younger generation. A lot of us in the woodie world have started to talk about what the future of this hobby will look like without the next generation talking over. In 10-20 years there may only be 1980's-1990's Honda car shows. I guess this could be a topic for another full thread. -
1949 Dodge B1B Woodie Makeover
Charles Furman replied to Charles Furman's topic in Mopar Flathead Truck Forum
Hank and Davin, What a wonderful surprise to see you at the woodie meet in Dana Point. It is always nice to meet people in person that you have been chatting with on-line over the years. Yes, our red Dodge will definitely be here next year. Thanks for stopping by, I really enjoyed meeting both of you. Charles -
1949 Dodge B1B Woodie Makeover
Charles Furman replied to Charles Furman's topic in Mopar Flathead Truck Forum
4-7-14 Update We put the front grill piece on to check the clearance in front of the radiator/AC condenser for the transmission cooler. Good news, there's plenty of room. It is amazing how much room there is in these Pilothouse trucks. we did not have to touch the firewall or the inner fenders, and you can see in the photo how easy the steering linkage was. I am even going to be able to retain my fresh air vent. The electric fan set up will go in directly behind the radiator.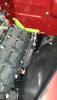
-
1949 Dodge B1B Woodie Makeover
Charles Furman replied to Charles Furman's topic in Mopar Flathead Truck Forum
John .... I went with 7x16 inch wheels instead of 6x16 inch wheels primarily because the weight of the wood body makes my pilothouse more like a large SUV, and I knew I wanted to go with slightly wider tires. It was certainly not rocket science. All my hot-rod buddies were pushing for 8x16's which I simply wasn't going to do. I have decided to go with LT265/75R16 tires which are essentially what is on my GMC Yukon. If I had a pick up, I may have considered the 6x16 inch wheels and slightly smaller tires. -
1949 Dodge B1B Woodie Makeover
Charles Furman replied to Charles Furman's topic in Mopar Flathead Truck Forum
Yes, Wheelsmith in Corana did the wheel work. I only did 4 wheels as 7x16. I am moving the spare up inside the woodie to make room for the new gas tank. I will be mounting a narrow spare tire the same height as the others on the stock 4.5 inch wheel so it can lay flat under the 3rd seat. -
Dave's Aka Themoose 1953 B4B
Charles Furman replied to TheMoose's topic in Mopar Flathead Truck Forum
Nice truck, welcome.