-
Posts
954 -
Joined
-
Last visited
-
Days Won
6
Content Type
Links Directory
Profiles
Articles
Forums
Downloads
Store
Gallery
Blogs
Events
Everything posted by soth122003
-
Sorry guys. i meant this action for the original radiators only. Joe Lee
-
Just read the thermostat section in the repair manual. The 180 t stat starts to open at 180 and is fully open at 195-200. So your system maybe working right. The 180 t stat was mainly for very cold climates to help the hot water type heaters in the winter. Joe Lee
-
If your original rad is in fairly good shape, this is how I did mine on the recommendation of an old timer. 1. Plug the rad and fill with a dawn dish detergent and water solution and let soak for a day or two. Flush with warm water and perform the flow check. If good then install and test. If not, you can try step 2. If there is evidence of heavy calcium or lime deposits I would try CLR. If not use vinegar. This one cleaned mine out great. Since CLR is great for the lime and calcium build up from hard water and is fairly mild. DO NOT use anything stronger than CLR (like muratic acid) as it will eat the metal of the rad. 2. Plug the rad and fill with 1 gallon of CLR or vinegar (a buck a quart CLR or a buck a half gallon of vinegar at the Dollar General) and top off with water. Lay the rad face down for 15 minutes. Flip over face up for 15 minutes. Stand in the upright position for 15 min. Stand on left side for 15 minutes. stand upside down for 15 min. Stand on right side for 15 min. Drain and flush a few times with warm water. Perform flow check and install and test. If after any of these tests the rad leaks, a good rad shop should be able to solder the leaks, or you can do it yourself if you feel comfortable with doing so. I believe it was after 1954 they went to pressurized systems, at least on the Plymouths anyway. Anywho that is my 2 cents worth. Take as a suggestion and not gospel. It worked for me. Joe Lee
-
You said you put in an aluminum radiator. What kind did you put in? Reason I ask is that the flow rate thru the rad might be to fast. (IMHO) Thus not allowing the coolant to bleed off the heat properly. Since I live in Florida, my car has a stock rad, straight water and runs at 170 all day long. Joe Lee
-

Engine Sputter & System Charging; Engine runs fine & no charge.
soth122003 replied to Noah's topic in P15-D24 Forum
Check the generator. Had the same problem one time and it was both the Voltage Regulator and the Generator. The VR was shot and the genny had a bad armature. Since you said you replaced the VR check the genny for voltage output and amperage. Motors manual and your shop manual will tell you how to check your genny. Joe Lee -

56 Desoto rear end wheel bearings and zirk fittings
soth122003 replied to jonkmahl's topic in P15-D24 Forum
Plymouth manual 46-54, states use short fiber grease 1/2 ounce using a low pressure grease gun. every 2 years or 20,000 miles. pg 311 lube and maintenance. Joe Lee -
I'm with Keith on this one. I think you got some crud in the carb and it fouled up the idle circuit. Clean the carb, because it does not take much especially with ethanol fuel when it breaks down. It leaves a greenish algae like stuff that can clog the idle circuit. Joe Lee
-
Hey Sam, It's because some one said "Hold my beer and watch this!" Rugbyjon, With the plugs out, pull that fitting from no. 6 and use a dowel rod or coat hanger about 12 inchers long. Bump the eng with a remote starter switch and put your thumb or finger over the number one plug hole. when you feel pressure start to build watch for the dowel rod to fully rise up. Just barely bump the switch when the rod is up and you felt pressure at number one that is TDC for that cylinder. Joe Lee
-
Pull the wheel and the panel and check the lifter springs to make sure they are not broken. I doubt they are but it never hurts to check. With the plugs out, pour a little oil in the plug hole and let it penetrate and lube the valves stems and guides. Some people use automatic trans fluid for this. Your call. While it is penetrating, check the area with the valve cover off and see it the penetrate is coming thru. With the plugs out, you should be able to see which valve is open. You should be able to work the valve from the bottom to loosen it up. My guess is they just got stuck from setting over the winter. Joe Lee
-
If the stud breaks off flush with the block and you have to drill, Start small and work your way up to just shy of the hole size. Make sure to center and drill straight. Also use oil or drill bit lube to cool the bit so it won't break off. If it is the number six exhaust, use a 90 degree drill. I had to do that on mine when the number six back bolt broke flush. I think I started with an 1/16 inch then a 1/8th, then 1/4 and I think I used a 5/16 last (maybe a 3/8) but only for the length of the shank. Then used a tap to clean the threads. It was a slow process but it needs to be. Joe Lee
-
Check your dodge service manual under the engine data. In the Plymouth manual under the same it lists the torque for the crankshaft nut as 108 ft pds min. for a 217 cid eng. Hopefully the dodge manual lists the specs. Joe Lee
-
Copy that GGDad. Just checking to see if I have then was going to PM Rugbyjon, but it is a moot point I don't have them. Rugbyjon, this link might help you out. https://www.ebay.com/itm/1946-1947-1948-Plymouth-driver-front-fender-stainless-molding-trim/372913727270?hash=item56d363e726:g:A1YAAOSwf~NeHevi Joe Lee
-
Rugbyjon I'll check tomorrow. I know I have the front end trim, grill headlight rings and other stuff. I think I have both sides but will have to check. It's been several years since I bought the car. Joe Lee
-
left or right trim? Might have one but will have to check. Joe Lee
-
Hey Jawes, When my rad was plugged up, I used about a gallon of CLR (calcium, Lime and Rust remover) in the rad to clean it out. I pulled the rad and plugged all the ports, pulled the cap and filled it with CLR. Laid it flat for 15 minutes then flipped to other side for 15 min, then set it upright 15 min, upside down 15 min, Left side down 15 min and right side down 15 min. After that set it upright and pulled the bottom plug and checked the flow rate. It was greatly improved but not quite at the 6 inch height. The rad shop old timer told me to soak the rad with a mix of Dawn dish soap and water for a day. Did that and it was spot on for the flow rate. That was 7 years ago and the car runs at a constant 170 degrees F. Might try that first and save you some money. No promises but it worked for me. Joe Lee
-
If that spacer is made from wood, I'd seal it so that over time it will not soak up fuel and swell, distort or deteriorate. Joe Lee
-

New Spark Plugs ... Damn what a difference
soth122003 replied to Stargrinder's topic in P15-D24 Forum
Looking at your plugs (last pic #5 and #6 plug) the metal point protrusion from the ceramic is corroded. More corrosion = higher resistance = less powerful spark. Joe Lee -
Bleed with the cap on. The return pressure from the lines causes the fluid in the MC to spurt up about 3-5 inches and can make a mess. Joe Lee
-
Hey Mark , If it is just the diaphragm that failed you might try this. It comes in 1/16 and 1/8 inch thickness. https://www.amazon.com/Buna-N-Sheet-Gasket-Black-Thick/dp/B0075DXMAK/ref=sr_1_1?dchild=1&keywords=fuel%2Bgasket%2Bmaterial&qid=1588884073&sr=8-1&th=1 The spectrum pump is also available. https://www.amazon.com/Spectra-Premium-SP1296MP-Mechanical-Fuel/dp/B00Q0DFTLG/ref=au_as_r?_encoding=UTF8&Make=Dodge|40&Model=Meadowbrook|2052&Year=1950|1950&ie=UTF8&n=15684181&s=automotive&vehicleId=3&vehicleType=automotive Joe Lee
-
Harbor Freight has the timing light for $30 and the fuel pump/vacuum tester for $15. Joe Lee
-
Look in the technical section then under the sub heading Brakes. Joe Lee
-
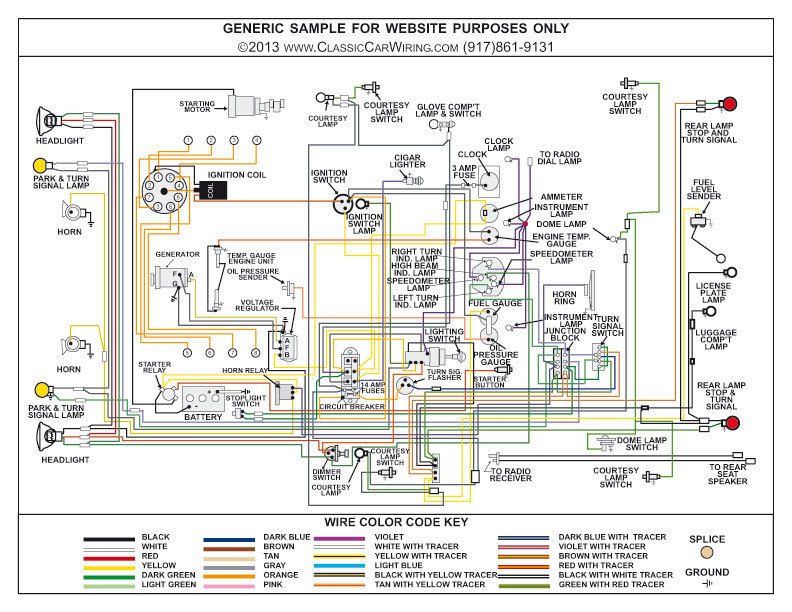
Hey DonnieT, the schematics in the book can be a little hard to read. This might help you out. Joe Lee
-
Time for my two cents. Sam Buchanan has it spot on. Something else to consider besides the corrosion is the flexibility of the metals. The steel is a harder metal and even though the temps are not extreme heating up and cooling down a steel plug vs a brass plug will result in a differing life span for the plug. The water, heat and reactivity of the steel plug has a faster effect on the rusting and life span than the brass plug, which being a softer and non corrosive metal that can tolerate the flexing from heat better. That being said, the steel plug will last for a long time. Just not as long as a brass plug IMHO. Especially in a hot humid environment like Florida. I've got the steel plugs in mine and around the edges the back plugs are leaking and has the classic signs corrosion. I'll be replacing mine with brass within the next few months. Joe Lee
-
Hey Turtle, When you're done re-wiring yours, come down and do mine. LOL Joe Lee
-
I bought a set of Hankook Optima's 205/75/15 for my P15 from Wal-Mart (for about $240.00 I think). I had also wanted to try bead balancing, but that was a little pricey. What I did instead was I bought 2 bottles of Air soft BB's, measured out 4 ounces per wheel and put them in. That was over 7 years ago and the tires are still good and the car tracks straight as an arrow. I also like the look of the tires on this car. I just want to lower the front end about 2-3 inches and I think it will look great.


