


9 foot box
-
Posts
628 -
Joined
-
Last visited
-
Days Won
15
Content Type
Links Directory
Profiles
Articles
Forums
Downloads
Store
Gallery
Blogs
Events
Everything posted by 9 foot box
-
Another 6 volt charging circuit question(s)
9 foot box replied to 1949plymouthdeluxe's topic in P15-D24 Forum
Roofus has his own way of testing a generator. This is the Service Manual procedure for a motoring test. The generator that is as clean as what you say yours is could be fine. The field coil in the regulator could be at fault, there’s a test for that too, it’s in the Manual. I could ground my field wire to show a charge, but it had to be grounded again every time I restarted. I replaced the regulator.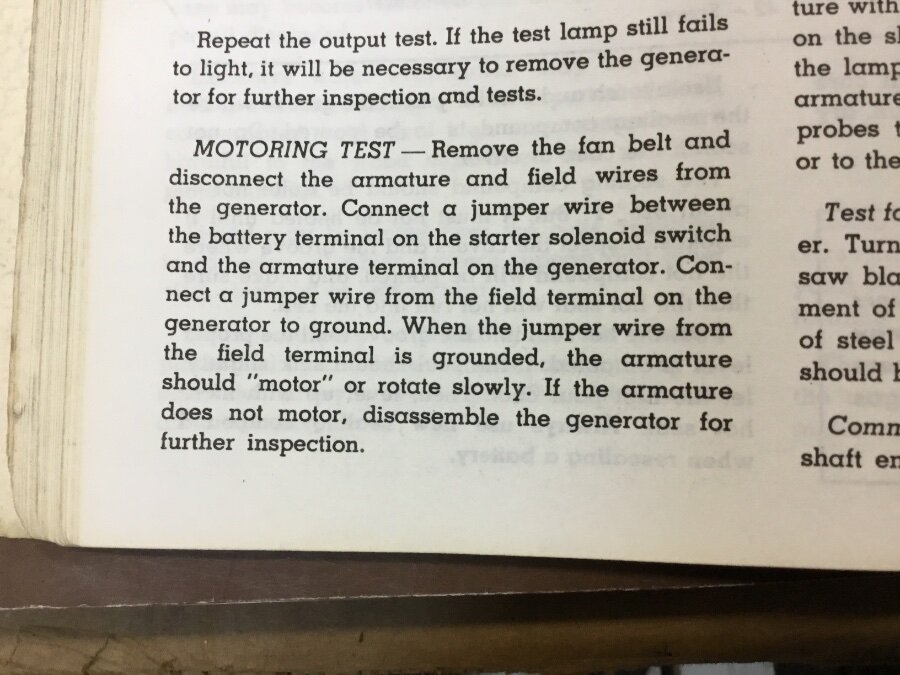
-
I thought I should mention that the front and rear drums have different numbers. The 100 front and 106 rear numbers are for the drum w/o hub, according to my parts book. The other drums that fit, are for Nash and Kaiser. I have a front drum from a 48 Plymouth and a rear axle from a 53 Suburban. I’ll have to compare the drums on a flat surface. Ply33 is a good resource. Side view of front and rear drums for a P15. The center hole and bolt holes are larger than the hub, it needs the five rivets to keep it centric.


-
Fuel Pump block-off plate
9 foot box replied to 1951 Dodge Dump's topic in Mopar Flathead Truck Forum
Google “t137 engines” and it will tell you how to use the engine number and the model designation on your drivers door data plate. To narrow it down when there are two engine sizes, you need to remove the 1/8” pipe plug over number 6 cylinder, and measure the stroke. 4.250”-237, 4.500”-251, 4.766”-265c.i. The Chrysler flathead six fuel pump has a staggered bolt pattern. -
If you Google “T137 Autolite cross reference” it might help you decide which VR you need.
-
It sounds like the field is grounded. The VR should be for positive ground, what is the part number?

-
Bkahler bought his repair kit from Ricardo Cavallero SRL. I found Power Brake X-Change in Pittsburg will rebuild your Gemmer steering box for about the same price. If you don’t have a press and tools to change out the bearing races and pin in the cross shaft, it’s something to consider.
-
The sending unit that DCM Classics sells is similar to what you have. Their installation instructions says if it doesn’t work with both wires connected, leave #2 wire connected to the center post, ground the other terminal to the frame and leave the #1 wire disconnected.
-
There is a service manual online for 36-42 Plymouth. pwchryslerclub.org resources
-
1941 DeSoto gas pedal linkage
9 foot box replied to Silvia's topic in Forum Announcements And Feedback
Desert Valley Auto Parts has a 41 DeSoto with the engine still in it. Maybe your correspondence with them, will get you the parts you need. There are a couple original print 41 DeSoto service manuals specific to the S-8 on eBay. -
My guess is that it was modified for an amputee. This picture is from a “36 Plymouth pedal assembly” that was on eBay. Rick

-
Distributor Help for my Barn Find 1950 Fastback
9 foot box replied to Theturtle's topic in P15-D24 Forum
When looking for distributor parts, use the use the model number. IAP-4103A-1 for instance, not the 1300795 part number. I have two distributors with those numbers. -
Clutch release (throw out) bearing return spring
9 foot box replied to Crazyred's topic in P15-D24 Forum
I think your clutch plate is stuck to the flywheel. Readjust the clutch linkage for 1” of free play at the pedal. With the clutch pedal depressed put the transmission in high gear and bump the starter pedal with the key off. -
TAILLIGHT QUESTION PILOTHOUSE TRUCKS
9 foot box replied to jcnida52's topic in Mopar Flathead Truck Forum
I went and dumped grass and garbage at the container site today. There was a 56-57 Dodge cab and a box. I got these parts off the box. I have an original left light with the adapter plate, so I need to buy a right side light, this plate will align the new light to the bracket with the narrow mounting holes. Parts is parts, so I grabbed the chain closures. The cab had two top corner cab lights, I sprayed with PB and I’ll see if they’re still there tomorrow. The tools are in the truck. DCM Classics show jc’s bracket is for a high side box. I know these parts aren’t right for a W series, but they were there, before they go into the iron pile. Rick D.
-
I replied to echodan about his coil, no reply. If you have the separate 643819 bracket, I agree that it is an easy fix. Guess who has the best price for the bracket. Good going, bacelaw.

-
I have that taller manifold for an engine going into a 47 WD21 that I’m working on. I like it for the higher flow and the disc at the bottom to atomize the gas better. I have one from another W series truck, without the disc. A S15 Desoto 251 that I have has the tall intake, as does the 49 Chrysler Spitfire in my 47 flatbed. I haven’t taken the carburetors off to see if there is a diffuser disc. The manifold is 47 and earlier in my opinion, and used on the one ton 230. The 251 engines had the taller intake port at least till 1952. The B series truck engines that I have, are short intake, like my cars. Your manifold appears to have the disc. I can only presume that atomizing the gas at the single port at the center of the block would be an improvement in performance or fuel efficiency and keeping the gas suspended in the intake manifold for the other cylinders to intake.

-
LED running lights and halogen headlights for my '47 Super De Luxe
9 foot box replied to 46Chris's topic in P15-D24 Forum
This is diagram of the signal switch on my milk truck. With the 5 wire connected to the brake switch, it will show braking, turn signals and four way on front and rear lamps. The center trunk brake light on your car should be a single contact bayonet socket. Run a single wire from the proper socket to the brake switch and terminate the 5 wire, so only the trunk light shows braking and doesn’t go through the turn signal. At present, I use an 1129 bulb single contact bulb on my center light, and 1154 double contact bulbs, front and rear.
-
I had to weld the bearing surfaces on the worm, turned down and new 68-3571-A bearings, gaskets and seal from Dennis Carpenter. It wore in and I took out some gaskets and readjusted. This was on a 41 that had been changed to R&P, I replaced with parts that I had. To do it correct and guaranteed, I would have Power Brake X-Change Inc. rebuild it. My truck needs more attention than a $500 steering column. Rick D.

-
There is an Autolite Service Parts Catalog online, for referencing. The coil for your car is a IG-3224-JS. Another reference source is “ply33.com”. What stage of getting your car running are you? Can you post a picture or two? Others with similar models may message you regarding your project. Now that you are participating, maybe you/we can get the car roadworthy. You will need a Service Manual. Rick D.
-
LED running lights and halogen headlights for my '47 Super De Luxe
9 foot box replied to 46Chris's topic in P15-D24 Forum
The flasher pictured is 68934 neg. ground. They sell a 84787 flasher for pos. ground. -
LED running lights and halogen headlights for my '47 Super De Luxe
9 foot box replied to 46Chris's topic in P15-D24 Forum
I looked at the taillight bulbs on my 46, with turn signals. The bulb is a 1154 that is Index style socket, not 1158 Bayonet. The front are probably the same, because I don’t have any 1158’s in stock. I would need 97465 for the taillight on my car. I have used the brightest 1129 bulb for my center brake light. I mention this for others that might want the LED bulbs, check the socket for pin orientation before buying. This is an old bulb download that I found. I’ve posted it before.
-
how do you lubricate this 41 alternator?
9 foot box replied to GTfastbacker's topic in P15-D24 Forum
This generator doesn’t have a plug above the wick, it should have one. Your picture shows a plug. As previously mentioned, it would be easier to install a dry wick from the top. Here is a picture of where oil is added. Swivel the tab to expose the hole. You haven’t watched the video on You Tube or you would have seen how the bushing has a notch milled into it, so the wick draws oil to the shaft and bushing. A lamp wick has a different absorption rolled into 1/4” hole than a felt wick. It’s the wrong fabric, in my opinion. Your rear bushing is already compromised by seeing the bronze particles in the end cap. The service manuals don’t tell us how to change a rear bushing, but I think that video on You Tube explains a lot. You can’t over fill a rear bushing, the oil will run out the vent. Over oiling the front bearing can pollute the generator with oil.
-
New guy here: 1949 Plymouth Super Deluxe
9 foot box replied to 1949plymouthdeluxe's topic in P15-D24 Forum
Buy a Service Manual, the proper way to tighten the steering is to remove gasket material at the end cap first, for major adjustment to the worm gear. Then tighten the cross shaft for free movement for minor adjustment. The best manuals are used and have a grain type cover.
-
That style coil was a hot wiring theft deterrent on Dodge trucks till 1947. The coil mounted on the firewall and the hot negative wire was shielded to the back/bottom of the coil from the dash mounted key switch. The pos. terminal wire went to the distributor with the coil wire and went through this style of wire loom that was bolted to an accessory type head bolt, not to the side of the head, like later model plug wire looms with coil mount studs.


-
how do you lubricate this 41 alternator?
9 foot box replied to GTfastbacker's topic in P15-D24 Forum
There is a You Tube series by Steve Blancard. “Autolite GDZ4817A Generator Repair”. His 8th video shows the end plate and how capillary action of the oil in the small reservoir lubricates the bushing and shaft. If you find a material that will suffice as a wick, pull the top plug and insert it dry through to the reservoir, soak it with oil and put the plug back in. I was mistaken as to what generators that I have. Here’s two that show the wick. McMaster Carr sells wick material, but you have to buy 5 feet of it @ $3 and change a foot, depending on size. You only need about 2”. An oiling cap like the one on the front won’t work with that style end plate. An other option is to replace the bushing with an oilite style bushing that has been soaked in oil. The bushing probably needs replaced anyway, because it’s been run dry. That’s your copper residue. It will eventually ground the armature to to the field coils and you will need a new generator or change to an alternator. I like to Keep It Simple Sometimes and do preventive maintenance before it fails.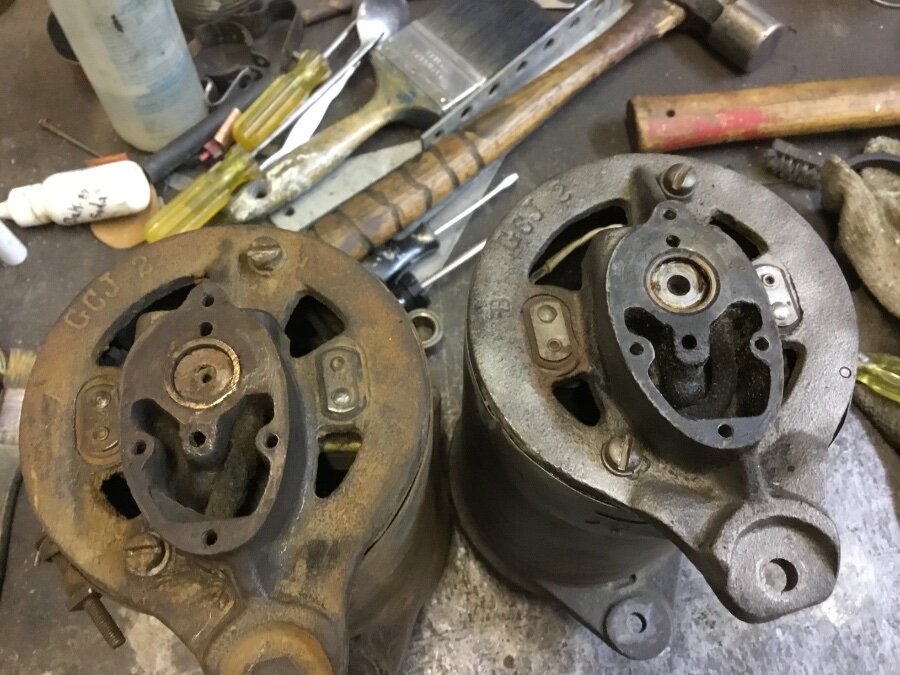
-
how do you lubricate this 41 alternator?
9 foot box replied to GTfastbacker's topic in P15-D24 Forum
From my P15 Service Manual. You need a piece of felt like material to soak up the oil to be a wick.


