


gtech636p
-
Posts
53 -
Joined
-
Last visited
Content Type
Links Directory
Profiles
Articles
Forums
Downloads
Store
Gallery
Blogs
Events
Classifieds
Everything posted by gtech636p
-
Are these available anywhere? This solves the issue of mounting the front of the running boards that I had no clue on before now.
-
I've finally gotten around to trying to work on the B1B again. I have an XJ master cylinder bolted up and put the pedals in the floorboard last weekend. I got around to trying to find the pushrod for the master cylinder but got distracted and didn't complete the task. Unfortunately, the truck is ~ 7 hours away again. The original pushrod is available, but I wanted to check what everyone else used before I put everything into the original pushrod. Another slightly related question, to those who performed the swap before, did you cut some of the "guide" for the pushrod on the front of the XJ master cylinder or leave it in place? Any help is appreciated.
-
Got it! Removed door, put a 2x4 on the edge and heated the middle of the hinge up for about a minute. Hit the hinge a few times with the sledge and changed the angle a good bit. The door opening needed a little encouragement to be square as well, and the floor riser between the running board and floor was poking out about 1/8" causing binding when closing. When all was addressed the door shut nice and smoothly. The gap might not be perfect, but I'm not claiming a professional restoration either.
-
I hung a door on a 48 B1B cab today. While I didn't expect perfection, I can't figure out how to fix what did show up. Everywhere EXCEPT the bottom latch side fits in the opening. The bottom latch part of the door hits the cab sheet metal by 1/16" or so. I have read a copy of the old manual that says to put wood here or there and push. The only issue I have is that I can't figure out how to get to the hinges in a straightforward way. Currently I'm thinking to open the door half way and hit the lower hinge with a sledge hammer somehow? The hinge only needs to move about 1/16", but how do you get to that more "professionally". I'd like to think you could put a cheater bar across the hinge plate and pry away but couldn't figure it out while I was looking at the hinge. Anyone have a better method?? I'm all ears, but the truck is 7 hours and three weekends away from me right now.
-
Sadly, this is what I thought I would hear... I guess it's time to see if I can get this figured out. Thanks for the replies.
-
I've got a '48 B1B and am getting ready to try and finish the front end off. My current fenders are a bit past prime at the bottom rear carriage bolt area. My plan when I first started putting things back together was to get a set of fiberglass fenders, but bebops doesn't seem to make them anymore. Short of me actually learning how to do a little bit of metalwork, is there a better option to source fenders for this truck? edit::I just noticed I asked the same thing sometime last year.... has anything changed?
-
Does anyone make fiberglass repops for B1B trucks? I believe I remember seeing them a while ago on Horkey's site, but they're no longer available. I've emailed Be-bop's and their mold seems to need work and aren't planning on making another run in the near future... anyone else to look for?
-
'48 B1B... Hood support brackets??
gtech636p replied to gtech636p's topic in Mopar Flathead Truck Forum
Yup. The blue arrows. -
'48 B1B... Hood support brackets??
gtech636p replied to gtech636p's topic in Mopar Flathead Truck Forum
Unfortunately, I was trying to describing the parts on the hood itself. Your arrows are in the right place, just move further back in the picture. -
'48 B1B... Hood support brackets??
gtech636p replied to gtech636p's topic in Mopar Flathead Truck Forum
I'm really bad about reading the first response and then not following up on threads... for now I decided to just patch the hood material and leave the bracing alone. I did receive a question about what I was referring to, and I may be breaking rules by hotlinking pics that don't belong to me, but I was trying to refer to the underhood braces seen in the pic below: -
The supports that go from the center of the hood to the edges. Mine are rusted fairly heavily and have actually contributed to the holes in the sides of my hood. The rusted metal has been cut out ans is slated to be replaced, but are the braces under the hood remanned anywhere? I'd like to replace these at the same time.
-
I just got covers for the seat in my '48 B1B and, well... they're about 2" short on either side when compared to the frames. I do have the "air ride" seat frame and figured I would stop in here to see if all frames were made equal in '48 before I brought it up to the supplier. I do understand it should stretch a little bit, but this would have to be spandex to make the cover fit on the current frame...
-
'48 B1B - Rear crossmember to bedside bolts?
gtech636p replied to gtech636p's topic in Mopar Flathead Truck Forum
Thanks for the help. -
I seem to have let my truck sit for entirely too long and have lost the bolts that bolt the bedsides to the last cross-member (or tailgate mount?) Would anyone know what size they are? I remember fine thread, but something was awkward about the bolts as well...
-
My cab is rusted out on the back wall around the intention in the panel. Does anyone make that step that I could weld in or am I on my own.
-
It's not too difficult... drill 4 holes and bolt everything back up. Of course, I haven't driven or really made any progress on my junk in about a year it seems. Large spacer goes in the bellhousing (tight fit with the input bearing retainer), large bushing takes care of the diameter difference between the throwout bearings, and the small bushing is your new pilot bushing. I took the time to have the pressure plate rebuilt and flywheel surfaced while I was in there as well. There's a recommendation somewhere on the forum for that as well. ::edit:: I also have swapped in an 8.25 rear as well and was told my gearing is going to be horrible, but what's another 8.25 regear gonna hurt things. Might want to keep the overall gearing ratios in mind if still using the flathead.
-
The backspacing and final wheel aren't chosen yet. just looking for ideas and seeing if there's something better out there, which there seems to be.
-
I'm looking into wheels now and am looking for some opinions. I'm set on (i believe) 215x85r16 tires for now and would like to get some older looking wheels to go with them. I'm looking for opinions on these if possible, sources, etc. Currently looking at something like these: http://www.summitracing.com/parts/wvi-14-671204/overview/ I would like to be able to paint them and, possibly, run the old dodge hubcaps eventually. Would these allow that, or is there a better source for what i'm looking for? I am running disk brakes.
-
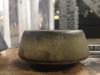
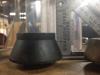
All may not be lost... the outside is craked pretty badly, but thr casting is THICK around that box. I cannot feel any cracks on the inside and the manifold does hold water when tested. With that said, I was able to find a replacement one. Thanks guys.
-
Haa, over a year later and I'm looking at these again, but have pictures this time. One image has a flash, the other does not. It seems the spot welds between the two pieces of metal aren't really attached any more. I would love to be able to wire wheel it again and throw some expoy type material down to get everything bonded together and water tight. I'm not too concerned where the roof meets the A-pillar right now. What has everyone else done here?


-
There's a long story to this, but the short of it is I didn't find the bolts under the intake that go through the exhaust when taking my manifolds off a while back. I'm assuming this happened then, but it may not have. At any rate, I have some pretty good cracks in the center "box" of my intake manifold. Time to find a new one. What are the interchanges here? I assume a car intake would work? What year trucks am I looking for? Anyone got a spare that they might let go of? ORR, and secrets on welding this thing? There's about three good cracks in it, so it would take some time but I'm always game to trying something new. I have flux core on the welder currently, but I do have a 220 solid core machine waiting to be used. I'm assuming it's cast, so new techniques are in order... is it even worth the trouble? It sucks, but it's part of the game. For me at least.
-
Alright, I took a step back and regrouped. The easy solution was suggested by Ed, and I went with it. While I do agree that everything needs a mount, I have poly mounts in most of the other toys, and that "almost" like running solid mounts anyway. That said, I took about 1/3" from both mounts and rechecked the fitment. I've got ~ 1/16th inch between the crossmember and the tailhousing of the transmission. I'd rather not have to do anything, but this seems a bit better than hacking the crossmember up and welding in a new section. Now I can get to other odds and ends and try to finally start rust repair. Maybe I'll be done in another two years or so... Thanks for all the help and suggestions.
-
Alright, more pictures!!! The new rear top mount measures ~1.75" tall and the old ~ 1.5" tall. I know the square says differently, but it's a speed square and doesn't include the base in the measurement. Is this the correct height or do I need to find another source for these mounts and see what happens?
-
Welp, it seems like I have the mounts right.... Honestly, the crossmember looks bad on the back side, so I'm already going to be doing some rust repair. It's not too much more to cut a slot in there and weld in some stock and gives me an excuse to play with the new plasma cutter a bit more. I'd rather do that than find out my frame rails are bent a little bit. It may sound stupid, but I'd like to remain blissfully ignorant of that issue. I will agree that the frameside mounts squished a bit when tightened down. I'll give that a shot tomorrow and see how it goes. Other than that it's time to cut and weld up a bit of stuff (not just this little bit).
-
Assembling a t5 Tranny to the stock bell housing
gtech636p replied to 19vette82's topic in Mopar Flathead Truck Forum
don't go up to 1/2", I can barely tighten the top right bolt down.


