


MarcDeSoto
-
Posts
1,860 -
Joined
-
Last visited
-
Days Won
10
Content Type
Links Directory
Profiles
Articles
Forums
Downloads
Store
Gallery
Blogs
Events
Classifieds
Posts posted by MarcDeSoto
-
-
6 hours ago, Sniper said:
A hammer is a great way to mess up the thrust bearing.
What other way could I have used? They don't make install tools for this size hub that I'm aware of.
-
I should also mention how much Keith's video helped me. The visual learning from it helped me a lot! I watched it a lot!
-
AACA told me to go back to using a hammer and block of wood. So I removed the hub and found some slight scoring on the inside of the hub. I used some 400 sandpaper on it and used some steel wool on the crank. then I greased the surfaces and used a stronger mallet with a hard plastic head. Then it started to move in. I moved it in far enough so that the Jaw could reach the threads inside the crank. I put a 1 13/16" socket on the jaw and cranked, but I was turning the engine over. So I had my helper hold the fluid drive ring gear with a ring gear wrench. So I think it's seated now. The pulleys looks lined up, so problem is solved.
-
I tried oiling my hub and hammering it in with a rubber mallet, but it only goes in so far. When I try to put the crankshaft bolt in, it is still about an inch away from the threads. I went to our best hardware store, but the thickest bolts they have are 1". I think my bolt is 1 1/16", or maybe 1 1/8" in diameter. I aksed the clerk if he could order a bolt that size and he said no. Does anyone know a source for a thicker bolt or a right install tool for this engine? Thanks.
-
Actually, I was thinking of ending this thread, but if the people demand it, I am willing to continue. I realize I'm providing entertainment here, so I did think of something more. Today I put the plate back on, and the camshaft sprocket and chain. I put the timing cover on loosely because I still have to center it on crankshaft hub. I watched Keith's video of him installing his hub and vibration damper assy. Boy he sure makes it look easy! I thought you would need some kind of fancy hub installer to do that. Maybe you do on my 48 DeSoto. All Keith used was a leather mallet which got the hub assy in far enough so that his hub nut could finish the installation. I wonder if I can do that to mine. Mine doesn't seem to want to go in that far. But I'll try again.
-
yes, but that old seal was put in 40 years ago and I don't even remember if I was the one to did it. I may have just used the old seal. Do I need to use gasket sealer on the plate and timing cover, or just use the gaskets without it?
-
I did grease the tc and seal to get it to slide in better. I'm using a seal installer tool and a mallet and I didn't want to have to hammer it too hard. About a quarter inch of gasket came out, but I think it's ok. At the AACA site , they understood why I was so confused about the direction of the seal as the new seals are put in seemingly opposite of the old leather lipped seals. Maybe I'm expected to know that, but I didn't. I still wonder why they don't put some simple directions on these seals.
-
I put a gasket in the tc because a gasket comes with kit and the Parts List shows one being inserted before putting in the seal.
-
I wonder if there is a way to stop the gasket from coming out part way when you install the seal?
-
I took your advice and ordered a new timing cover gasket kit. It's another Fel-Pro kit. I ordered from NAPA because they can get it today, while Rock Auto would take a week.
-
I've seen many covered with leatherette, a vinyl leather look alike similar to what is on the backs of seats and the seat frame.
-
Ten or fifteen years AM still had some good music stations that played big band swing, and 50s 60s stuff. But here is Calif. the Mexican stations pushed that station off the air. Now AM is all talk, news, Mexican, and Christian radio. The music is gone. What is involved in changing my radio so I can plug in an Ipod or Blue Tooth?
-
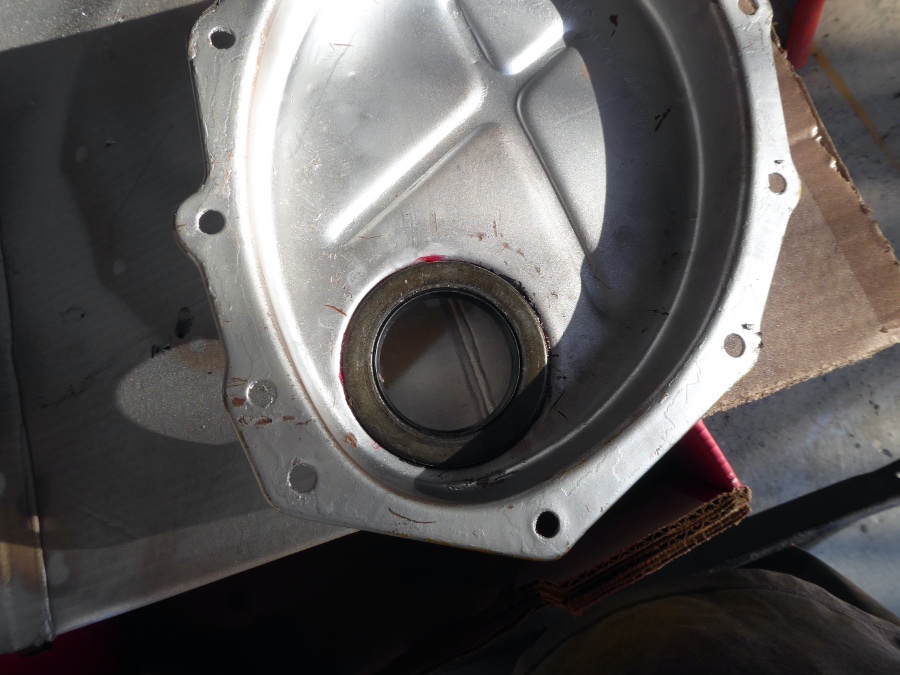
Based on information I received here and at AACA, I decided to knock out the seal and put it in the other way. Here it is. What looks like the rubber lip coming out on the front is really the gasket.


-
Yes, the cancer has metastisized over to AACA Technical. They unanimously say I put it in backwards. So I'm going to press it out and maybe order a new seal if this one looks damaged.
-
Looking at Keith's video, his seal look likes mine, and he put his in with the circle ridge thing point inside the tc. So I guess that means mine is on backwards even though I put it on just like the old one.
-
A guy on the AACA site said that seals have an open side and a closed side. He said the open side goes toward the engine and the closed side goes toward the fan. If you look at my pics at the beginning of this thread, it looks like the closed side is going to the engine and the more open side is going to the fan. That's just how I installed my seal. Is it wrong? Here are two pics this guy used from a tractor seal showing the closed and open sides of a seal.


-
I installed the new seal just like the old seal with the ridge part sticking out the front. So did I install the new one correctly?
-
1 minute ago, Hickory said:
I did not want to read this thread but I couldn't help it after I saw 4 Paiges. My god should I even suggest hammering the bolt holes flat so that gasket seals or not.
I'd be happy if you could just tell me if I need to remove my seal and put it in the other way or not.
-
The pics above may not be clear enough to see, but when I look at the seal it looks like it's closer to hub on the outside.
-
So it looks like the rubber is beveled down toward the engine and up toward the fan. I installed my seal just as the old one was and as Dodge4u's pic showed. No one ever mentioned that my old one was on backwards. Can you tell if mine is installed backwards from the pics above?
-
I took some closer shots of the seal with my cell phone. Can't believe I still can't get an answer after 4 pages of replies. Looks like I found area where most of us are ignorant. The first pic is taken from the back of the tc. The other three are taken from the front of the tc.


-
The old seal that I just got out had a spring, but this new one doesn't. I looked at the slant of the rubber lip and it is beveled down toward the damper. Is it supposed to be beveled down toward the engine?
-
Does anyone know if I installed this seal correctly with the lip coming out of the front? My car is a 48, not a 53. By lip, I'm not refering to the rubber part, but the ridge as shown here on the outside of the timing cover.

-
I noticed when I looked at Dodge's timing cover oil seal, the lip was coming out of the front. That's how I put mine in, just like the one I took out. But when I watched Keith's video, he had the seal reversed with the lip coming out of the back. So I hope I did it right and Keith's car is ten years older than mine, so maybe the oil seal changed. I hope!
How does one install a crankshaft hub on 48 DeSoto?
in P15-D24 Forum
Posted · Edited by MarcDeSoto
If this site is not for helping owners of these cars having problems then what is it for?