


Stinger
-
Posts
33 -
Joined
-
Last visited
Content Type
Links Directory
Profiles
Articles
Forums
Downloads
Store
Gallery
Blogs
Events
Classifieds
Everything posted by Stinger
-
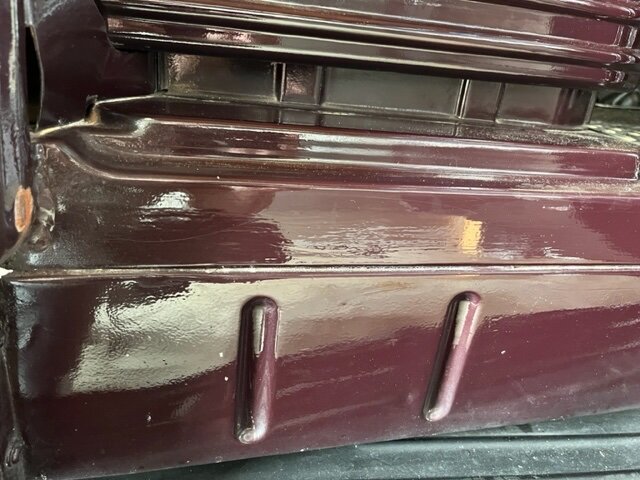
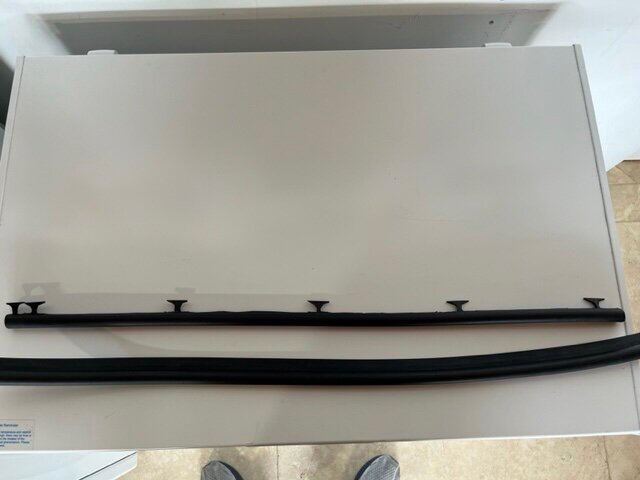
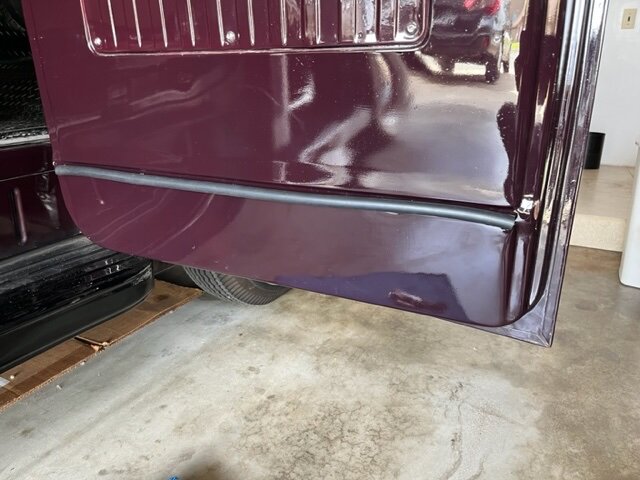
I read a number of threads on here regarding the rubber trim piece that goes on the bottom of the door or in some cases, attaches to the cab, that serves as a seal for the bottom of the door and the cab. I know that it is different for the various years. I ordered the door seal kit (RW-4855-DS) from dcm for my ‘49 Pilothouse because I need all of the door trim. My door has holes in it where that trim piece is supposed to mount (see pic). The piece they supplied with the kit has no way to mount to my door. The bottom seal in that kit is a tube with a flat piece attached to it (see pics below). I asked dcm about it and they said that in my case, the seal provided was meant to fit in the crease between the rocker sill and the floor. I have seen pictures that show these as two pieces with bolts or screws to separate them. Mine is not like that (see pics). So, I thought of a way to modify the seal provided in the kit to mount to the door using the holes in the door. With sharp scissors and an x-acto knife, I trimmed the excess rubber off the seal and then pushed the wide part of the Y-shaped rubber into the holes with a small flat bladed screwdriver. I like this solution because it doesn’t require using any messy glue. The piece looks pretty good and stays in place, although the door is a little harder to close. Time will tell how well it holds out.


- 1 reply
-
- 1
-

-
Follow up: I had my brother come over to give me a hand. We loosened the bolts on the lower hinge a half turn and the door moved in and out easily. We ended up moving it maybe a quarter inch. The door was still binding and had to be slammed to close. Fortunately having the extra set of eyes on the problem helped as my brother figured out the issue. The previous owner had installed a dome light in the cab and the plunger style on/off switch was placed in the door jam and it was sticking out so far that it was hitting the leading edge of the door itself. We took that switch out and the door closes nicely. I never liked that dome light anyway as the light always came on when I opened the door to work inside the cab. I had to tape the switch closed so that I didn’t drain the battery when I needed to leave the door open. Because I have the new headliner kit from dcm to install I was going to have to remove the dome light anyway. So…we pulled the dome light out and discovered that it was actually cheap plastic and the hot bulb had melted / burned part of the plastic. It was a fire waiting to happen. All in all a successful hour and a half.
-
Thanks. I hope it’s not that difficult. The truck was restored about 6 years ago so I’m hoping the rust hasn’t taken hold yet. I asked the previous owner why he had not adjusted the door and he said that he did. He adjusted it for the finished look when viewing from the outside. He didn’t consider the fact that you had to slam the door to shut it an issue. I would like to make it a better fit before I install the door rubber that he never did.
-
Thanks Brad! Can the hinges be moved independently of each other? In other words, can I just loosen the bottom hinge to move the bottom of the door without loosening the top hinge? How heavy are the doors? Can this be done with one person? They don’t feel that heavy.
-
I read all of the threads I could find and drilled down on the ones that had links that went back 10+ years, but I still have a question. The driver's side door on my '49 doesn't close easily. It feels like the lower hinge is binding in the last 3 inches of travel or so to close the door. The fit looks tight at the bottom inside of the door and there is a little wear on the paint. From what I read, it looks like the hinges themselves have a slot for each of the four bolts so that both upper and lower hinges can be moved in and out independently. What I couldn't determine is if the hinge itself has a nut welded to it or do I have to get a wrench down in that small slot behind the kickplate on the lower hinge to hold a nut that is there? I am recovering from surgery right now so I couldn't contort myself enough to see down in there. I hope it is as simple as slowly backing out each of the four bolts on the jamb face side side and moving the door a small amount at a time until it closes properly and the fit looks okay from the outside when the door is closed.
-
What is this numbered metal tag for?
Stinger replied to Stinger's topic in Mopar Flathead Truck Forum
Thank you! -
What is this numbered metal tag for?
Stinger replied to Stinger's topic in Mopar Flathead Truck Forum
Hmm, I suppose that if you were sitting in the cab that the plate would be on the upper-most left side - ha! Then again, my truck originally had a radio and while the face of the radio is still in the cab, the radio itself was removed from the cowl / firewall and a new braking system installed in that location. BTW, Bill, how can you tell the dates your trucks were built? -
What is this numbered metal tag for?
Stinger replied to Stinger's topic in Mopar Flathead Truck Forum
The Bunn book also says “the body number plate is riveted onto the engine-side of the cowl. Look for it at the upper-most top left corner of the cowl.” So, the opposite side of where billrigsby has his? -
What is this numbered metal tag for?
Stinger replied to Stinger's topic in Mopar Flathead Truck Forum
Bunn’s book shows that all of the B series truck body numbers started with a 47 except for the Express Power Wagon, which started with. 43 -
First step is to remove the backrest part of the seat by simply pulling up on it about four inches or so. It hangs on the seat frame by a couple of hooks. Remove that from the cab to give yourself some working room. Then pull up on each end of the seat bottom. I used a small pry bar, but a big flat blade screwdriver would also work. Once you pop the pins out on both sides of the bottom of the seat, the seat lifts up and out pulling forward on it. Mine came out easily. At least that is how it worked for me.
-
What is this numbered metal tag for?
Stinger replied to Stinger's topic in Mopar Flathead Truck Forum
Got it, thanks. Now I see on page 152 of Bunn’s book that the first four digits (4712 in this case) equate to “all conventional cabs through 2 ton”. -
The previous owner left this approximately 3in metal tag in the glove box and said it came off the truck when he restored it but he couldn't remember where. Any idea what this is and what the number means?

-
Sweeper Clips and Weatherstrip
Stinger replied to Jocko_51_B3B's topic in Mopar Flathead Truck Forum
I pulled that video off the web. It isn't my truck. Mine isn't that nice! -
Sweeper Clips and Weatherstrip
Stinger replied to Jocko_51_B3B's topic in Mopar Flathead Truck Forum
John, At about 3:10 in this video you can see these strips. The ones I got from DCM do not curve up at the ends. The clips fit right into the holes in the door. https://www.youtube.com/watch?v=fTgpLwzZ77s -
Sweeper Clips and Weatherstrip
Stinger replied to Jocko_51_B3B's topic in Mopar Flathead Truck Forum
Sorry for bringing this up again. The diagram that comes with the sweeper kit from dcm, does in fact, show that the beaded end goes up. However, when I installed my new ones today I could not roll the windows up as the glass pushes up against the sweeper too tightly even after I made sure the clips were as flat as I could get them. Is there a trick to getting the glass centered in the door frame? Is there an adjustment of some sort if I open up the door panel? -
Thanks for the video. Very informative. The piece that goes on the cab frame looks to be the same on the B1. It is that piece that goes on the leading edge of the door that I think is different. I would have thought that the rubber ran right down the edge of the door.
-
Thanks Lingle, I have those as well. There is actually another diagram they have that shows the rubber that goes on the leading edge of door itself. There is a point where the rubber on the door overlaps the rubber on the door frame when the door closes according to dcm. I’m looking for that detail. Also appears the rubber that goes down the leading edge of the door itself has t pass behind the lower hinge. I’m wondering if that is accurate or do you cut the rubber so it sits on either side of that hinge? the rubber dcm is very nice quality and they are very generous with the length, giving you extra in case you screw up.
-
Thanks JB, I saw that thread. It helps with that lower door to rocker seal. The one that comes with the dcm kit won't fit a '48 B1. I am more interested in pics of the rubber piece that goes on the leading (front) edge of the door itself and the one that goes on the door frame. I found a thread that has pics of a B3, but not sure if it is the same for a B1? I also found some Youtube videos that show both but I'm not convinced that what I am seeing is correct.
-
In searching this forum, I was able to find pictures of the B3 door seals but unable to find them for the B1. I just received a new set of door seals from dcm and I have looked at their drawing of how they should go on the door and truck, but it isn’t obvious to me how they go on. Pictures would really help if anyone has them. Thanks.
-
Ha. Great description. I think that is what is happening with mine. You would think that Southwrn California would have great roads since we don’t get snow or ice, but the potholes here are the worst I have seen and I have lived and driven all over the country.
-
Ha, that’s interesting. Seats ride pretty nice just the way they are for me.
-
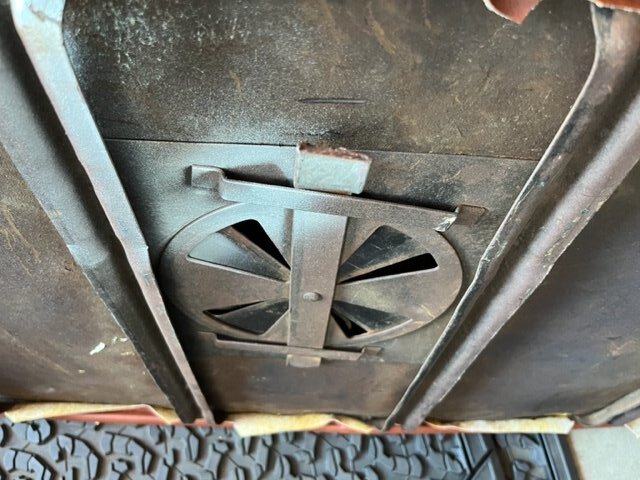
Please disregard. I figured it out. It was too easy. ...but. what is this on the bottom of the seat? Looks like it had a lever of some sort that broke off. Early seat warmer or cooler?
-
I could only find one thread in the search function for a ‘46 and it didn’t discuss the whole procedure. Can someone please walk me through it or provide a link to a video? Thanks in advance.
-
Thanks guys for the tips. A little adjustment here and there and it is working fairly well now.
-
How is the hood latch/catch supposed to work? On the drivers side mine works fine with almost no effort. I can see that the when the handle is turned the rod ends turn up inside the catches mounted on the front and back of the inner fender. On the passenger side, it is difficult to turn the handle and the rod goes up and over the catch and the back one seems to bind up. The catch (bracket thing) on the front end was adjustable up and down. I was able to adjust it so that the rod goes up inside of the catch like it is supposed to but the back one is not adjustable. There is enough pressure on that back catch that the metal is actually starting to tear at the top bolt. seems to me that if I could just raise that back one up a quarter inch, that it would work properly. Are both front and back supposed to be adjustable? If so, where can I buy an adjustable catch?
