


1TonDirtyMopar
-
Posts
132 -
Joined
-
Last visited
-
Days Won
1
5 Followers


-
"On the Road Again" with Phoenix
1TonDirtyMopar replied to pflaming's topic in Mopar Flathead Truck Forum
Sure is. -
"On the Road Again" with Phoenix
1TonDirtyMopar replied to pflaming's topic in Mopar Flathead Truck Forum
Reminds me of what my truck used to be... -
Still need the other stuff to be sent to you.
-
$125
-
Man @B1B Keven I thought you were kidding! Congrats!
-
@Jeff BalazsThanks Jeff! It feels good to be wrenching on it again. I Have to get some paint so I'll check that out! Thanks for the tip! @ggdad1951THat makes sense. Even the lights in the office have white behind them not the silver/chrome paint on them. I'll buy a gloss and semi gloss and a matte and see which works better. Thanks @johnsartain Even if it is an old thread great knowledge to be shared!
-
Would a gloss white work or should it be more of a satin/matte white? I'll start taping the rest of the light up to avoid overspray. Did a little rust removal with some evapo rust. I think it came out great! Just need to get a big tub to stick the whole pedal in.
-
Yeaup, it definitely does. We got to meet up one of these days. I'm trying super hard to get my truck on the road by the end of the summer. I'm pushing to make it happen. DId some tearing down of the nose clip. A few dents that need to be fixed down and the moustache bars need new mounting tabs on them. Going to remove one or two and try and get them duplicated. Took apart the lights and decided to throw a coat of bedliner on the rear. Then just painted the inside lips black. Going to try and get some "chrome" paint to maybe create a "reflector" for the bulb to shine off of.
-
Would the braking system benefit from a proportioning valve to split the brake bias front to rear?
-
I Picked those up from here: http://www.wiringproducts.com/stud-junction-block-4-stud.html Yea I know. I plan on reinforcing the rear with a plate to make sure it's nice n tight.
-
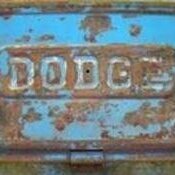
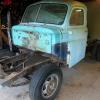
Well after a little bit of a hiatus, I'm back to wrenching on the truck. I removed the old brake lines and to my surprise there was still some fluid in there. Going to have the old rubber lines replaced with some stainless steel braided ones. Also had the mastercylinder rebuilt some time ago but never installed it because I screwed up one of the bolt holes. Thinking of jb welding it shut and then drilling and retapping it. The other 2 bolt holes are still in great shape. Still have to mount the brake and clutch pedals, clean up the drive shaft, electrial, fuel, brakes, cooling, wheels and tires, bodywork, paint. Almost there. LOL So Found out my truck used to be this awesome blue! The interior looks like they just sprayed the whole thing in white paint. I pulled the covers off to see what I was working with. I'll eventually disassemble the doors to make sure everything is greased up and works fine. The windows are hanging up and so are the door latch releases. Going to blast the housing and get it all cleaned up. Might have to send my gauges out to Keven to have him refurb for me. Oh I also bought these new 4 post terminal junction blocks. I wish I could have got the clear covers that go over them but can't seem to find them. I'll keep looking. Yes, 4 terminals since I do have fender lights going on this truck.
-
Well I tried using Evaporust on the driveshaft but that didn't work out. Not sure if the sun hitting the shaft while it was being treated affected it or not. So i guess back to the sand paper and scrubbing. I did manage to clean all the rust off of the shock mounts both upper and lower. Going to try and get those bolted up soon. Then need to buy some shocks to throw on the front end. Also need to get my steering box put back together and mounted. Need to figure out how i'm going to mount the steering wheel since the threads got smushed when trying to remove the wheel. Will probably just cut and reweld a piece on there. Also been thinking about the wiring. I got quite a bit of stuff to do....eesh. I'm still chugging along!
-
Lucky duck Brent! I wish I could snag another truck but I need to get the '50 on the road and start putting the '48 back together. Nice SCORE!
-
Thanks JB. I did hit it with a flap wheel but i think i'm going to hit it with the 80 grit and see how that works out. I'm not afraid of a little primer and paint. LOL hopefully weather permits this weekend and i'll be laying out under the truck working on stuff.
-
Well finally got both of the u-joints in. After buying 2 "Moog 305 U-joints" off of vendors on Amazon and 2 returns later I ended up purchasing the u-joint through Summit Racing. Now that I have both of them I will be pressing them in hopefullly this week and then have the driveshaft installed this weekend. Does anyone know if I were to sand down the driveshaft would it affect the balance of the shaft? Mine has a lot of surface rust and i'd like to get it off before throwing it onto the truck again. What if i were to primer and paint it as well? Then I need to figure out how I'm going to mount the pedals again and then get all the linkage for the throttle on, I already bought new return springs for the brake and clutch pedals. Then the fun part of rewiring the whole truck and fixing my gas tank and getting my original radiator checked out and fixed/replaced if neccessary. Oh and can't forget the brakes! Need to fix a mounting hole I screwed up for the master cylinder then I can mount it and run the brake lines. Then i need to check to make sure the brakes are in good order. Still need to finish putting my steering box back together and remounting the steering wheel. I think that's the list for now. LOL Oh and going to neeed new tires as well. I would love to have the centers put on some modern tubless rims but that might be a pretty penny to do.
