

52b3b Joe
-
Posts
902 -
Joined
-
Last visited
-
Days Won
20
Content Type
Links Directory
Profiles
Articles
Forums
Downloads
Store
Gallery
Blogs
Events
Classifieds
Everything posted by 52b3b Joe
-
I'll have to look at what came with the car. It had a couple tools, but I'm not sure what is original and what is not. I know the hand crank for the engine was homemade by the previous owner. Next time I get out in the garage I'll take a picture of what was in the car.
-
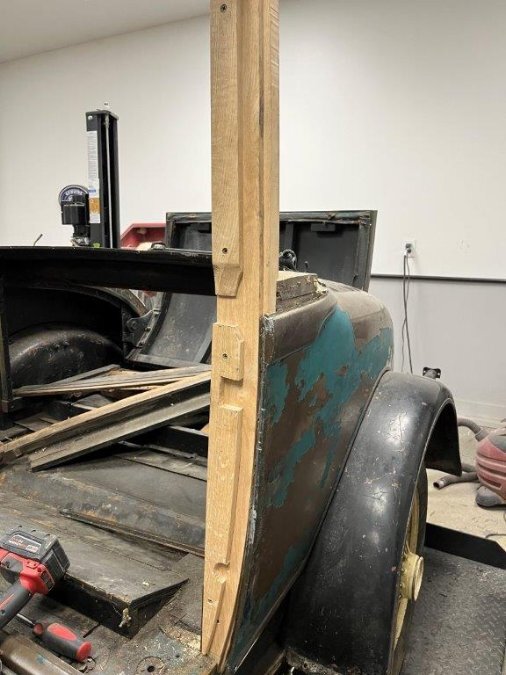
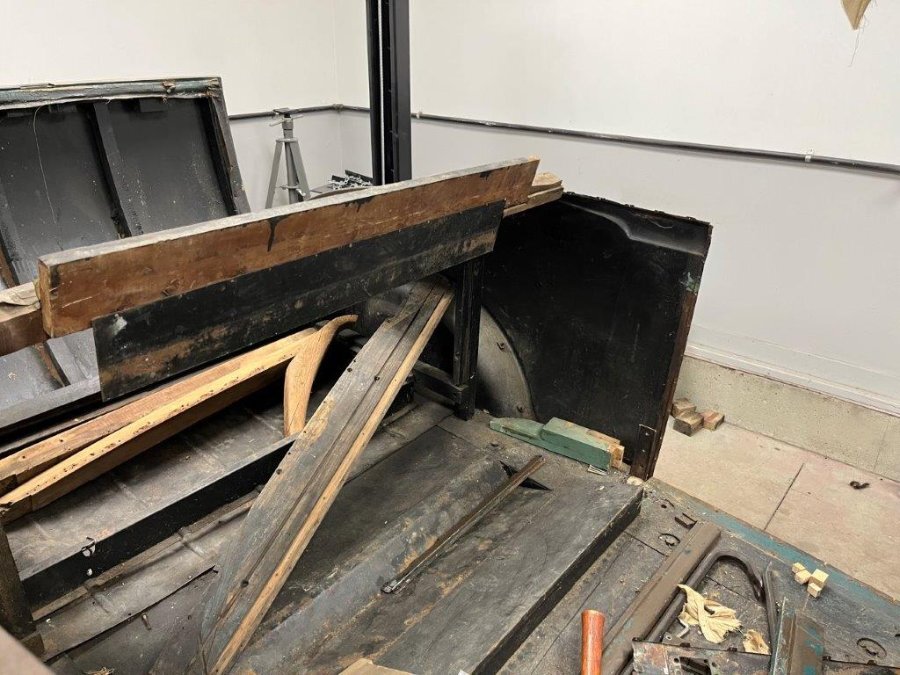
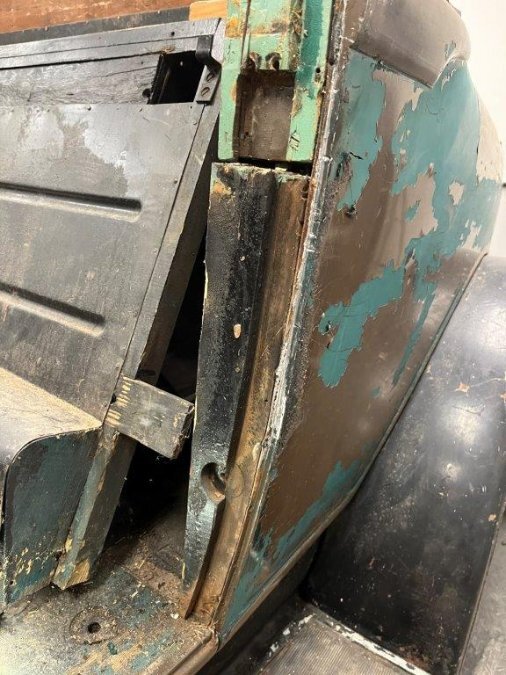
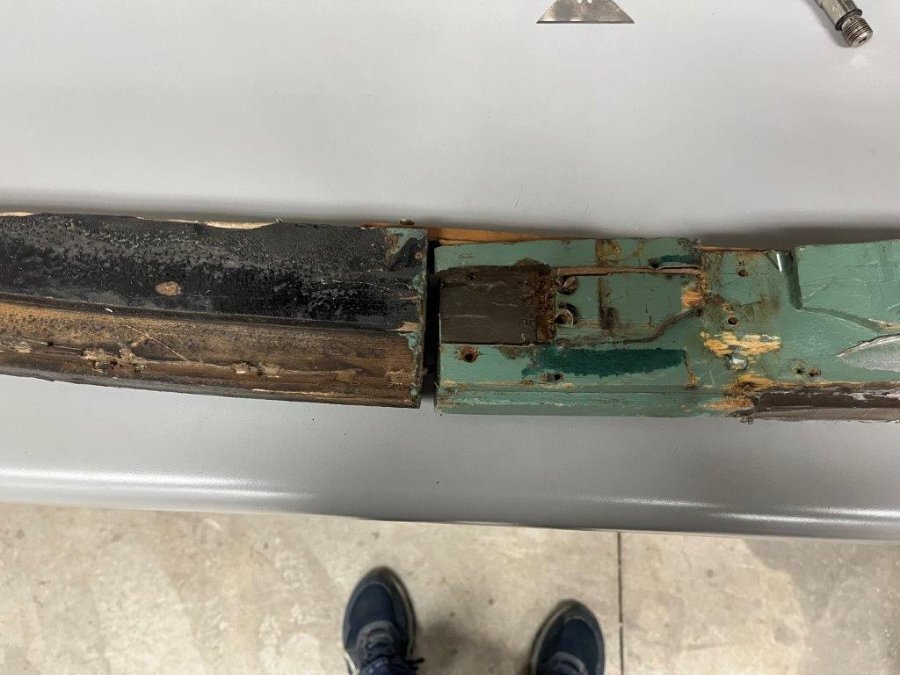
Worked a lot on the car over the weekend. I had some friends come over Friday and Saturday night to work on the car/hang out. Got the fenders and running boards off, and some other misc. parts. It was very time consuming. My friend who likes doing wood projects volunteered to make the B pillar. He started on it last weekend. It came out great! We spent time Saturday night fitting it and I got the Sheetmetal caps for it straightened and fitted. Only need to treat the wood with something (yet to be figured out) and install. Then on the other rotted wood. One piece at a time.


-
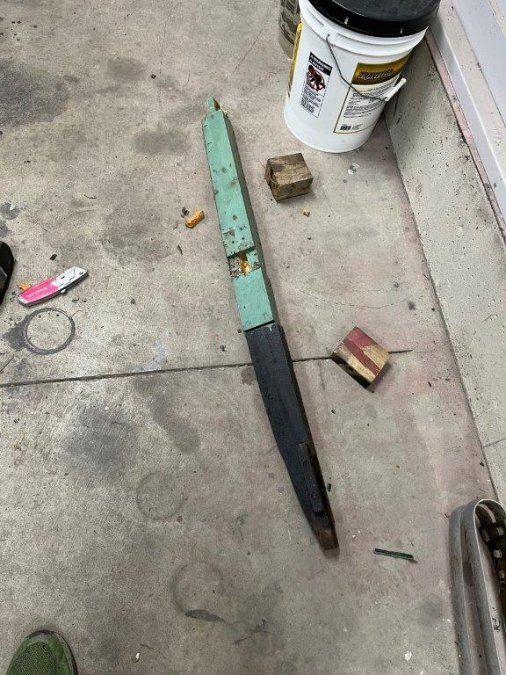
Though I'd give another update. I spent the last month getting the fuel tank cleaned up and sealed. It was horrible inside the tank, and I didn't think I'd save it myself but I got it. I power washed the inside of it, and let it soak in vinegar for two weeks. I bought some different power washer tips and ends that go different angles. They were advertised for cleaning gutters, but they worked great for getting the inside of the tank everywhere with some patience. The soak also showed me where the hole in the tank were. I soldered the holes I found, the power washed the inside again, and repeated the 2 week vinegar soak. After the second soak, I power washed again, and the tank looked like new again. I then used the POR15 tank sealer kit. Hopefully it will hold up. I also got the eBay vacuum tank. I lucked out and got a good one. I cleaned it up, painted it, and put a new cork gasket on it. It seems to work well on the car. I also had the radiator shop I use check out the radiator and clean it. It came back with a good report card, and I got it painted and ready to go again. It's currently back in the car for now with coolant in it for testing the fuel system. Lastly, I decided to start diving into the wood issues on the body. I started with the drivers B pillar. Someone had been in there before and only replaced the lower half. They used two nails to hold it to the upper original half. It was pretty flimsy at the nail joint causing a lot of body movement. I plan on replacing one wood piece at a time until I get the body stiffened up again. Time to get my woodworking skills sharpened up...


-
I am a member of the NDC facebook group. I just looked into this. I never knew Facebook had files like this for groups. I downloaded them and printed them. Thanks!
-
Yeah, it seems to be a common issue. The ebay one "looks" ok as far as the pictures show, but I'm not going to expect perfection. It doesn't have the half the casting blown out at least lol.
-
Thanks for the info! I did see his website in previous searches I did for parts/info. It's good to know he's a reliable source. I am also bidding on a similar looking tank to mine on ebay right now. I was hoping if I win it, I could use parts between the two to make something good. If the can is the same size or even close, maybe just use the ebay one?
-
I used napa's website and it came up with a Napa 1100. It seems right on the dimensions, so I ordered one last week. I still haven't gone to pick it up yet and see.
-
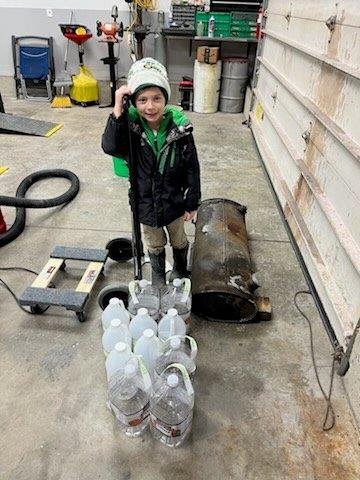
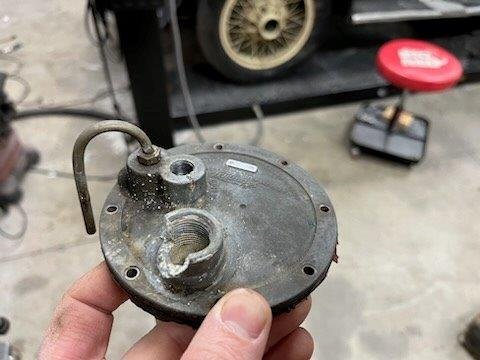
I spent a little time on the car the past two weeks. I pulled the fuel tank out to start cleaning it. I power washed the inside out as best I could. It has baffles so it was only effective in the one sections I could get at. I kept filling it and rinsing it getting as much rust and chunks out of it as possible. I then filled it up with vinegar to try and eat the rust out of it. The plan was to fill it to the top, but a hole reveled itself about 3/4 of the way up at a spot weld for a baffle. It should easily be repairable. I don't see how I'm going to get the center clean without cutting a hole in the top of the tank, but we will see. I also pulled the fuel vacuum tank off and took it apart. It had some sort of sealant or soft epoxy on the top around fittings. A little heat softened it up, and it was easily peeled off. As I thought, the pot metal casting was cracked. I figured I wasn't out anything but some time and a couple dollars, so I made a steel ring in my lathe and used some two part epoxy rated for gas and for drilling/tapping. I put the broken pieces back together after applying the epoxy, and pushed the ring over it. I let it set up, and re drilled/tapped the holes. It's kind of a hack repair, but it seems to work. The outer tank and inner tank appeared to be brush painted with what appeared to be brown rustoleum primmer. you can see the inner tank in the background of the 4th picture before I cleaned it. I had to bead blast everything to remove it all. I got everything working as it should with the float and needle/seats, and I reassembled it with the old top gasket (there is no doubt in my mind it is leaking), and put it on the car to see if there was any hope. I poured some fuel in the top to prime the carb, and the car ran about 30 minutes. I drove it up and down the road a little using the handbrake to stop. I believe the vacuum tank was working at some capacity to run as long as it did. I thought it was totally fine until I went to park it in the garage and it ran out of gas. I'm hoping a new gasket will fix it, but we'll see.


-
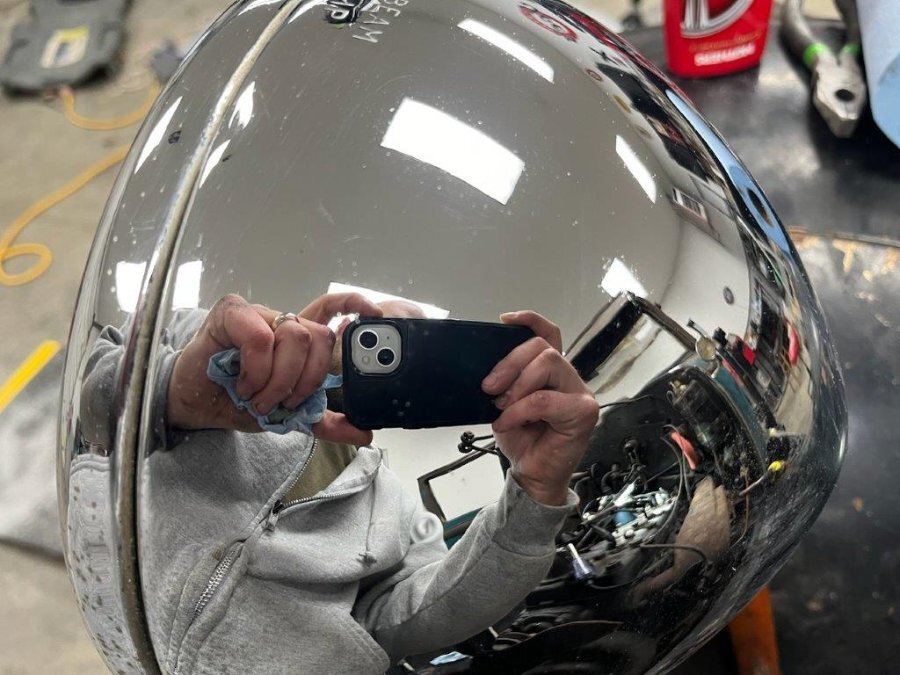
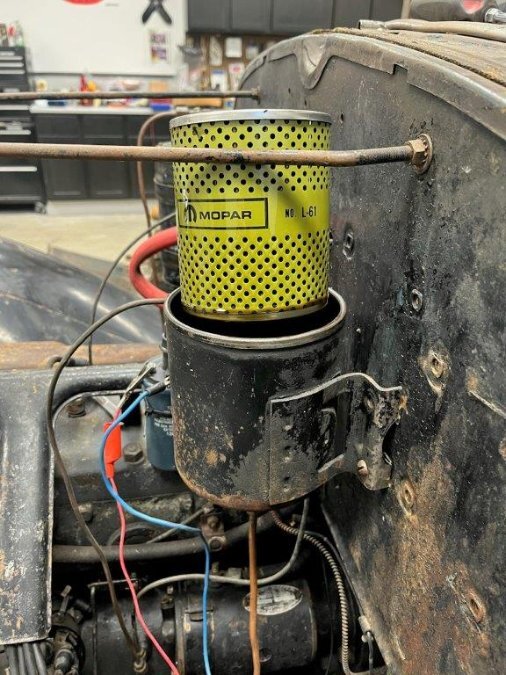
A lot was done over the weekend and after work this week. The oil pan is back on, the new points are in, I was able to get the ignition system on the car fully working, my dad went through the carb, and I flushed the radiator and engine block out. I pulled the thermostat off, and tested in on the stove in a pot of water. It works as it should. I have all of the cable controls working perfectly now. I set the timing per the manual. The timing was WAY off. There is no way it would have run. Last night my dad came over, and we set up a gravity fuel system from a gas can, and the car started right up with no hesitation. It runs great! No noises, good oil pressure, and no coolant leaks. Even seems to run cool. I ran it for about 40 minutes. There is tons of oil in the exhaust system. The exhaust pipe to manifold connection has a large leak, and when it fired up, it sprayed oil everywhere. The smoke from the oil burning off is getting better, but it's going to take some time. The clutch feels great, and will get a little better once I use it a little. All gears are present and work. I did move the car back and forward a little and it drove itself back in the garage when I was done. A huge victory for the car. I feel a lot better about continuing down the path on I'm on. I tried attaching a video, not sure if it will work. On a side note, I pulled the oil filter, and it is similar to my others but a little different in size. I'll need to get a cross on the filter that's in it and get a new one. The filter in it seemed new and I saw no reason to use it for the first run. I also polished some of the chrome. Some of it will clean up great, while others will need plated. IMG_3546.3gp


-
Thanks for the info! As far as being a member of the NDC, I am not but I plan to join soon now that I have one. My dad is a member. He's been a member pretty much from the beginning of the club. He was a member of the Buckeye Desoto Club before the national was started. I forget his NDC number, but its very low. Most of my childhood was around Desoto's. Many of our family vacations were attending NDC conventions.
-
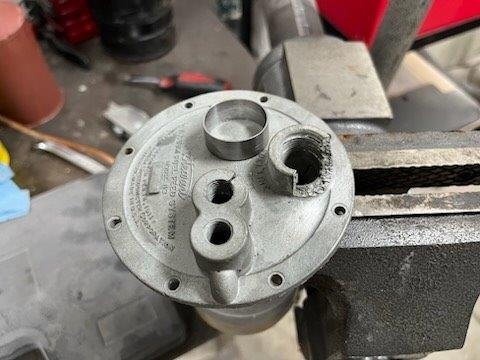
I'm not sure if my filter is correct for the car. If you look at the picture of my engine, it looks different. I'll have to check it out this weekend. On a side note, what is the tank next to the filter? I found the same tank in the back of my car, I didn't look it up in the Instruction Manual for the car yet, but I'm assuming it's a brake fluid reservoir?
-
Thought I'd give a quick update. I have new ignition parts on the way, I have a carb kit also in the mail. The original carb was replaced at some point with a Tillotson JR5A which was (from what I can tell) an aftermarket replacement for the car. I decided that I didn't want to rush into trying to run it without making some checks first. The wife had the kids out shopping last night, so I headed to the garage. I did a compression check last night, and the readings were higher than I expected. The lowest cylinder was at 62 psi, and my best was 75 psi dry. When I put a little oil in the cylinders, the range was 92-110 psi. Being that the car has sat so long, I didn't have high expectations. I put marvel mystery oil down each hole and am going to let it soak the rings for a while. I think the compression might even out with a little exercise, I'm going to stay optimistic about it. It could be valve adjustment, but that's for another day. I also decided to pull the pan last night when I was done with the compression checks. I dumped the oil into a pan, let it settle, then carefully ran a magnet through it. There was no metal debris or glitter, it looked good. Then I dropped the pan for inspection. The engine is surprisingly clean. I am happy I pulled the pan, there was a decent amount of water/oil goo in the bottom. I'm guessing it is from years of condensation from sitting. I need to clean the pan well and I'll reinstall. I need to put a new oil filter in. I didn't pull the cartridge out yet, but the housing looks to be about the same size as the filter on all the other flathead Mopars we have. Maybe I'll get lucky. After I get that figured out, I think the next step will be installing the ignition parts, going through the carb, then I'll attempt to run it. My goal is to have it running before New Years if I don't find any major issues. From there I need to go through the vacuum tank, and get that rusty gas tank cleaned and put a liner kit in it. I also was able to get all the control cables working freely. The spark control is now working with the lever, the choke is working perfect, the manifold heat valve is now free in the manifold and works with the cable. The only stubborn one right now is the hand throttle which is moving stiff now. With a little more time, penetrating oil, and patience, it'll free up. I ended the night on a positive note by getting horn working.


-
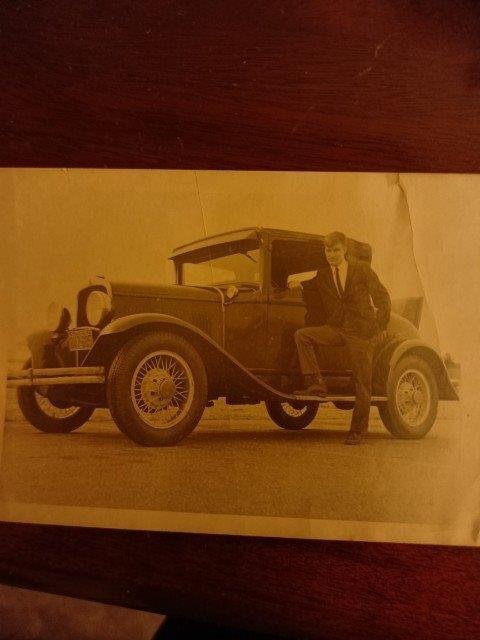
Thanks for all the replies! I will probably have some questions as I go. I did get it lightly power washed and I went through the parts that came with it. I'm confident that all the brown paint would peel right off with my gas powered power washer and some more time. A lot of the brown peeled off Saturday when I hit it lightly with my small electric machine. The only thing I seem to be missing is the rear bow for the top. I put a battery in it to check some basics out. The lights all work, the starter rolls over nicely. It would probably try and fire, but the spring for the points is grounding out on the distributor housing. I didn't get anywhere beyond looking at that for a few minutes over the weekend. I did receive another gift for the car. My buddy who gave me the car left me the original shop manual for the car. It was on my desk at work when I got here this morning. There's an old registration and insurance card in there for the car. I was also sent a picture of the car from the late 60s (I'm guessing). I can't believe how nice this car is.


-
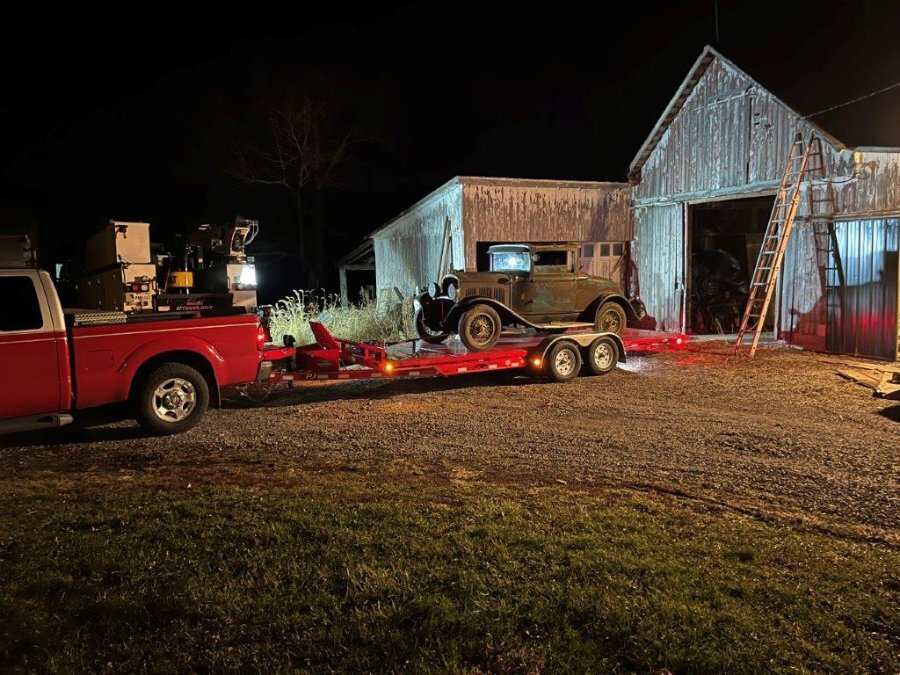
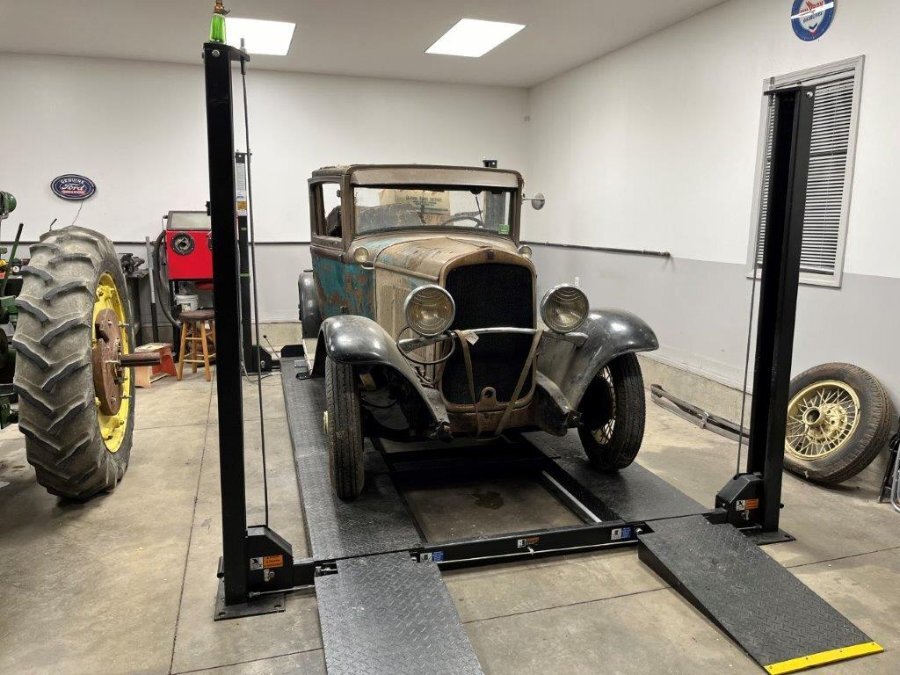
I thought I'd share my newest project. I was graciously gifted a 1929 Desoto Cupe de Lujo (rumble seat soft top deluxe coupe) from my friend with the simple goal of saving the car. He acquired the car 3-4 years ago from his uncle who drove the car in high school in late 60s and kept it ever since. I'm guessing the car was last driven in the early 70s. From what I can tell, it's 100% complete and was parked while driving. Over the years his uncle tried to preserve the car by putting oil down the cylinders and rolling the engine over and various other things. The engine is loose and it honestly looks like it would run if I clean the points and run it off a gas can. He did work on it some since it was parked in hopes of driving it again. He put new wheel cylinders, brake lines, and it appears he rebuilt the master cylinder. He collected some parts, like wheel bearings, a very nice (looks NOS) Desoto grill emblem, and a few other odds and ends. I picked it up last night after work, and didn't have much time to look it over very good. I did spend 15 minutes or so digging around through the boxes of parts and through the rumble seat area and found the original top (perfect for a pattern), the missing rear bow for the top (I was worried about that!), and even the original door panels that he saved when he replaced them in high school. He saved everything he ever took off the car down to each screw. The worst part of the car is going to be repairing the wood body frame as needed and making a new top for it. The cowl is weak and it flexes when you open the doors to the point the doors hit the opening at the rear. It takes a firm push to get the doors to close. Other than that, I think its going to be fairly straight forward. I'll just need to pick away at it as I get time. It was originally a teal-ish blue but someone painted it brown at some point. The brown is lacquer and is peeling off in sheets. Here are some pictures. My kids seemed to enjoy it. It's a pretty exciting event for them lol. I have other projects, but I have a big hang up currently with one, and the other one is in a running/driving state, so I haven't been eager to start it other than acquire some parts. With that said, I think this one will be what I tackle. Hopefully I can get after it in a reasonable amount of time as money and kids allow!


-
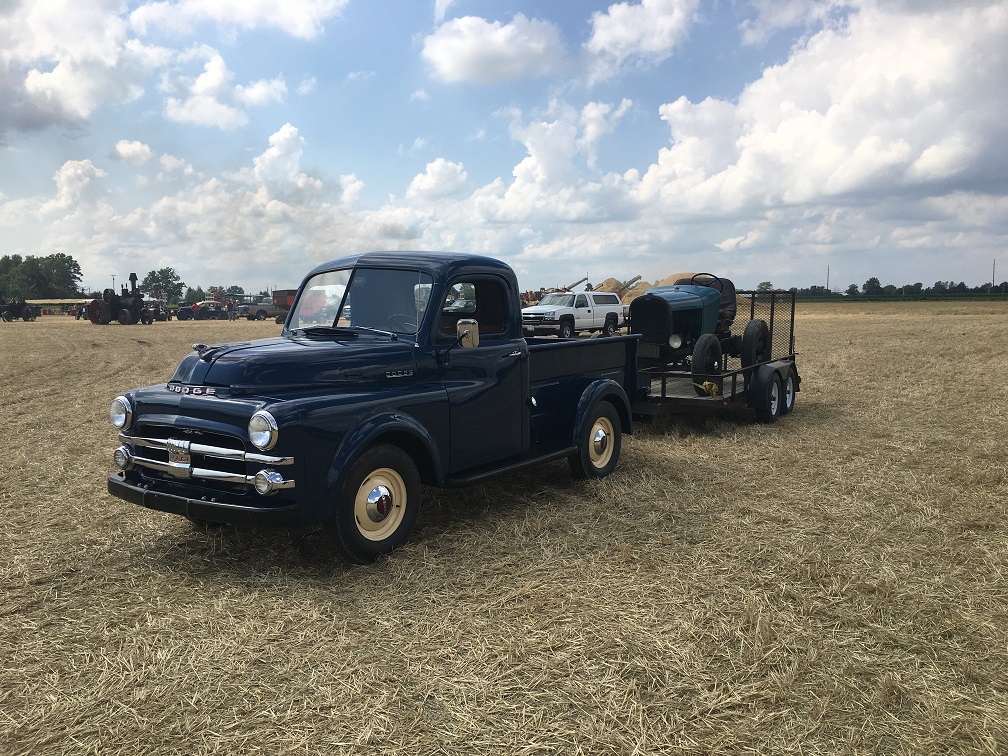
I think the bias tires look better, but we went with the radials because of the "budget build" nature of the project. They were far cheaper than any bias ply we could get. We really tried not to break the bank with this car, and we did very well. The 41 Desoto and my 52 Dodge have 6.50-16s on them.
-
Thanks! Tires are 225/75R15s. Good luck on your car!
-
Yes, the top sill plates did come with the holes in them already. If I remember correctly, after everything was done, I did have to elongate some holes as needed for the sill plates to fit.
-
When I did the rockers on my Dad's 48 Desoto, we bought the panels from the Plymouth Doctor. The panels were not perfect, I had to modify and fit them a lot, but they worked. I used an inexpensive flux core wire welder. It took some time to get decent with it. Prior to starting the project we were in the same situation with it being a 4 door and if it was really worth the money/effort. We felt the car was worth it, so we ordered the panels and starting cutting it up once they arrived. If you look in the link to the thread, you can see what I did. It was a lot of work, but I enjoyed it. As far as the rocker supports, I used scrap metal and made new ones or repaired the existing ones. It doesn't look completed factory, but I really didn't care. It's strong and it functions just fine. I made all of the other patches in the car from an old metal desk we cut up years before. I'm still using that desk for metal to this day lol. The car came out very nice, and for whatever reason it always gets a lot of attention at car shows. I was shocked this year it won best Mopar at a show lol.
-
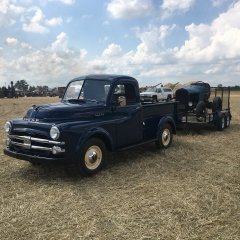
I use mine a few times a year for landscape around my house. It's licensed and I run it down the road within 20-30 miles. I did put new radial tires on it and put a new pinion seal in the axle to keep oil in it. I used it this past weekend when I re-roofed one of my sheds. I parked it on each side of the roof as I tore the old off and just let it fall in the bed, then I took it 10 miles to empty out the garbage when I was done. When I haul mulch with it, it's level to the top of the side boards. The springs are definitely overloaded when I do that lol. I get a lot of positive comments with the trailer, especially when I pull it with the 52. Most of the time it seems pointless to license and keep it, but I have storage for it and try to have a little fun when I can....even if its just getting mulch with the 52 and trailer.

-
What would you do?? - 52 COE Project
52b3b Joe replied to 52b3b Joe's topic in Mopar Flathead Truck Forum
I ended up pouring the floor on April 1st like I was hoping. I let it sit a couple weeks before parking on it to be safe. As of the weekend, I was able to get a lot of the big stuff put away and parked. The COE's new home looks good! Just need to get the wiring finished up this summer/fall and I want to get some pallet racking out there to store a lot of the spare big parts I have like engines, trans, and so on.
-
What would you do?? - 52 COE Project
52b3b Joe replied to 52b3b Joe's topic in Mopar Flathead Truck Forum
I know this is a little OT, but I swear it's all for the truck! I finished up 95% of the concrete prep over the weekend and I was able to get the permanent lighting in Friday night after work with some guys from work. I'm just running the building with my generator until I get the power feed ran from my other garage. I'm really hoping to pour it Saturday pending I can get concrete. It's a little early in the season around here for any concrete plants to be running on a Saturday. Every ounce of my free time has gone into this the past 3 weeks. I'll be happy when it's poured and I can relax a little.
-
What would you do?? - 52 COE Project
52b3b Joe replied to 52b3b Joe's topic in Mopar Flathead Truck Forum
Lol, that grill is the best part of that truck! I could possibly make a heated area, but I have my other shop (30x50) that has half of it heated and finished where I work on everything. The COE is too tall for the garage doors on that building though. It'll be a fair weather project in the barn.
-
What would you do?? - 52 COE Project
52b3b Joe replied to 52b3b Joe's topic in Mopar Flathead Truck Forum
I know...I can't believe how fast the kids are growing up. It's a bit scary. I would have loved to, but I don't ever see myself insulating and heating the building. It's too large of a space for my budget to heat lol. -
What would you do?? - 52 COE Project
52b3b Joe replied to 52b3b Joe's topic in Mopar Flathead Truck Forum
A little more progress has been made and is currently being made towards the truck. I sold the 10R22.5 tires and put 235/80R22.5 tires on my rims that I got from a my friends parents. They put new tires on their motorhome. The take offs are about 60-70% tread and have great casings (no visible dry rot. The diameter is about 3/4" less than an 8.25-20, so I should be in good shape. I'm also in the process of pouring concrete in my barn and getting electric ran to it. This will definitely help the project move along easier! I'm prepping everything myself which takes some time, but it is going good. As long as the weather is good enough (temp wise) I'm planning to pour April 1st. I have three finishers from my work lined up to help me pour. The picture below is my best helper. The only bad part is having everything sitting outside in the yard until I'm finished. I'm hoping to have the electrical ran by the end of summer. I'm only planning on 60 amps to the building. I have to run the wire 330' from another building, so I'm trying to save money on wire size. It should be enough for everything I plan on out there. It's primarily a storage building. As far as the title issues go, I decided to take a break. I found another option that I am going to move forward with, so we will see how it goes.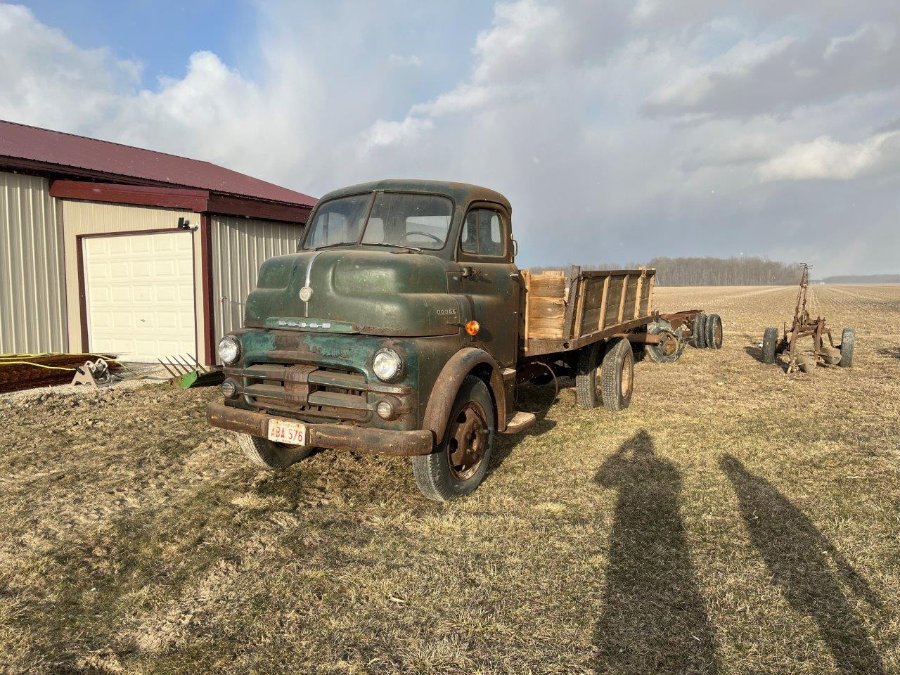

-
I'll bid $150
