jjefferson
-
Posts
16 -
Joined
-
Last visited
-
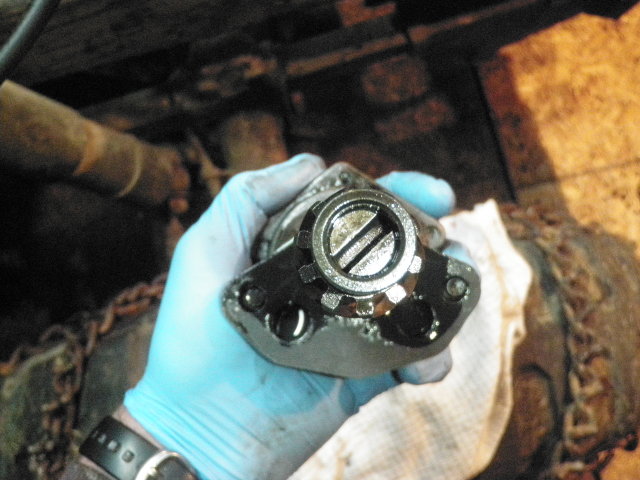
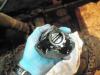
Happy New Year all. Finished out 2010 by finally getting the rebuilt engine to start - way better feeling then watching ball drop. Anyways just wanted to confirm that the oil pump is timed correctly. From the distributor side the slot goes from 10 to 4. That seem right. This is with #1 at TDC via dial indicator in the #6 cylinder hole. It started so I guess its correct - just wanted to confirm. Also attached is 2 pictures of the oil pump prior to install. Took me several hours to figure all this out. Why I have no idea. Had a terrible time getting the distributor back in and the truck would not start, and would not start. Finally pulled the oil pump, reinstalled and then everything seemed to line up correctly. I think before the pump was lined up from say 8 to 1 oclock - I have already forgotten in all my frustrations. Why can such a simple task take so long and prove so frustrating. Its that feeling you get when you know something is off - but just cant place what it is. -Jim and once again Happy New Year.
-
Hello and Merry Christmas. Putting the intake and exhaust manifold back on with new stud and nut kit from VPW. Do the 4 steel nuts and beveled brass washers go on exhaust or the intake. Likewise for the brass nuts, brass washers, and 4 steel washers. Too many choices. I have worked out a bunch of scenarios but can't seem to make them all work. Maybe my brain is getting too tired - it took me about 15 minutes to realize that I had the head gasket flipped the wrong way - could not figure out why one bolt hole / gasket hole would not line up. Even grabbed my old gaskets and set it up the same way. Duh Jim you idiot its backwards DUH Love those moments of brain power. Thanks and Merry Christmas Jim
-
Just started to install my new piston rings (57 Belvedere 230) - .06 rings with .06 pistons and just realized that I don’t know what the required gap clearance in the rings should be. All my books just reference the standard piston and ring gap clearances. Or at least that is what I am assuming. Would the gap be to the same as a standard set of rings - .007 to .017 for the upper rings .007 to .015 for the remaining lower 3 rings And I guess the next question would be the ring clearance in the piston groove - standard or different. I am also wishing that I had done this during summer or fall - cold under the barn this time of year. Silly me. Thanks Jim
-
Ah hang on looks like I did the picture wrong. Lets see here...got it, Jim

-
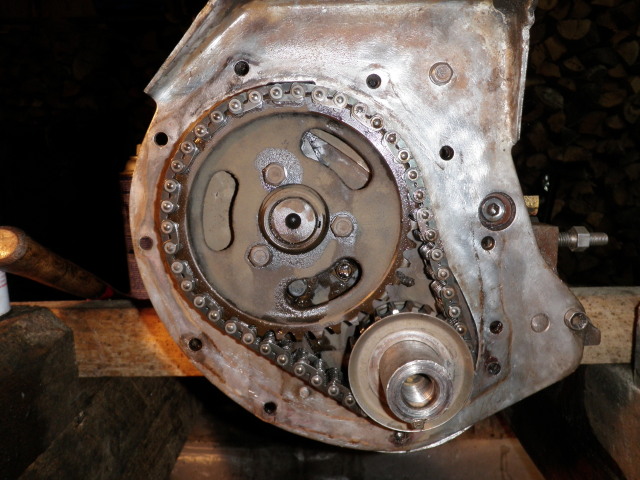
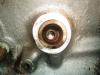
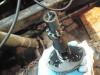
Little background 1954 Dodge M37 with a transplanted 1957 Plymouth Belvedere 230 engine. Doing a quick and dirty rebuild and have come across a part that I don’t see in any of my references. The part is behind the timing cover and almost looks like a cup seal. The question is = should this be here? I sort of assuming it would add a outward thrust pressure to the old seal. As is stands now I still have the part installed, with a new timing cover seal and felt behind the hub. Thanks Jim
-
I take it back. Had one of those DUH moments. Forgot that I hadn't driven the old seal out yet. DUH. Hopefully I can keep those DUH moments to a minimum. Thanks Jim
-
Putting everything back together and seem to have more seals then what came off the engine. The gasket set is from VPW via Best Gasket.com. Here is the kit, http://bestgasket.com/pop_up_picture.asp?PartNumber=RS523C What do I do with seal # 3205 the timing cover seal retainer? From my parts diagram it looks to go between the lip seal and the timing cover itself. Is this correct? Thanks Jim
-
Yes maybe I'll drop the tranny. I might try to roll it 45 degrees to the left and try that. Kind of wedge it and leave it hanging in the chain falls, it would be easier then working upside down. Should have mentioned that the plow truck is a M37 (with a 57 Belvedere engine) so its pretty strait forward to pull the whole power plant out with the tranny attached. Took me about 3 hours and that's with alot of screwing around. One of the problems is that the more I look the more I find, I'm sure many of use have been down that path. And for now I am trying real hard to put some blinders on and to avoid seeing some stuff I don't want to see / fix. It is just the plow truck - but its also hard not to fix it and make it right. Was reminded of this last night - cleaned the engine block and painted it up nice and pretty - then I looked up at the truck with broken windshield glass and no doors or heat. Ah yes I was reminded this is just the plow truck ie tractor with a roof. Then I promptly went back and touched up the paint job. Will we never learn. Currently trying to find some red plastigage - seems no one in my town (Napa, Carquest, Autozone and even a machine shop) stock it. All they have is the green plastigage. Shame no one works on old stuff anymore. Jim
-
Currently in the process of giving the plow truck and her engine some much needed love. And have seemed to have opened a large can of worms. In interest of time and budget I pulled the engine (57 Belvedere 230) out with the tranny still attached, and made a wooden stand to place the engine on. Couldn’t really see the need to buy a stand especially given that the work is happening under the barn on a crushed stone floor. And I wrongly assumed this was to be a quick valve job. Well now I see the need. Oh how silly I was thinking I could work on my back under the engine staring up into dripping oil and anti freeze. Have managed to drop every single piece of plastigage that I have cut into the dirt, not to mention the floor is cold. So has anybody here ever try to roll a complete engine with the tranny. I I was thinking of two slings -one at the front and one at the back and then with a long 2 by 4 try to roll / wedge it over….somehow…maybe... any thoughts. Thanks Jim
-
Mystery part found in engine- What the heck
jjefferson replied to jjefferson's topic in P15-D24 Forum
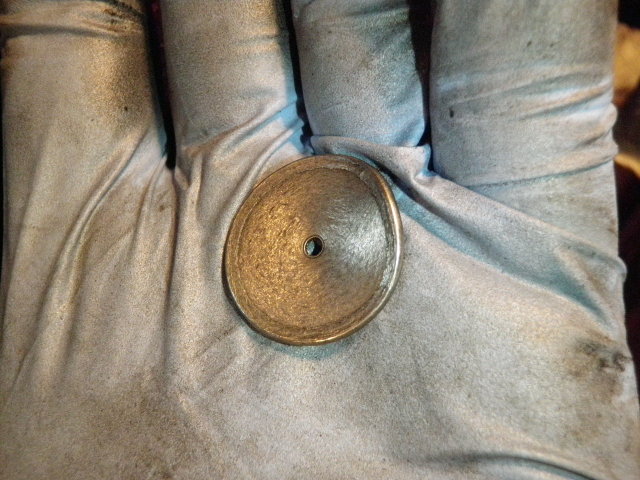
The winner is the choke plate diaphragm. I remembered just as I fell asleep that during the carb rebuild I had taken a bunch of pictures and voila. I knew I had recognized that part from someplace. The little diaphragm was missing. I can't remember if I stole a spare diaphragm from the parts bin or replaced the whole choke. I do recall that the parts were slightly different - I think just the little hole on the bottom of the choke plate. Will have to dig deeper - whats one more project. Wonder what happened to the little retainer fastener that held the diaphragm on? Ironically this valve was one of the good ones. Number 6 intake valve is all bent, maybe the screw got stuck in that one and the diaphragm slipped by #1 with no damage. Jim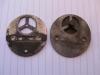
-
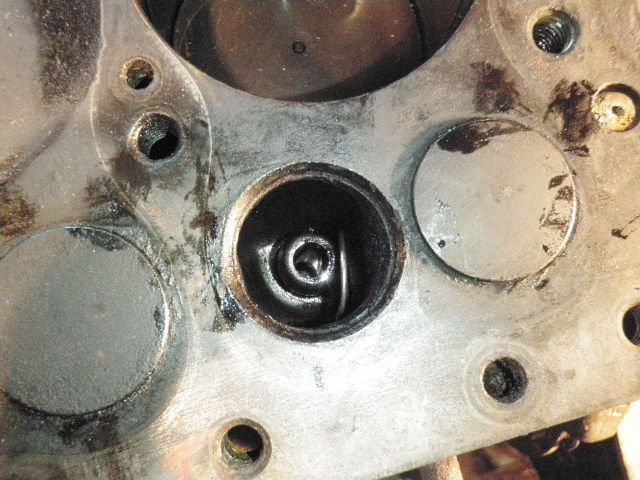
So doing a quick and dirty valve / ring job on the old plow truck and found this in the #1 cylinder intake valve, wedged down low around the valve guide. This is a 54 Dodge M37 with a transplanted 57 Plymouth Belvedere engine. It’s the same size of a quarter with a small hole in center. Kind of reminds me of the blank slugs that were used to trick pinball /video game machines, but it has more heft to it. The center hole looks to have a wear mark where small fastener head was. I tore the carburetor apart about a year ago (Carter BB) - but I don't recall this matching anything - of course that was a year ago, and things are kind of fuzzy from last year. Anybody recognize what this is / was? It looks familiar but I can't figure out why. Thanks Jim


-
Yet another update- Let the truck sit all night outside - to teach it a lesson (or maybe me). Went out this morning - around 15 - 20F and she started right up. Have since tried it several times over the course of the day and it still fires right up. I think that the rebuild kit just had the wrong needle and seat combo and the carb was just flooding right from the get go. Jim
-
Hey Niel I'm in Midcoast maine just outside of Belfast, ME and trying to take advantage of this warm winter weather to work on the truck. Well an update. The old needle is a all metal one and the new needle is a viton tipped one. As I mentioned put the old needle and seat back in, let it sit for a while. Just tried it - fired right up with a little coaxing. Ran it for a while. Turned off the elec pump and then let it run till it began to die and shut her off. Trying to eliminate any flooding issues. Tried to start it - would not go. Until I realized that I had also shut the valve off in the gas line. Turn on gas and vroom fires right up. Now I guess I'm not sure what to think. Leaning towards a really bad carb rebuild kit - 2 bad gaskets and a bad needle. Not very good because it was an expensive kit 65.00 - they will get a call on Monday. So it looks like float likes the old needle and seat. I will try this all over again tomorrow and see what happens. Jim
-
Tuning Carburetor - Power Wagon
jjefferson replied to sams50b2d's topic in Mopar Flathead Truck Forum
Hey SamS Did you ever sort out your carb issues - I have the same set up and fighting with mine as I type.. JIM -
Thanks Greg - I guess I should have given some background to give the full picture. Truck is just a plow truck with a very tired engine in need of an overhaul. I have had it less then a month and am figuring out the idiosyncrasies of the truck. As an example the port side of the engine is covered in oil from the breather so I know I need a ring job for starters. And I am sure that is the tip of the iceberg. The truck was purchased with the intent to just plow with it and use it for parts for my other Dodge truck. Rebuilt the carb (but used the old needle and seat because I was missing a fuel fitting) last weekend and truck fired right up, in the past the previous owner always used a can of ether. Ran the truck around a bit, worked on the plow etc. Then she would not start. Finally got it going and parked it for a few days. This week got the proper parts, changed out the needle and seat. And now she continues to flood and fill the intake with fuel. I could see the fuel at the insulator gaskets just leaking out. Checked the float level – tweaked it a smidge for a 5/64 clearance. Put it all back together. Truck still will not start. Took the carb apart and noticed that the 2 interference gaskets have a larger throat diameter then the original. Posted my questions and headed to town. Picked up some gasket – made 2 gaskets. Put it all back together moments ago and she still floods out. I have around 3 -4 psi of fuel at the carb. That should be about right. Just put the old needle and seat back in, checked the float level for the old needle – around 5/64 and if anything its on the lower side of that so it should shut the fuel early. Tried it again and she almost goes – better then last time. In the meantime I have checked the plugwires (covered in oil) and found a little oil seeping into the distributor via the plug wires – cleaned that all up. Also vacuum sucked the raw fuel that had pooled in the intake. One thought is that the coil is going and I have been all over the truck – so perhaps I knocked something or loosened a wire. Although it is only wired with a master switch and the coil. I have cut all the other rotted wires out. It’s a mystery. Going to let her sit for a few more minutes and i will go try it again. The kicker is that I had it going..... -Jim