


47 Coupe Tom
-
Posts
31 -
Joined
-
Last visited
-
Days Won
1
Content Type
Links Directory
Profiles
Articles
Forums
Downloads
Store
Gallery
Blogs
Events
Classifieds
Everything posted by 47 Coupe Tom
-
Thank you SIR! I suspected the "ribs" on the back of the hood ornament might be filled too. There is enough red paint still in the "SPECIAL DELUXE" badges on the sides that I figured that was somewhat original. I guess that will be this weekend's project since it's going to be about 90 degress and humid here again...
-
Hi again, all - is the background of the Mayflower/Ship/Shield supposed to be in-filled with paint (I assume red if yes)? Like the hubcaps, etc. What other areas are/were in-filled?
-
Thanks everyone. Looks like an original-style bulb bracket might not be too difficult to fabricate.
-
THAT is one awesome photo!
-
Hi guys - now that I am getting the paint to look better, naturally all the bright trim is looking worse. My hood ornament is very pitted, but I found a decent one on EVil Bay, spent an afternoon polishing and buffing it out, and I am pretty happy with the result. I know the clear plastic "Mayflower" ship part is available new. My question is: Were these always internally lighted (the clear part) or was that an option? My original one doesn't seem to have any bulb holder or power source going to it. Since my "new" one is turning out pretty nice, I am wondering if I should bother making it light up - especially if it was only an option and my car wouldn't have had it originally.
-
PLYMOUTH script and nose shield removal
47 Coupe Tom replied to 47 Coupe Tom's topic in P15-D24 Forum
Sounds like I'll be heating up another wrench and bending it all to heck... -
PLYMOUTH script and nose shield removal
47 Coupe Tom replied to 47 Coupe Tom's topic in P15-D24 Forum
Thanks again. I had a feeling it might be fiddly. I can't imagine they put these on before the rest of the nose was assembled - but who knows? Tom -
PLYMOUTH script and nose shield removal
47 Coupe Tom replied to 47 Coupe Tom's topic in P15-D24 Forum
Thanks, Plymouthy - at least I know what I am dealing with then. Any hint as to the nut size? -
Hi guys - in order to continue wet-sanding/buffing out the paint, I'd like to remove the PLYMOUTH script and the shield on the nose. Even with a LED flashlight I can't tell if these are held on by threaded studs, or push on trim nuts from behind. My eyesight doesn't help. Most of the other trim is more obvious to me, but I would really like to NOT break anything if possible. Is there ANY access below the hood release mechanism panel to get to the PLYMOUTH lettering? Thanks in advance! Tom
-
Thanks, Sniper - this counts as cardiac-rehab, right!?
-
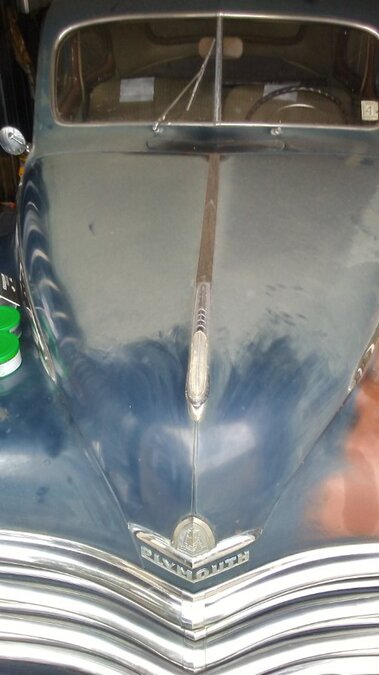
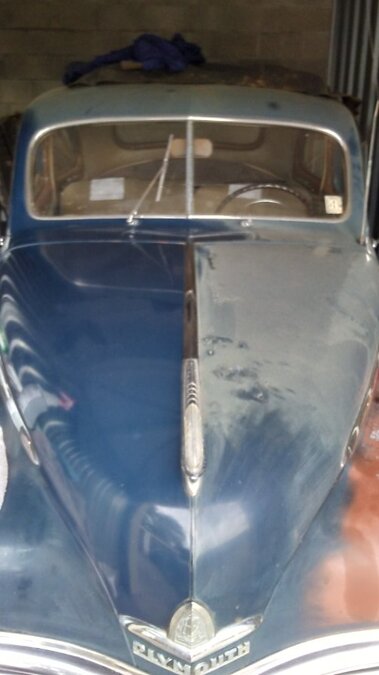
Well, I keep going - but it is exhausting (although really satisfying). The left side of the hood was 2.5 hours by hand. Dupont #7 followed by a wet color sand in #3000, back to Dupont white polish, Mequiar's Ultimate Compound and black wax...

-
Thank you all (again) for the sage advise!
-
Hi all - in my zeal to keep going with the paint rectification on my coupe, I need to remove the cowl ventilator for a couple reasons: 1: The gasket is disintegrated and needs to be replaced 2: The ventilator is the most practical-sized piece I can remove to get scanned for a paint color match for the spot repairs I will have to do 3: Some of the areas around the ventilator need touching up with new paint I see the two elongated vertical holes in the mesh for accessing the four cross-head screws. Is that and the lever all there is? Or am I daydreaming? Thanks in advance, Tom
-
allbiz49 - That's amazing. What products/equipment?
-
Thanks Doug&Deb - I used to manage a restoration shop. We did amazing work, even when just detailing. It also made me painfully aware of how expensive a quality, complete repaint can cost. I really like this car, but it's not a Bugatti - and I am on the strictest of budgets. If I can make her look pretty with my own sweat equity then I'll keep scrubbing!
-
We are on the same page. When you use a buffer, you can't "hear" the paint over the electric motor noise. I love when you are progressively using finer compounds that you can "hear" the paint getting more and more quiet as the imperfections get smaller and smaller. Once your sanding, polishing, waxing efforts are nearly silent, you've done the best you can do. When the paint is literally squeaking from the polishing cloth. You are there.
-
Thanks, Plymouthy - If the paint was in better shape to begin with, I would have used Meguiar's exclusively. But I really needed to (inexpensively) cut through heavy crud first. I cannot say enough good things about Meguiar's Ultimate Compound though. I had a '53 Buick Special in black. The paint was horrible. It was single stage enamel, which most "kids" today will tell you cannot be color-sanded. Well, I color sanded every inch of that car by hand (ruining my right rotator-cuff in the process) ending up at #3000 grit wet-sand, then buffing the whole car with Mequiar's Ultimate. When I was done you could shave yourself in the finish. As my dad used to say to me when I had been out in the garage way too long polishing a car "Son, you can stop now. I just saw a mosquito slip and break his neck on your car..."
-
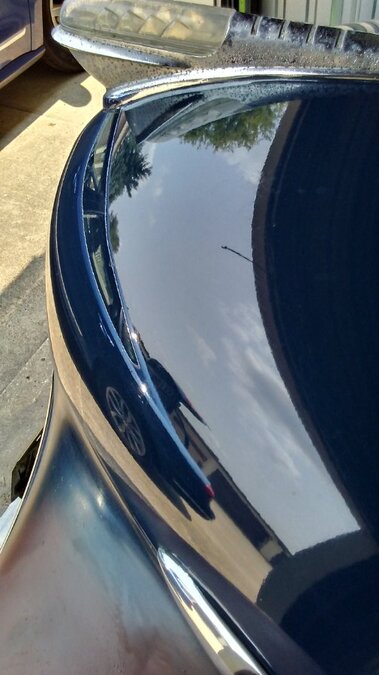
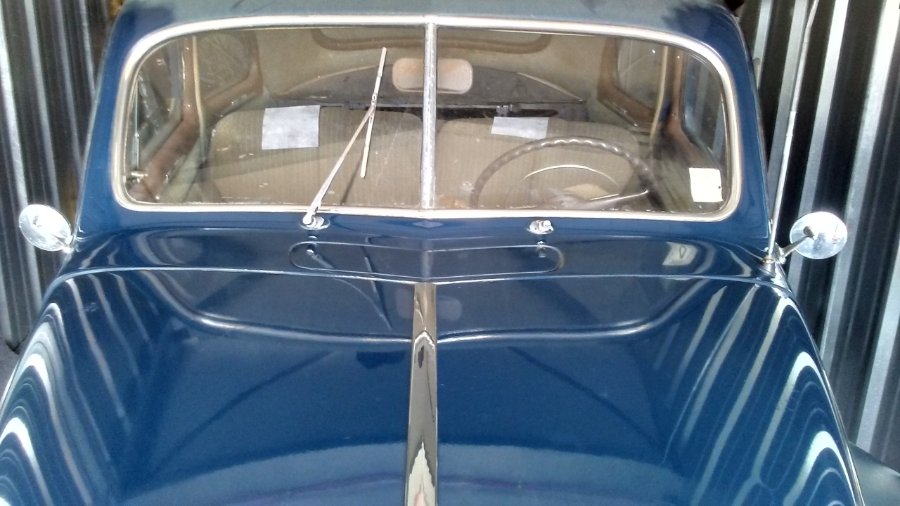
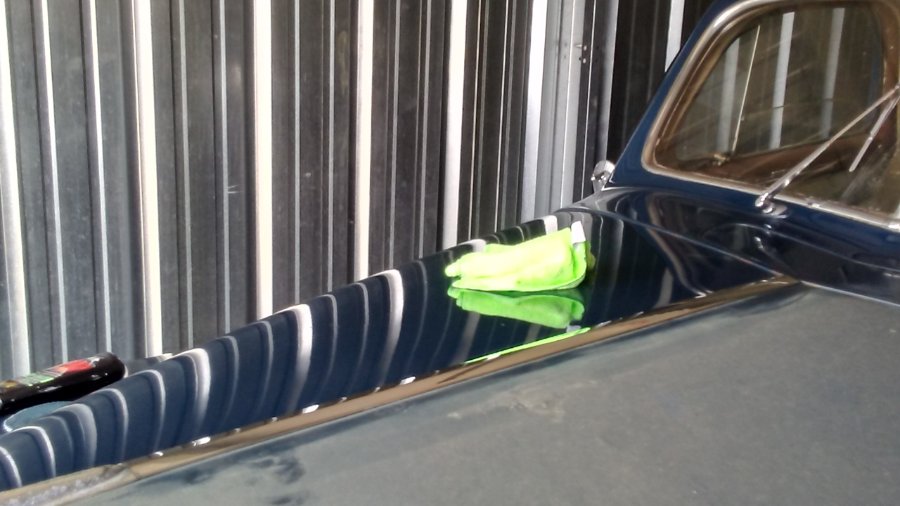
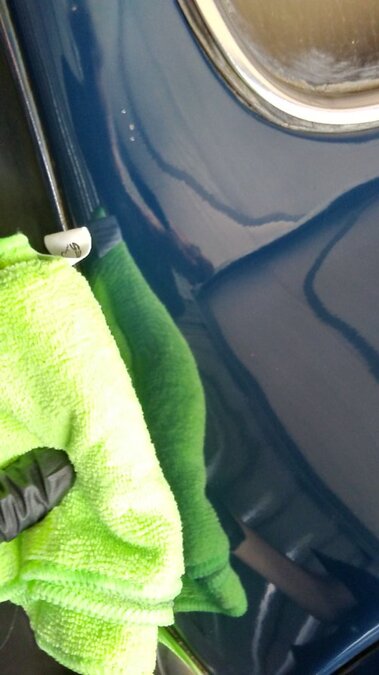
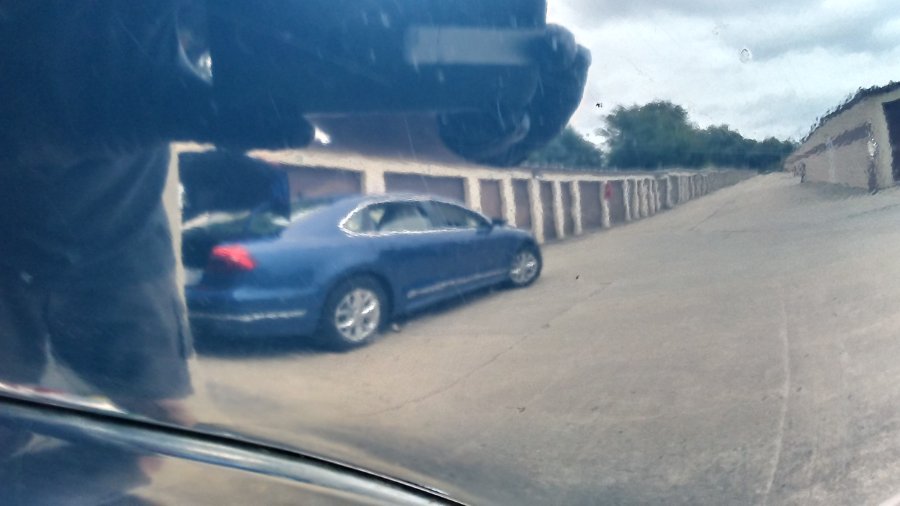
Since I am waiting for parts and still want to make progress, I decided to try and do something about the cosmetics. I have brought back finishes before that seemed too far gone, and my coupe would, I am sure, seem way too far gone to a lot of people. Keep in mind, I currently have the '47 in a storage unit, with no power and no running water. Given those two facts, I am, as the English would say "Rather Chuffed" with the result. The formula? Spray bottle of water for repeated dousing of the crud, many, many large terrycloth towels (that have to be frequently washed in hot water), Dupont #7 (orange), followed by Dupont fine polishing compound (white), followed by Meguiar's Ultimate Compound, followed by Turtle wax's tinted black wax. I generally think Turtle Wax products suck, and how they came to be so big in this industry I will never know, but their tinted black wax hides a multitude of sins on dark colored cars, especially. Particularly if you have busted your keester prepping the surface first. On the unfinished side of the hood, that's not just dust. It's how the actual finish looked before I started. It was like running your hand over sandpaper... The photo with the blue VW Passat in it (my daily driver) is the reflection in the hood. Now I just have to do the rest of the car!!!
.jpeg.20b32acd98ba4e399e370f964cab96ad.jpeg)
-
Thank you! Is there generally enough slack in the harness to be able to change it out? What was the combination of keys originally supplied? Was it - Ignition / Door lock, then Trunk/Glove box?
-
Hi again, everyone - my next step is to R&R the ignition switch in my '47 Club Coupe. Unfortunately, I got the car with no keys whatsoever. I have a new assembly coming from Andy's, but since it's not here yet I don't know how it's held in to the dash. I don't see a threaded trim ring or anything on the outside of the chrome center panel. Can anyone advise as to what I am in for? Since my recent health scare I am probably not supposed to be hanging upside down under the dash for any length of time. Thanks in advance, Tom
-
WOW! I love this forum. Thank you all for this valuable info. It occurs to me I am a long way from worrying about concourse correctness, but I hate to buy parts twice and do work twice if I can avoid it. My color-coded wiring diagram should arrive today in the mail. I do see a yellow wire from the + coil connection to the distributor. I have new plugs, wires, cap, rotor, etc. just waiting for me to show them some love. I also ordered a Pertronix ignition (6V + Ground) and have that now. I have used their system for years on many vintage cars and have been extremely happy with them. There are no external wires or ignition boxes, it all hides under the dizzy cap. chrysler1941 - I am guessing this should be "0" gauge ground cable - and should it be a vinyl-wrap cable or cloth? Are the cable color-coded red/black? And would my newly-acquired braided cable be correct if it were used as a secondary ground as suggested by Greg G? I will look for that generator bracket attachment point today. Unfortunately the coupe is in a storage unit - but only about a mile from my house. I need a bigger toy box at home.
-
Hi all - Still sorting through my 47 Club Coupe details/ I did get a new battery, but of course the only cables available locally are relatively light duty 12v ones. I now have a correct braided ground strap and have ordered a proper 0 gauge battery negative cable. Can anyone tell me the correct OEM attachment point for the braided ground strap? And what is the proper routing for the black/negative cable to the starting solenoid? I have my current ground going to the generator adjusting bracket because it was convenient - but I suspect it should probably be a cylinder head nut or some such? Is he negative cable suppose to tuck under the inner fender flange then head South to join up with the solenoid? I see some cable routing clips on the inner fender but would like to know what's correct. Thanks (again) Tom
-
SuperGas61 - one of my other toys is a '57 Morris Minor. My wife and I were fortunate to live and work in Melbourne, Australia for a couple years. While we were there I found the Morris and decided to bring it home with us when we were repatriated by our employer. One of the EPA requirements to import the car was that the car had to be steam-cleaned (with a receipt to prove it) from a licensed garage. There was one nearby where we were living, so I scheduled an appointment and took her there. I could walk to where the garage was so I went home and waited for the phone call. After a few hours I got a call that they were done, but the car - which had ran great previously - wouldn't start. I walked over to the garage, and sure enough, she cranked but wouldn't fire. I asked if they had any WD-40 (a lot of things common here aren't available there), and fortunately they did. I took off the dizzy cap and blew it out with compressed air, reattached it and then sprayed the outside of the cap and wires with WD-40. The car started immediately. WD-40 ("Water Displacement formula 40) doesn't "dry" anything, but it does, literally, displace moisture from wherever it has gathered and allowed the sparks to follow their intended path, instead of shorting to the least path of resistance (via moisture).
-
Dan, thanks for that clarification. It really helps me. I have ordered a color-coded wiring diagram, and a new/NOS ignition switch with keys just this afternoon (and a carb rebuild kit), so hopefully can make a little progress as my health allows. Wasn't feeling great this evening, hence my awake-late posting here. I don't see an escutcheon on the outside of the ignition key-hole in the dash. Is there going to be a trick to getting the old ignition switch out? I also noticed a red jumper wire in the engine bay going to the horns, and a discreet black button screwed to the underside of the dash below the steering column, so I am guessing someone direct-wired the horns to that switch. I didn't have time to reconnect the battery today and double check that theory. Thanks again, Tom
