


fireguyfire
-
Posts
192 -
Joined
-
Last visited
Content Type
Links Directory
Profiles
Articles
Forums
Downloads
Store
Gallery
Blogs
Events
Classifieds
Everything posted by fireguyfire
-
Yes, they are a mopar specialty engine shop that has been around for 70 years so they will definitely understand the can of worms they have opened that they will have to make right unfortunately I picked this engine up from them over a year ago and didn’t think to check the crank bolt pattern before I put it on an engine stand and covered it up while I restored the rest of the truck, so the other crank is long gone
-
I did read it and it was very informative
-
Howdy! I spoke with the owner of the engine shop, and he fully admitted that they have made a mistake and that they will fix it at their cost. He remembers my engine well and said there was another guy named Todd that had a 318 engine in at the same time as me and is sure that they used his crank in my engine. The crank has been ground and balanced etc for my engine, so he is thinking about how they can make my original 8 bolt flywheel fit my now 6 bolt flange. I also mentioned about the option of using a later 318 6 bolt flywheel, but then you have to swap the ring gear for the original 172 tool one. We are just starting down the road of how to fix this issue, and I will keep updating here what winds up being the solution.
-
-
-
So if indeed I have a later crankshaft, would the matching later flywheel interchange, meaning would the diameter , ring gear etc be the same? would the older pressure plate and clutch disc bolt up?
-
Correct, the flange is shorter
-
-
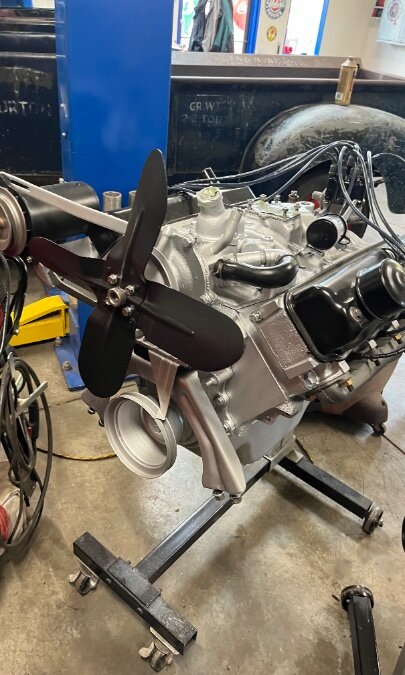
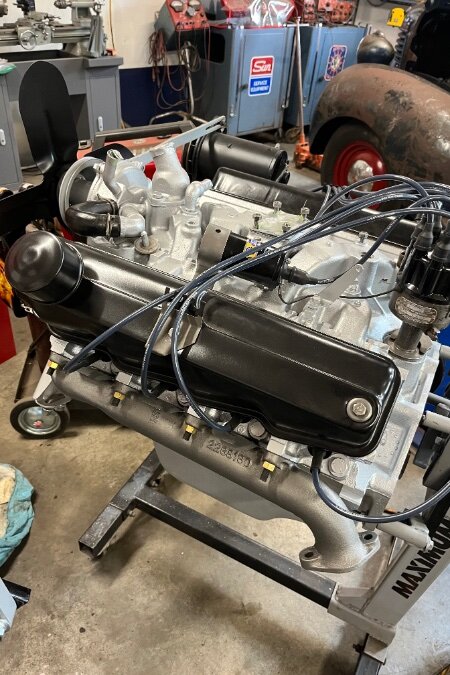
The engine is the factory engine, it’s a 313 v8. The Canadian engines were similar to the US dodge engines except the had a slightly longer block.
-
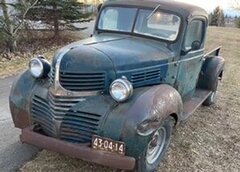
Long story to get to my question so I apologize up front! im getting close to finishing the restoration of my 1958 Fargo Sweptside truck, one of less than 10 that came with a v8 engine. The original engine and transmission were in the truck when I bought it, but the engine was badly seized so I had to have it bored out, pistons made for it, etc. That process took a year and a half and while they was going on I took the flywheel clutch and pressure plate to a local shop that has been servicing stuff like that for 100 years. The ground the flywheel and pressure plate and refurbished the original clutch disc to new; that was over a year ago. I finally got to the point recently where I could mate the transmission back with the engine and drop it into the fully restored truck frame. When I pulled the engine from the engine stand and went to bolt on the flywheel, I was stunned to find that the flywheel bolt pattern is a circular 8 equally spaced, and it also has non threaded holes meaning it has the clipped head bolts and nuts to hold it onto the end of the crank. The end of my crank has a 6 bolt pattern that is not equally spaced, with 2 of the holes obviously closer together meaning the flywheel can only go on one way. Also, the end of the crank flange holes are threaded to take bolts, no nuts needed. This engine and transmission were together when I bought the truck and I have absolutely no idea how I can have a flywheel that doesn’t match my flange now. I thought perhaps there was a chance that I got the wrong flywheel back from the shop by accident, so I called them and they don’t have any record of a mixup where someone else got the wrong flywheel (mine) by mistake. Luckily I have 2 flathead 6 parts trucks here (non Sweptsides) and one has the same 3 on the tree transmission that is in my Sweptside so I pulled the transmission to get a look at that flywheel, and it has the exact same one that I have, 8 bolt equally spaced around tge circle with clip head bolts and nuts. So I have absolutely no clue how this can be unless the engine shop put a different crank in the engine? My question is, we’re there 2 different bolt pattern on flywheels of this vintage?
-
Where would be the best place to take power from for the dome light?
-
Voltage regulator questions
fireguyfire replied to fireguyfire's topic in Mopar Flathead Truck Forum
I have all 3 on one side . -
Hi gents; I have a couple of questions regarding the voltage regulator in my 1940 1/2 ton. when I got my truck the wiring harness had basically disintegrated and the voltage regulator was missing. I sourced a 6 volt voltage regulator from a guy who has a few parts trucks, and I think it came out of a 42 or 43. The holes in the voltage regulator don’t seem to line up with any existing holes in my firewall. Can someone post a photo up of your firewall showing where the regulator mounts? And secondly, is there a way a guy can bench test a voltage regulator to know its good before I mount it into my truck? If so, how can I test it?
-
Mounted the intake/exhaust manifold back into my 1940 1/2 ton, and I’m connecting up the throttle linkage. I bought a new throttle return spring from DCM to replace a badly stretched and obviously incorrect spring that was on the truck when I disassembled it. The old spring hooked the loop of a large gate pin that goes through the upper steel floor plate. Can someone post up a photo of the correct way the throttle return spring should be routed for me? I’ve been through the FSM but it doesn’t show any diagrams showing the throttle linkage.
-
Another couple of (dumb) questions
fireguyfire replied to fireguyfire's topic in Mopar Flathead Truck Forum
Can someone post up a photo of where the rods bolt onto the nose (rad)? Maybe if I see that I can fab something up that will work to tie the front to the firewall again. -
Another couple of (dumb) questions
fireguyfire replied to fireguyfire's topic in Mopar Flathead Truck Forum
Ah; what does a guy do if he’s got an aftermarket aluminum rad with no tabs? -
So I’m continuing to put the front of my 1940 1/2 ton back together, and I have another couple of questions. The reasons I have these questions is that on my truck some parts had been stripped years ago, including the radiator and the 2 firewall to nose support rods. I’ve sourced a set of rods, as well as a set of hood prop rods. My questions are; 1) it’s obvious where the firewall to nose support rods go on the firewall, but can someone confirm where they bolt to the nose/grille section? 2) and can someone show me where the hood prop rods should go?
-
Thanks Ed; looks like the top of the cross brace bolts to the underside of the bottom of the frame.
-
The ends of the frame rails on my 1940 1/2 ton had been pretty badly bent up when I got my truck, but luckily the bumper and brace were in the back and were saveable. im putting the front end together, and I was fiddling with the front bumper brace that goes inside the bumper. I came up with a couple of ways that I could bolt it in, and when I look at the FSM it just shows an exploded diagram that doesn’t help. I was hoping someone could post a photo up of how the front bumper brace bolts to the bumper, and to the front frame rail ends to co firm that I’ve got it installed properly.
-
Not specific to my style of gauge, but it’s great to confirm that the suggested repair will work on any style of gauge.
-
I’m curious, as DCM sells the thinner one only in their kit
-
So I’m wanting to keep my gauges and dash 100% factory looking in my 1940 1/2 ton. When I bought the truck the tube from the temp gauge was broken, looks like years ago. im wanting to use the factory temp and oil pressure gauge, but it looks like the gauge, tube and temp sensor that threads into the side of the head are a 1 piece system. Can anyone suggest a way that I can keep my factory gauges, but make the temp gauge function again?
-
I’ve blasted and painted my “U” shaped rad support and I’m getting ready to re install the front clip of my 1940 1/2 ton. The rubber insulator that goes between the bottom of the rad support and where it bolts to the frame is long gone. Is the rubber insulator that goes there a thin rubber piece (1/16”) or the thicker style (1/4” thick). I see both available on line and it’s impossible to tell how thick it should be by the drawing in the parts manual.
-
Thanks Ed!
-
I’m ready to drop my restored flathead engine back into my 1940 1/2 ton, and I’ve got a couple of questions regarding the motor mounts. 1) Does the front motor mount bracket bolt directly to the front frame crossmember ( at 2 points) directly, or is there supposed to be something between the frame and the motor mount bracket where they bolt together? 2) the rear motor mounts on my truck were badly decomposed and falling apart. I ordered a new pair from DCM and they look to be good quality. As we all know the rear motor mounts are in pairs, one on top of the frame mount bracket, and one below. The new rubber rear mounts are different; one is all rubber, and the other is rubber mounted onto a metal washer type base. Does tge mount with the metal base go onto the top of the frame bracket, or the bottom?
