


lostviking
-
Posts
688 -
Joined
-
Last visited
-
Days Won
6
Content Type
Links Directory
Profiles
Articles
Forums
Downloads
Store
Gallery
Blogs
Events
Classifieds
Posts posted by lostviking
-
-
Something I'll be adding to my truck, eventually, is the Fenton style cast dual manifolds I purchased. They are the Langdon parts, but sold via another site these days. Pretty nice looking parts, although I might just do a bit of cleanup in the exit hole. Unfortunately they do not sell a flange for the things, kind of strange but true. I found ones I like and they are .25 thick, which is a plus in my book.
https://www.wfoconcepts.com/i-30505198-2-tube-flange-2-bolt.html
I know there are a few members in the San Diego area. Does anyone know of a machine shop that knows flathead Dodges? I'd rather build my own motor than have someone else do it, but I need to find a machine shop to trust. Thanks.
-
Thank you. I'm designing an adapter plate to mount the A833 overdrive transmission to my bellhousing. AoK had one, but that was many moons ago. IMHO, it's a much better choice than a T5 and keeps things Mopar. Some people don't care about that, but it's important to me.
Thanks again.
-
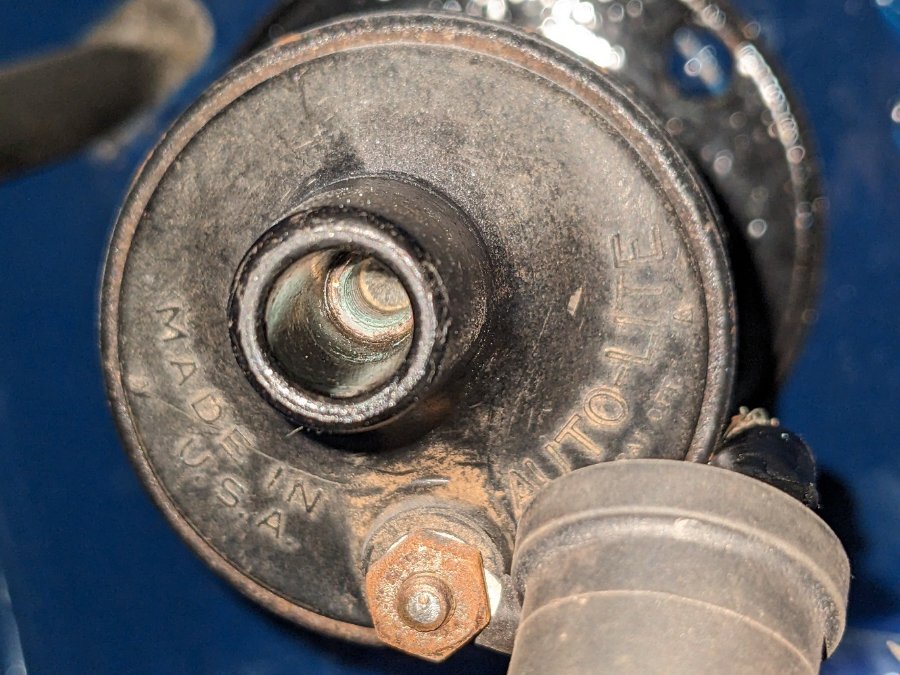
Got the Delco part today. It's in the truck. I just had to strip back the HV lead to expose the conductor more. I gave it enough to stick through and wrap a bit over the edge of the tip. I figure that's how it was done, as nothing clear about it in the manual I can see. It screws in perfect and holds the wire. I did leave the rubber boot on, although I don't think they originally did...
-
You do have a manual right? Simple google search finds that also.
-
Los, anyone that tries to help is helping in my book. Thank you.
Jerry, is the bearing retainer centered top to bottom and side to side in that drawing? That was exactly what I needed. The bearing retainer on the new trans is larger, but that locates the four bellhousing bolts for me. Thank you!
-
1 hour ago, Los_Control said:
I was out looking at my truck earlier since I have the toe boards out ..... pretty tough to measure.
Might be easier from underneath, I do have it on jack stands and need to change the trans/rear end oil ... can check it out then ..... tomorrow when not raining.
Just curious when or if they did change the bolt pattern on the 3 speed transmissions?
I think around 1935-36 they changed the starter/flywheel some, which changed the bell housing ..... I assume the actual transmission bolt patterns stayed the same?
Just thinking your 46 and my 49 transmissions would interchange.
I do have a 1970 318/3 speed in the garage. I pulled the trans off of it and easy to measure .... but I bet they may have changed something by then.
Yes, the V8 transmission is different. The only place to get the adapter I want only made them once that I know of, and they aren't obtainable right now. I might ask for the dims from them, since they aren't making them, maybe that wouldn't be an issue. I'll have to contact him directly since he no longer comes to this forum due to certain people who just can't shut the F up sometimes
") I love it when we lose the kind of experts this man represents, because of someone who has zero cred arguing them off the forum.
I love it when we lose the kind of experts this man represents, because of someone who has zero cred arguing them off the forum.
There are really two persons who are the gods of Mopar flatheads. I wish the one who used to participate here still did.
I was hoping someone had a transmission or bell laying around. Didn't want anyone to go over the top to get me this. Thank you for offering, and I'll take it if you do go that far.
-
2 hours ago, greg g said:
You should be able to find the gasket that goes between the transaction bellhousing this would give you the bolt arrangement and dimensions. The other variable is the input bearing retainer diameter as I believe three different ones were used. My spare trans is stored under a vehicle and not available with snow equipment needing to be moved as well as other items to access it.
There are several pictures of the gasket on e bay sites. Maybe you could fiddle with enlarging the pics till you got a correct sized one.
Without any reference dimension, it would be useless to try and scale a image.
-
Does anyone have the bolt pattern for where the transmission bolts to the bellhousing? I'm drafting an adapter plate for another type transmission. Thanks.
-
There was a Delco part on ebay, so I bought one. It has the correct thread, so at the least I can salvage that and modify the rest. Once I have it I'll make a drawing and see about making more.
-
If you get the time please post a picture for anyone else needing to see it. Thank you.
-
So I saw this when I did the compression test, and didn't do anything. Now I am going to fix it, or try. If you need a good mechanic for your Dodge, please avoid the PO of my truck at all costs. He is the master to rigging things, without the master part.
The coil wire was just bunched up and shoved into the coil. He did put a boot on it, and it's been "working" so far.
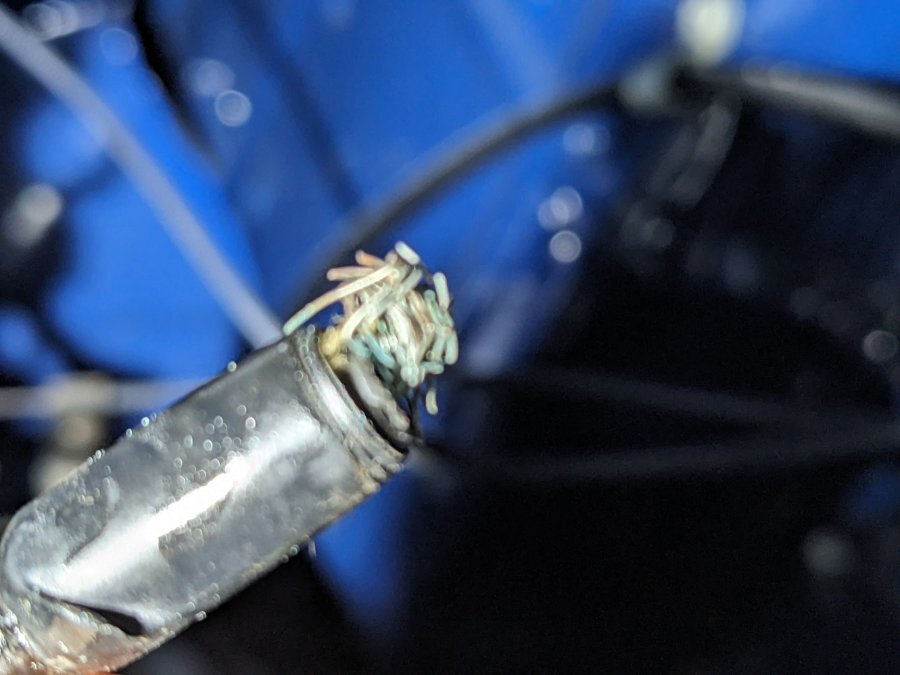
Out of focus, but that's all it deserved anyway. I took a picture of the coil and saw there is threading in there. I checked it with a tap and it's 1/4-28. I used a bottoming tap to try and clean the threads a bit. Picture is from before.
Now I need to fab a terminal for the wire. I'm going to make a brass "bolt" with a hole on the end for the freshly stripped wire, and a set screw to clamp it. Just long enough to stick out a bit so I can grab it when needed.
Unless someone knows where I can get the original terminal? That would be the best, but I'm not buying a complete setup just to get that part. Not when I can make something.
-
Got er dun today. Some rebending and clocking of the fittings and the PCV system is installed. Even though my plugs all looked fairly lean when I did the compression test, I'm not hearing anything like a lean miss at idle or if I bring the engine speed up. I didn't take it for a drive yet, so that might change with a load. As usual the engine revs nicely and returns directly to idle without lagging to going under idle speed. Either would indicated the idle mixture was off. Seems spot on, both cold and after it warmed up. Yay.
I think I could do a much better job with the plumbing, but it will change with the dual carb intake anyway.
Had a wonderful surprise just before Christmas when I tried Tim Kingsbury's email address, and he responded. He was extremely nice to a complete stranger and we exchanged a few emails. Even offered to introduce me to George Ashe, his business partner at AoK Racing. It was too close to Christmas (Christmas eve), so I thanked him and just wished him Merry Christmas and Happy New Year. What a great Christmas present to me to get to talk with him at all. If he hasn't, I wish him and George would write some books to pass the knowledge on.
Talked about my Offy intake, which I knew wasn't optimal. George is about to turn 91 in Feb, but I guess he's still willing to make some parts. Tim said he might just convert my stock intake to duals and split my exhaust for me. I have the Langdon (Fenton copy) coming, which Tim says are good parts. As far as the intake, I'm thinking I might just try and clone/copy an AoK intake. I have access to the machine shop required and the TIG welding to make something up. I'm looking at a heavy wall aluminum tube for the transfer tube, mounting the carb flanges there. Have to keep the angles and such, which I can get from the Offy. As for the runners, I think some large radius 1.5" ID 6061 tubes cut properly and welded could get me pretty close the the unobtainable AoK intake for the 23 inch motors. Assuming I can pull something like that off, mainly via the skills of a friend and his machine shop, I'll post up some pictures and how done it in this thread.
Again, this isn't really a tech thread, just a scratch pad of thoughts and your feedback is welcome. Maybe Tim still drops in here and I can get him to comment. I won't bug him for that though.
-
Does the speed increase with RPM? Does is match the crank speed, or twice that (CAM)?
-
Funny. In order to drill a pilot hole to tap 1/4NPT, I would need to remove the inner fender. I know it's only 8 or 10 bolts, but this slight hold up gave me time to think about modifying the stock intake, when I'm going to be swapping in the dual carb intake. So I didn't. I am just going to pop a 1/4 to 1/8 reducer in there. I think it will still pull better than a draft tube, and it's temporary.
-
 1
1
-
-
Dec 16th, I've had it for some time now, but other things had to be fixed. Today I started to install the PCV upgrade I got from VPW. I know others have installed it, this is just my ramblings.
1) The port on my intake where the system should install is only 1/8NPT rather than the 1/4NPT needed. Tap on the way.
2) The tubing supplied had a 45deg bend that didn't bring the fittings next to the intake, so I added a second 45deg bend and it lines up fairly perfectly now.
Otherwise it seems to be everything to just pop it on. The PCV valve is fairly heavy duty looking, probably the military one, although I did try to read the fine print on it
Pretty sure it is the only one I'll ever need.
-
In case anyone else is interested, I just bought the Langdon manifolds from 12bolt.com, who sells for Langdon Stovebolt now. Just $340 plus $30 shipping...and uncle sam of course. Pretty darn good deal IMHO.
-
This is a military upgrade that moved into the civilian arena. Makes perfect sense to me. Why use a draft tube if you can have something that works better and doesn't allow road dirt to get sucked into the engine? It's like all the various changes Dodge made over the years. They didn't do it because it was different. They did it because it was an improvement over what they had. Self adjusting brakes, either disk or drum. Rear axles you don't have to use a puller to get the drum off. 12V electronics. It's all an upgrade. Sure, you can continue to use the original stuff, not saying that's wrong at all. It works. But, there might be something that works better and is easier to maintain. That's where I think I'm heading. I want to drive, and don't like the helicopter maintenance schedule. I love stock original builds. At least I love looking at them.
Probably going to buy the cast Stovebolt manifolds rather than Reds headers. He wants $445 plus shipping and that's $100 more. I doubt it's worth the extra, and I know his cost is MUCH less. I don't like profiteering.
-
The engine in my 46 WD15 is a 230 from a 1958 W100 I believe, might be D100???
Anyway, I was going to swap it in one of several ideas, but I think I'm going to stick with it. It's been a pretty good running engine that fires on the first try, when it's been run in the last week or so. I've never "gone inside" to check it out, so today I did a compression check. Here's what I found.
1. All cylinders are 95-100 PSI. I didn't bring it fully up to temp. I didn't remove the air cleaner and open the throttle, so it might be slightly higher...I guess. Either way looks pretty good.
2. The plugs were NOT gapped correctly. Way bigger than .025, didn't even measure, just regapped as I put them back in. All look a bit lean actually, no deposits or other "bad things". Engine seems in very good condition. About 50 PSI oil pressure just off idle, 40 at idle and warm not hot.
Next up is to install the PCV conversion I got from Vintage Power Wagons oh so long ago. After that, I'm going to put some Reds headers on it and then rebuild those two Carter WA-1 carbs I bought for my Offy intake. I have the kits already, so it's just a bit of time.
That's all this thread is going to be. Me talking about things I see and things I'm planning to do. As always comments are welcome so long as I'm not expected to change course over a difference of opinion. Merry Christmas everyone! Happy New Year.
-
3
-
-
Thankfully the Dodge Brothers looked down on me with kindness today. I pulled the master out and replaced the lines to the proportioning valve using the M10x1.0 fittings I cut in the lathe. I took off about 2-3 threads and cleaned them up some.
I remade one line from scratch and the other was long enough I was able to just cut the offending fitting off and reflair. I bought one of those nice flairing tools someone mentioned...single size that you could use under the truck if needed. The rear side of the flair was a bit deformed looking, like the recess isn't machined quite right, but I'm not getting any leaks, so I'm happy.
Once again I got lucky and was able to take the dry master and install it, fill it and just do some pumping. I get a hard pedal. Never had a master that didn't need bench bleeding before, but this toyo one has bled for me each time in the truck. Go figure.
Anyway, this thread is now finished...again
-
Because I like my truck. That frame swap is butchery.
-
Thanks, the end of those adapters is what I find is correct. You can just buy the 10mm flair nuts for 3/16 tube, no need to use the adapters. That's what I am doing, but the ones I purchased were threaded right to the ends. I'm going to remove the last couple threads tomorrow and redo the brake lines one more time. Edit: Just the ones going from the master to the prop valve
At least the layout and everything is pretty nice now, this nothing hanging down to get caught and ripped loose.
-
Reviving an old thread to talk about brake line fittings at my master cylinder. I used a Toyota master cylinder, and originally I epoxied an adapter to get regular SAE 3/16 type, thread and double flair fittings. I worked. But...
While I am waiting on other issues to be resolved, I decided to "fix" a few things. I never liked the brake switch hanging down below my proportioning valve, and I didn't like having expoxied fittings.
I purchased some M10x1.0mm flair end fittings off Amazon and redid it all. I had the rear of the master connected the rear brakes, which I believe was wrong, so I swapped them in the lines to the proportioning valve. This time I used the metric flair nuts. The master cylinder ports and threads were completely clean. I was able to remove the adapter fittings, which is another reason I didn't want to leave them glued in place. When I was originally swapping the lines, I noticed one moved and broke the epoxy joint. Pulled the whole thing out of the truck and took it to my work bench.
This time I made nice new brake lines, moved the brake switch up to the top fitting and ran the front disks off the bottom (proportioning valve) fitting. I put a nice tight loop there, so it's all protected and nothing hangs down now.
The M10 flair nuts I bought had threads all the way to the ends, which is what I'm used to with the SAE ones, so I didn't give it a thought. Then, both of them leaked. I tried to tighten them, but my flair wrench is flimsy maybe and they just leaked. I read a bit on the internet and it seems that the Toyota flair nuts are supposed to have a bare nipple where the threads end short of the tip. Most I see pictures have at least two to three threads missing.
I'm going to take some to work and pop them in the lathe to remove a few threads.
Does anyone know for sure if that is my problem? Thanks.
-
I used a Toyota master, because it has almost the exact same three bolt mount. You have to run a drill through to open the holes a bit. The stock rod in that case was about 1/5 inch too long. You should adjust yours to min length and install it, adjusting longer and see. If you can't get it in even with the min, then wack a bit off the end.
Dead give away, the brake lights are on. Too long.
-
I'm on that forum also. Still not really interested in using a T5. Thanks though.
Random talk about my engine, nothin special
in Mopar Flathead Truck Forum
Posted
Rebuild, but I need to save for that. It can be 130 for my year motor, so it's OK, but not great.