


Wiggo
-
Posts
140 -
Joined
-
Last visited
-
Days Won
2
Content Type
Links Directory
Profiles
Articles
Forums
Downloads
Store
Gallery
Blogs
Events
Classifieds
Everything posted by Wiggo
-
I just read the title. I was hoping for a new liver...
-
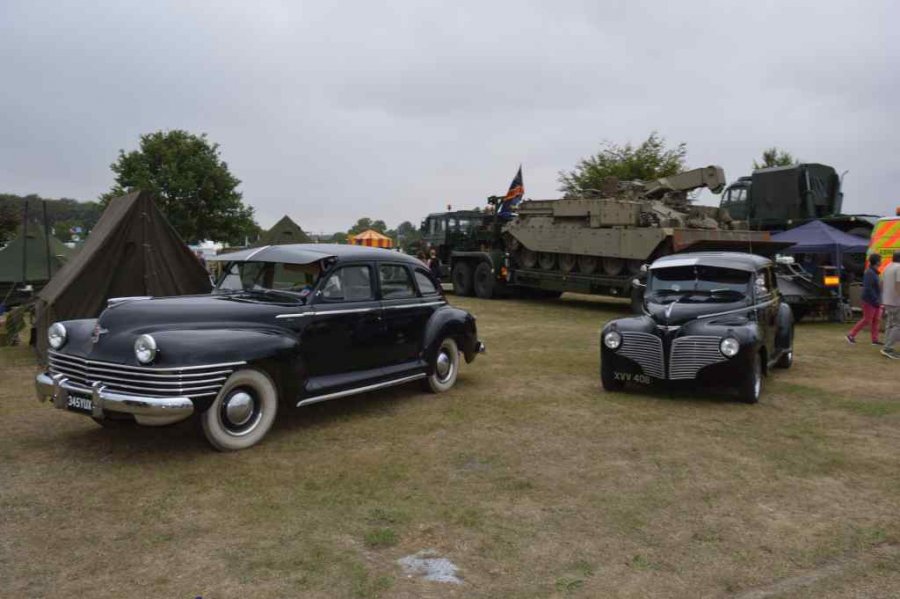
Went to the Retro Festival in Newbury at the weekend, and ran across this little gem from 1942...


-
I used these: https://www.ebay.co.uk/itm/Gripper-Clamps-for-Awning-Rail-to-Vehicle-Gutter-/292573633284?hash=item441ebf5b04 For the gutter clamps, I turned them around so they went together like spoons (if that makes sense), and beat them about a bit in the vise to get them to the right shape. Just took a bit of experimenting, as I was trying not to drill the gutter.
-
Thanks, Andy! I'm still playing around with different types of bracket, and I need to make one for the top centre, so your photo is really helpful.
-
Ah, so when I bought the car it had a couple of rusty mirrors, one with a bent arm. One was mounted low down, the other to the top of the door. Looked real odd, so I bought a nice new pair of 4" peep mirrors. Once I fitted them, I realised that while the driver's side was fine, it didn't matter where I put the other one, I couldn't see a damn thing in it. So the rusty one with the long, bent arm went back on, which left me with some spare mirrors. And the 4" ones give a really crappy view anyway, so I just bolted all four on... Ooops, replied to the wrong post...
-
Ten bucks on Ebay? Looks like it should slot right in...

-
Hmm, well the glovebox was a misshapen piece of cardboard held together with alumin(i)um strip and pop rivets, so that got junked, but I'm afraid I don't drink coffee. I think I could modify a sandwich toaster to fit, though...
-
Hmmm, the seats are from a 1966 Mk II Daimler V8, some foam and a lot of homemade angle iron support framing. The visor is two Honda spoilers and a cupboard stay, the vacuum wipers are augmented with a pair of Audi A3 vacuum reservoirs, a one way valve and some aquarium tubing...
-
OK, so personally I think a Fulton visor on one of these cars is as cool as. But a decent one on Ebay is around $600, and by the time I get that to the UK, pay shipping, import duty, taxes etc I'm up at around $850-900 and that's before I paint the thing! However, a 1998 Honda Civic hatchback has a rather useful sheet metal tailgate spoiler... So I bought two of them from a scrap yard, removed the plastic parts and the pressed steel liner (only held in with mastic and a couple of spot welds) and cut them to shape. Here's my lad showing that an electrician has no concept of what tools to use to deburr sheet metal after cutting it with a grinder (yes, that's the edge of a chisel): On the other hand, he did prove that he can weld very thin sheet metal with my cheap gasless MIG welder... Et voila! One homemade $60 visor!


- 23 replies
-
- 13
-

-

-
As all that electrickery has to get inside the switch somehow, I'd hazard a guess that 'I' is for 'Input'...
-
On the other hand, we have one that runs: "Why do the Americans have their beer so cold? So you can tell the difference between beer and piss..." But I did also see a gravestone that read, "RIP J Lucas - father of the intermittent wiper."
-
You'll build your own for a lot less money than a kit of parts will cost you. An original interior is likely to be hugely expensive, or just as shot as the one you've got.
-
Thanks again, guys. I just took a look and as you can see there doesn't ever seem to have been an exterior trim strip. The rubber seems to have a metal strip inside it, and you can see the edges are all sorts of thicknesses where it feels like the metal has blistered and rusted slightly...
-
Thanks for that, guys. My car has a metal trim strip on the inside, held on with four screws, but nothing on the outside. I guess I'll just have to take it easy...
-
OK, so I am a cheapskate and I'm making my own visor, but I do have a question about mounting the things, generally... I had the front and back screen rubbers replaced a little while ago, and the new front rubbers just had a thick rubber molding in the center. The old one seems to have some kind of metal insert (not the chrome trim, but internally), as there is an interior trim strip screwed to the rubber. Does anyone know where in the rubber molding this is? I'd like to be able to screw a visor bracket to it, but I'm wary of putting a screw in and shattering the windscreen. By the same token, I'm a little unsure of a clamp-on solution, as I don't want to risk that compressing the rubber too much and allowing the bracket to touch the glass. Does anyone have any decent images that show the Fulton hardware and how that mounted, for example?
-
Get a small (scooter/motorbike) 12V battery and connect the negative of that battery to the frame of the car. Now connect the positive to the supply of your new 12V radio. Your new radio will see 12V negative ground and be happy. Just remember that the new 12V battery will have no charging system, so you will have to take it out every now and then to recharge it, or connect to a cigarette lighter so you can leave it on the vehicle and charge through the lighter socket.
-
OK, for a start, connect the ignition switch as follows: #31 Coil (Pink) to the IGN terminal on the switch #19 Neutral Safety (Purple) to the ST terminal of the switch (this means ditching the existing start button, bear in mind - I re-used mine as a trunk release switch) #33 ACC (Orange) and #32 ACC (Brown, if fitted) to the ACC terminal on the switch #34 Ign Power (Red) to the BAT terminal on the switch That will get power to the appropriate circuits on the fuseboard and should allow the engine to crank and run. However, you will be starting from the key, not the old starter button. Other thoughts. The horn will not work, as it is a 12V relay in the Kwik Wire kit, and the 6V signal will probably not be enough to pull in the contacts. That's why you hear a faint click, but no horn. The same is true with the indicators: the faint glow is a 12V bulb being given only 6V, and when you try to turn on the indicators, 6V is not sufficient to operate the 12V flasher relay. The dimmer and dome light can wait, for now. The instrument lights actually should have a separate switch according to the old wiring diagram, so that's almost certainly not connected for now. I'd suggest rewiring the dash so the instruments are powered from the sidelight power. I'm guessing that wire #30 (Gauge lights, Red) is a loose wire and not connected to the main fuseboard, in which case connect it to each of the instrument cluster lights, and then to either of the brown wires on your new light switch (i.e. join to #27 or #29). UPDATE The dimmer should use your existing stomp switch, otherwise you will need a 70705 switch: http://kwikwire.com/dimmer-switch/ You will also need to hook it up to your main beam indicator lamp, wherever that is on the P15.
-
Hold tight, I'll check what I have against the P15 diagram and check the OEM switchgear part numbers...
-
OK, Larry, I took a look at the wiring diagram in the download section (I assume 1948 is the P-17/18, right?) and it's amazing how much more complicated the electrics got from my 1941 D-20. Anyway, here's the thing. The Kwik Wire kit is indistinguishable from the kit I recently installed on my car, so I can speak from experience here. Fitting these kits is relatively straightforward, but you need to know your way around a car's electrical system. It is time consuming and requires you to be very methodical, and you will spend a lot of time deciphering old wiring diagrams to adapt what you have to the kit. Trying to do that at the same time as mentally flipping a negative ground kit to a positive ground application will be even more interesting. So, how much have you done so far? Was this a case of ripping out all traces of the old wiring harness and starting again, or are you doing it in stages? When you say the headlamps work, do they work correctly from the switch, and do the instrument lights come on as well? What about things like the heater motor? As for why the other circuits are not working, my best guess is that your ignition switch is wired up wrongly. The kit is assuming a modern ignition switch with (typically) 5 connections, but yours looks to be a 4 connector one. More confusingly, yours has a terminal labelled ACC, which really isn't the ACC referred to in the wiring kit. What I think you should have is the following: #31 Coil (Pink) to the ACC terminal on the switch (was a BLACK 16 Ga wire to the coil negative) #19 Neutral Safety (Purple) to the B terminal of the switch (was a BLACK/YELLOW 16 Ga wire going to small terminal on starter solenoid) #33 ACC (Orange) and #32 ACC (Brown, if fitted) to the starter switch terminal that had Blue, Red and Black wires going to it (to fuel gauge, radio and handbrake) #34 Ign Power (Red) to the remaining ignition switch terminal (was BROWN 12 Ga to a 30A circuit breaker) That should get the car to turn over and start (and hopefully get most everything else playing nicely, too). The dome light is an exercise for another day.
-
I'll take look in the morning, I won't be able to see them on my phone at this time of night...
-
Or above the top of the glovebox. Does it matter, if you can find room?
-
Doc, my car is already 12v negative earth. If someone has a neg earth and problems as described (i.e. random) the starting point has to be to figure out what the previous owner has done. I could have been facetious and said if the OP swaps back from neg to pos ground, his headlights will work, his tail lights won't and his engine will run back to front, but that wouldn't be that helpful. So, my question is: is the car 12v neg ground or some horrid hybrid 6v neg ground?
-
6V battery or 12V?
-
OK, this is a '52: this is a '53 convertible: Any help?
-
OK, so here are pics of '51 Cranbrooks with and without a radio... Looks to be a simple change of centre panel and I believe the speaker was mounted below the radio...
