


Dennis Detweiler
-
Posts
243 -
Joined
-
Last visited
Content Type
Links Directory
Profiles
Articles
Forums
Downloads
Store
Gallery
Blogs
Events
Classifieds
Everything posted by Dennis Detweiler
-
39 Plymouth Weatherstripping Placement?
Dennis Detweiler replied to Dennis Detweiler's topic in P15-D24 Forum
I started the application process as per youtube suggestions: apply a coat to door surface into the door corner and up each side about 1/4 inch using an artist brush and on the weatherstripping and brushing it out and let dry. Then apply a coat to the weatherstripping again and stick it on. However, the adhesive dries too fast for the second procedure and it's too messy to apply to the weatherstripping. So, I applied adhesive to the door corner and up each side about 1/4 inch with an artist brush and let it dry. Then applied to the door a second time for about a 12 inch length. Then applied the weatherstripping, pushed it down and pulled it open again to allow it to tack for a few seconds. Then pushed it back down and it stayed in place well. Then the same for the next 12 inches until I got all the way around the door. I went back over the whole door and pushed it all down a second time. At the hinge mount, I just glued down one side of the weatherstripping, since it only makes contact on one edge. The doors shut a little harder, but that should lighten up after the door stays shut and the weatherstripping conforms to the jam. The doors have a much more solid feel to them when closing. Bernbaum sends enough material to go around the whole door. I didn't add the weatherstripping to the bottom of the door, since there is already a sill weatherstrip. Looks like I'll have to order some new sill pieces and install them next Spring. They're pretty old and rubber is hard. The drivers side sill rubber is torn and not functional.
-
39 Plymouth Weatherstripping Placement?
Dennis Detweiler replied to Dennis Detweiler's topic in P15-D24 Forum
Yes, that was my guess with the trough and contours of the door edge to channel water away from the inside. My floor on the passenger side looks like it has had water/rust setting in it at some point in time. Could have been a window open.? I'm just going ahead with the weatherstripping. It can at least help with possible leaking. The water that gets past the weatherstripping will channel away from the inside with the original contours of the door. -
39 Plymouth Weatherstripping Placement?
Dennis Detweiler replied to Dennis Detweiler's topic in P15-D24 Forum
At minimum, there had to be a piece that fit in the contoured dip or trough at the top of the door. Earlier years had it to keep water from entering the top of the door during a rain. The sides? My 39 shop manual shows some pictures of the doors being worked on. There are rubber bumpers in a few places to keep the doors from rubbing against the jams but, no weatherstipping around the doors. I'm assuming the rubber weatherstipping that I acquired from Bernbaum is an _add-on? However, I'm with andyd on this and there should be rubber around each door to make the car washable. Plus rain tight. The round rolled fabric around the inside of the jams is called "windlace" and is a nice looking finish to the edges, but it's basic function is to keep wind from whistling around the doors while driving down the highway. Since we are having temps in the 70's here in Iowa for the next few days, I'm going to get some of the Bernbaum weatherstripping installed. I'll take a picture and post it. -
39 Plymouth Weatherstripping Placement?
Dennis Detweiler replied to Dennis Detweiler's topic in P15-D24 Forum
I'm not sure if the weather in Iowa will allow me to get it installed before Winter. I don't have a heated garage. It's the last item on my list right now. I'll be putting in a new fuel sending unit this week and calibrate the guage. I'll probably get rid of the cork float and replace it with a plastic float before I install it in the tank. I purchased 3M Black Weatherstrip Adhesive 08011. There's a youtube video on how to use it with best effectiveness. Squeeze it along the door, brush it on the door surface to spread it and on the weatherstrip and let it tack. Then brush another coat on the weatherstrip and apply the strip to the door. -
ANSWERED Fuel Mixture Screw doesn't change the idle.
Dennis Detweiler replied to 48ply1stcar's topic in P15-D24 Forum
I got the same results when I put a rebuilt Stromberg on my 39. I couldn't get the rebuilt Carter to idle properly, so switched to a professionally rebuilt Stromberg. Like you, I had the idle setting a little too high and the mixture screw had little effect until I slowed the engine down as slow as I could get it before stalling, then the mixture screw (needle) was more sensitive and adjustable. -
39 Plymouth Weatherstripping Placement?
Dennis Detweiler replied to Dennis Detweiler's topic in P15-D24 Forum
I think I have it figured out? This is an end view of the rubber weatherstripping that Bernbaum sent me for all 4 doors. I looked at pics of inside door panels in my 39 shop manual, which shows mechanics working on the window and door adjustments. There is no factory rubber weatherstripping. There is wind lacing as shown in one of the above photo replies from Lloyd. I have wind lacing on my 39. However, I'm assuming the Bernbaum weatherstipping is an optional aftermarket weatherstripping (not anything Plymouth sold). In my photo, the bottom "V" fits nicely into the corner of the door. The vertical piece presses against the door jam when it's shut. This rubber is very flexible and strong. The doors on my 39 don't have much space (maybe 1/8 inch) between the door and jam. So, this rubber should work well. The trunk weatherstripping is a larger design.
-
39 Plymouth Weatherstripping Placement?
Dennis Detweiler replied to Dennis Detweiler's topic in P15-D24 Forum
I googled pictures of 39 interiors last night and couldn't find any rubber weatherstripping around the whole door, only a piece on top of the door in the indented or trough contour of the door. Yet, Bernbaum sells a big roll that is supposed to go around the whole door except the bottom, which is a different sill piece. Another website seller sells the same. So ??? I wish I could find a 39 dealership advertisement photo with the door open. 39 was an odd year with a one year only "style" fuel guage/sending unit and column shifter. Maybe the door seal is also on the list? -
39 Plymouth Weatherstripping Placement?
Dennis Detweiler replied to Dennis Detweiler's topic in P15-D24 Forum
The body and paint on my P8 was done by a professional sometime in the past. The fellow I bought it from did the upholstery and wiring himself. I had to gut the wiring and rewire it myself and added two fuse panels. He crimped old rotten wires to new wires and some of it came loose. However, the previous owner used self stick home weatherstripping which is mostly falling off and very thin strips. I bought a box of weatherstripping from Bernbaum and it's fairly thick. It looks like I'll have to adjust the doors outward to get this new much thicker weatherstripping to fit unless it's supposed to be placed along the inside of the jam? The doors are presently adjusted within 1/8 inch of hitting the jams. It's currently only a sunny day ride. I can't even wash it. The trunk will be much easier to deal with than the doors. -
There is no weatherstripping on my 39 Plymouth Sedan. The door edges have contours (ex. trough at top of door). I have a large roll of original door weatherstripping, but don't know if it goes on the sides and top of the doors or some on the door and some on jam/posts? I googled on-line for some pictures or info with no luck. I have a short roll of different design stripping for the trunk and need info on it's placement also. Thanks
-
The 4th Annual P-15 Picnic in the UK (pictures)
Dennis Detweiler replied to Robin (UK)'s topic in P15-D24 Forum
It would be interesting to hear the history behind some of these cars. Fantastic display! -
The whole car has been rewired and schematic made in the process. I've been on-line finding info on the guage. I looked at my wiring schematic and I did replace the three wires from the guage. It's a pretty simple wiring project, so I doubt anything is lacking continuity. Since the guage went to full on an empty tank and I switched the wires around, it should be showing at least an approximate half tank of fuel after I put in 10 gallons. I'm guessing the resistor or points aren't functioning on one side of the guage. As luck would have it (not that often), I found a NOS 39 guage still in the box on ebay. So, I bought it.
-
Yes, it's a two wire plus I grounded the sender to the frame.
-
I put a new tank and fuel sending unit in in my 39 Plymouth. Before I put gas in it, I hooked up the battery and the fuel gauge went to full. So, I reversed the wires on the sender and it went back to empty. Then, I put 10 gallons of gas in the tank and the gauge needle moves from far left up to slightly past empty. When I turn the ignition switch off it bumps up a little then goes back to far left. With 10 gallons in it, the guage should read at least half full?
-
Giving up on the Carter and going to Stromberg
Dennis Detweiler replied to Dennis Detweiler's topic in P15-D24 Forum
Success! Got the Stromberg on, choked it briefly and it fired up, responds as well as the Carter, but it idles now. -
Giving up on the Carter and going to Stromberg
Dennis Detweiler replied to Dennis Detweiler's topic in P15-D24 Forum
It must come down to two chances, slim chance and fat chance? ha! -
Giving up on the Carter and going to Stromberg
Dennis Detweiler replied to Dennis Detweiler's topic in P15-D24 Forum
Another event that makes me lean toward the Stromberg; in the late 60's, I owned at 47 Ford coupe with dual Strombergs and Edmond heads (V8) that ran very well and the carbs were never an issue. I also owned a 69 Mustang with a 351 Winsor and I never could get it to run well after trying two stock Carters on it. I switched to a Holley and solved the problem. Maybe flukes, but I don't have much faith in Carter carbs. They seem to be a little less dependable or more sensitive than the alternatives. Perhaps it's the design difference? -
39 Plymouth: I rebuilt my Carter bb. I set the float to specs and it flooded out. Reset it to a lower fuel level and solved that problem and got it started. It responds quickly when goosed and runs well above idle. However, it idles rough and can't adjust it to smooth out. The throttle shaft had too much play/wear, so I installed a new shaft when I rebuilt the carb. When I bought the car last year, I had to run the choke half shut to get it to run well. The vacuum pod was shot (sucking air), so I replaced it and only need the choke to get it started now. I gave up on the Carter today and will try a Stromberg.. I have a factory rebuilt Stromberg BX0V-2 which is the proper size bore (2 11/16), but an electric choke. I stripped the manual choke linkage from a junker Stromberg and changed it to manual choke. I hope the Stromberg solves the problem. Any pro's or con's to using a Stromberg vs Carter?
-
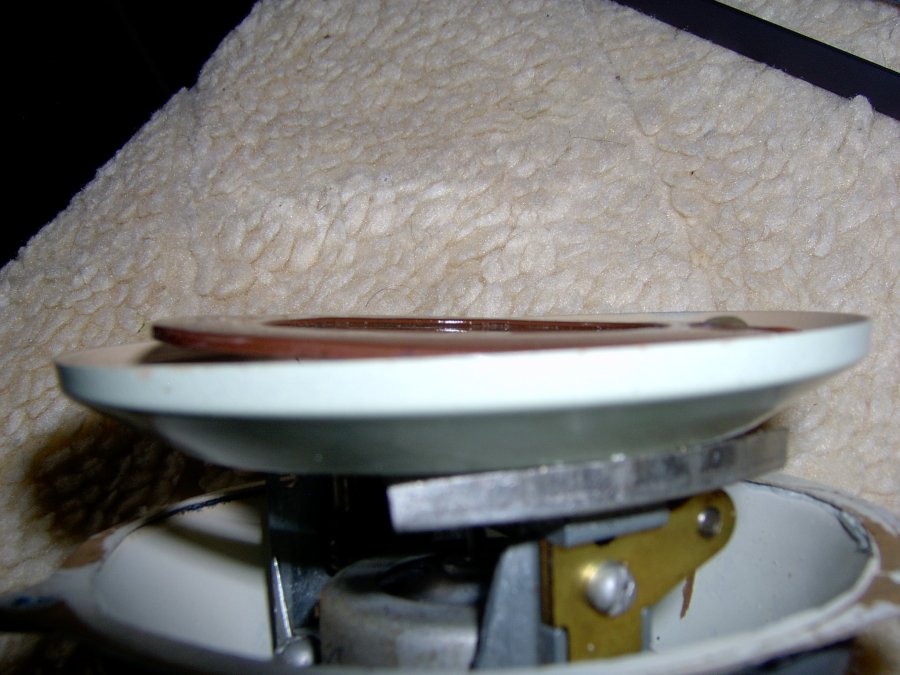
It looks like the back of the disc has 4 spokes to support it. The photos might be a little deceiving. It looks to me like the spokes are bent like someone sat on it or dropped the whole thing on it's face. The disc has some scratches on it. I went ahead and tried to push down on the high part and bend it flat again, but it just springs back to a tilt. I'd have to remove it and use needle nose pliers on it? Getting it off might be a challenge?
-


-
I posted a few months ago that my speedometer won't go past 15mph. I took it out of the dash and it looks like it's been worked on before. Someone made a cardboard (cereal box?) outer gasket. The dial is tilted. Not sure yet if the shaft is bent or the dial is bent at the axis. I'm thinking, that, possibly, the dial is accurate to 15mph and hanging up on the bezel at that point? The dial moves freely with a slight push and returns to zero and bounces a little. Can I just push down on the high point of the tilted dial to a more level position or is this risking more damage? Now that it's removed from the dash, can I test that it moves past 15mph using a drill and piece of speedometer cable? I'm assuming the drill would have to be set for reverse? Thoughts?
-
disc brake conversion flex hose placement
Dennis Detweiler replied to Dennis Detweiler's topic in P15-D24 Forum
My brake line bracket connection at the frame is right behind the bumper bracket. The hose goes backwards from there to the calipers ( a little more distance). Mine looks like the original stock position for the brake line. I see no other brake line bracket mounting holes to show that it has been repositioned. However, I like the position of your bracket as being closer to the spindle and less movement of the hose when turning. I could probably move mine, which would require cutting and re-flaring. Is your hose positioned between the shock and vertical steering knuckle arm? The rotor is hiding it in both photos. Looks like whiskey for brake fluid? -
Finished installing a scarebird disc brake conversion on my 39 Plymouth. I ran the flex hoses between the shocks and the steering knuckle support. Using the optional 2 inches longer 17inch hoses. The 15 inch ones were stretched too much on the outward turn. The hoses want to rub against the sway bar on an inward turn. Also, when turning, the hose rubs along the shock. Is this all normal? Do I need to add a spring(s) or brackets somewhere along the hose to keep it away from the suspension?
-
I'm in the middle of installing a bypass filter kit and have the option of 3/16 or 1/4 oil line connections. Which one is best? The bypass filter has a tiny hole (approx. 1/16") for pressure regulated flow. The 3/16 line looks like it would have enough oil flow to and from the filter? Plus, 3/16 is easier to bend.
-
I posted several months ago about my 1939 speedometer stalling at 15mph. I got some good replies and will soon be removing it from the dash to clean and lube it. One reply stated that it is likely that the magnets need to be re-magnetized. If cleaning and lube doesn't work, is there somewhere to send the magnets to have it re-magnetized? Can I do it myself?
-
Ok, that is what was confusing me. The relief valve is the restrictor and is built into the engine. So, can a full flow filter be used instead of a by-pass filter if the engine already has the relief/restrictor valve? Or, is the internal flow of the full flow filter and by-pass filter different?
