Dennis Detweiler
-
Posts
243 -
Joined
-
Last visited
Content Type
Links Directory
Profiles
Articles
Forums
Downloads
Store
Gallery
Blogs
Events
Classifieds
Everything posted by Dennis Detweiler
-
suggested master cylinder conversion 1939 New Photos
Dennis Detweiler replied to Dennis Detweiler's topic in P15-D24 Forum
I've been reading several previous posts concerning brands of adapters, brand and model M/C's, installation and function reviews. I have a Scarebird front disc brake conversion on my 39 Plymouth. It uses Chevy S-10 calipers. Scarebird makes a universal M/C adapter which looks like it can be positioned and drilled out to mount in place of my original M/C. Scarebird recommends using a Wilwood 260-7563 M/C kit which has a 1 inch bore which may be a Corvette M/C, but I have to look into it a little more? The Wilwood M/C kit includes the remote fillers. Summit and a few others carry this same kit. So, my next question; has anyone used the Scarebird adapter along with the Wilwood 260-7563 M/C kit on a 39 or another year that had the identical frame and floor pedal setup? This M/C has ports on the bottom. -
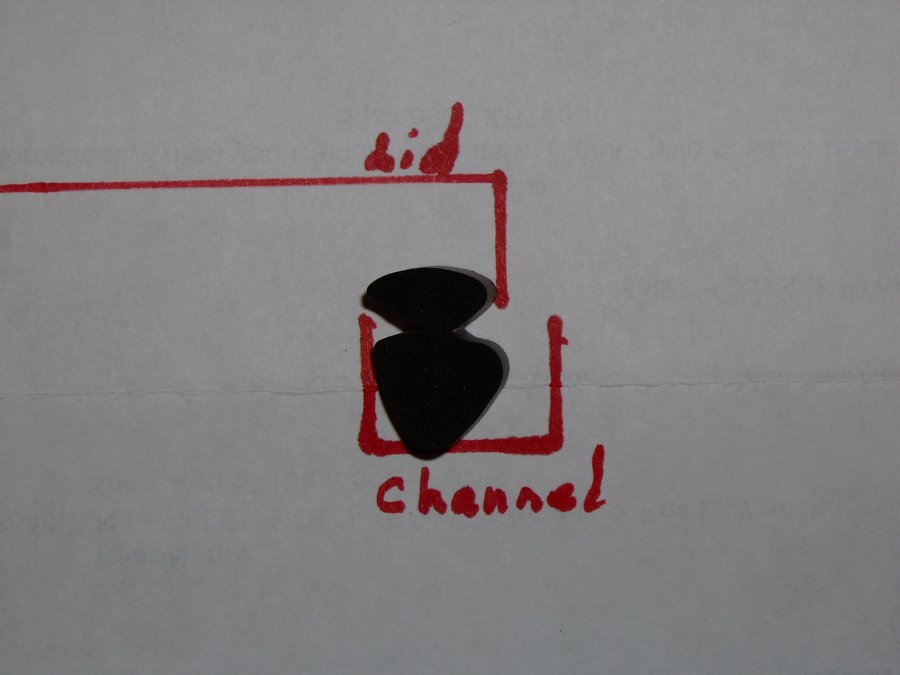
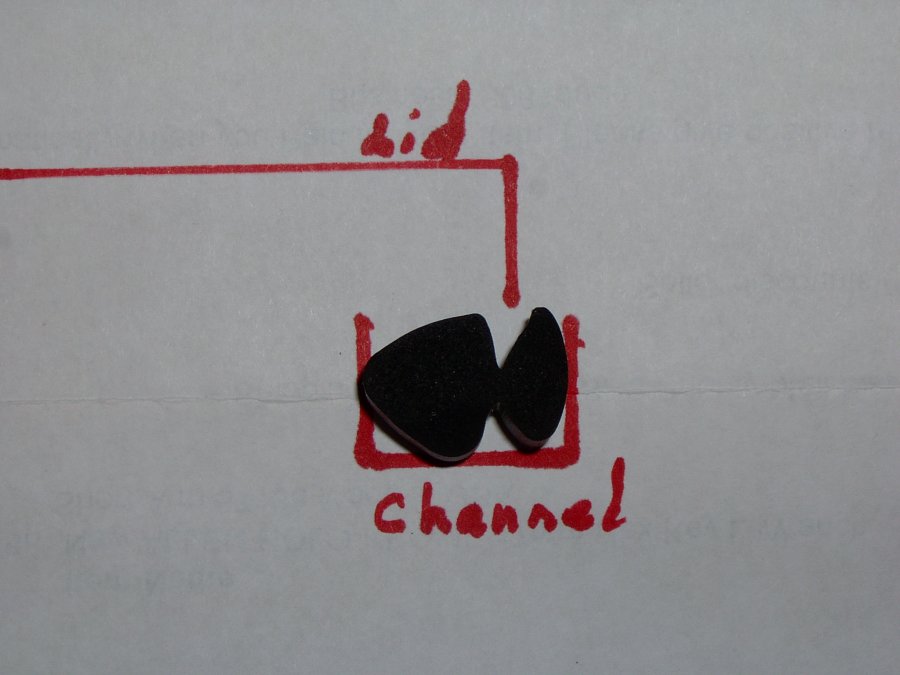
It's been a toss-up for mounting the weatherstripping on the trunk lid vs body channel. I couldn't find a logical position with this weatherstripping design to mount it on the lid. However, it did pinch into the body channel nicely. I used weatherstipping adhesive on the outside edge of the channel to keep water from getting under the stripping and to hold it into the channel. The lid closes snuggly.

-
suggested master cylinder conversion 1939 New Photos
Dennis Detweiler replied to Dennis Detweiler's topic in P15-D24 Forum
After digging around on the internet the only master cylinder conversion kit I can find for a 39 is ECI kit #EC441 which includes the master cylinder for $295.00. -
I already installed a front disc conversion on my 39 P-8. Now considering a dual master to compliment it and get better brake response. I checked ECI, but having trouble using the site. does anyone have a suggestion?
-
I know it is safer to install a dual master conversion in my 39, but will a dual upgrade also have a more solid feel and pedal travel? I already have a front disc conversion in it. The rear axle and brakes are later model between a 1946 - 56 year. It currently has a new original master cylinder and rear cylinders and bled the whole system out with a quart of brake fluid.
-
That's all I did. It just takes the place of the optional canister filter. I used 3/16 brake lines. I had to purchase a plug socket to get the square socket plugs out of the block. They were installed tightly and an open end wrench was about to strip the sides off of the square ended plug. Also, the socket allowed me to put an extension on it and give me more room to turn it.
-
I had a similar problem with my rebuilt b&b carb. I messed with it for several days plus adjusted the float lower. No results. I replaced it with a rebuilt Stromberg and solved it.
-
The particular weatherstripping design that I have in the pictures above doesn't seem to conform to any way to lay it into the lid and be effective. However, the best way seems to work into the body channel as in picture #2 (second from the top). It tucks nicely into the channel and leaves an indentation all the way around the channel for the lip of the lid to fit into. If I apply some adhesive to the outer side of the body channel, it should keep water from getting under the weatherstripping. After spending a few hours pouring over pictures of trunks on 30's model Plymouths, I've seen the weatherstipping applied to the lid or to the channel. Most late model cars have it applied to the trunk body. I'm thinking 1930's reproductions came in either placement depending on the design of the weatherstriping? The channel seems like the only effective option with this design. I got it from Bernbaum and it's supposed to be for this trunk? It looks good in the body channel and is the right thickness when the lid is down. I'll post a picture after I install it next week.
-
Fuel Guage Calibration 39 Plymouth
Dennis Detweiler replied to Dennis Detweiler's topic in P15-D24 Forum
I shortened the float arm to accommodate a 6 1/4 depth (original tank is 7 1/4 deep) fuel tank which now gives the sender full travel. I calibrated the original fuel guage and a NOS guage with the same results. For some reason, I can only calibrate the guage to register 3/4 tank. So I set it to read 3/4 full on a full tank which makes it accurate on empty. I put this in the "makes no sense file." -
Fuel Guage Calibration 39 Plymouth
Dennis Detweiler replied to Dennis Detweiler's topic in P15-D24 Forum
I'll give you a call tomorrow. It's too late in the evening now. Since the new tank is 1 inch shallower than the orginal, the non-adjustable float arm can't travel it's full distance which means I can calibrate the guage to show empty and 3/4 full or full and 1/4 from empty. I already cut the float arm to allow it to make full range empty to full. I will recalibrate it tomorrow. I think this will solve the problem. The old tank was rusted out on the bottom in a few places. It looked like someone had repaired it with some kind of goop at some point in time. There used to be a few places around here that reconditioned and repaired gas tanks and radiators, but they aren't in business anymore. This is the generation of "throw it out and get a new one." I bought a poly tank for the 39. -
Fuel Guage Calibration 39 Plymouth
Dennis Detweiler replied to Dennis Detweiler's topic in P15-D24 Forum
Hi Rich, Yes, I have the manual and followed it. One reason I'm having problems, the original tank is 7 1/4 deep and the new one is 6 1/4. The sending unit doesn't have an adjustable float arm. So, I'm having to cut it down and reinstalling the float. More tomorrow. -
Fuel Guage Calibration 39 Plymouth
Dennis Detweiler replied to Dennis Detweiler's topic in P15-D24 Forum
I just came inside to check the forum. I ran a ground wire from the sender to the panel fuse block ground and got the same results. So, it's not a ground issue. I'm going to pull the original fuel guage which I calibrated earlier and I'll calibrate the other one (NOS) which I also cleaned up all 4 contacts and wire terminals. I pulled the new correct 39 two wire sender out of the tank again, mounted it on my cardboard box to simulate the tank depth and have it ready to set at empty and full with the float arm to calibrate the guage which I'll set on the front seat and connect to the wires under the dash. I'll make sure the sender and guage are grounded. Then, I'll reply back with results again. The final electrical process to completing this rewire job and it has to be the biggest pain in the @$$! -
Fuel Guage Calibration 39 Plymouth
Dennis Detweiler replied to Dennis Detweiler's topic in P15-D24 Forum
I'll start with putting a ground wire direct from the sender to the fuse block ground. The engine and body are both grounded to the fuse block ground with braided ground wire. I cleaned each point of contact with sandpaper and/or grinder and used new bolts and sanded the new nuts. However, I didn't use star washers on the large connections. I ran continuity tests from the body to the fuse block and other areas and the needle showed positive, but maybe it's not enough. I'll try for a better ground before I re-calibrate. I have two gauges. One is a NOS. I tested resistance of the coil resistors on each of the two bi-metal blades and both gauges don't show a short. I initially had trouble with both gauges needles shifting up and back (unstable) until I ran some used 400 wet/dry paper between the 4 sets of points on each guage. That solved the instability problem. I sanded the guage wire connection surfaces (nuts). I'll work on it today and reply with results. Thanks for the input. -
Fuel Guage Calibration 39 Plymouth
Dennis Detweiler replied to Dennis Detweiler's topic in P15-D24 Forum
The reason I questioned the length of wire effecting the calibration, I am a musician and know that the quality of wire, length and thickness effects resistance in a guitar cord and changes the tone. If the fuel guage is very sensitive, it may change the calibration setting? I'll try pulling the sender out and set up my cardboard box in the trunk drop the guage down from the dash and recalibrate using the car's wires. Also, try another ground if I don't get results from recalibrating. I can check the plastic float to see if there's fuel in it -
Fuel Guage Calibration 39 Plymouth
Dennis Detweiler replied to Dennis Detweiler's topic in P15-D24 Forum
I spent most of the summer rewiring the whole car (new wires). 39 fuel sender and guage is a two wire system only pertinent to that one year. So, I have two new wires running through plastic wire loom to the rear. I checked for continuity to be sure and and it is good. The ground wire is new and I used a grinder to clean the rust from the frame at the rear before installing a connection. The car body and frame are ground to the battery using braided ground wire connections and all shows good continuity. All other circuits in the car test good. The fuel guage is the last detail to finishing the electrical system and making it all functional. I suppose I could try running a different ground to the sender? Maybe run another wire from the sender all the way to the firewall and to the new fuse panel ground? There would be no doubts about the ground contact that way. -
When calibrating my fuel guage, will the length of wire have an effect on the outcome? In other words, calibrating the guage with the sender using short alligator clip connections to a battery on a workbench vs connecting the guage on the front seat to the sending unit in the trunk? Will the accuracy of the guage be different with short wires vs long wires (added resistance)? I have a new poly tank 6 1/4 deep. I cut a cardboard box 6 1/4 deep and mounted the new sending unit in it. I adjusted the guage on the bench replicating empty and full with the float arm. I put the sending unit in the tank which has 10 gallons of gasoline in it (16 gallon tank). The sender is grounded properly. I installed the guage in the dash. The guage shows under 1/4 full? I reversed the wires and the guage shows empty. The guage should be showing over half full. Is the longer wires in the car causing enough added resistance to mess up my bench tested calibration?
-
Yours looks like it might have been square on a couple of sides and rounded on at least one corner? Whatever I find, it can't be too tall and keep the trunk from shutting or too shallow to not do it's job. Maybe I can shut the lid down on a ball of rope caulk to make an impression and get some idea of the thickness needed? The sill trough on my car leans inward, which will allow water to pool in it. Maybe it's supposed to have some kind of sealer or rubber jammed into it? Or, since I removed all of the old rubber and silicone sealer from the body channel, maybe there's a couple of drain holes along the bottom sill that has been plugged? I haven't done a total solvent cleanout of the channel yet.
-
My trunk channel and lid looks like your 38.
-
The jury is still out. I wish I could find a promotional advertisement for a 39 with a view of the opened trunk. The design of my claimed original style trunk weatherstripping and it's placement is still a guess. 39 was a transitional year for new ideas for Chrysler (two pole fuel sender and three pole fuel guage and shifter on the column using a cable and single shifter lever on the tranny. Maybe weatherstripping design and placement too? 1940 moved on to upgrades.
-
I'll try fitting a short piece into the lid and see how it conforms to the trough. Since the door weatherstipping is applied to the door. The trunk weatherstripping would logically be applied to the trunk lid.
-
Yes, please post a picture or two. . I'm trying to narrow it down before I proceed. Thanks
-
I already have a short roll of the contoured style in my photo. So, I'm trying to figure out how it lays in the trough. Someone had installed the square style years ago, but they also added black silicone caulk along the edges of it at some point in time. I'm assuming it had developed some leaks? The bottom sill trough is a little narrower fit than the sides and top. I'm not sure how to deal with that. Some experimenting.
-
Strange that they show two totally different designs for the trunk and each one claims to be designed from the original part? The second one (70-1691-84) is fairly close to the design that I have. I guess they could have changed design in the middle of the year.
-
I considered that also and still open to that idea. The weatherstripping that I got from Bernbaum is also available on a few other websites. One site touts rave reviews with years of satisfied buyers. I tried and failed to find a clear on-line photo of a late 30's Plymouth trunk in the open position. My car had a chunk of square rubber glued into the channel along with some black silicone in some of the gaps which didn't look to be a factory installation. I'm sure the design of this weatherstripping has a specific placement for effectiveness. If it is placed onto the trunk lid, I would assume the "arrow" point of the stripping would go into the corner of the lid?
-
The first photo doesn't allow the lid to close. I'm assuming the second photo is the correct position to install the weatherstripping? However, the lid flange isn't consistent with it's position in the channel all the way around the trunk. Sometimes it's more in the center of the channel. Does anyone have experience in installing it?