Leaderboard


Popular Content
Showing content with the highest reputation on 01/23/2023 in all areas
-
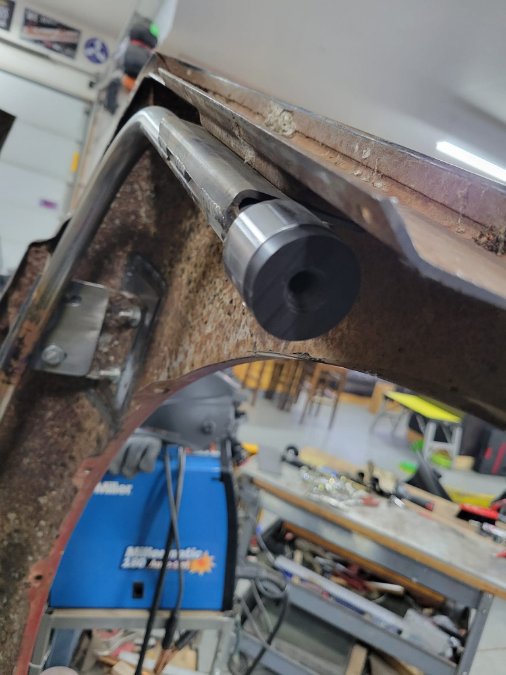
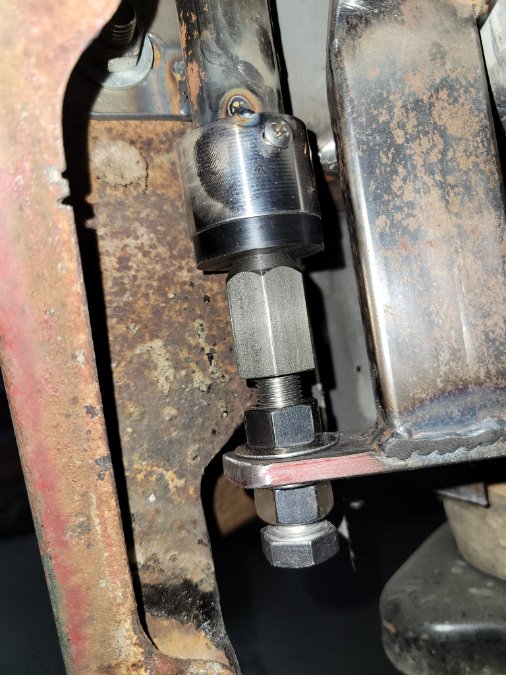
After much angst and time and thought and putting it off....the front clip finally has it's home on all the new mounting points.


 2 points
 -
Done.
 2 points
 -
? That Bucket Seat did the trick, but it also added a bit of a hazard. My carb wasn't tuned correctly yet at that point and it had a nasty hesitation when opening the throttle. It would bog for a second then take off suddenly causing me, and the bucket, to rock back. (accelerator pump jet was plugged) If it wasn't for the rigid steering column and wheel to hold on to I'd have probably fallen over backwards and got myself run over.2 points
-
A caution for all, do not forget to put the cotter pins back in! I would add that you shouldn't reuse them either. When you lose a wheel it is always in the middle of an intersection and its mighty hard to find a jack that fits under a car without a wheel. Don't ask me how I know this!2 points
-
Did you loosen all the spark plugs?1 point
-
go to the other end of the engine remove inspection cover on bellhousing turn engine from flywheel maybe can use big flat screwdriver or flywheel turner1 point
-
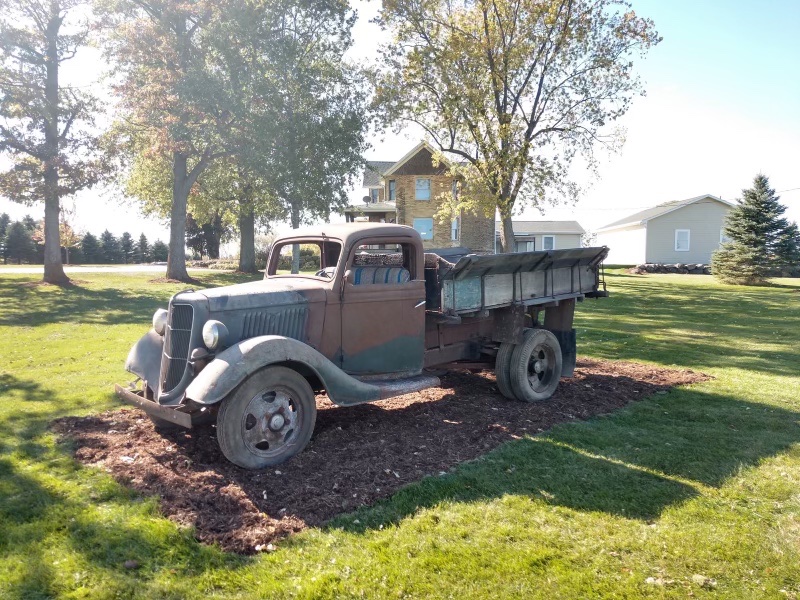
Well this is not mine but belongs to friends of one of my daughters.
 1 point
 -
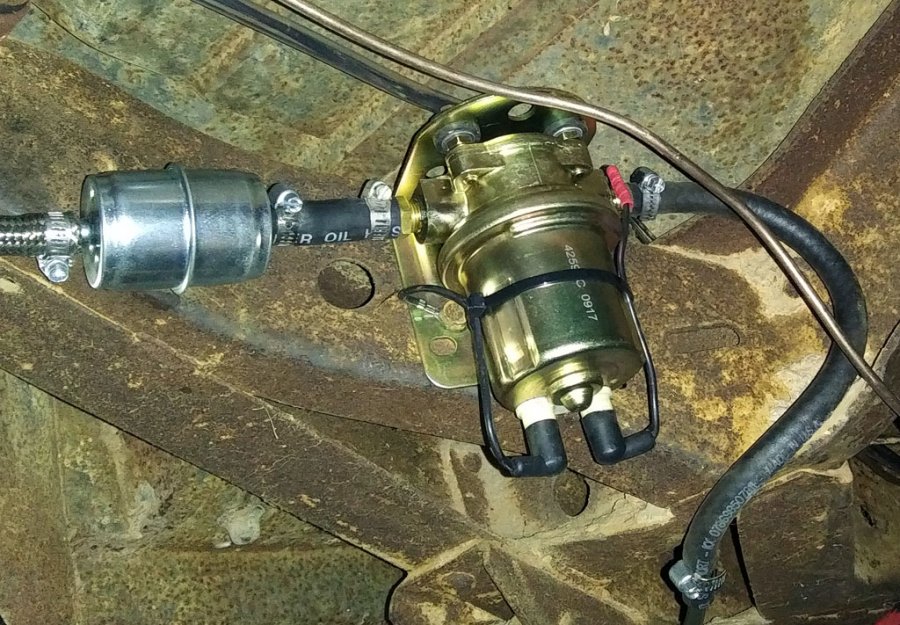
I had a 12v Carter rotary pump on the kit car and presently run the 6v version of this pump on the P15. Both pumps have been flawless for the carbed engines with no regulator needed. My RV-6 airplane has a Facet diaphragm boost pump that has been in service for 23 years. I also had the same pump on a Chevy S-10 pickup after an engine swap. I think the Carter or Facet would work fine for you. Below is the Carter in the Plymouth mounted just forward of the fuel tank.
 1 point
 -
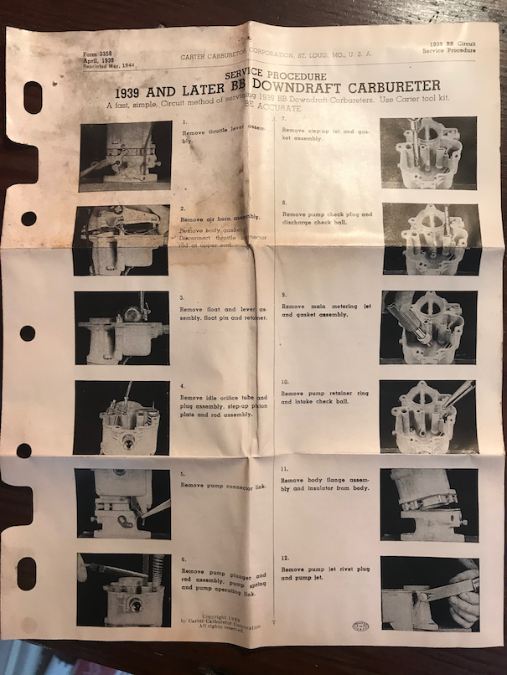
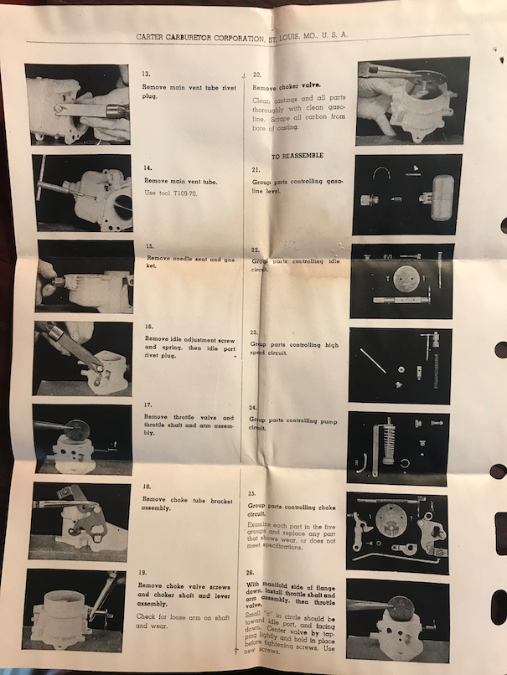
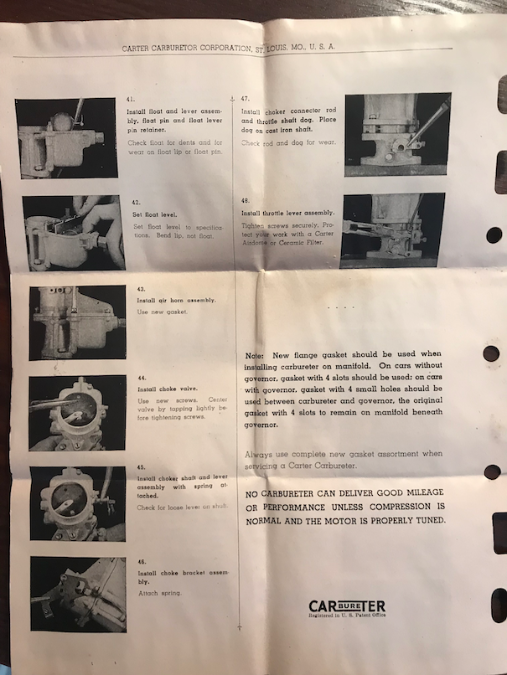
I had problems with carburetor performance both in the accelerator pump and the dashpot, I would say there are important and very subtle differences between OEM parts such as the accelerator pump spring length that require careful attention. Here's a short video clip my son took of me testing the accelerator pump springs that come with the kits (old and new), and the springs control the flow through those holes. I watched his video a number of times but Mike's kit doesn't replace all the relevant parts for our Chrysler B&B such as the dashpot. I found things very tricky like the triangular base that controls the choke can easily be put on backwards. I ended up reading the Carter B&B documents (original) AND the shop book. Both are written, as it turns out, very precisely and done in specific order. Once the system is put back together precisely then it really works flawlessly. I also purchased most of the Carter original tools like the float level measure, accelerator pump tool, and several other small parts that helped. Many people are 'old hands' at putting these carburetors together, but I think we just have to go through that trial and error phase to get it right, and then we too can put them together in no time at all! I ended up buying an original Carter rebuild kit and using parts from it. Those Carter kits are much more comprehensive including the accelerator pump spring!

 1 point
 -
A simple DRL setup could be done with a ballast resistor, a relay and an oil pressure switch. Use the switch to trigger the relay when the engine is running. The relay will feed voltage to the ballast which would in turn be wired to the headlight low beam in parallel with the headlight switch. So when ever you use the head light switch it will put full power to the low beams, but when you are not using the headlight switch the low beam will be partially powered up by the ballast setup.1 point
-
I took Wagoneer's advice and pulled the carb. I took it completely apart and cleaned the parts with Chemtool 12 carb cleaner and soaked the jets in acetone. Then I blew everything off with compressed air. I made sure the accelerator pump holes were blown out so I could feel air coming out strongly on both sides of the divider in the venturi. Right now, I'm reassembling everything. If you get lost assembling your Carter B&B carb, Mike's Carburetors has a good two part video showing you how!1 point
-
@MarcDeSoto I applaud you for sticking with your 48 DeSoto Business Coupe and not losing interest over 42 years! Or have some other shiny car catch your eye and you forget about your 48 DeSoto. I've been reading through a few of your previous threads on here. You definitely seem to be doing a thorough job! Maybe our DeSotos will meet someday at an NDC Convention! My goal is to have a reliable driver quality car. Mechanically and electrically, I plan to inspect, clean-up, and or rebuild every system in the car. Brake master cylinder, all 6 wheel cylinders, all hard and soft brake lines, front suspension bushings, a full engine rebuild, the list goes on. As far as the body goes, I will definitely repair the structural rust fairly early on, mainly thinking of the inner and outer rocker panels. As for the hole in the rear quarter behind the driver's door, I do want to repair that at some point, but that can wait until it's running and driving. Maybe I'll try to blend in some black paint after that hole is patched, but aside from that, I don't plan on painting the car any time soon. As for the chrome, aside from polishing it, I'm happy with the condition it is in currently. My car will never be a perfect show car or a frame off nut and bolt restoration. Rather something that I can get in and know it will start...and stop...reliably every time. Like many have advised, it is not a race, but I do hope to get it running and driving, at least around the neighborhood, in the next few years. Carl1 point
-
I have a 39 Desoto inwhich I have dual filament bulbs in the taillighs and they have running lights, brake lights and r/l turn signals. i installed an after market turn signal stat unit on my steering column. First no one will take off any points for a turn signal because it is a safety devise. since most modern drivers are now seeing the third brake light on our modern cars I purchased a 6v suction cup mounted unit that is in my rear window. Very easy to hook up. It has the following functions: Brake light, left and right turn signal indicator and also fourway blinking lights. This is very cheap insurance when driving our older cars. The modern drivers are not custom to looking down low on the rear fenders for the brake lights and turn signal. Spend the money for one of these units to protect your car and you and the riders. Cheap insurance. Rich Hartung1 point
-
One thing that really helps is to clean up the lenses and the housing. In my case the 51 was built when chrome was a strategic material (Korean war) and the housings are not chromed. They are zinc plated so they don't reflect light as well. I ended up painted the insides white to help. Another thing, dual filament bulbs usually have two different outputs, bright and dim. Dim is for running lights. Bright is fro the brake and tun lights. Make sure you use the correct filaments. You can see what I did with my housings in this write up. http://www.yourolddad.com/rewire-it1 point
-
I'd bet it came stock with a bench seat, buckets won't look right in that cab at all.1 point
-
I didn't have any trouble getting my rear drums off, but apparently I didn't do it right, because I didn't use any special tools. I just loosened the lug nuts a little, and did a half a dozen donuts in the parking lot.1 point
-
I downloaded the template from this site and made my template out of foam board. ( I laminated the offset area.) It worked swell.
 1 point
 -
I have a '47 DeSoto Custom in the same old black paint patina. I'm torn between repainting it in that old sheen or gloss black. They seem to look more "vintage" like they just stepped out of time with that original paint dullness.1 point
-
I did make the same mistake as you did, Marc. I got the restoration fever and started taking off parts, sometimes labeling them and sometimes not. I did get a good amount of sheet metal restored, however. I'm waiting for the Spring to start the car with my rebuilt fuel pump.1 point
-
Well, as tight as I can get it usually means I broke it. Not interested in dealing with that.0 points