Leaderboard


Popular Content
Showing content with the highest reputation on 01/10/2023 in all areas
-
sounds like either the screw threads or the sisson threads are stripped. Start with a new screw of same thread sizing. If that fails then it's likely requires fresh threads in the screw hole. Run it through same size tap and use a new screw. Failing that, re-cut the threads ever so slightly larger to get a fresh hole. Painful but less permanent than JB Welding the wire to the sisson which won't let you have much flexibility for adjustment in the future. You should be able to find a small enough tap once you identify the specific thread size.3 points
-
I know this engine has been discussed here in the past, but I just came across this YouTube video about it.2 points
-
Installing headliners is not as difficult as it may seem. I've done a few, but not enough to be a whiz at it. Just takes patience and attention to detail. "Manage expectations" I tend to tell people undertaking something new. Remember that you do not do this professionally, so don't expect to go in and get it done as quickly as the reality shows, upholstery shops, etc. If something gets frustrating, stop. Do something else for a while. There are restoration books out there that detail headliner installation in a way that you can easily adapt what they teach to your car. Well, I say that. My books are about 40 years old, but I'm sure there's some still, or something else, out there. The basics are the same for every car. To do the job right, I would plan to remove all the interior trim and garnish on or about the headliner, even if that means removing the rear quarter windows. You'll be happier with the process and results if you do. You may even discover that you have a knack for installing a headliner!2 points
-
I doubt there is enough meat on the old Mopar bone for suppliers to spend the $$$’s on quality ……..2 points
-
It requires a very short screw, or the screw will bottom out, grounding the wire. Maybe your screw is too long. You can check with your multimeter to see if the screw is bottoming out and grounding2 points
-
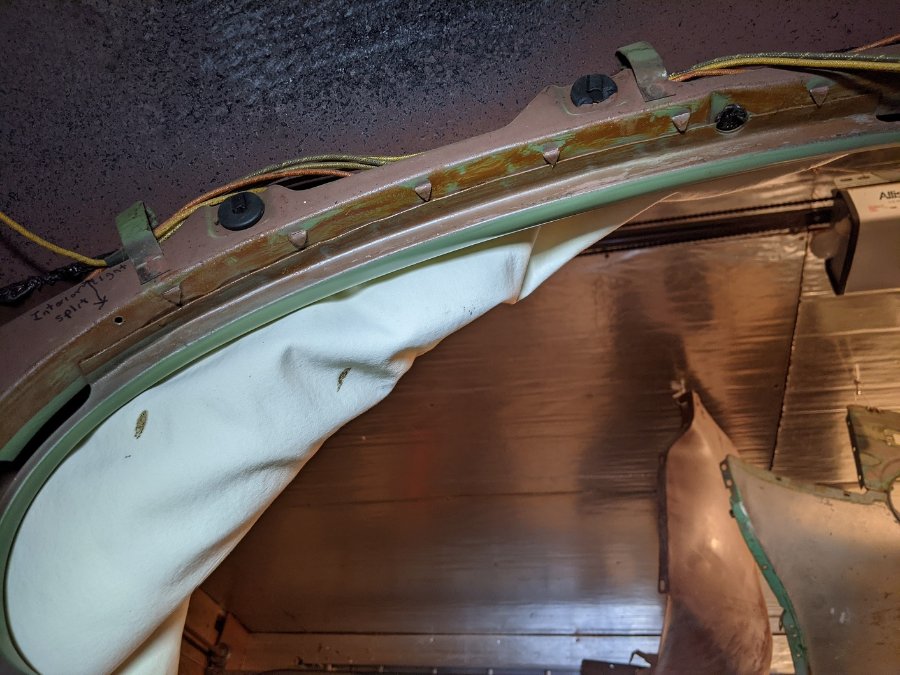
The barbs that secure the headliner in that area are inside the curvature of the rear window. (This is also a 4-door P15, and it has the rear wing windows.)
 2 points
 -
The pedal going very high and tight is a classic symptom of the relief port in the master cylinder either being clogged or that the piston cup is not clear of the port when the brake pedal is released. I'd check the length of the push rod going into the master cylinder to assure there is a slight gap to the piston. The pedal should move about 1/2 to 1 inch before the rod contacts the cylinder. The other thing to check is that the relief port in the master is not clogged with some debris.2 points
-
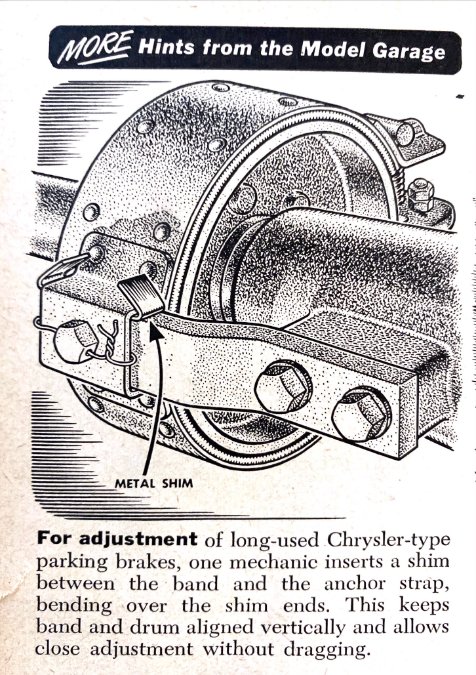
Looking through an old (1953) Popular Science magazine and found a bunch of stuff on the "new" 1954 Chrysler, Plymouth and Dodge. Desoto didn't make the issue for some reason. This hint was for the "long-used Chrysler parking brake". Anyone employ this technique?

 1 point
 -
I should have been more clear in my posting. The product I mentioned is not the 'removable locktite', but one that molds new threads into the hole and around the screw. The screw/bolt is installed and removed as normal but that Locktite creates a new thread for it to enter. Not quite as strong of course, but works for most light duty jobs. No head bolts, manifold bolts etc. Search for 'form-a-thread'.1 point
-
these links to my install my give you some ideas. I installed my WLS headliner. I had no experience and I think did ok.1 point
-
Thank you so much for all the information and help. After cleaning up the case this morning, I found this letting punched into the back of the machined area of the case. PJ = 1935 Plymouth! So, the transmission is the original and the parts purchasing has begun for a 1935 model transmission. Bob - checking the other gear for damage, I see it is well worn, but not broken. I found a new one on the auction site, so maybe next week it will be here.
 1 point
 -
If the threads are just wallowed out you might find a metric screw that is close enough in size to cut new threads as you force it in the hole. Soldering or JB'ing should be your last resort.1 point
-
Keeping things similar and not moving to a solenoid seems to be the way things were done back in the day. On my COE I do scratch my head...but such a limited run likely didn't necessitate a new direction.1 point
-
Don Bunn calls the transmission connection a reach rod, I understand that. It’s interesting that Chrysler Corp. retained the stomp pedal starter at that position, when a solenoid actuated starter with a dash starter button would work. Everything’s fine, I didn’t fall off a turnip wagon and I’m still rodeoing. Learn something every day. I have a B4D chassis and engine with the rear axle flipped and a farmhand loader mounted. It had a bale handler on it that the co-buyer wanted, but not the chassis. This is the starter lever. Rick D.
 1 point
 -
Well that’s why I bought a new one!☺️?1 point
-
as stated...use contact cemet as stated....coat the metal, coat the fabric, let both dry tact free...when they touch...instant bond...be sure you are aligned.... Thanks Eneto 55......I did not have such a clean memory on this but for some reason the cleats stuck in my mind....too many days have passed since I put in my headliner.1 point
-
I think I will be going to Steele Rubber Products since I was not too happy with some of the pieces I had already purchased elsewhere from supplier mentioned above. Just a personal observation, but I never really had quality problems with parts for the 39 Chevvy in my years of maintaining it. The parts that I bought for the D-14 restoration so far have had numerous quality issues (tie rod bushings for starters &&&). A repoop oil pump that could have ruined an expensive rebuilt motor has sent me on a boycott of these" purveyors of the questionable" and sourcing as many NOS ones as possible for the rest of the project. They are a little harder to get but well worth the wait and $ compared to the alternatives. The only way to correct the quality situation is to go elsewhere until the big suppliers get the message! M1 point
-
contact cement is your friend1 point
-
100%, that's what it is. dodge used that as a linkage, since the transmission was back under the seat (more or less) rather than under the center of the floor as on the standard cabs. Bunn's book shows this, too.1 point
-
as an added note....ensure first the return of the piston to most rear position in the master before probing the relief port.....1 point
-
I think the rod or lever going back from the gearshifter is part of the transmission shift linkage.1 point
-
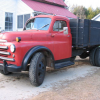
Whoa, awesome time capsule of a truck! Looking forward to seeing more photos of it!1 point
-
Grab an extra hose to keep in the car. Cheap insurance. Seen half a dozen fail on tours and travel with others to meets. I had one made up at a hydraulic hose place. 10 bucks, 10 years ago.1 point
-
the headliner should attached to strips with serrated edges that will hook the fabric in place....the tacking strips are generally along the b post for the windlace...the front windlace tucking in and cleated with serrated edge here also...as the bottom of the rear quarters is covered with the garnish that overlays the lower quarter trim panels the headliner goes no lower here. The sail panel and window at the rear I have very vague memory here so eveidently was not an issue....the addressing of the fabric below the rear glass at the package tray is where I found the system most lacking and thus made a similar serrated strip for this area for quick and easy install.1 point
-
I can see a latch point on the box, so I assume your truck has swing open doors. The truck has a shroud under the dash, that again, I assume it directed the cowl vent air towards the driver. Last is, what is the control lever on the floor rear of the gear shift? I’d like to see pictures of inside the box, to see how they secured the load, at your leisure. Did you get your gas gauge fixed? Rick D.1 point
-
i will definitely be in contact next time i'm passing through binghamton. i'd love to see this thing - it is in fantastic condition, nevermind the rarity.1 point
-
I hand made my own plug and coil wires using MSD 5552 http://www.yourolddad.com/plug-wires So if QC was an issue I could quickly point to the faulty person, me, lol.1 point
-
That is an awesome truck and story! I wish you were not on the other coast, that would just be awesome to check out in person! Just curious, could you throw up a couple photos of the other truck too?1 point
-
"I would use a bit of caution when you delve into your cowl vent. With that air conditioning unit under the dash (where the cowl vent handle was), whoever installed it may have permanently closed the vent. I don't remember if the handle is necessary to lock down the vent, and I'm currently too lazy to go out and check. " I think what @Dan Hiebertis saying, many people did permanently weld these vents closed in some fashion or another. They often leak in the rain & cause rusty floors .... in this case the vent would leak water into the AC? Love them or hate them, cowl vents were often closed when customizing a 20 year old car ..... now a 70 year old car we like them to function.1 point
-
Ha! Ha! Good comparison! Welcome to the forum and good luck on your project! Looks like it’s going to be a fun build.1 point
-
The Car was made by Derham Body works which was located approx 15 miles from where I currently live here in Pa. The old Derham body work is now a Foreign car dealership with Ferraris and other makes of cars. They are still inthe same original building and they are located in the town of Bryn Mawr PA. I have some more information about Derham Body works. My 1939 Desoto was sold by the Wolfington Desoto Dealership in center city Philadelphia. When the wolfington body works was first stated they did alot of custom body work. I recently met with the Great Granson of the Wolfingtons. He now runs the Wolfington School Bus company out in Exton, PA. He told me that when his gradfather body company needed extra coach builders and if Derham Body works was slow they would hire the derham men to work for them and the reverse when they were slow the Wolfington men would go help the Derham coachbuilders. When I took my car to the Wolfington Bus company the great grand son was very impressed with the car and we had about a 2 hour conversation about the company and the history of the dealership. The dealership was located at 34th and Chestnut Street In Philadelphia. I love the look of the customized roof line onthe car. Rich Hartung.1 point
-
did she flip you off or being old are you are overlooked the invitation....inquiring minds DON"T need to know....1 point


.thumb.jpeg.28cb36506a6b17cd30e7d4a22504384d.jpeg)