Leaderboard


Popular Content
Showing content with the highest reputation on 01/07/2023 in all areas
-
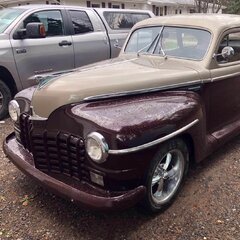
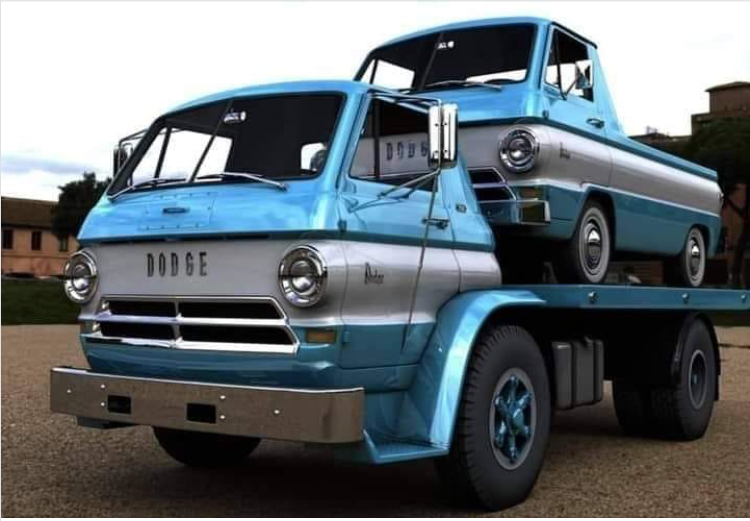
Extremely cool. It makes me weak in the knees. I am not typically a 60's Mopar lover, but these cool little cab over trucks with a hopped-up 318? Its futile for me to resist.
 4 points
 -
I'm reminded of the four phases of learning. 1) Unconscious incompetence; I don't know what I don't know.... 2) Conscious incompetence; I know what I don't know... 3) Conscious competence; I know what I'm doing but I really have to think about it... 4) Unconscious competence; I know what I'm doing so well I barely have to think about it.... Some phycologists add another phase: 5) Complacency; This is where you get the timing light too close to the fan......4 points
-
Thanks guys. I did it just like the manual says. I didn't need to fool around with the timing hole in no. 6. Here's what I did. 1. I took out the oil pump and slid the dist. up about an inch. 2. I held my thumb over no. 1 spark plug hole and cranked until my thumb blew off. Then I moved the DC mark on the pulley to line up with the pointer. 3. I followed the shop manual's directions for indexing the oil pump. Face the slot toward you and turn the gear until the slot is horizontal to the two mounting holes. Then turn the gear one tooth to the left. 4. Install oil pump by sliding it under the frame rail and into the hole. Secure with two bolts using 9/16 open end wrench. 5. Take rotor and turn to 7:00 and slide it into the oil pump slot. Install minor adjustment screw finger tight. 6. Attach test light between positive side of coil and distributor points screw. 7. If light is on, (it was), turn dist. counter clockwise just until light goes off. Then tighten dist. minor adjustment screw. 8. Then I put a visible spark attachment on no. 1 cylinder to see if it would spark when the DC mark appeared on every other revolution of the crank. It did. So tomorrow, I think I'm good to go.3 points
-
I need to sew some repairs in my truck interior and what better way to practice ...with thread and needle ...redo the bottom seat fabric in the outside swing chair. Jo-Ann’s fabric store has lots of end cuts off fabrics bolts and I got a yard of heavy duty stuff. Am using a strong polyester thread and am getting better at it. Then I will attempt a sewing machine for reinforcing. I’m a bit scared to do but I have more courage with a sewing machine than indexing an oil pump and determining where the heck #1 wire should be...or takin apart a rear end...or...man there are some just plain challenges right now on the forums here that I’ve been reading and learning believe me. Ha. Just hanging out sewing whilst the weather is cold. This might challenge me to make my own interior parts for my p-23 that the field mice ate up. Yeah. ( I don’t do headliners though..that’s as scary as taking an engine apart)
 2 points
 -
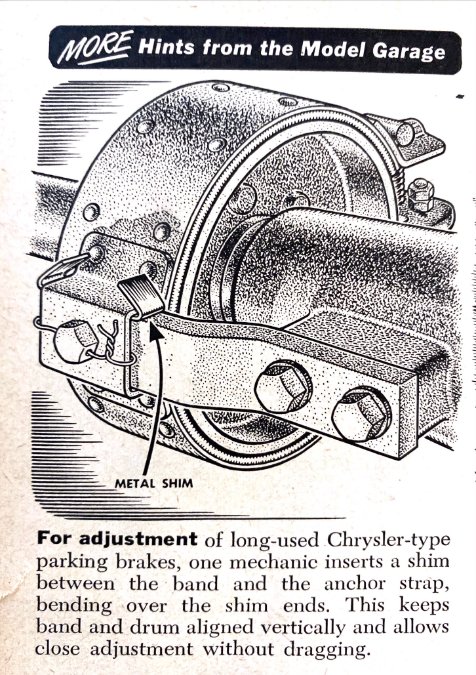
Looking through an old (1953) Popular Science magazine and found a bunch of stuff on the "new" 1954 Chrysler, Plymouth and Dodge. Desoto didn't make the issue for some reason. This hint was for the "long-used Chrysler parking brake". Anyone employ this technique?

 2 points
 -
A wild cat got into our garage back home once, and as I was trying to chase it out, it went up into the attic (open ceiling). I poked at it with a broom handle, but it just went from place to place - wouldn't come down & go out. So I thought OK, if I can knock it out with ether, then I could take it out, and let it wake up on its own time. I shot a stream in its direction, but it hit the ceiling joist above me, and came right back in my face. I just about passed out before I could get out into the fresh air. Never tried that again....2 points
-
This is why I always push automotive system fundamentals. A person cannot troubleshoot and find a problem if they don't understand how the very fundamental things function. If you don't understand exactly what 4 stroke means and valves and what they do and why, how can you troubleshoot for no start? Then add the ignition system. Things get more complex then. Another variable added. How does it work? Why, and what is it supposed to do? Make a spark is not the right answer, showing not enough understanding. Next add the fuel system. 7 circuits of a carb. WTH does that mean? Fuel pump? Choke? Fuel pressure? More confusion added. WTH does all this do? Knowing we need all systems to work to start the car is not enough. When you understand the basics you can easily eliminate some variables and get the engine started. A shop manual eliminates all the fundmental info. They expect you are not a first year apprentice when you read the shop manual. Reading it will help you maybe get things going, but likely not if you don't understand the basics. If you do get the engine going with some info in the manual, you won't be able to explain why. I heard a saying one time....If you can't explain it simply to others who have no knowledge, you do not know the subject well enough yourself. Get some books. Read them. Today I will highly recommend the book "Automotive Fundamentals" by Frazee & Bedell. Published from 1949 to 1958. If you want to work on your own old Mapar, a book like this is a priority to own before socket sets and screwdrivers. https://www.amazon.com/Automotive-Fundamentals-Frazee-Bedell/dp/B0013ZH02W PS: I suppose owing the book is not enough. You have to read it.2 points
-
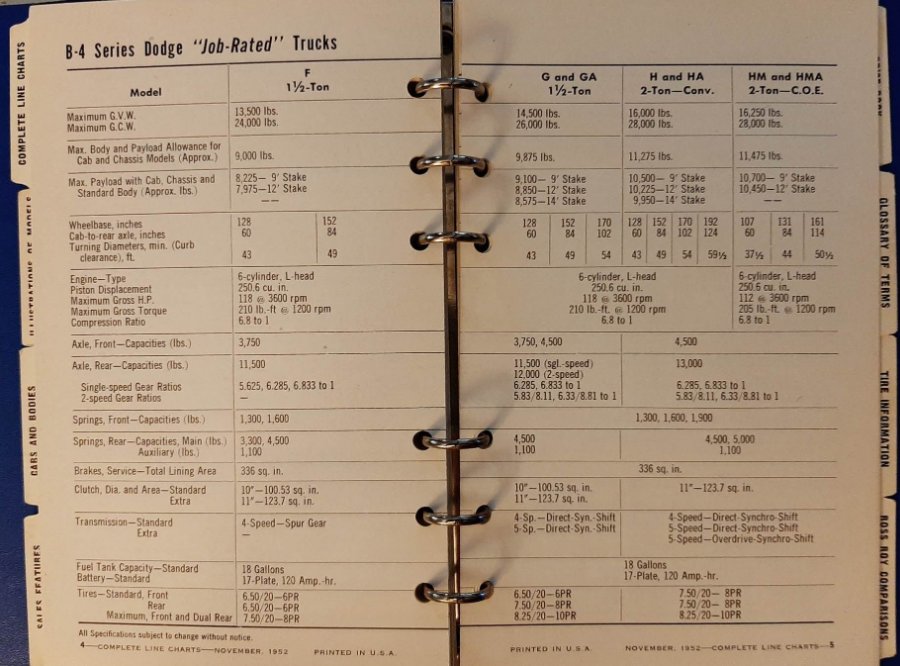
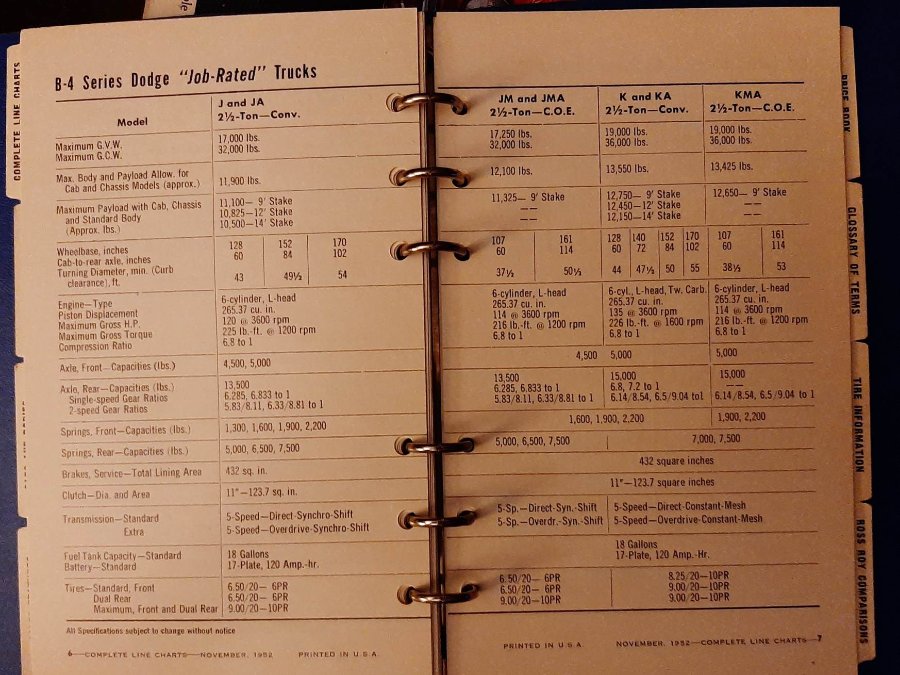
Oh oh....you don't have the bigger COE...no 265. The pillar tag is a must! It's a 2 tonner. Yours has the 251. Here's your specs....
 2 points
 -
Yea see....read the god damn shop manual. That's what it's for. More owners should. It would help eliminate these endless drawn out threads.2 points
-
Crystal meth for your motor! LOL2 points
-
Some specs on the B4 series COE J and K models...
 2 points
 -
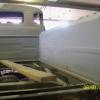
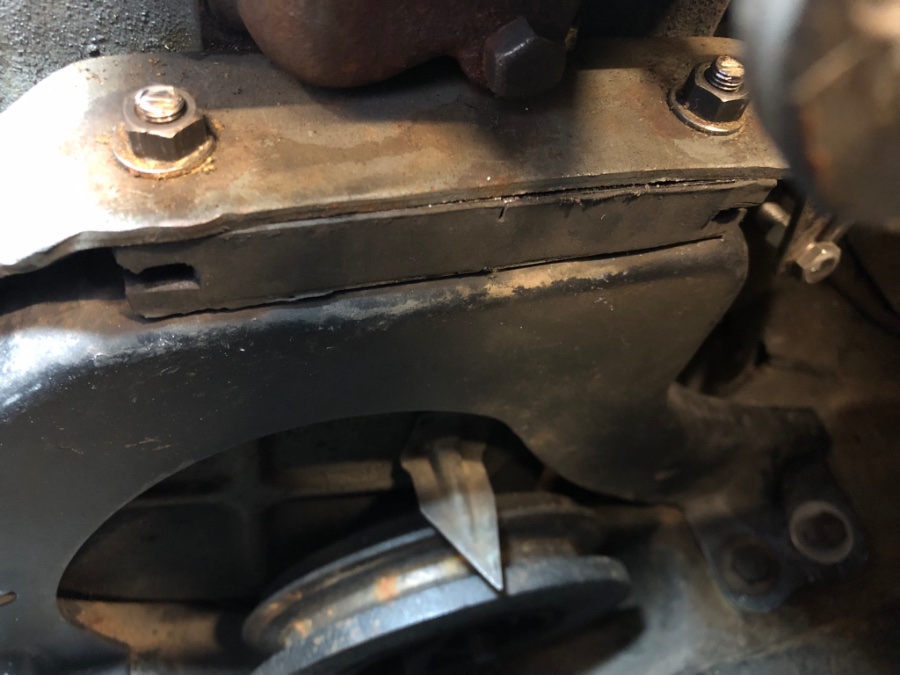
Thought I’d close this thread out with success photos. The mounts arrived quicker than I expected. They seemed soft enough with the fingernail test. I removed the floor board and parking brake assembly to provide clearance to jack up the rear of the transmission. The old ones came out and new ones slipped in. They squished nicely and the engine sat forward about 3/8 to 1/2”. Used the engine crane to lift the front of the engine just enough to slip the support plate out. Replaced the front mount and lowered the engine. The issue of the partially obscured lower pulley has been solved. There is now a bit more than 1/4” clearance between where the belt will track and the support plate.


 2 points
 -
As we used to say in the Navy, it isn't clean if it doesn't smell like pine oil. Just remember to replace the wife's stash before she finds out you used it.2 points
-
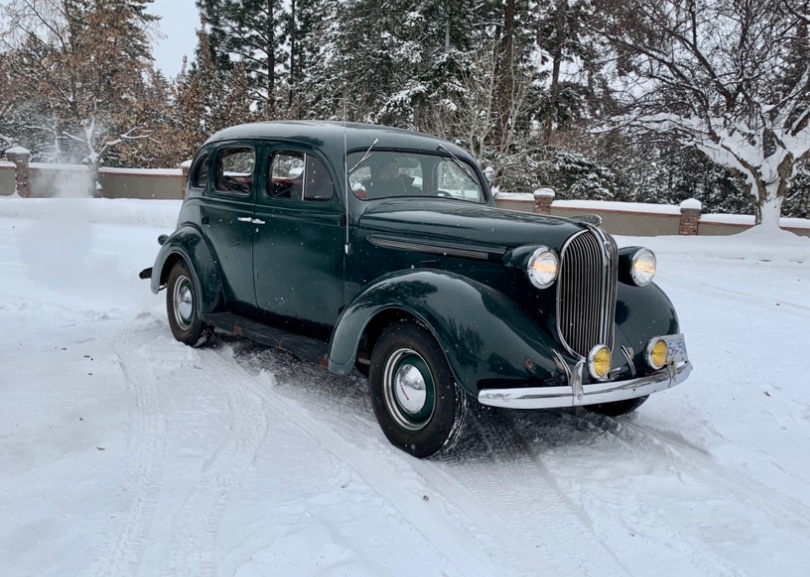
My cars go into the garage just like every other day. They have good A/Freeze even though the garage is heated. I fire them up a couple of times over the winter. Keeps seals and gaskets well lubed. Pump the brakes now and then. Heck I ‘ll even back them out into my snowy driveway for some nice winter-esque pics. I question, why drain the engine oil in the fall and put new oil in? New oil oxidizes and breaks down just by sitting in your crankcase all winter. Its not ideal to drive next year on that “new oil” that sat all winter. Perhaps you dump that new fall oil in the spring again? How many miles does the average vintage car get each year. Mine about 1000. The oil is not real dirty and due in Oct. So I leave it in. I Get it hot in March. Flush out all last year’s oil and refill with new 20W40. Then run ‘er all summer and fall. Rinse and repeat. Keep in mind I do run modern detergent oil. Just last week we were having fun. Cars that sit around too much go bad. They need to be loved and get regular attention.
 2 points
 -
2 points
-
Oh wow, Thanks for that! Great to have that info. Thanks again!1 point
-
Maybe a few hours in the garage alone with Motown blasting on the radio and a 6er of cold ones would help? It always makes me happier. Or maybe a strong laxative.... ?1 point
-
I've never had a need to use starter fluid. I would try all other methods to start a cold tired engine, using a little starting fluid as a last resort. It's a very flammable gas that I believe causes extremely high combustion pressures inside your cylinders when ignited. Higher pressures than your gas engine was ever designed to tolerate. Likely leading to broken piston rings and scored cylinder walls. Bent connecting rods. Expect to find lower compression readings from a gas engine that has seen its share of starting fluid. A diesel engine would likely tolerate starting fluid as diesels have an extremely high compression ratio compared to gas engines. Diesel engines are engineered and built way stronger, heavier blocks and heads, pistons, rings etc, to operate under extreme combustion cycles from such high combustion pressures. Diesel engines make massive power and torque due to the extremely powerful combustion process that occurs inside the cylinders. Gas engines, not so much. Starting fluid, like a shot of a drug may wake the your gas engine up, but it will take its toll.1 point
-
That’s impressive! Great tip1 point
-
Name plate reads, B4 HMA 161 WB, MGVW 16250 Have to look on the rear to see if numbers are present. Thanks for that info, very helpful. Oh yes, by the way, all the books for the truck were present in the dash!1 point
-
I've been working at learning the craft also. I picked up a used industrial machine years ago from a former upholsterer retiring and liquidating his equipment and supplies. There's a lot to learn about the craft and I'm just getting started. Y tube has lots of helpful videos. Just finished my third set of bucket seats, the second set I've done for my Mach I since the first set didn't turn out as well as I wanted, still not perfect but usable. The second set I did is for my B3B, a pair of low back Mustang seats in a light tan with emerald green inserts. I can do these over a half dozen times and still cost less than a pro's one time deal.1 point
-
Above is quoted for extra emphasis.1 point
-
Your truck should have the larger 265 engine in it as it is a 1953...J or K serirs...(6 lug nuts) If it's a "J" series it has a 2 speed Eaton 1350 series rear axle with the most likely ratio of 5.83/8.11. If your truck is a "K" series 2-1/2 tonner I cannot remember off the top of my head the ratio's offerered...I'd have to look it up. The K Models used the Eaton 1650 series 2 speed axles...pretty sure on that part. The axle ratio is stamped on top of the differential case. The truck model/ wheelbase, HP etc. Is on the drivers door hinge pillar.1 point
-
Many of us have tried to explain this in earlier posts in this thread. " #1 TDC on the compression stoke" has been mentioned a few times. A piston has to travel up and down 2 times, to complete a 4 stroke cycle of the engine. In order to do that the crank has to make 2 full complete revolutions. Every time the piston travels up or down that is 1 stoke. A piston goes down. Intake valve opens. It sucks in Air/fuel mixture. Stoke one is now complete. Crank has turned 180 degrees. Piston travels up. Intake valve closes. Piston compresses air/fuel mixture. Piston continues to travel up until it stops. Where it stops is TDC on compression stroke. Stroke 2 is now complete. Crank has travelled 180 again, Spark plug fires just BEFORE piston reaches TDC. Exactly how soon before TDC depends on piston travel speed. Actual firing position is manipulated by mechanical and vacuum advance. We call this timing. Timing is adjusted and you need to get the timing in the ball park before air/fuel mixture will fire and go bang! Violent combustion forces the piston down to the bottom of the cylinder bore. The explosion creates torque on the crank. Stroke #3 is now complete. Crank has turned 180 degrees again. Piston travels back up. Exhaust valve opens. Spent gasses are pushed out the cylinder by way of the exhaust valve. Crank has turned 180 degrees again. Stroke 4 is now complete. Piston again reaches TDC but not at compression stroke. So spark does not fire here. The 4 strokes of a 4 stroke engine are now all done. The process start over again. A home mechanic rebuilding an engine needs to understand this. One should strive to research, read and understand it. #1 and #6 piston both travel at exactly the same time and motion. They are exactly 180 degrees out. When #6 is at TDC compression stroke, #1 is at TDC intake stroke. When #1 TDC is on compression stroke, #6 TDC is on intake stroke. Every single time the crank turns 360 degrees the timing mark on the front pulley passes the TDC mark. You must know how and why ½ if the time it,s not accurate for TDC on #1 compression stroke. What really seems to screw people up is they set a wood dowel down the timing pin hole above cylinder #6. They turn the crank over until #6 is at TDC, and think they've got it. They have a 50/50 chance of being right, on the compression stroke. Why the heck is the darned tootin' timing pin hole above #6? Shouldn't it be above #1 cylinder? People are confused! It is because above #1 piston there is a thermostat and waterneck in the way. You can't place the timing pin hole there. The engineers and mechanics were like, "ya sure. Put it above #6 cylinder instead. #6 and #1 travel the same anyway. We got it"... 100 years later people are still often mistaken. I am convinced in another 100 years nobody will have an inkling how all this works. The difference between #1 piston and #6 piston movement in the block is nothing, The real difference is the valve timing. Valve timing dictates what cylinder is currently on what stroke.1 point
-
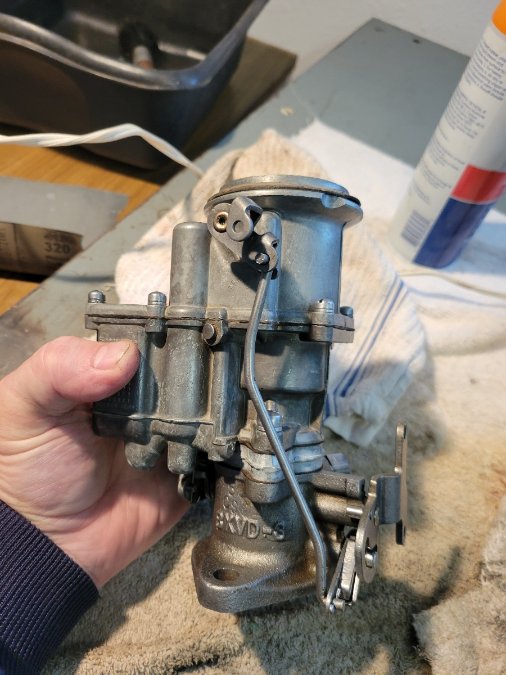
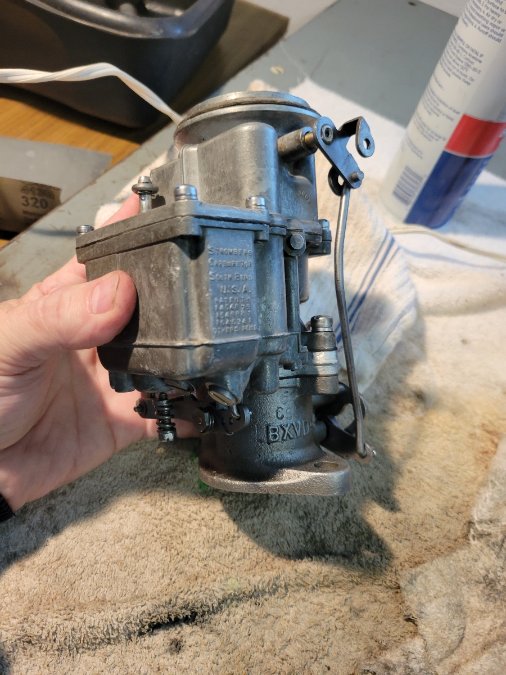
Call me old fashion but I get a kick out of using old tech. The easiest way to help with wide open throttle slow down of the wipers is of course a vacuum tank. Another way is to get a dual chamber fuel pump. The top chamber only pumps vacuum. What makes the dual chamber pump so useful is that in the situations of prolonged high rpm wide open throttle ( going up a long grade ) which would drain the vacuum tank, the pump is actually pumping more vacuum than you'd need. Put them both together for a really workable system. Electric wipers are two speed and aftermarket motors are 12 volt only. I find it fun to live with a good working 6 volt system so the aftermarket is out for me. However, vacuum wipers have an infinite speed control ( between slow and slower lol ). Good modern rubber wipers, dual chamber fuel pump and a vacuum tank give you a serviceable system. Add a momentary vacuum switch foot or dash mounted and you can have manual intermittent wipers!1 point
-
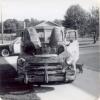
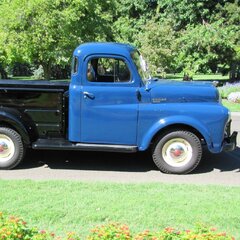
Thanks for sharing, only a dream to drive that truck! Cant be many left in that condition! Do you know what motor and rear gears it has?1 point
-
That’s fantastic! Thanks for the pictures.1 point
-
Just fire it up...too much posting1 point
-
That's a period radio that I have. I brought it back to life in 2007, following on-line instructions. I replaced all the capacitors and revived the vibrator by zapping it in series with a household light bulb. I replaced the speaker with one that the kids left behind. The sound isn't great, but the radio works. The nostalgia is listening to the radio begin to hum as it is turned on, then as the radio warms up, the sound begins to reach its volume. It's alive! .. alive!1 point
-
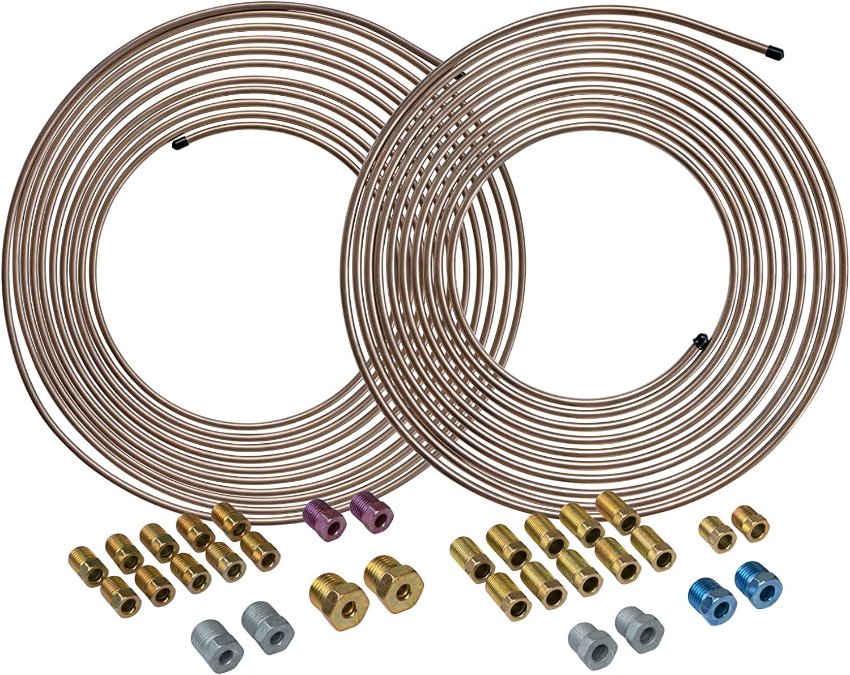
For the plumbing, I would suggest going with nickle/copper lines. Just so much easier to work with, you can bend it by hand without a bending tool. You can use pipe and bend it around it for a straight corner. It comes in a roll, you can drill a hole in a wood block, pull the rolled line through the hole and have a 25' straight line .... You can probably do magic tricks with it if you're a magician. Because it is softer, it is easier to make your double flares. It is rated as a lifetime line, is certified to work with fuel, brakes, automatic transmission lines. I see Amazon has a 2 roll kit with fittings for $55 .... My 1/2 ton uses 5/16" & 1/4" ... no idea what your 1 ton uses. I am making another thread on the fuel tank ... Tanks has been around for some time, they sell the fuel tanks for the earlier 1947 trucks. They claim will fit 48-50 trucks with some modification. Why I feel it is important is currently Tanks sells that tank for $315, searching on ebay others want between $600-$800. Since you have a 1 ton, you already have the needed bracket, you just need to grind off the 2 rivets holding it to the frame & move it 2" .... Or make a new one. Hope you can clean out & use what you have. Brakes are a tough one for me on my 1/2 ton. If I need new drums on the rear, I'm swapping in a modern rear end. Drums are $400 each & only 1 vendor. Same with the front, would swap in disk brakes. .... These are my options with a 1/2 ton, no idea what your parts availability are with a 1 ton. Just seems like as long as we have good drums, hydraulics & shoes are available. You might talk to rustyhope, they sell a brake conversion kit for the 1/2 ton & some mods can work with the 3/4 ton .... they may be able to help you with the 1 ton. Their kit is simply brackets & hardware, with a list of calipers, rotors, bearings etc... you can buy from napa. IMHO, as long as your drums are decent, is cheaper, easier to just fix what you have .... then decide later after driving it what future upgrades to add. That cooling system looks like more fun then a barrel of monkeys. We have real hard water here in TX, sure AZ water smooth as a babies behind. With the radiator & water pump removed, I used a long piece of flat steel to clean (rod out) the distribution tube. I removed all the core plugs, with a garden hose inserted into the distribution tube I flushed out the block. I used a long bent wire to reach into the block through the core plugs and pulled out all the leftover casting sand & crap I could find. Is common to find lots of sand leftover from when the blocks were cast. I got a lot out of mine, along with other crud. My truck was parked because of overheating .... I think. After cleaning it best I could, I installed core plugs, water pump, T-stat hoses ... I filled it with vinegar I ran it through several heat cycles, let it sit for days & warm it up & then drained it. .... Runs pretty cool in the driveway now. Just need to work at it.
 1 point
 -
The things done as a "farmer fix" the these old boys never cease to amaze me. Just because it will work doesn't mean it should be done. Lol1 point
-
I recommend removing the hood and then taking the front fenders, grill, radiator off in one piece. Then you can remove the radiator and get to the five core plugs on the left side of the engine, the block drain plug and the water distribution tube. The weight of the radiator keeps the clip fairly balanced. I did use a couple 1” ratchet straps to hold up the fenders. I pulled two B model engines that way, with each truck still on my trailer. I used my forklift with a boom, but a cherry picker will work fine, with your truck on the ground. The trouble with honeycomb radiators is that when old time shops fixed them, it looked like it was hit with a shotgun. A local shop wouldn’t fix mine, but recored it with a newer style core for $500, with my top and bottom tanks. It would probably cost twice that now. You have a junk yard handy for parts anyway. Rick D.1 point
-
That was her name Don... "The Bitch" or herpes. Maybe I am on the wrong forum? I will stop posting1 point
-
Just thinking I may give the pinesol mix a try. I have a master cylinder that has been soaking in Berrymans carb cleaner for 3 days .... I pulled it out today, did a very quick 30 second hone on the bore & it looks like it will be fine. The reservoir has some crud in it yet, the old paint is flaking off .... Thinking the pinesol as a final rinse while I clean it ... see how it does. Naturally after cleaned & painted would use Dot 3 brake fluid to rinse the bores before assembly. I have never used the ultra sonic cleaner, They seem to do a pretty decent job though .... I have one on my personal want list. Even they will not remove wasp from passages though0 points


.thumb.jpeg.28cb36506a6b17cd30e7d4a22504384d.jpeg)