Leaderboard


Popular Content
Showing content with the highest reputation on 11/22/2022 in all areas
-
I would forget where I put the notebook.2 points
-
Never mind. I just found them! I'm Guilty with an explanation. I had painted my throttle linkage silver to go with the engine. But after seeing Bob's pic, I'm thinking it's supposed to be black. The whole linkage assembly was hanging over the silver bell housing, so I couldn't see it. Very relieved to find these essential parts that would have been very hard to find. Marc.2 points
-
I had four lock ring wheels sand blasted. I washed any residue off and brush primed and painted them satin black. I like to use 7.50R16LT tires, they are taller than 215/85R16’s. I use tubes with a TR150 valve stem that you bend after putting the tires on. I like to keep the wheel dry so I wipe the bead and wheel with rubber lubricant. I got four 8.5x17.5” wheels that could be assembled tubeless, but I would need to buy tires and they would still be a shorter height. I’m going to wipe the tubes with corn starch when I assemble them. I had a flat this summer on another truck and the tire dismounted easily and the wheel was still clean. There was a short piece of cellophane type tape inside the tire that rubbed a pinhole in the tube, another reason to use corn starch or talc. Rick D.


 2 points
 -
I've had my DeSoto since 1980 and I've heard of the Spiegel catalog since then also!1 point
-
Also, a HUGE thanks to Mr. 9 foot box. He pointed me to a junkyard fairly close that had a full set of (almost matching) dually rims. Not sure what's going on with the one 3 hole ? but the '48 2 ton had a homemade wrecker bed and a V8 in it so I'm sure she's seen a thing or 3 over the years. I shot down there yesterday afternoon to grab them and they look to be in better shape (from the outside) than the ones I have ... gotta love the desert. Now I can take my time to get 'em cleaned up (aka wait till the wife is gone to fire up the sandblaster lol) which is super nice and I'll have a spare when I'm done. ?
 1 point
 -
Tires came yesterday and I got 'em on in less time than I spent looking for someone to do it LOL ... about 45 min. Got some talcum powder and a jug of RuGlyde from napa and had zero problems. I don't understand all the resistance I ran into and honestly, I'm kinda wishing all my wheels were like this so I could work on them myself. That being said, I didn't make it out unscathed. I scratched my thumb with another fingernail while stuffing in a tube so maybe all the warnings about the dangers were warranted LOL. Anyway, thanks for the help everyone. Time to get 'em on and get the old girl home for some electrical work.

 1 point
 -
I originally put the throttle linkage there on the bell housing thinking I'm going to put it right back after painting the head. But I didn't, and then forgot where I put it. Now I'm thinking I should keep a notebook. In the notebook, I would write down every part and every nut and bolt that I remove, and besides putting it in a marked can or bag, saying exactly where in the garage I put it. that will save a lot of time!1 point
-
here are the screenshots of oil pump conditioning chronicled by Freewheeling Tony Smith over on the facebook...lots of good information there to help keep those infamous replacement oil pumps from destroying our flatheads.1 point
-
Clay: i am so jealous of your car. I know it has taken you a long time to get it put back together but the wait has been worth the time. May be one day i will get the 39 Desoto done. Right now we will be starting a total kitchen remodel and will be gutting the entire kitchen. I got the car 35 years ago so now its time for the wife to get her dream come true. She has been patiently waiting. Still picking out some new table and lights but the really hard work was done just trying to pickout the style of cabinets. Have a Happy Turkey Day and go out a admire your car. You long time Miller Tool buddy. Rich Hartung Desoto1939@aol.com1 point
-
I am of the belief that a person with an engine hoist at home, and a load leveller, would still be better better off to remove the tranny first. Then lift the engine, clutch and FD out together. If this is video of any use to you, here is what I did. 3 speed manual though. No fluid drive. When I put my engine back in, I did remove the rad nose cone. Much easier. I realize you have a later model ‘51 year car. I just thought this might give you some perspective. Also see the tools and safery tips I recommend.1 point
-
Just be glad you can buy a water pump..............1 point
-
Here is a prime reason why everyone should have a fire extinguisher in their car, modern and or antique. The FE should always be in a spot where you can always get to it easily. Also, when you all now go out to your car you should also check the expiration date on the label or the date of manufacturer. Most FE have a lfe span of 10-11 years. The date of manufacturer might be on the label or even stamped on the bottom of the FE. This also goes for the FE's i your home. Also Check the date of manufacturer of your smoke alarms and carbon monoxide detectors. They also have a shelf life of 10 Years and Since it now winter or late fall replace all of the batteries in your Smoke detectors and CM detectors. The cost of a $2 battery just might save your life. When you put the new battery in each unit put some masking tape around it and mark the date of installation so that each year you know when a fresh battery was installed and periodically test each of these units. I do this every October which is known as Fire Prevention Month when I was in school. Rich Hartung Desoto1939@aol.com1 point
-
According to my records P15-D24.com launched 24 years ago today! Now with over 12,000 registrations thank you for making it such an ongoing success today! GT1 point
-
I got the kit from Newport Engineering. Came with new linkage arms and you can get switches as well (altho the delay won't fit in stock location as you can see). All you need from the original is the wiper pivots.1 point
-
Vaseline by the way is the only approved assembly lube for automatic transmissions that I have worked on. Anytime you have to deal with shims and thrust washers and you want them to stay put while assemble something vaseline is really useful. It doesn’t dry out like a lot of greases do. Because it is a standard petroleum product, you don’t need to use the name brand. You can use the house brand.1 point
-
Crank it without the plugs and watch your oil pressure gauge. If is shows pressure, you are good to go.1 point
-
I agree with Kencombs. Open it up, and, because it has been sitting for decades as a NOS, thoroughly clean it, and pack it with vaseline. The vaseline will dissolve in motor oil once it is primed. I was taught this trick back in the 70s and have been doing it for years with no problems.1 point
-
I think I saw a video of him doing this, and as I recall it was probably someone here that have put up the link. What ever it was, I copied the pictures and text into a document to keep in my files. (I've learned that not everything that is on the internet will be there later. Generally just the trash, and old vendor & price listings which go nowhere.) EDIT: I thought at first it was a video I had seen, but the pictures I saved are identical to these. Maybe he did a video and referenced this source?1 point
-
My standard procedure on any oil pump is to remove the cover and pack it full, gears/rotors as well as intake and outlet ports with Vaseline. Aids a lot in picking up the oil ASAP. I started doing this in the early 60s when I worked on my first Buick 215 V8. They recommended this because the oil pump on them is in the very front of the engine and the pickup in is the very back. They were very slow to prime if not prepped with a vaseline pack. Seemed like a good idea so I just adopted it for all I work on. Even lawnmower engines with oil pumps get the same treatment. I like NOS parts too. When I assembled my 230 I found a set of .040 rings, in Dodge boxes, how lucky can you get? 040 is not used a lot, and to find a set 66 years after the engine was built was amazing.1 point
-
If you have access to Facebook The Freewheeling Tony Smith goes thru an oil pump and is probably a good example of what to do. https://www.facebook.com/photo?fbid=5050826834938532&set=pcb.50510572782488211 point
-
Yes I seen that on Sniper's link. I find it kinda weird that they sell a part that needs prepping before priming and installation. But WTH the whole damn world is getting weird and moving forward like a slow motion train wreck.1 point
-
you can easily inspect the cam gear through the oil pump hole and dropping the pan could well be prudent...the likelihood of a broken tooth entering the oil pickup with the screen in place very slim. Odds are you know the tooth count missing, a magnet could likely retrieve these through the drain plug. Any broken remains of teeth compared to the portion missing from the gear on the pump. And, at having another issue spring forth (no pun) you may wish to take a minute to compose before tackling. Not suggesting alcohol mind ya, coffee works well for me, but a bit of the hair of the dog may be in order...don't consume the whole dog.1 point
-
Mine is a 201cu, 1938 version. Pics show full flow filter system as adapted and plumbed into the oil pump. You should be able to do something like this that is even tidier as mine is right hand drive version with steering box in the way somewhat.

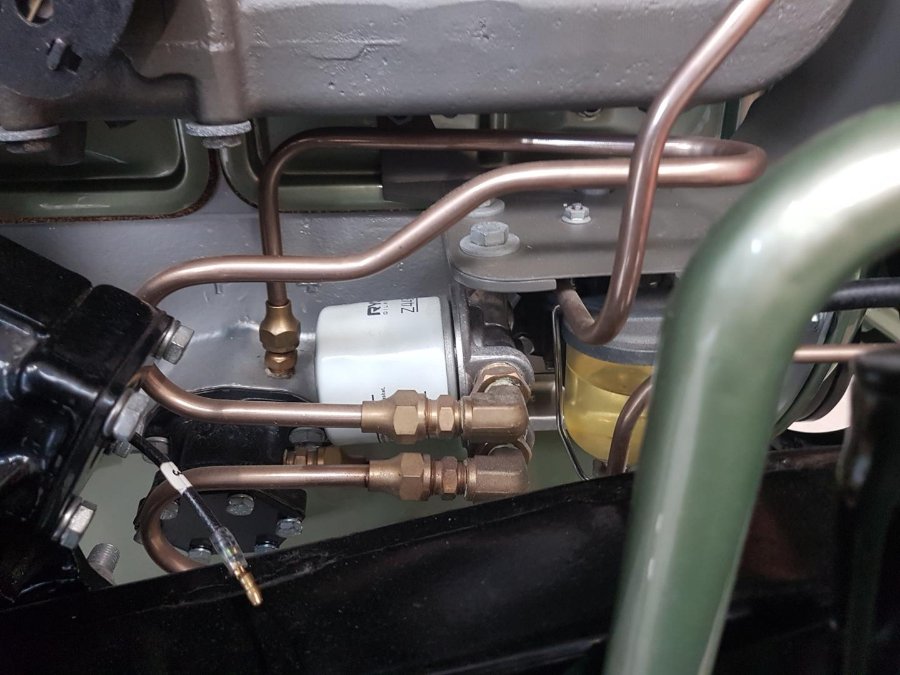 1 point
 -
Definitely if the pump cover shows signs of leaking replace the oil pump cover gasket....a square profile rubber O- ring. Don't let the outer rotor pump gear fall out. The smaller inner rotor gear cannot fall out. The outer rotor gear needs to stay assembled exactly as is...meaning you could put the rotor gear in face up two ways. Those two gears have a good wear in pattern ...you do not want to change it....otherwise possibly causing slightly lower oil pressure.1 point