Leaderboard


Popular Content
Showing content with the highest reputation on 07/09/2022 in all areas
-
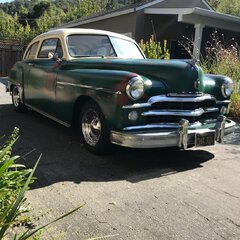
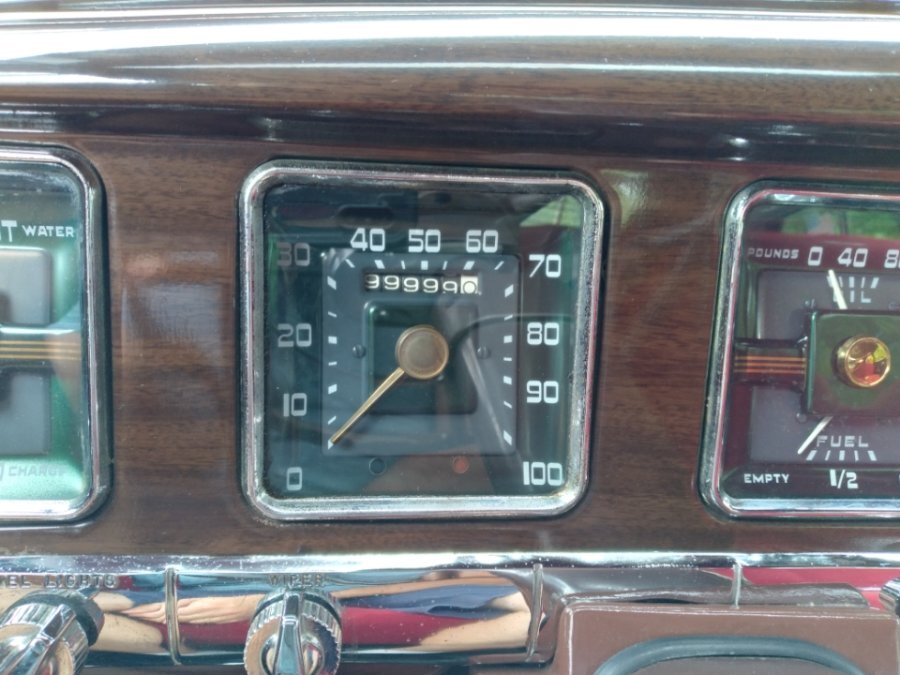
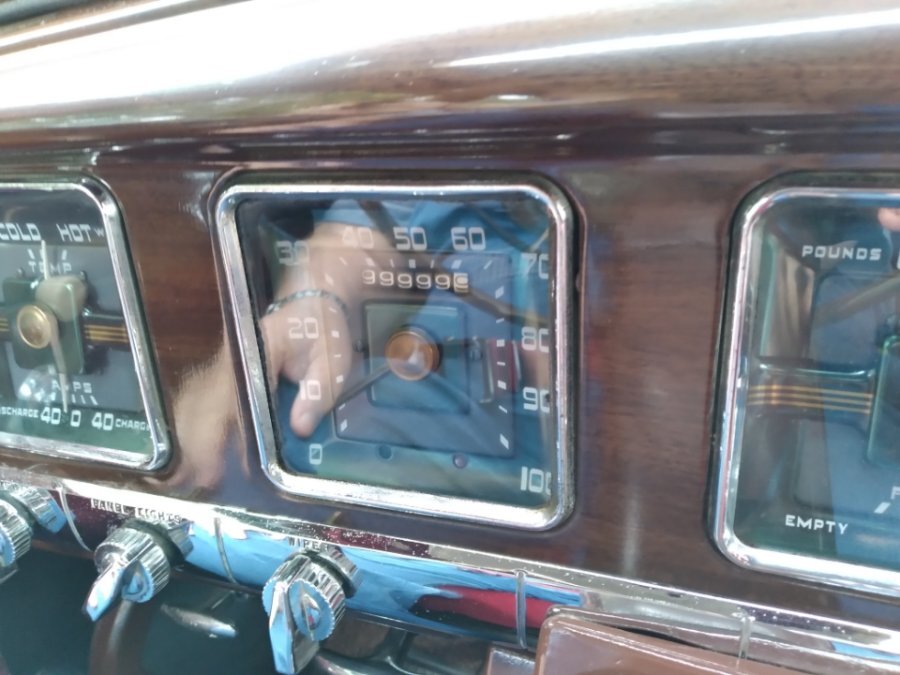
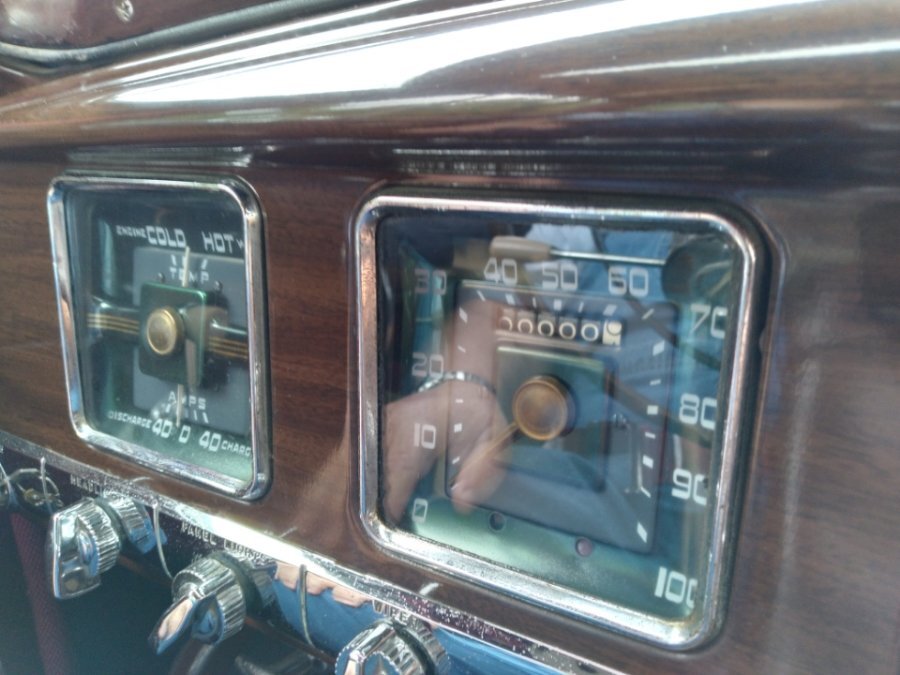
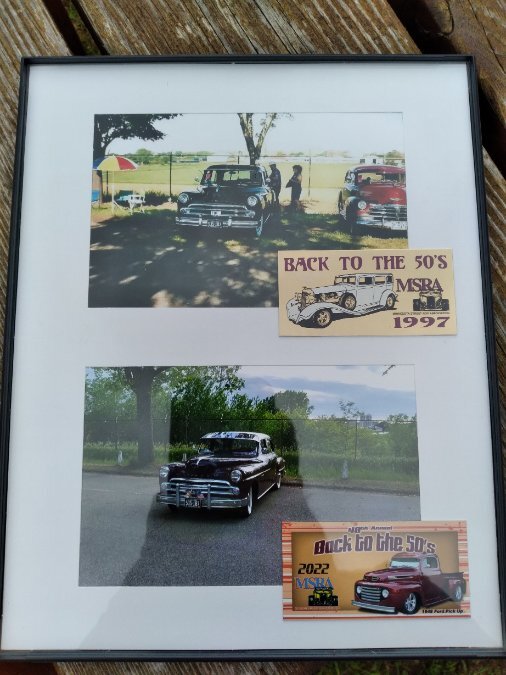
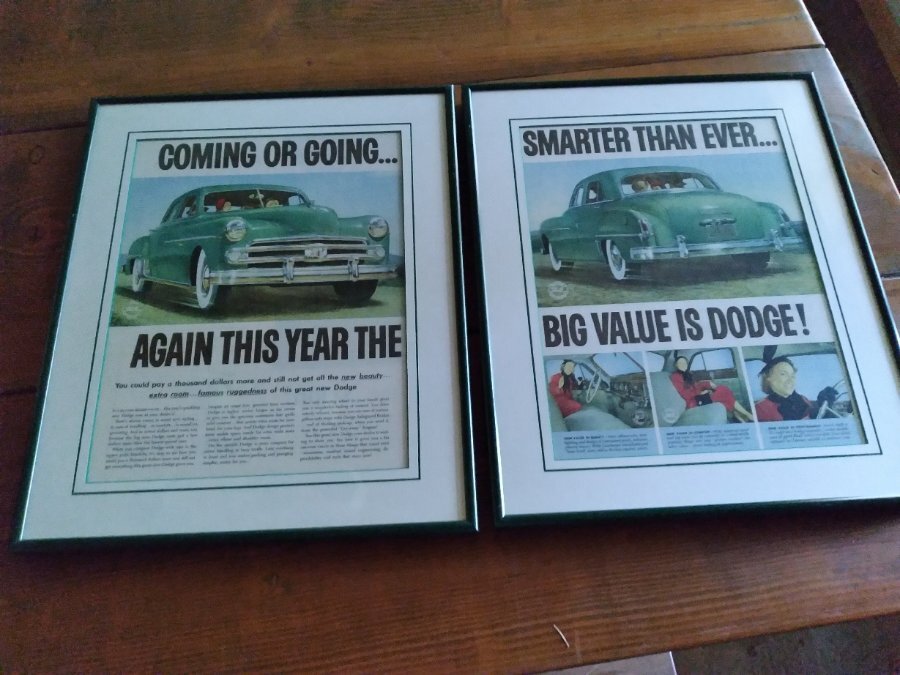
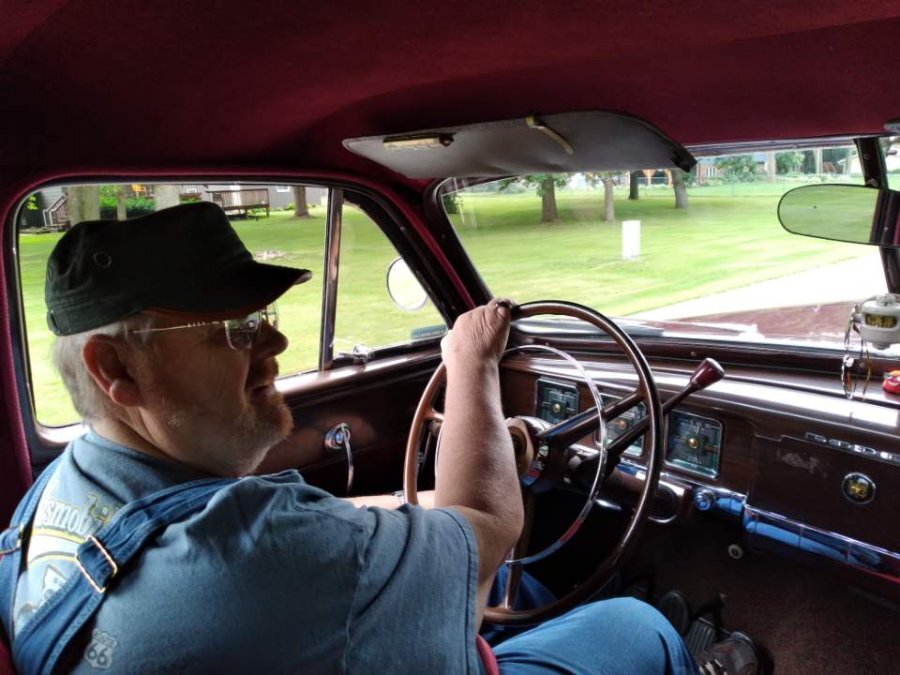
Today was a great day making memories and hitting a milestone. It's a bit of a story, so hang in there. Back in October 1996, Ed and Jane bought a 1950 Meadowbrook with around 69k miles that had spent the last 14 years in storage. It was the first classic car they owned together. Over winter and spring they put in a lot of work, bringing the car back to life. In June of 1997 the Meadowbrook attended its first Back To The 50's car show in St Paul, MN. Over the years they made a lot memories with the Meadowbrook and cataloged most of them. They took a trip to Mackinac Island that included a ride on the S.S. Badger ferry across Lake Michigan. For Ed's 50th birthday they drove it to Tulsa Oklahoma to attend the opening of the time capsule with the 57 Belvedere inside. After 22 years of ownership and declining health, it was time for them to sell. In January of 2019 my wife and I purchased the Meadowbrook with around 92k miles on it. We hit it off with Ed and Jane and formed a friendship. We've gone on a few car cruises with them and keep in touch throughout the year, sending them pictures and updates as we make family memories with the Meadowbrook. Earlier this week I realized the Meadowbrook was 68 miles from turning over 100k. Ed's house is 67 miles away, it was meant to be. I called him up and asked if he'd like to ride along for the rollover. He was in! Today was the day! With my wife and son along, we headed down to Ed and Jane's house. Busy doing math in my head, I missed a turn along the way and didn't quite make it to Ed's house before running out of odometer. So I stopped on the side of a quiet road at 99,999.0 miles and had Ed and Jane meet us. Knowing that he'd likely want to drive, I saved the last mile for him. After a few minutes waiting on the roadside they pulled up behind us. I asked Ed if he'd like to ride along or drive, of course he said "drive!". He was overflowing with excitement to have the opportunity to drive the Meadowbrook again, and for such a milestone! Ed never stopped smiling and commenting how much he's missed the Dodge and how great it drives. We stopped for a couple photo opportunities, just before and right after the rollover mark Then Ed drove back to their house. He let my son drive their Harley Davidson golf cart around their property while we hung out for a while chatting about life, cars and of course, the weather. I had also put together a small gift for Ed and Jane to mark the 25 year anniversary of the Meadowbrook attending Back To The 50's. I found the spot they parked in back in 1997 and took the same photo during this year's 50's. I framed it with the dash plaques by their respective pictures. 25 years of growth and change makes the background hardly recognizable. But I knew it was the spot because of the silos and water tower in the far distance. Out of appreciation, Ed and Jane gave me some incredible Dodge advertisements. I had secretly admired these from the first time I went to their home to look at the Meadowbrook before purchasing it. I had found similar advertisements online over the years, but none this nicely framed. Today is a day that I will always remember. I know Ed will too. I had no idea it would mean so much to Ed to be a part of hitting the 100k mile mark with the Meadowbrook. Making memories is the best part of owning a classic. Get out there and make some memories while you can!
 9 points
 -
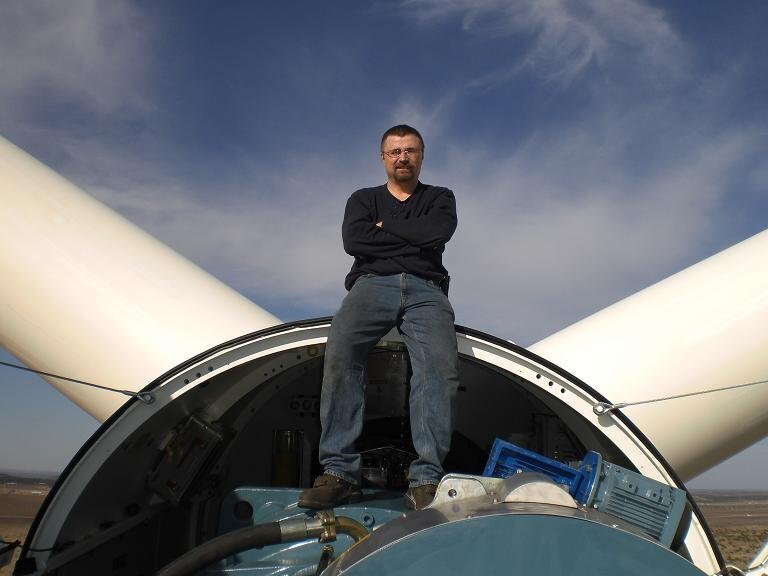
Well, I have a pic of my as a sophomore in HS in the background of my profile, my son looks almost identical to me. The pic of me in the posts, that avatar, is from my second deployment to the Persian Gulf, at sea somewhere, about 24-25 depending on exactly when that picture was taken. The one of me on the wind turbine, I was at least 42 then. I am 57 now.
 2 points
 -
Thank you Marcel, that is N399SB, my main hot rod since I finished it in 1999, have covered a good chunk of the USA in it. That was my first experience with PPG Concept, it still looks great after 23 years.
 2 points
 -
Single stage PPG Concept is a superb paint. I've painted an airplane, a truck and a VW with Concept and gotten excellent results. It cuts and buffs very nicely which is a big bonus for this amateur painter. But the price increase of all the components over the past decade or so is breathtaking..............
 2 points
 -
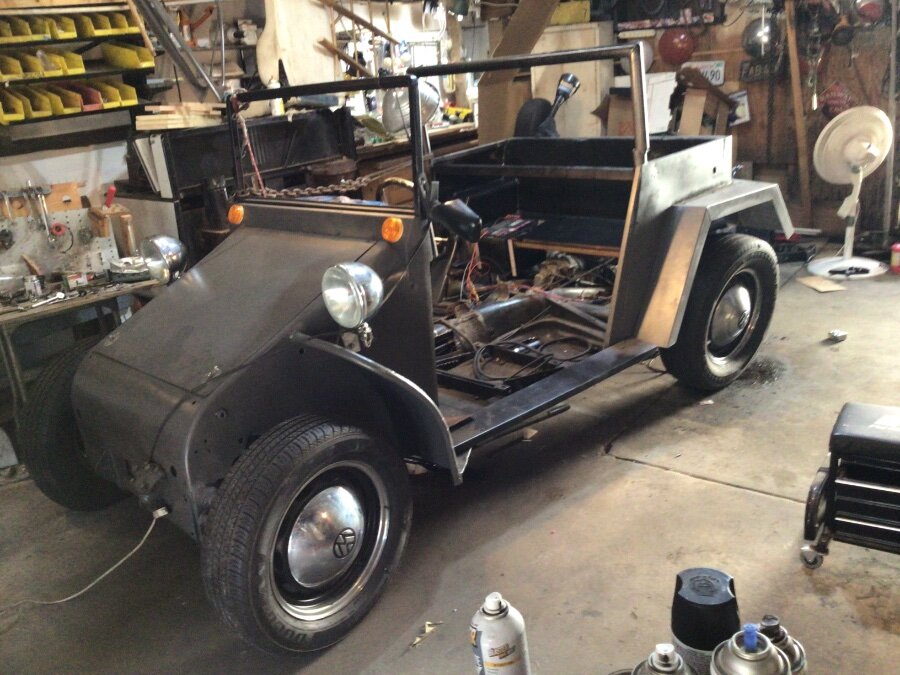
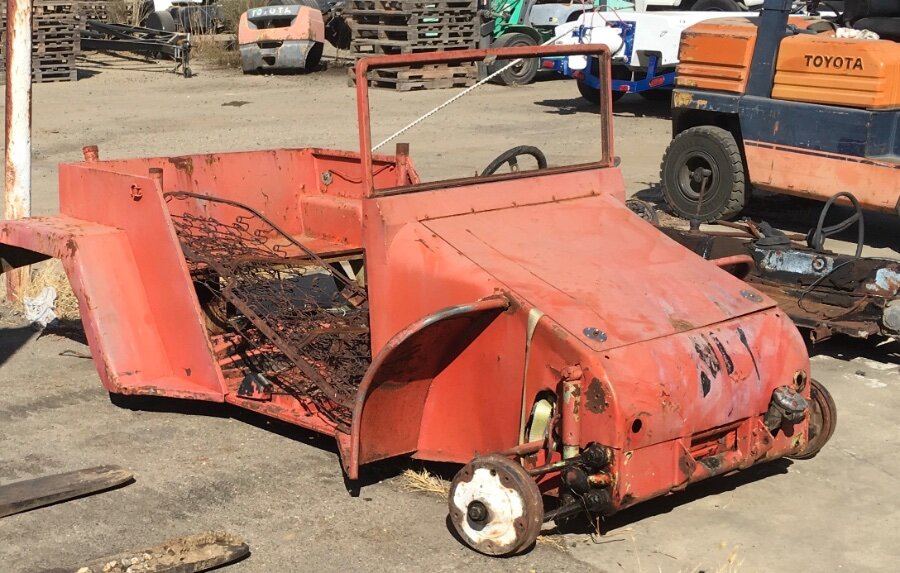
It is time to get the sportster into its own post. I bought this some years ago to be a project for my grandson and myself. I paid $10 for it and $70 fuel to haul it home. I thought it would be a quick and easy project. Sound familiar. Photo is current status.
 1 point
 -
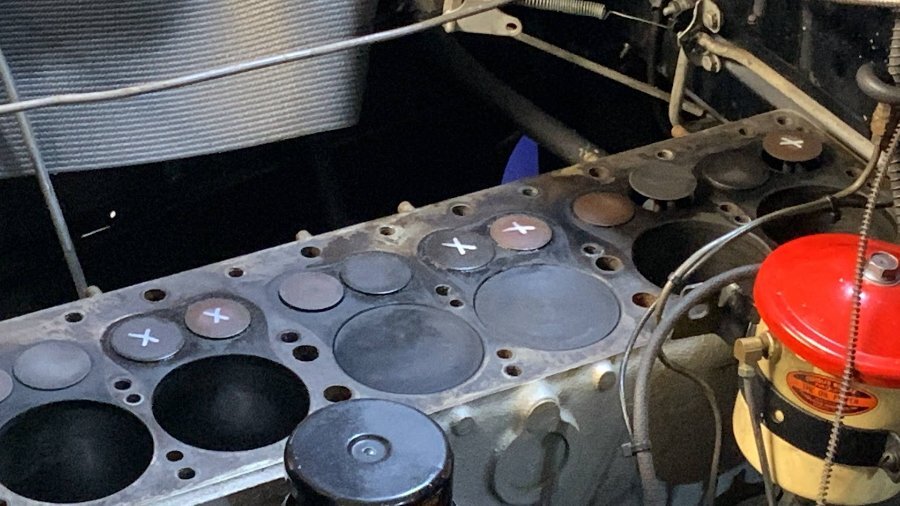
Recently I deleted a post I made in a Facebook flathead engine group. As you know, I like to share my project progress and enthusiasm for old Mopars. I believe it helps the hobby. Below here is the photo. I was about to make some unfriendly rebuttal comments but chose not to. Here's the story. I recently found a crack in the cylinder head, near the thermostat housing in my '38 Chrysler Royal. I pulled the head and I am swapping it out. My spare head is at the machine shop today getting crack tested, sandblasted and milled. While the head is off, for about 30 more mins of my time I can remove the manifolds. I'd test all valves for leakage. Indeed I found 5 leakers. The previous owner of my Royal told me the engine was rebuilt about 8000 miles ago. Not massive valve leaks, just allowing a little kerosene to pass through. A little kiss with some lapping compound was my planned job scope. A statement on FB was made: "If you are that far into the engine and only doing valves, the engine won't handle the increased compression". One guy admitted that later after a valve grind he developed a knocking rod bearing. Maybe, on a high mile engine that you are patching up. Or the engine bearing was about to fail any day and it happened to after he did a valve grind. Other comments were made about the general misunderstanding about lapping compound. A guy went into a dialogue about people should not be attempting to fix valve leaks with lapping compound. That the grains in the compound will get deep seated into the valve seats and stay there, then cause the valve to continue wearing quicker. "You should not/cannot lap hardened inserts", someone said. Further comments about the engine pushing oil past the rings after a valve seat clean up. Keeping in mind this is only FB and there are subject matter experts behind every keyboard. I do trust and have confidence in the experiences shared here. I tend to skim past FB opinions, however maybe there is a learning opportunity here. I don't want to wander the planet ignorant. Deep down I was thinking, "Dude I hope you don't waste your money on a gym membership. You get plenty of exercise quickly jumping to conclusions." Yet I kept my mouth shut. Lol. My thoughts: - My engine is not a high mile example. I'm just kissing the valve sealing surfaces to tiddle them up slightly. Removing hardened soot and or carbon build up. - Yes I agree a high mile engine is likely to burn oil after a valve lap. Consider worn rings and tapered cylinder walls. Again, my engine is not a high miler. - I do understand the use of lapping compound. To frost up the mating surfaces to closely inspect the seating area. Also A final sealing to get a nice tight seal. - Lapping grains remaining in the surfaces to cause expedited valve seat wear. Really? I am having trouble accepting this theory. - Yes indeed you can reseal hardened seats. I have done so in the past. Yes is takes a lot more effort by hand, but you can successfully hand grind and lap-in exhaust valves. A general question about machine shop valve grinding. When I recently rebuilt my 1938 Plymouth engine I had the machine shop perform a valve grind. I provided them with a full set of new, single cut 45 degree stock valves. I asked them if they hand lapped valves for final sealing I was told no. I did not inquire as to why. I just assumed I would have to do the final sealing myself, and did so later. Is it expected that when a machine shop does a proper valve grind, they achieve a 100% seal? I am doubtful. I did have to seal up my new valves in the newly machined block when I got it home. Learning as I go here.... Thanks.
 1 point
 -
The man revealed! The face says “don’t play games with me”. Ya’ll see my mug a lot, I am glad to see yours.1 point
-
I don't think that word means what you think it means.1 point
-
Sniper, you just won today's prize for the most irrelevant post.....congratulations! Sorry you missed the humor in my post.1 point
-
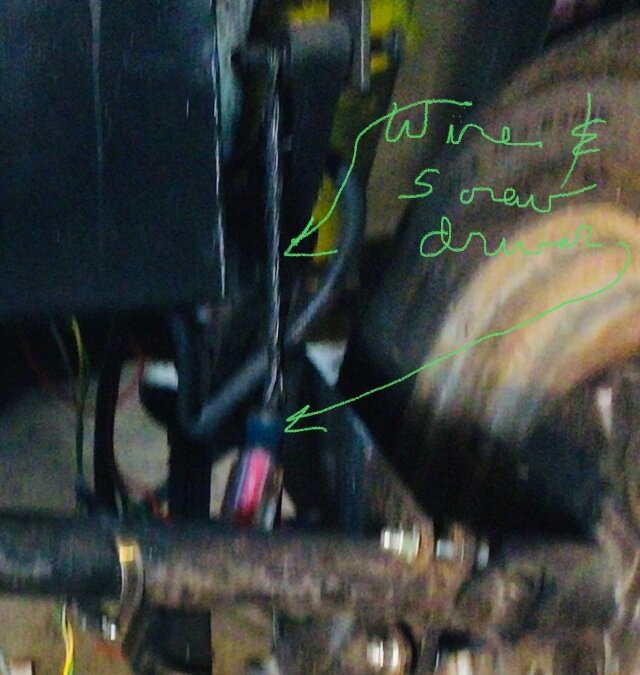
That stem sticking out the end of the caliper ruler is a depth gauge...flip the calipers over, rest the end of the ruler on the block and use the stem to take a depth measurement.1 point
-
A skill set I have yet to master. You are a better man than I. I'd be real skeptical of any valve job that didn't lap them. As for engines failing after a valve job. No kidding? An engine wore out to the point it needs a valve job is magically going to have a bottom end with no issues? SMH Loren, Goodson offers valve lapping compound in many grits, you can choose your poison. https://goodson.com/products/lapping-compound?_pos=1&_sid=fad83fde1&_ss=r1 point
-
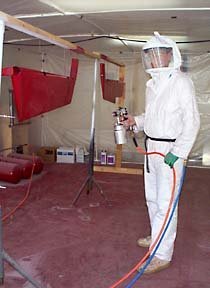
Thanks, Marc. Yes, fresh air is supplied by a small compressor (blue hose) located outside the shop to the hood. Only the hood is special, the suit is just a Tyvec coverall available in most paint and tool stores, the hood tucks into the coverall collar. You never smell the fumes. https://www.hisco.com/Product/S-657-31180?utm_term=&utm_campaign=Transactional - PLA - 3M&utm_source=adwords&utm_medium=ppc&hsa_acc=8827094775&hsa_cam=10331010423&hsa_grp=103215905952&hsa_ad=443006607011&hsa_src=u&hsa_tgt=pla-1050265673418&hsa_kw=&hsa_mt=&hsa_net=adwords&hsa_ver=3&gclid=Cj0KCQjwzqSWBhDPARIsAK38LY9p6n27G90x5zbxIThnIi84DsDSoahySyEnXDuDq6hcUX-xigCAnhEaAiIKEALw_wcB1 point
-
I'm sure the guys who were overhauling these engines in the back of gas stations back in the '40's were being this meticulous with their measurements..... ?1 point
-
My results: 251 engine #1 .022 below beck #2 .022 below #3 .023 below #4 .020 below #5 .023 below #6 .021 below Upto About .005 difference between front and rear of piston. My numbers could be more accurate likely. I did what I could with my tool. I cannot speak to any machining as the previous owner rebuilt the engine. I guess he’s not as OCD as us here. He didn’t have records how much was cut away from any areas inside the engine. I measured 040 over on the bore. I’m gonna “run what ya brung” on this engine and “just send it”.1 point
-
A tapered rod journal will not cause a piston to be cocked. There is simply too much clearance for that. If the journal were tapered it would wear a band on the bearing insert. A bent rod will. Pistons do “rock” at the top of the bore (and the bottom as well) but only in the direction of the wrist pin action. Checking the rods is a job for the machine shop as they have the equipment to do it. You may think machine shops are sloppy (they are of course) but they know what they can get away with. You have to trust them and if you don’t like their work, find another. I have my favorites and ones I don’t care for.1 point
-
I think your instincts are correct. They wouldn’t make lapping compound if it wasn’t useful. My only complaint is you only get two grades corse and fine. The fine isn’t fine enough to suit me but I use it anyway. I once worked with an Italian guy (he worked on Fiats and Lancias) when he did a valve job, he’d lap the valves and if they wouldn’t seat he sent the head out to have a new seat installed. The logic being that as the seat is ground it retracts the valve dropping the compression ratio. Okay. I can see the importance of that in diesel engines for sure. Not as bizarre as a 20 minute VW valve job through. Drop the engine, torque the heads (to check for bad threads in the case) remove the heads, put a rag on the bench under the exhaust valve, hold a deep socket over the spring retainer and smack it with a hammer releasing the keepers. Toss the exhaust valve, slip in a new valve, replace spring, keepers the tap with hammer. Re-assemble. Done. I saw it and it worked very well indeed, much to my surprise. It was my boss who did it too. He claimed he could do a valve job in half an hour...I watched and he did it in 20 minutes! Smoked two cigarettes and answered the phone once all in 20 minutes as well. What am saying is if those guys can get away with this kind of stuff, I wouldn’t worry or listen to anybody else. The valves seal with compression pressure. The valve springs only keep them in contact with the lifter. The proof I offer are the engines with desmodromic valve systems. One cam lobe opens the valve and another closes it, with no springs. The clearance is measured on both therefore compression pressure is required to fully seat the valve.1 point
-
This can't be the same Sniper in the Avatar photo..Lol. I need to reprogram who I envision in my brain when I read your posts.1 point
-
I used to climb wind turbines out here, in addition to no ac or swamp cooler there was no shade to speak of. So yeah, I learned to handle the climate and to drink ambient temperature water too. Back to the grindstone now. Had to swing by the parts store for some disc brake grease and brake spring pliers.
 1 point
 -
If you are going to some websites that list application for these older cars...odds are you are going to pay way too much as they figure they got you...but, if you buy the muffler by specs, you will get a very good muffler with excellent tone from your local big box store. As you are looking for a muffler only I take it the rest of the system is not being replaced. Mufflers are sold in inlet and outlet pipe size and body location of these pipes (straight, offset or combo) they are sold in length of body and length overall including the inlet/outlet pipe and the style, pancakes or round, are sold by body size......armed with this you should be able to get a muffler in the 30-45 dollar range...for me, I find Walker is a very good muffler for the money. Go to Summit racing and plug in your dimensions1 point
-
This is what Greg (ulu) did. Works perfectly.
 1 point
 -
That's my Cub Cadet zero turn mower. A time saver when you have an acre to mow.1 point
-
This is my Phat Cycles beach cruiser. I have had it for many years but felt it needed some gears. Today I swapped out the rear hub for a Shimano Nexus 3. It's now a 3 speed and I just need to tinker with the sprocket sizes a bit more to get her perfect for the hills around here.
 1 point
 -
I can quit anytime. And this isn't showing what's in the attic.1 point
-
Got on the Plymouth again. It's my weight loss program, lol. Down 5 pounds since yesterday. I ran by Harbor Freight yesterday and picked up one of their Icon split beam torque wrench. I prefer a clicker over a digital wrench. Anyway, I also picked up a few other odds and ends needed a 3/8" hex bit to torque the caliper mounting bolts, so I bought a set. Probably find my old Craftsman ones now. Tossed my old torque wrenches, one of which was just a breaker bar anymore and the other two were deflecting beam ones, which I dislike even more than the digital. This morning I got on the Plymouth early, it was only 95 when I started. Finished up torquing all the front suspension and steering stuff, even ran the wrench on the steering gearbox bolts, two were mildly loose. Found out during the process I need another torque wrench, on that goes from 20ft/lbs and up. Had to bust out my work torque wrench to cover the gap. Then I greased up all the grease fittings, I swear every time I do that I find more. The latest find was a fitting on the outside of the frame rail for the clutch pedal pivot, right by the over center spring. It was so covered in goo and who knows what that I never noticed it before. It's clean now and greased. I was happy to finally be done with the front end stuff, other than an alignment. So I moved on. Once I finished the disc brake swap and bled the brakes I noticed that the front tires do not spin easily. I cracked open the bleeder on one of the calipers and released the pressure. It spun freely now. Time to get around to putting in an external residual pressure valve for the rears and pull the one out of the master cylinder. Being that this car is 70+ years old and is probably still running all the original brake stuff, except the line from the splitter in the front to the driver's side wheel and maybe the master cylinder, I was nervous about taking it apart without any issues. My rear brake line goes from the backside of the master to a T fitting right about where the driver's side front leaf spring mount is. I got the connection at the T fitting loose easily enough. The master cylinder connection was a bit tougher because the line to the front brakes is right there, in the way. I did the tighten then try to loosen trick, it worked. So I tried to loosen the front brake line as it needs to come off to pull the cap off the master cylinder and pull the internal rpv. Tried to tighten, no dice, tried to loosen, no dice. My flare nut wrench was spreading and threatening to round off the fitting. So I stepped back and punted. Actually, I was remembering past attempts on other vehicles and what a PITA those ended up being. Now I have a nice set of genuine, made in USA, Craftsman flare nut wrenches so I was not happy. I recalled in the past having to just clamp on the fitting with vice grips and getting the fitting loose. I really didn't want to do that because i really didn't want to have to deal with replacing the fitting or line. Then it was like a stroke of genius hit. If I clamped down on the flare nut wrench with the vice grips that should keep things from going sideways and messing up the fitting. It worked, lol. I ended up not having the right sized wrench or socket to pull the cap of the end of the master, so the universal hammer was used, aka adjustable wrench. Then it came time to make up a new line from the master to the rear T fitting. I have a spool of copper nickle 3/16" brake line and new tube nut fittings. So using the original brake line as a guide I made up a new line with the remote residual pressure valve in it between where the ling would snap into the factory mounts on the inside frame rail. Which meant I had 4 double flares to make. To be honest here, my ability to make good double flares on steel line is, mmm, hit or miss. Of course if I had a fancy expensive pro type flaring kit it might work better than the low buck kit I used. But with the CuNi line it works much better. 4 flares later, and I did remember to slide the fittings on first, lol, I was done. One trick I learned from a pro I know is to seat the new flare a couple of times and inspect for a nice circular witness mark on the flare. Otherwise you'll leak. Installed the line and did a bit of hand fitting. Everything looked good. Decided I was to slobbered up to mess with bleeding the brakes, didn't want to fool with the carpet. Decided to pull the rear tires in prep for the brake bleed tomorrow. While I am there let's do a minor brake adjustment. That went ok, then I was remembering when I first bought the car and the nuts on the lower brake pivot bolts were so loose you could see a gap. So I looked up the torque spec and busted out my new fancy dancy torque wrench. Well, now I get to do a major brake adjustment now, the nuts would not tighten up, just spun the bolts. So I pulled the drum off the driver side and got to thinking about what a PITA the factory method is. Then I recalled someone, can't remember who, just cut a slot in the end of the bolt so he could use a screwdriver to set the adjustment. Too bad those factory engineers didn't think of that. At this point I called it a day, my voice goes away when I get wore out, followed closely by my left leg and I was sounding like James Gammon. Probably didn't help that it was 105 when I buttoned up, i did get an extra hour in today compared to yesterday. I do have a nice Hessaire swamp cooler that helps. Might help more if it was a garage and not a car port. Cleaned up the shop and left the Plymouth in a good place to carry on tomorrow with the brake bleeding, brake adjustment and I need to fix a coolant leak. If I get those things done all I have left is an alignment. Wish me luck.1 point
-
I also agree about Chrysler at Carlise, a hit or miss on the older MoPar parts. The real next big event is Fall Carlis and then following week in October is Hershey the biggest Northeast event. But even at Hershey the early MoPar stuff is getting harder to find. If you plan on attending I have two sites inthe Orange field row OAD7&8 feel free to stop by and chat. Rich Hartung desoto1939@aol.com1 point
-
i went to moultrie, GA earlier this year.they had some older stuff. i got new wiper arms with the blades. a great brake drum puller. you just had to look around alot and there was some old car stuff. found a guy parting out a 53 chrysler. never been to carlisle. i cannot walk these huge shows. at moultrie i rented a scooter, but book one early if you go to any show that has them. only thing is the scooter has very little carrying space, so bring a wagon you can tie to the back for any bigger items. capt den1 point
-
my neighbors new (chebby) truck is at 4:21 other car club members are the chebby truck behind him and the Dodge 4 door sedan behind him Video taken on the Saturday of the show, by the time he got to FEF it looks to be around 6PM or so and people had started to leave. Attendance was down this year it seems to just under 10k vehicles.1 point
-
Marc - If you're willing to experiment a little on a test panel, you could try a product called "Japan Dryer" with acrylic enamel. I use Valspar hardener with the acrylic enamel I shoot, also thinned with acetone. The Japan Dryer should reduce the gloss a little1 point
-
No shroud. Clean block. Six blade (Dodge Truck) fan. Water wetter. Soluble oil. No antifreeze. Non-pressurized. Car has a 251. Car is about 5000 pounds. 180F Thermostat. 95F-100F day climbing out of Yosemite Valley to the north on two lane no shoulder highway. Several thousand feet. No boil over. Car ran to about 210F. Should have boiled by the math on altitude. The only time the temps climb and I cannot stop them is dead still with the fluid coupling engaged for more than 5 to 10 minutes. Then if I clutch it and kick on a 6 volt aux pusher fan I can keep it at 190-200 range on a 100F day which at a dead stop or stop and go. James1 point
-
This evening I made the last tool to compliment my Bend Pak alignment lift and round out what I need to do alignments. These can be anywhere from 35-65 bucks on e-bays. This I made from a caulk gun I bought new at the swap meet for 1.00 and the metal rod with nuts....free as they were discarded items I had picked up. The rubber foot, not sure where I snagged this in the past, was in my box of do-dads for when I project a bit on small stuff. Turned a collar, cut a piece of flat steel, drilled and threaded 4 bolt holes, painted the parts red and let the big dog eat.1 point
-
Caliper fitted up. You can see clearly how that 90 zerk is a good idea here as well.
 1 point