Leaderboard


Popular Content
Showing content with the highest reputation on 07/05/2022 in all areas
-
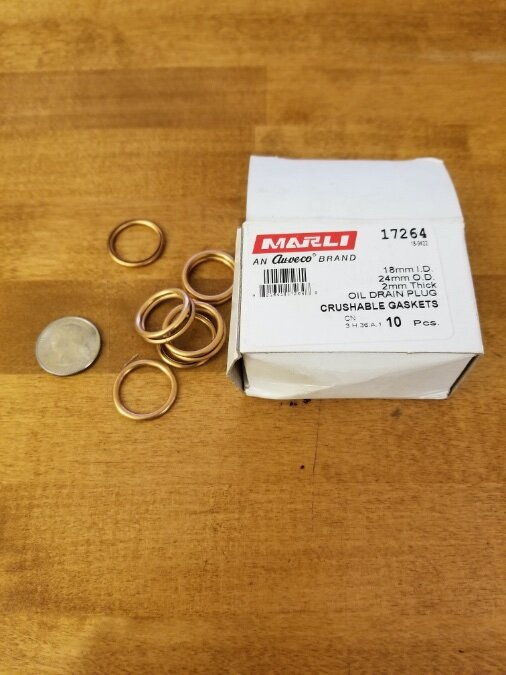
JB, I ordered the Auveco 17264 copper gasket you recommended, the one that seals the T-handle at the top cover of the oil canister. It worked great and fits perfectly. No more leak and I still have nine left! Here's where I found them: https://autobodyclips.com/product/17264/ Jocko
 3 points
 -
New to me 1952 B3B restomod. Has a modified MOPAR 360 ci motor from a 1986 vehicle couple with a 737 transmission. Older restoration, but still pretty nice.


 3 points
 -
DELUXE PRODUCTS CORPORATION can be seen stamped into the lids of oil filter canisters that originated from a long-gone parts supplier whose origins and demise are not readily verified. But DeLuxe had the forethought to also stamp the filter element required into the canister lid for service needs, so that information endures. Questions about these filter canisters and elements in 2009, 2015, and 2020 got me motivated to do some research to see if I could find anything dispersed across the internets and in my travels about this orphan company and, more specifically, how that affects Dodge Trucks. What I was able to find has clarified my knowledge of these oil filters but I cannot say for certain if these findings are definitive as the source material for these things may be buried in boxes in a warehouse somewhere in Indiana for all I know. But to summarize, the DeLuxe JC filter elements used on Dodge Trucks were available in basically four different filter canisters that were adorned with five decals depending on the year and engine configuration. Early Chrysler flatheads had pressurized crankcase oil lubrication, but apparently no filtration, so companies like Purolator, Fram, and DeLuxe made aftermarket kits that relied on colorful product finishes and informative advertising to sell their products as a cost effective solution to extending engine life. I reckon DeLuxe first sold the CU series around 1937, before developing the JC series around 1939. This 39JC canister is notable in that it has an offset hemispherical sump to accommodate the drain port that is adjacent to the inlet port. These 39JC canisters appeared to have been painted red with two mounting clamps, and have the DeLuxe Clear Oil decal, available from Jim Osborn Reproductions [DZ0054]. A very rare service poster from 1945 changed hands to a private collector around 2010, and this was shared online, showing the evolution of the JC series from the bottom drain port on an offset hemispherical sump to an angled drain port on a hemispherical sump. This 45JC canister appears to have the outlet and drain ports in the same vertical plane. Pressurized oil filtration was an option on Chrysler flatheads, as seen in these two screen captures from the 1951 Dodge Truck Sales Training Film: Early B-series build cards may have listed this filter option, as seen in this ’48 1-ton build card: The B-series factory parts manual lists two part numbers for the oil filter canisters (1265706, 1503494) using the same replaceable oil filter element (676575), with the second canister p/n applicable to the B-4s. There is no diagram for this shown, but looking at the Power Wagon and Route Van parts listings, they use the same p/ns and show a diagram for each. The Route Van differs from the Power Wagon in that it has that bracket that mounts the filter canister to the rear of the flathead engine. The 1265706 canister shown appears similar to the 45JC canister, with the outlet and drain ports in the same vertical plane. These two screen captures from the Route Van Servicing Master Tech video show the installed RTVan DeLuxe filter. These also appear to have the 45JC canister. A September 1948 magazine advertisement found online describes the new DeLuxe-Baldwin cartridge, apparently showing the JC405 sock filter element, as well as a perforated metal cased element, but no part numbers are listed. The 45JC canister shown has a new decal on it that predominantly displays DELUXE, possibly a new branding of this filter product. Could a Baldwin buyout have been the demise of the DeLuxe Products Corporation? The best factory picture of an installed DeLuxe JC series filter that I could find was in several of Bunn’s books for a ’51 with a column-shift. Notice that it uses the old DeLuxe decal, and that the outlet and drain ports could possibly be in perpendicular planes. This appears similar to what I have seen in a ’50 Spring Special and my ’51 flatbed. I could not find any pictures of the B-4 1503494 canister, so for years, I assumed that it was some minor difference in the canisters done as a cost savings. Then I spied a ’54 stripped of its powertrain at auction, and discovered a barely legible part number: 1504092 [image pending] Looking at the C-series factory parts manual, 1504092 is not listed, just 1503494, same as the B-4. Looking up oil filter interchange numbers, and 676575, 1265706, 1503494, and 1504092 all refer to the Baldwin JC405, which I thought was odd since 3 of those 4 numbers are for the filter canister, not the filter element. Since the 1503494 was used on the B-4 and C-series, it dawned on me that the C-series parts manual might be incomplete, lacking the listing for the 1504092. Then I found a C-1 with a very similar looking filter canister as the one on my B-4 and it finally hit me: 1503494 was used on the flathead 6, while 1504092 was used on the V8…the differences appears to be the port fittings, lid and the use of a bolt or a T-handle. I found two factory pictures of V8 engine compartments in Bunn’s books, but the filter canisters were mostly obscured by the engines, though looked similar to what I found at that auction. Canister 1265706 appears to have two configurations of the same 5 parts. Both configurations use a smooth hemispherical sump that has a continuous resistance weld joint (similar to what is used on B-series fuel tank perimeter welds) with the housing. Inlet, outlet, and drain ports are brazed couplings. The 45JC configuration has the outlet and drain ports in the same plane, similar to what I removed from my ’48 B-1-B-108. The 49JC configuration has the outlet and drain ports perpendicular, similar to what I removed from my ’49 B-1-D-126. Canisters 1503494 and 1504092 use a 4-piece assembly (53JC) with a ribbed hemispherical sump that has an almost seamless joint with the housing. Inlet and outlet ports are brazed couplings, and there is no drain port. Decals differ by part number and location as engine mounting and firewall mounting differ. On the 1503494 canister, the T-handle appears to have been replaced with a simple hex head bolt that has a machined shoulder to seat in the recessed area on the lid. The perforated dome is spot-welded to the lid, with a lower profile than previous domes. I was not able to remove the T-handle on the 1504092 that I found at that auction, so could not confirm if that had a similar lid construction. The lack of a check valve as with the T-handle made me take a second look at the spot-welded dome, and sure enough there are perforations located closer to the lid than on the previous version. My guess is that if the sock filter element becomes clogged, the oil pressure is great enough that it breaks the upper element seal to the center flow tube and allows fluid to bypass the element and escape through those upper perforations to the outlet. And that is a guess that I am unwilling to verify (continued for restoration tips...)1 point
-
They sell a gloss hardener & a semi gloss hardener. As others say talk to the supplier.1 point
-
The first thing you need to determine if you are going to paint the car yourself is how you are going to assure your personal safety and the safety of any who will be exposed to overspray. Urethane paints have really nasty components that can cause long-term health problems. Spend some time reading the data sheets for any finish you are considering. A source of fresh air for your mask is the preferred way to avoid breathing isocyanates.1 point
-
I used auto color library for my 51 plymouth. I used their urethane enamel, and have no complaints with the product. I would caution to purchase all your product at the same time. I started by purchasing a quart to see if I liked it. When it performed to my satisfaction I ordered a gallon and there was a slight color difference. I ended up using the quart for the back side of the fenders.1 point
-
a bungee cord or ratchet strap would go a long way towards securing that bottle1 point
-
Had a great day yesterday. Put up my flag in the morning. Went and saw Top Gun Maverick in the theater, then had a great BBQ with friends and ate too much.1 point
-
Ed, the last of the original community bad boys! We had a few fireworks set off last night....tonight before dark and in a manner still ongoing is a storm with lots of rain earlier....no big bang booms tonight. Will be a rain delay....for sure if folks bought these they will eventually be set off.1 point
-
Yesterday we lit off fireworks with the neighbors until the cops showed up.... We did some more tonight but apparently we used up all the big stuff last night.1 point
-
We already covered this hack's work. https://p15-d24.com/topic/54610-great-engine-rebuild-video-restoration-of-a-classic-reviving-the-chrysler-218-straight-6-flathead-engine-asmr/1 point
-
I have a Langdon's 32/36 Weber on a rebuilt 230 1947 Dodge. Original fluid drive trans. Original rear end. Electric fuel pump. I'm very happy with it. I can cruise comfortably at 65, but rarely need to. Is it necessary for better performance?..not really Do you get better gas mileage?.. probably. For the price of finding a single barrel Carter BB that's not worn out might be comparable to the price of a new Weber. I'm not knowledgeable to argue the merits of double vs single. My car starts reliably. It idles smoothly. I don't need it warm up to drive. My 2 cents This may or may not help1 point
-
Another item off the list and I believe the second to last expensive item with the last one being the full brake system. Also got my /6 modified distributor installed. The junkyard wiring harness from the donor turned out to have a bad ballast resistor. Luckily I had a random 78 Mopar shop manual so we were able to go through all the trouble shooting steps. Beyond that the gasket I had for the dist was too thick so it didn't seat enough to actually spin the dist! Spent a couple hours on it sat night with a fellow car addict neighbor and we got it running before we quit for the evening! Driveshaft was made up by a local shop. I went there Thurs and told them I had the T5 along with a jeep rear end. They happened to have leaning behind the register a driveshaft that was a little short for another customer that was long enough for them to cut down for me. Cutting balancing installing u joints and my yoke and I was out the door the next day for just under $250. Not cheap but in my head I was fearing worse.1 point
-
I am not knowledgeable on the long term effects of 200F+ temps on these flathead engines. Although I have never experienced it, I have heard talk of warped cylinder heads or damaged head gaskets. I have not researched to learn at what temps this might become a concern. My stock gauge was pinned to the top under certain hard driving conditions. My Old gauge read to 212, my needle was above that on a steady long slow hill. My new gauge shows I am maxing out at 200F under the same conditions. General around town driving 170-180 . Based on comments here, this seems pretty normal for these era cars. I am not boiling the coolant. I am likely fine to leave well enough alone. Smaller projects like moving the fan blade ahead with a spacer is easy. Some rubber trim around the outer edges of the rad won't hurt either. I will do these. A shroud, maybe if I lived further south. I don't think I need one for the brief 100F ambient temps that we generally see around here each summer. It's pretty easy to just enjoy the car in the morning and later evening on those days. I run a thicker viscosity detergent oil. 20W40 or so is my preference in the summer. I've enjoyed the conversation here. It's great to hear other owners experiences.1 point
-
Pretty sure the force exerted by the ignition of the fuel air charge would have far exceeded anything you could have put on it hanging from a cheater bar trying to loosen the bolt. Which is, sort of, my way of saying you shouldn't worry about it.1 point
-
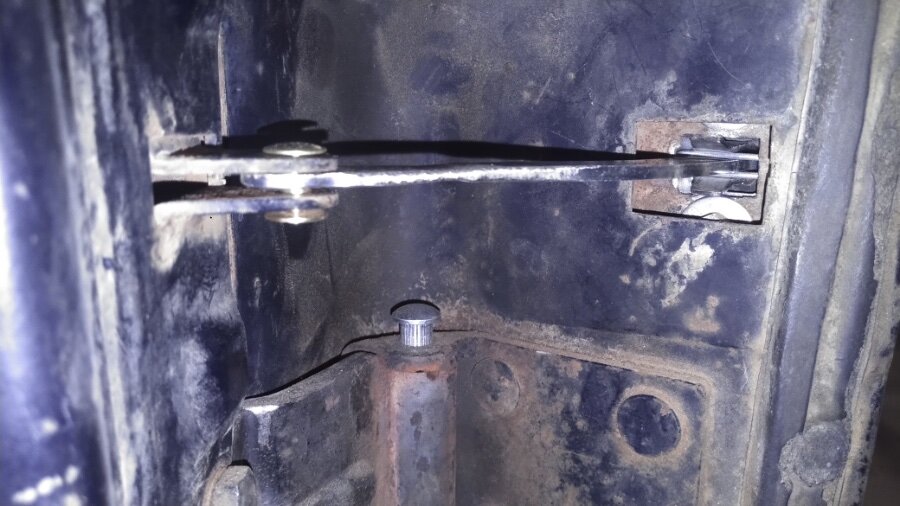
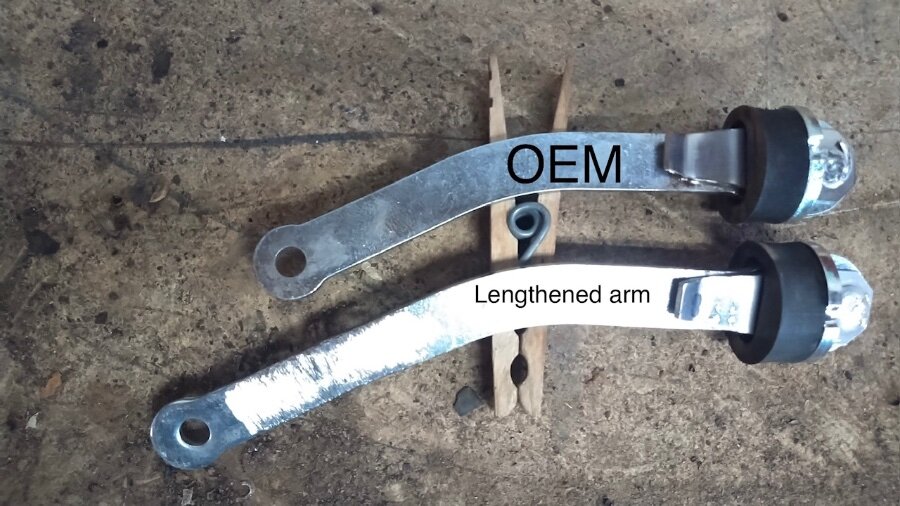
Working off of JBNeal’s fix and door check source, I thought I would add my adaptation. Thanks for sharing the information and inspiration. Fortunately, I had the door off of the cab and stripped of pretty much everything allowing access and mobility. I was able to leave the exterior of the door intact by working through the access panel to place clip portion of the check internally. After drilling holes on the inside door panel, I threaded 1/4” x 3/4” bolts through the clip plate. Fishing a lock washer and nut onto the bolts between the exterior and interior door panels took some patience, but it wasn’t too bad. Tightening the nuts as much as possible, I then moved to the inside of the door and backed up the bolts (threaded into clip mount) to tighten the nuts against the interior door panel. With the OEM replacement check bar, I too noticed the door didn’t open as much as much as originally intended. Since I had the limiter arm from the Chevy replacement, after measuring how much longer the check needed to be, I cut the hinge end off and added just under an inch to the arm. It now opens to the original angle and doesn’t seem to interfere with anything internally on closure. I am very happy with the outcome and again thankful for the previous information in the post.
 1 point
 -
Another possibility is , If the truck had the optional stainless grill bars , they could have been removed to be sold for big bucks .1 point
-
I suspect the "112" should be "T12" if the "T" stamp wasn't held straight and the top didn't stamp correctly.1 point
-
Well call me shocked. About a week after being asked for a photo of the VIN and only 3.5 weeks after the initial application I now have a title to the truck! Quite surprised since they said 2 months at least and possibly longer since I was doing a non title application.1 point
-
Spiffing up these canisters is fairly straightforward, but it’s important to be patient, clean thoroughly, and pay attention to the details. The cosmetic restoration would be meaningless if the filtering functionality is lacking. The T-handle for the lids houses the bypass check valve, and I have found that a #1 Phillips-head screwdriver can be used to clean out the passage and move the check valve for cleaning. This handle also holds the perforated dome in place with either a hex nut or a speed nut. This perforated dome has two sizes, depending upon whether the lid has a raised handle opening or a recessed handle opening. Both require an appropriately sized soft copper gasket. Note the original orientation of the brass fittings before removing. Removing the brass fittings can be done carefully by using a spare flare nut to keep the brass from deforming. Hold onto that canister like an uppity teenager in a headlock, and the fittings should unthread. With that bottom fitting removed, the inlet flow restrictor can be seen. On two of my canisters, I could see a glob of goo in the flow tube, so I used my long shaft #2 Phillips-head screwdriver and rotated while working it back and forth, scraping the tube walls of crud, and was able to dislodge and remove that goo and rinse it thoroughly with aerosol brake cleaner. I wiped down the canisters with parts cleaner, and sure enough, on the 45JC and a 49JC canister, I found specks of yellow flakes in the area where I expected the DELUXE decal to be. But the paint was in such bad shape, I was not able to save any sizable remnants. I removed the tool rest from the bench wire wheel buffer and was able to clean up the surfaces well. After cleaning with Dawn like them parts were a slicked up duck, I could see OUTLET stamped in the 49JC canisters but not the 53JC canister; the 45JC canister, not so much. That’s when I started to notice some differences in the lids. Apparently, my 45JC lid did not get the corporate info stamped into it that day. And the lid that came off of the ’49 was unlike any of the others I have as it calls out a different gasket. Lids either have a raised center hole, or a recessed center hole. I painted with Rustoleum rusty metal primer and gloss black, as I have had good results over the years with these coatings being durable and not fading too badly from heat. Original decals for the 48JC and 53JC cansiters line up relative to the center of the outlet port and the center of where the clamp bolts in place. On canister 1504092, the clamp and decal switch places. On the 45JC canisters, the faint stamping of OUTLET appears to be so that the decal will place closer to the port so as not to be blocked by the clamp.1 point


Rescaled.thumb.jpg.72b30067313ca448ec104f87d35a8215.jpg)