Leaderboard


Popular Content
Showing content with the highest reputation on 06/24/2022 in all areas
-
Hey all, I have meadowbrook with fluid drive in front of the 3 speed transmission. My tranny was so bad it wasn't even worth rebuilding. I found another tranny in great shape but it was set up for a conventional clutch, not fluid drive. I searched this forum and others for answers to if and how to adapt my new transmission to accept a fluid drive. There were lots of opinions but not definite answers. So, now that I have accomplished this task, I thought I'd mention it here on the forum for others in the future who might be trying to figure this out The input shaft on for the fd set up is quite a bit longer than for a regular clutch, this is due to the thickness of the fd torque converter. As is the front bearing retainer. That's the bad news. The good news is that everything else in the transmissions are the same. So, All you need to do is obtain the right input shaft and snout for your desired application. So in my situation all I had to do was take off the input shaft and bearing retainer from the old bad fluid drive tranny and put it on the new transmission.2 points
-
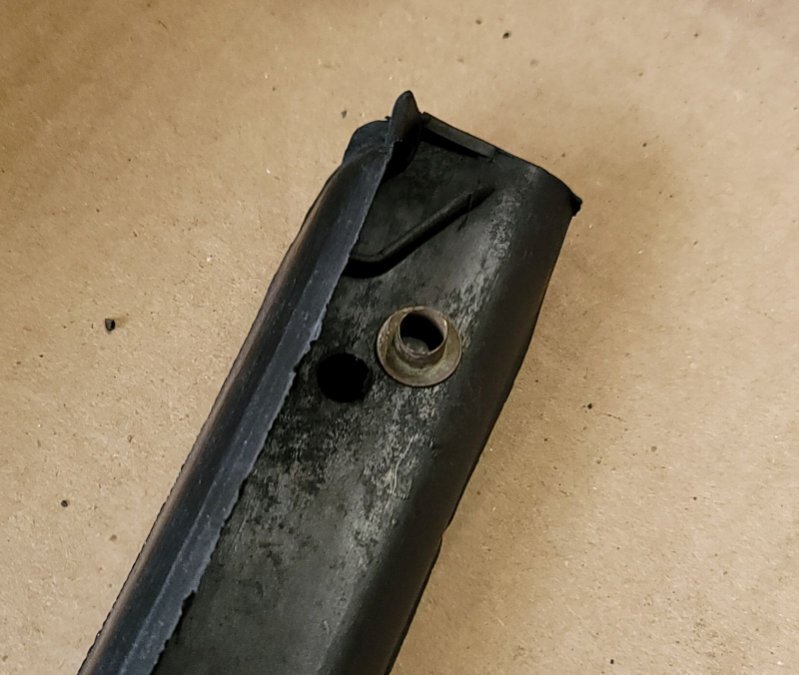
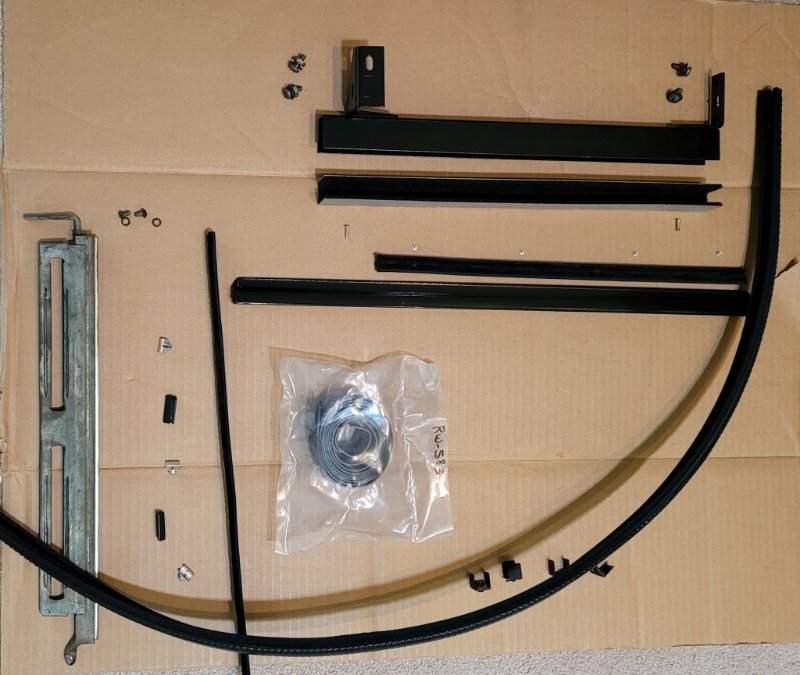
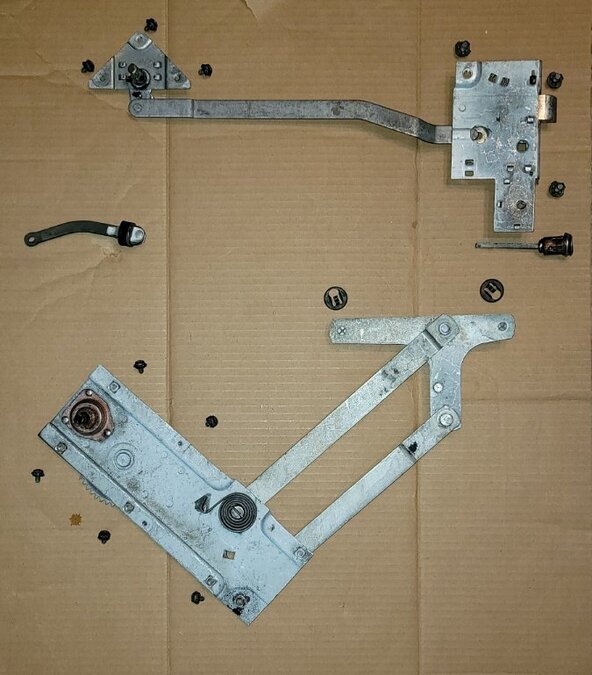
In this thread I'm going to document the assembly of my B3 doors and hopefully get some answers to a few questions that I have. I plan to build the two wing windows first, next assemble the two roll up windows and then install everything into the two doors. This first picture shows all of the components for one wing window. I meant to take this picture before I installed the rubber gaskets but forgot to The next picture shows all of the components for one roll up window assembly. In a follow on post I'll list where I got each of the pieces along with part numbers. I do have a question on the four screws holding a wing window to the door frame. While removing the rotten hard brittle rubber from the frame I found four top had style brass sleeves. They were imbedded about half way into the rubber. The rubber gaskets I bought from Roberts years ago does not have any sort of sleeves installed. My guess is when new the sleeves were on the top and when the screws were drawn into the door frame the sleeve would slowly over time sink into the rubber. Am I right or if not how the heck do you use these sleeves? More to come.....
 1 point
 -
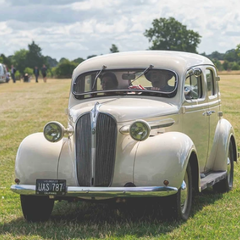
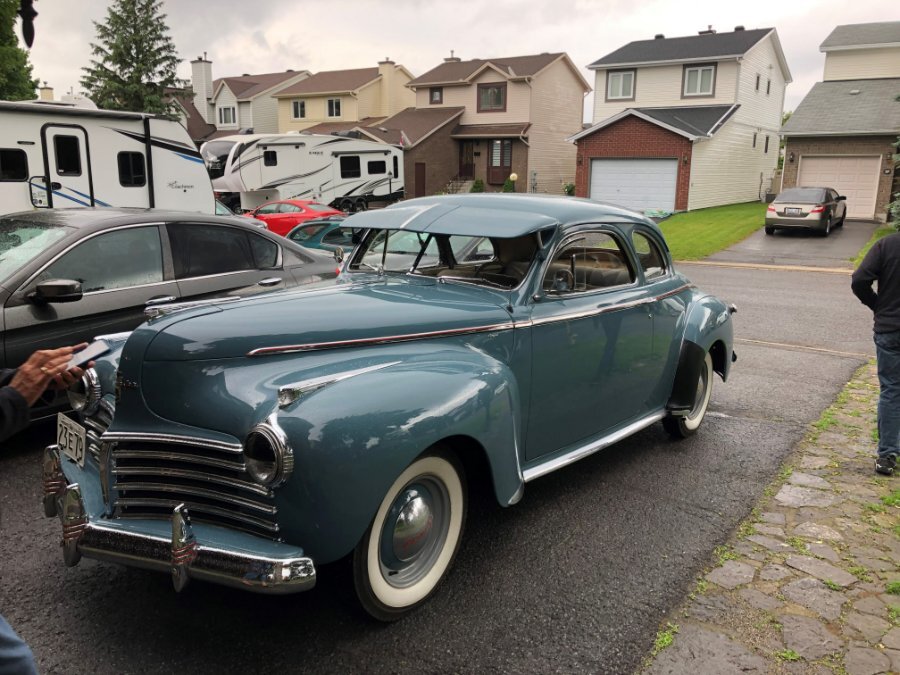
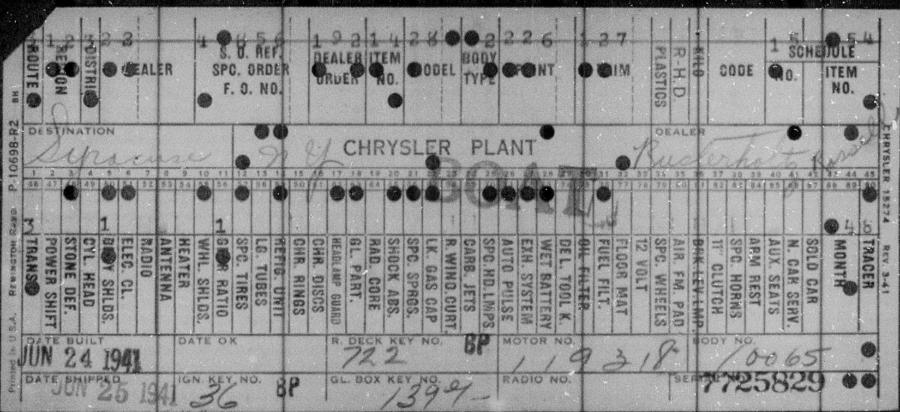
My car finally made it onto the road yesterday. Due to its long layup and the need to get a new windshield made to get an Ontario safety inspection (required when a car is registered to a new owner), it took a few weeks. The car is in its new home just in time for its 81st birthday on Friday (how do I know that? Read on!). My first outing in it after buying it over the winter was 15 km of city traffic through a downpour to get home from the shop (on the plus side, I know I can count on the wipers). Driving it, though, was an experience that did not disappoint. It felt like piloting something substantial, and the car goes down the road very nicely. From my limited experience driving older cars my expectation of braking is about right. The steering takes some effort at low speed, but not too bad (it's got Coker 6.00-16 radials on it). My granddaughters are amazed at the idea of turning a crank to lower windows, and at what ashtrays might be for (in a car, or even in general...how times change). There are a couple of kinks that probably need a bit of working out: 1. The Vacamatic transmission seems to shift about like it should (although there's no real audible indication of the shift happening, on some I've heard a click which I've been told is more "ideal" than a thump), but the Fluid drive seems a bit draggy and the engine stalled out or nearly did a couple of times when slowing down, which I didn't think it should do. I am wondering if the first thing I should do is check and consider changing out the fluid. I'm not at all sure when it might have been done before (people do take these things for granted nowadays). I have read James Douglas' post on Fluid Drive fluid (and saved it, and printed it), so my plan would be if the fluid seems incorrect to get the Mobil DTE Light circulating oil. Anyone else here have any tips about that? Is it possible that I'll need to have a flush done? Other things I thought about that might contribute is the idle being a bit too slow but I have read that there's a "sweet spot" you need to be in for the transmission shift to work. 2. The passenger door lock displays some odd behaviour. I can't seem to unlock it from the outside. I can open the door from the outside by putting the key in and giving it about 3/4 turn, but it won't turn all the way and let me withdraw it to leave it unlocked as the manual indicates it should. I have to turn it back to take the key out, and then the door is locked again (so the key is needed every time you want to open the door from outside). From inside it seems to work OK. From the manual and the way the driver's side door works, it seems I should be able to put the key in, give it a full turn, and the door will lock or unlock, depending on direction. What do you think? Should I just replace the locks, or have a lock guy look at them? I think it's not original (the pass. side lock does not use the ignition key), maybe the wrong lock was put in? Thanks for any advice you can offer. Also, during the winter I got the build card (Thank you, Danielle at Stellantis), which is how I know the car's birthday. It's interesting but I'm not sure how to interpret some of the data on it...anyone know of a good guide to this? According to it, I read the following: -Build date of June 24 would be very late in the model year. That jibes with having body number 10,065 out of a total production of 10,830 1941 Royal club coupes. -The car was shipped to Syracuse and doesn't seem to have strayed far from there in its life, before making it to an auction in Toronto with about 29,000 miles (it's now just under 34,000). Ruslerholtz & Rossell advertised themselves as the largest Chrysler dealer between New York City and Chicago. -It looks like the car was built with a clock (not standard on Royals) but without a radio. When it came out of a long slumber in 2013 and was acquired by the previous owner, it had a radio but no clock. Now it has both (neither functioning). There is an extra blank plate in the glove box. My intention is to dig around the dash and see what model of radio it is first; maybe it was a retrofit but it certainly looks like a Chrysler radio of that era. -I'm guessing that the "3" and the punched hole at Trans refers to the Vacamatic. Not sure what the 1 and hole at "Gear ratio" means. -Lack of a punched hole for "Cyl. Head." likely means that it has the standard head (112 horsepower) and not any higher or lower compression option Chrysler might have offered at the time. Lots of other interesting things with holes punched in them, too, but at different locations on the card.
 1 point
 -
Are you saying you have 12vdc ground to battery or 0.12vdc?1 point
-
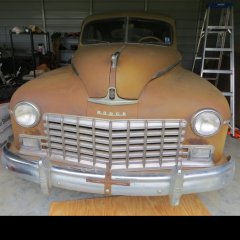
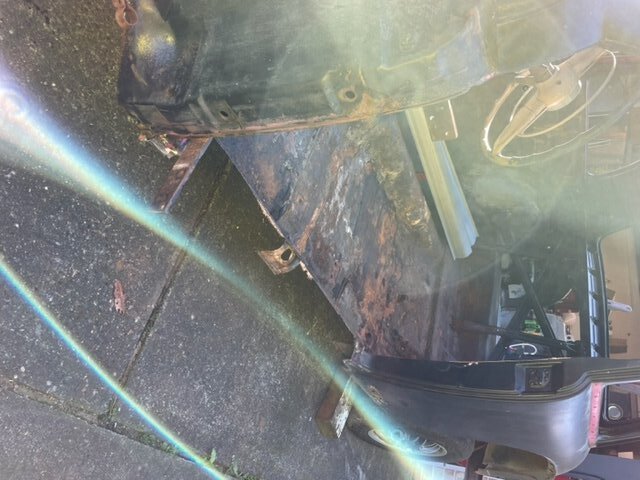
While waiting on the front end components to arrive I decided to remove the rusty rocker panels with some new steel. Probably my second least favorite part of working on a car after body filling. I am cleaning out everything soda blasting, sanding, rust treating and painting the interior and exterior panels. The rocker body panel welds could be a little cleaner, it is a fine line on the new steel vs the old steel since some spots can be a little thin.
 1 point
 -
Uh oh......looks like it's time for some wiring replacement. Yank out all the flakey stuff and start over.1 point
-
The glue application did NOT hold.l So need a good weld then a new tunnel plate also welded in. Maybe this week. I’m slowly making progress, not easy for me anymore. So I done one or two things each day.
 1 point
 -
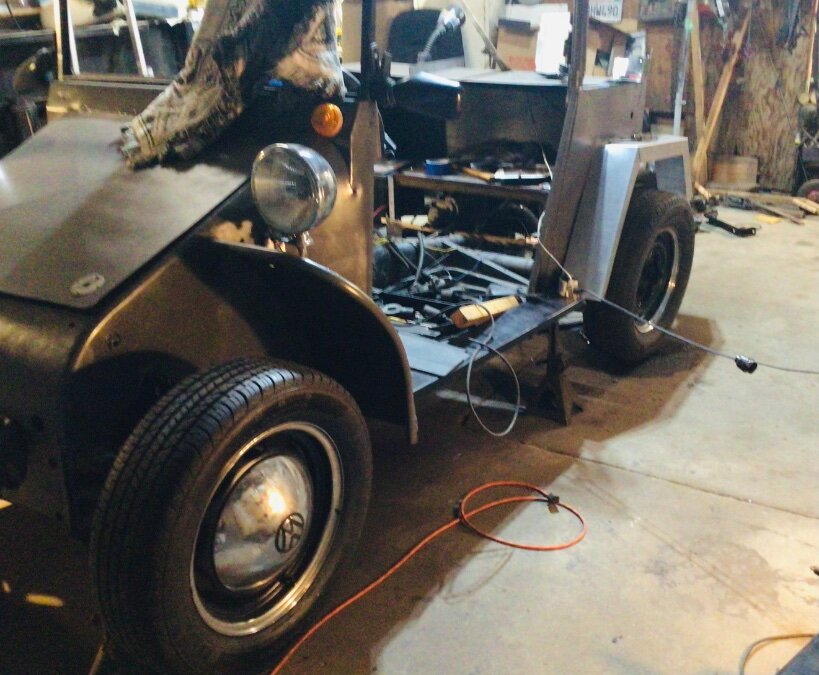
I started a new job this month with a 1+ hr commute one way, and though the QuadCab can make the journey, the traffic can be tricky. So after 4 years of my elderly neighbor offering to sell me his 2015 Ram 1500 that he cannot drive anymore, we worked out a deal, as that truck does way better on the highway than the QuadCab in ride quality and fuel economy (26mpg!!)...did I mention the AC seats? This Laramie Longhorn is about to turn 33k, so it's got a lot of life left in it...the QuadCab, with 233k, gets to wander around on the weekends, as it needs to exercise or its brakes might start sticking again.1 point
-
That was my rationale for my first response also. I can't pass judgement on the differential, but the axle design is not flawed in any way. Well, except for brake maintenance accessibility and that is fixable without changing the thing out. I ran a 413 in a 58 Dodge for several years. Beat on it hard too. Never an axle/hub issue. Edit to add: My Dad owned and operated a salvage from 1960 though 1990. I spent many hours working there, removing, selling and installing parts. I saw exactly one failed Mopar rear end. The pinion was driven back so hard it broke the case and carrier. But that was due to a high speed collision with an immovable concrete object. Hit the front of the crankshaft and broke everything from there back. Never encountered a slipped hub. Some guys used hardened keys but IMO they are not needed. But for the system to work as intended they must be assembled as speced in the shop manual. Clean, dry tapers! No rust, scratches or lube as the resistance to spinning comes mainly from the interference of the tapered joint. Keyway is only secondary.1 point
-
I haven't been around much lately, my employer has been trying to get as much out of me as possible before I call it a career on June 30th. I managed to spend 25 days in Mexico working on what we, in my After Sales Service branch call, Factory F***Ups. It's real bad this time. Told you that to tell you this. Every other morning, since I got back home from the best of the best Mexican food, I've been riding my fixed gear track bike into town for a cuppa and maybe breakfast. Days without breakfast is about a 5 mile round trip. Days with breakfast will be 7 to 17 miles. Burning calories and losing weight. I feel a whole lot better, too. I'd like to get back down to my 80s and 90s racing weight but without the racing part. I'd prefer not to wipe out at my age.1 point
-
That looks great! Well done. One step closer to driving down the freeway in a mad rush to a car fire?1 point
-
not everyone posts their donations....like the above mentioned headlight deal, the man was kind enough to give me a headlight...he paid the postage....I in turn donated to the forum in his name..I only mention this as I do not think any of this would be found on open forum.1 point
-
Must be like me at 65. Can wash my hands or hear water running and have to run.1 point
-
I got one this morning about "held messages" and it is not from the site. If you look at the FROM email address it is "fraser.robinson@waitrose.com". That email address is not tied to a registered member of the site. Do not open these messages or click on any links in the message, they most likely are a phishing attempt.1 point
-
I'm beginning to get a little worried about JB. It's been 19 days since his last Route Van picture posting Did you forget your FB password? ?1 point
-
When pushing the latch mechanism into place I had to use a little force to depress the bolt into the housing slightly before it would slide into place. The first door took a bunch of finagling before I figured that out. The other door was in and done in no time1 point
-
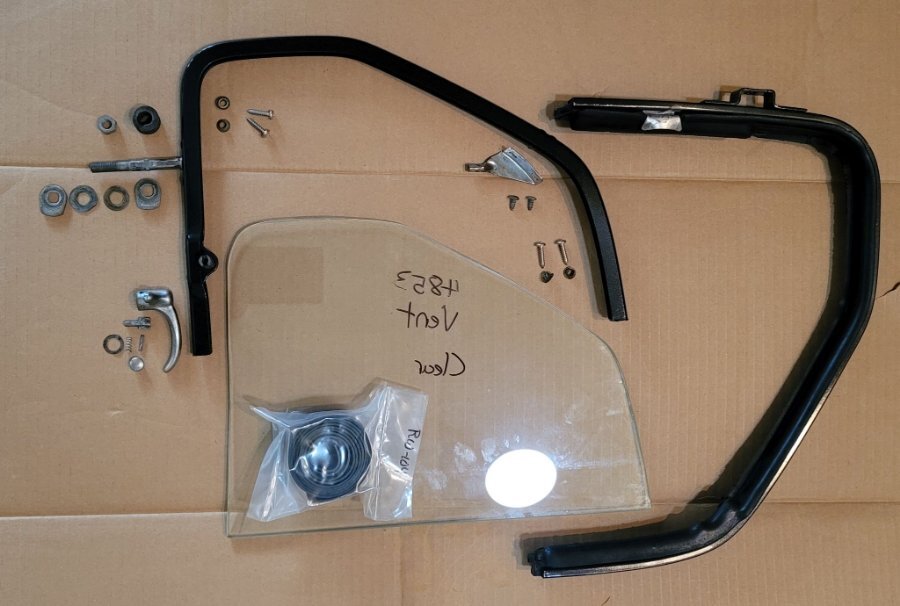
This picture covers the remainder of the components that go inside the door.
 1 point
 -
I bought my rebuild kit from Then and Now in Weymouth Mass have a video on YouTube which is very helpful1 point
-
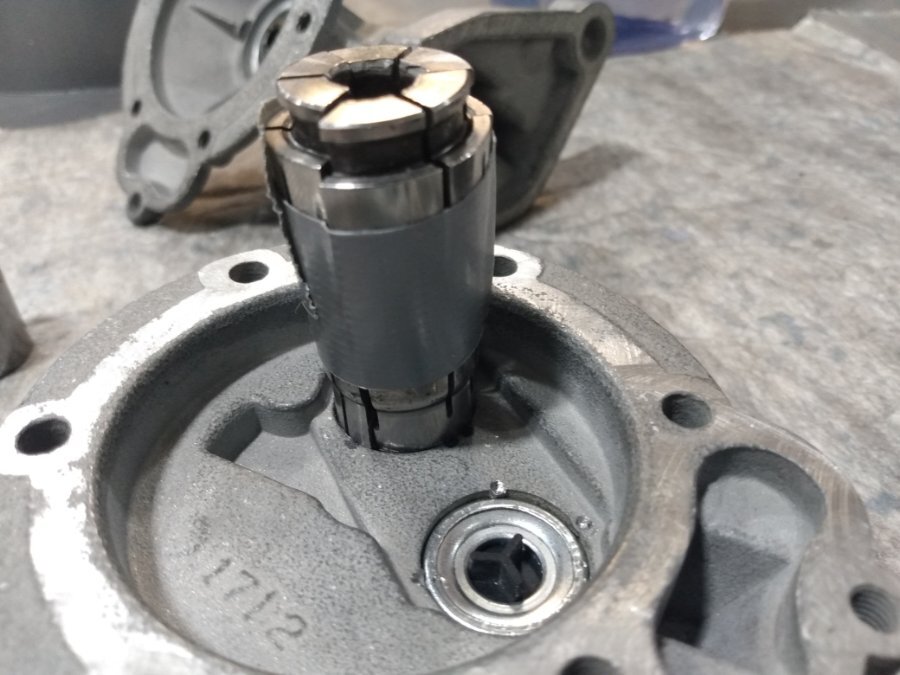
A 1/2 socket fit one. A few solid taps with a hammer and it got much tighter. A few more and it expanded enough for a good seal. For the other side, the socket wouldn't fit over the frame of the valve, so after a thorough search of my work, I found a junk collet that fit over it but had a thin enough wall to only press the edge. Due to collets being fragile I opted to use a shop press on this one. Again I went a little ways, stopped, and checked. Then applied pressure again. I don't know if you could crush these things, but didn't want to find out. You can see collet ended up breaking while I was using it, but was able to hold it together enough to finish the job. A dedicated tool would be easy enough to make, may even be able to find the right size tubing.

 1 point