Leaderboard


Popular Content
Showing content with the highest reputation on 06/08/2022 in all areas
-
If you read the book on the development of Chrysler's engines...the section on the slant six where they talk about the issues with the aluminum vs the iron blocks...there are references to the issues of drilling the blocks. Problems with long drill bits in production. I suspect that the different sizes may have something to due with the need to not have long bits fail in production. Just a thought...it may have nothing to do with engineering and everything to do with production issues. James2 points
-
There is a template for the rubber part in the down loads section. The pieces are mirror image, so on the trmplate was made by tracing the one original piece that was on my car. For material I used some thin walk off mat that was lying around in the garage. The one shape fits both sides. Mine were stapled on with the staples piercing the sheet metal bits. When I redid mine I cut short lengths of mechanics wire to recreate the look of the staples. If your radiator is stock, don't pressure test it above 3 or 4 psi. If there isn't a leak you don't want a careless tech to make one or more. The location of the overflow tube generally indicates whether the radiator was designed for pressure. If it has the dome o n the tank its a zero pressure system.. if the overflow tube is below the cap gasket in the filler tube it is zero pressure. If the relief tube is above the gasket in the filler neck it is a pressure system, the amount of pressure will be determined by the stiffness of the spring pushing the gasket down onto the seat in the filler neck. So do make sure you identify your radiator before the guy puts his tool on it and blows it up.2 points
-
You know, I got to thinking about the engineering of this engine. The "Plymouth 6" as it was originally called was specifically built to a price. The big deal when it was introduced was that Plymouth gave you a 6 in a low cost car whereas the competitors only gave you a 4. It was a marketing campaign that pushed Plymouth sales up. It worked. But one has to think that the engine was developed with low production costs in mind and not so much building the perfect engine. So when the claim is made that the engineers back then knew what they were doing we need to understand what it is that they were doing. I think that was building an adequate engine for a low cost. Turns out they did a pretty decent job building a durable engine, but even then they did make changes over the years.2 points
-
If it were mine, it would get tested. I hate having to remove parts after installation for any reason. Especially ones that could leak on my fresh work. Not that I don't trust the shop, but I'd do it at home. I have a cooling system test kit from Harbor Freight. Not too expensive and works on the car or with a couple of plugs for the inlet and outlet, can test on the bench too. Without the kit, a bicycle inner tube can be used to pressurize to a safe level. Cut the tube and clamp the open ends over the radiator's outlets and either plug the neck or use the cap, depending on pressure cap or not. Now use the tubes air valve to inflate the radiator. The tube's expansion will provide warning of over inflation.2 points
-
Thanks for the kind words...I am just an old guy that loves to tinker with rusty old metal... There is something about fresh ground crusty steel that makes me smile...2 points
-
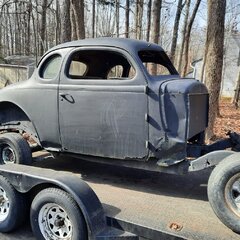
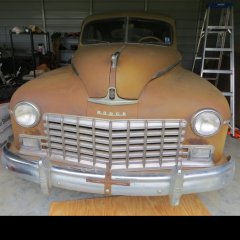
Hello - just joined forum. Had a crazy moment end of last year and sold a completely finished old bowtie truck and after looking at everything on Facebook Marketplace an Craigslist for 3 months I purchased an older 1948 Dodge project truck. Reasons I got it, besides being first mesmerized by the beautiful original flathead 6 cylinder, and then finding I was easily able to get my 6' 5" frame into the seat, was I thought it would be a challenge to find missing parts compared to finding parts for Fords or Chevys of same era; I was right about that one. The truck also has the original 3 speed manual transmission - it needs to be rebuilt or upgraded. It runs, and stops (both slowly). The rear was swapped out - looks like a chevy rear end that cruises well at 60 MPH. The interior and wooden bed were stripped for replacement. She sits in mainly white primer. So far I've used EBay, DCM, and SRPM for parts. Thanks for working with me in advance. I'm sure I'll need the collective forums advice.


 2 points
 -
I happen to agree with Tim on this one... ?2 points
-
Thank you Lord, they have my camshaft!! Delta just called me. I thought it was USPS Washington state at first. They've already ground my cam and resurfaced 8 lifters. $ 164.28 They kept it per specs, making sure exhaust lift/durations are the same, intake lift/durations are the same. Refinished the bearing journals/cleaned up. I had told them on the request sheet didn't want to increase the duration or lift to one of these 4500 rpm types. Requested a spec sheet..see what I get. I AM HAPPY. 1 1/2 weeks messing with USPS..was about to put in a claim.2 points
-
I don't get much time to do anything on my P15, so just little projects is all I can tackle. I dismantled an old HP printer recently (to separate what can go to the landfill, and what is considered toxic waste, like the circuit boards), and saw the rubber paper feed rollers, and had an idea of a way to use them. Made a mandrel and chucked it up in my drill, then shaped the roller into what I need to replace the grommet that fits into the headlight bucket. The original wiring harness was molded in one piece - the grommet and the rubber sheath over the wires was cast in one go. I was already planning to run the ground wire back to the terminal block (instead of screwing it down at the headlight housing) and some time ago i found some new 3-wire heavy gauge stranded electrical wire (with a strand count similar to the original wiring) in the dumpster behind the local hardware. Rubber coated, not plastic like most of what you see being sold now-a-days. But I still needed the grommet. These paper feed rollers are just a hair smaller diameter than the original MoPar grommet, so it was a good match. In the picture, from left to right, is an original paper feed roller, my first attempt (I got the groove too deep & too wide on this one), the first successful one, then the original harness and the jig I turned it on. (On the first try I didn't have a lock nut on the jig, and the resistance of the wood rasp I used to make the rough cut spun the grommet a bit, and that tightened the nut, which compressed the rubber roller, which I didn't notice until I stopped the drill for a look-see, and the rubber was really pushed out of shape, and the saws-all blade I was using to cut the groove went too wide. Used the same blade on the second one, but the lock nut prevented the rubber roller just tight enough to keep it from spinning on the jig.) Now, will this type of rubber last? That's something I do not know how to evaluate. But if someone manufactures these, I've certainly never seen them available anywhere. And, should I coat the surface with silicone rubber?
 1 point
 -
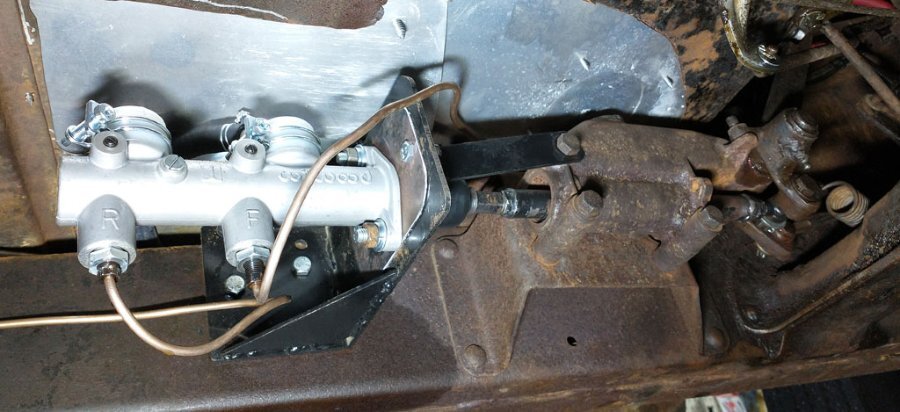
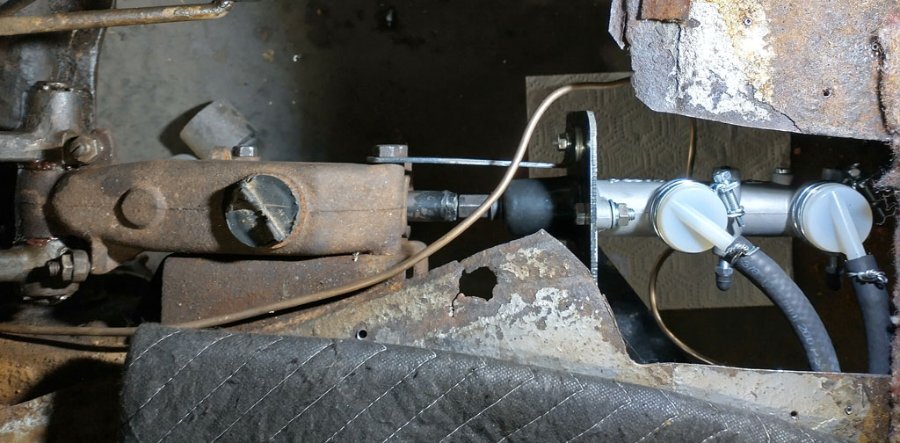
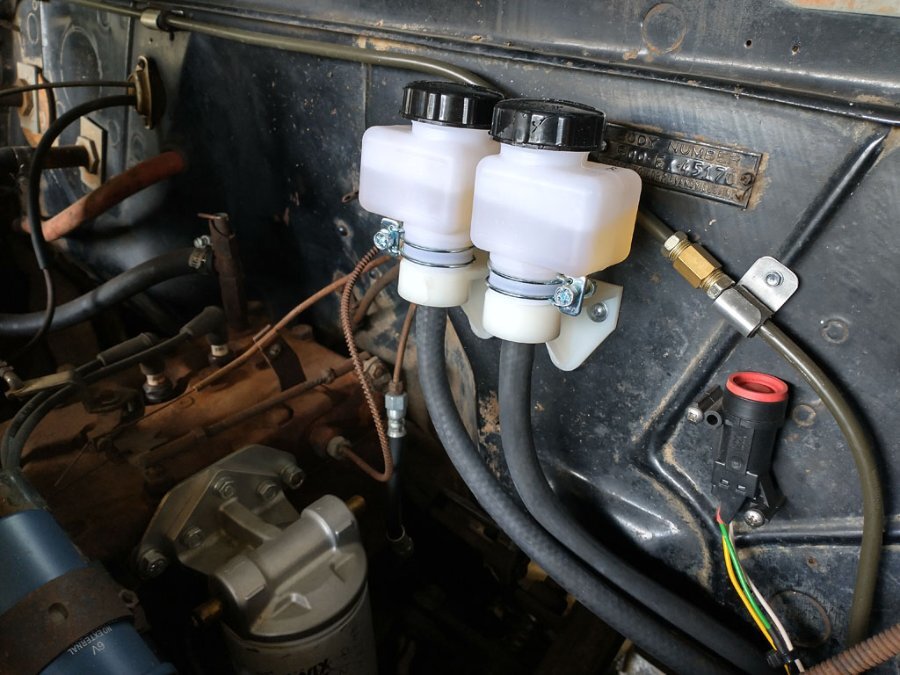
Even though the brakes on my '48 P15 are probably as effective as they were back in the day, the single-chamber master cylinder is a relic of bygone times. If pressure is lost due to a line or cylinder failure, the car effectively is left without brakes...probably at a very bad time. The remedy was mandated by the guvmint in the late '60's when they required all new cars to have a dual-chamber master cylinder. If pressure is lost on either a front or rear brake, the split master cylinder would maintain some degree of pressure for the brakes on the other end of the car. Not an ideal situation, but much better than being totally brakeless. Two years ago I fabricated a mount so the body of an original master cylinder could be retained for the pedal mounts and a modern cylinder could be mounted aft and actuated with a long pushrod extending through the old cylinder. My mount worked very nicely but the "Corvette" cylinder I used didn't work, probably due to a combination of insufficient bore and/or stroke. So I've been driving and enjoying the car with an original-style master cylinder even though the desire to upgrade remained. In the process of researching a disc brake upgrade, I found a reference on the Scarebird site to a Wilwood dual chamber cylinder. Wilwood is a highly-regarded manufacturer of brake components for the racing and custom communities. I used their components on a kit car several years ago. The cylinder is 1" bore, model #260-7563 and comes with remote reservoirs. It's available from Jeg's, Summit, etc but I found the best price on Amazon. https://www.amazon.com/dp/B002G37IBS?psc=1&ref=ppx_yo2ov_dt_b_product_details My old bracket and pushrod were dusted off and the Wilwood cylinder mounted and plumbed. This unit has residual valves built-in for drum brakes but they can be easily removed for a disc installation, no need for inline residuals. I still need to clean up the installation a bit but you get the idea from the photos. The hole in the floor above the cylinder was cut when I originally tried the Corvette cylinder so the reservoir could be accessed. But it isn't necessary for the Wilwood cylinder because the remotes are now mounted on the firewall for very easy access. Nope....doesn't look period correct, but neither does the alternator, spin-on oil filter and inertia switch for the electric fuel pump. But I like 'em. ? The Wilwood has bleeders on the cylinder itself so "bench bleeding" is easily accomplished after it is installed and connected to the car's brake lines. I had a decent pedal immediately after bleeding the cylinder and it should be even better after I get around to bleeding the entire system again. Pedal/brake response seems better than the original cylinder, all-in-all an excellent upgrade. A thread from a few years ago detailed using this cylinder with the Scarebird system so I'm probably looking at discs in the near future. I really enjoy the 1940's ambience of this car but some additional brake margin is a good thing to have in reserve in our cell phone-addicted traffic.
 1 point
 -
Wifey was tired of the soot coming out of the pipe in the garage and getting on random other stuff. So I got a different tip and happened to get a nice chrome look too. Before After1 point
-
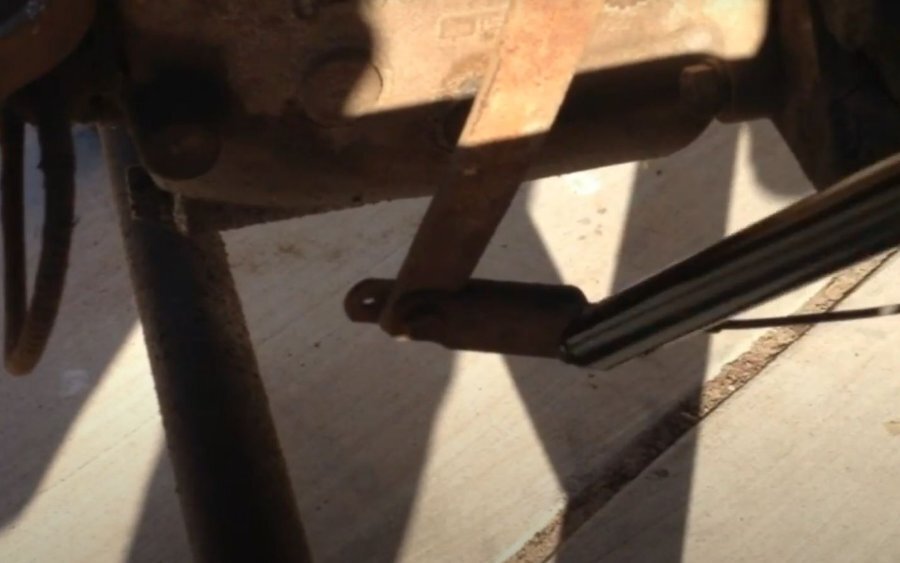
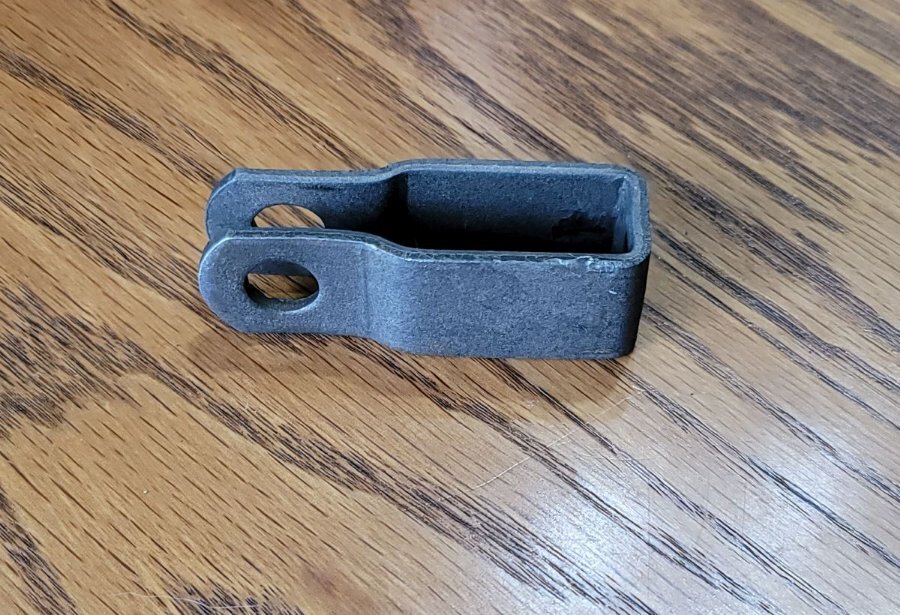
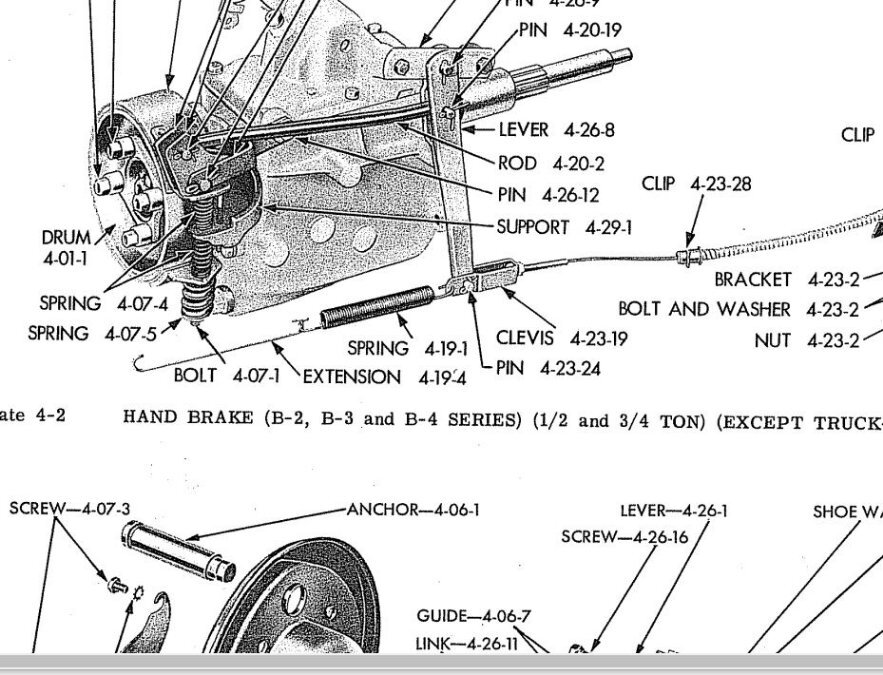
Here I was all ready to install the clevis and pin on the end of the parking brake cable and I happen to run across 48Dodger's video on the dash parking brake configuration. So guess what, in his video he shows a clevis that is NOT like the clevis I have for my truck! What?!!! My clevis: 48Dodger's clevis: Parts manual matches 48Dodger's: As the saying goes, one of these is not like the others When I got my truck it didn't have the cable but I managed to source a nice one complete with clevis and clips from Larry Frank. Needless to say I was a little bummed that my clevis is wrong. My first thought was someone for some reason replaced the original clevis with the one I have now. After thinking about it for a bit I decided to get the part number from the manual and see what google could come up with. Well whadda ya know, looking deeper into the parts manual there are TWO part numbers for the clevis. The B2 is 1266-643. The B3 is 1272-600. Already I'm feeling better My guess is for whatever reason Dodge eliminated the hole for the return spring in the clevis. More than likely because it was cheaper to make. Now that the stars have realigned and my heart rate is back under control I'm ready to get back to working on the truck
 1 point
 -
Anyone know what to replace the existing gaskets that mount on the metal window edge? I got something from Steel but I dont think its correct as its rubber and that wont work.1 point
-
Yeah Vinegar wont fix that Yet again, get er did and Vinegar will be a nice icing on the cake.1 point
-
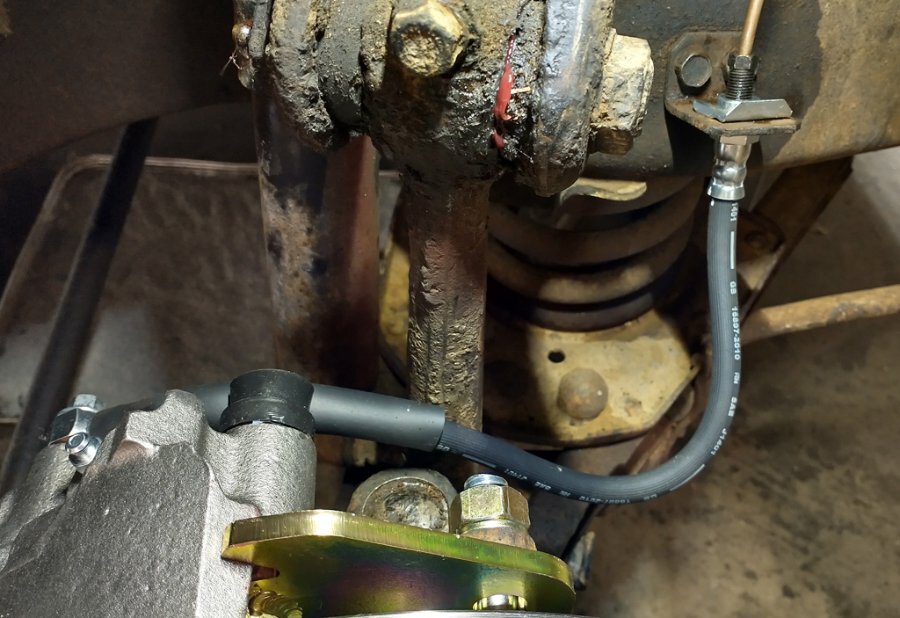
The Caddie brake hoses arrived this morning so one side is finished. I used 15" hoses, the only mod needed was to slightly enlarge the hole in the frame bracket so the hose fitting would insert fully into the bracket. Then the big moment........would there be any interference between the caliper and wheel?? NONE! When I installed the Wilwood dual-chamber master cylinder I mounted the remote reservoirs high on the firewall. I was able to open the caliper bleeder and the caliper basically bled itself as gravity did its thing. After the bubbles disappeared, I had a decent pedal. All four corners will get another bleed after everything is finished. One more side to finish then the test drive....more to come.
 1 point
 -
Ahem..? ?..
 1 point
 -
Read it cover to cover....then read it again. That way you know when to feel guilty about the little things only you know are "wrong"..... 48D1 point
-
I think my comment, in general, was directed to the theory that the engineers knew what they were doing so don't do anything else types.1 point
-
Cotton braided wires are also available on Ebay, shop called Ton's Performance. Company on Internet called Brillman.1 point
-
oh...he would not have gotten away with it....trust me!1 point
-
Here's a color coded wiring diagram for a '50 coronet if it helps. Wes Coronet Wiring Diagram-Flattened.pdf1 point
-
Just sent him a PM via the forum. Also sent an email after noticing he doesn't post here often.1 point
-
I put a Scarebird kit with their new hubs on my DeSoto and found dust caps that fit perfectly at my local hardware store. They were in an aisle with replacement utility trailer parts.1 point
-
I would want a pull back spring regardless of book part#'s. Just because of wanting to be sure the brake band and linkage will be fully released.?1 point
-
I haven't checked in a long time, but there used to be templates for those hood seals in the technical section of this site.1 point
-
Hmm, I might have to pull the cam and lifters out of my core 230 and send them out for rework. Did they share with you the grinds they had available? I do want more poop out of mine, lol.1 point
-
Ok Merle, I guess I'm some what of a dunce I know I had searched my B3 manual for info on the gauge in the Fuel section of the manual and didn't find it. I just looked again and somehow someway a page has been inserted into my manual since then The page describing the gauge is just like your B2. So I then looked for the information I was looking for about the doors and surprise surprise, the information is right there in the Body section. Go figure. It looks like I need to spend some quality time with the manual each night to get familiar with what really is in the manual. Thanks!1 point
-
Been there lol. I need a new harness also. One project at a time.1 point
-
That's what I'm understanding. It's hard to find basic info without them getting into a bunch of complex equations. And if there is a restriction in the line before that, it affects flow also. I ordered a cobalt drill bit and 8 mm ball hone.1 point
-
Mark Your 46-48 radtior uses an R-3 NON-Pressurized cap that is the same that I use on my 39 desoto. I checked my Atlas catalog to verify the correct cap Number. NO PRESSURIZED CAP IS TO BE USED. Rich Hartung1 point
-
Use Google for your searches, works much better: site:p15-d24.com color change speedometer This search returned several threads.1 point
-
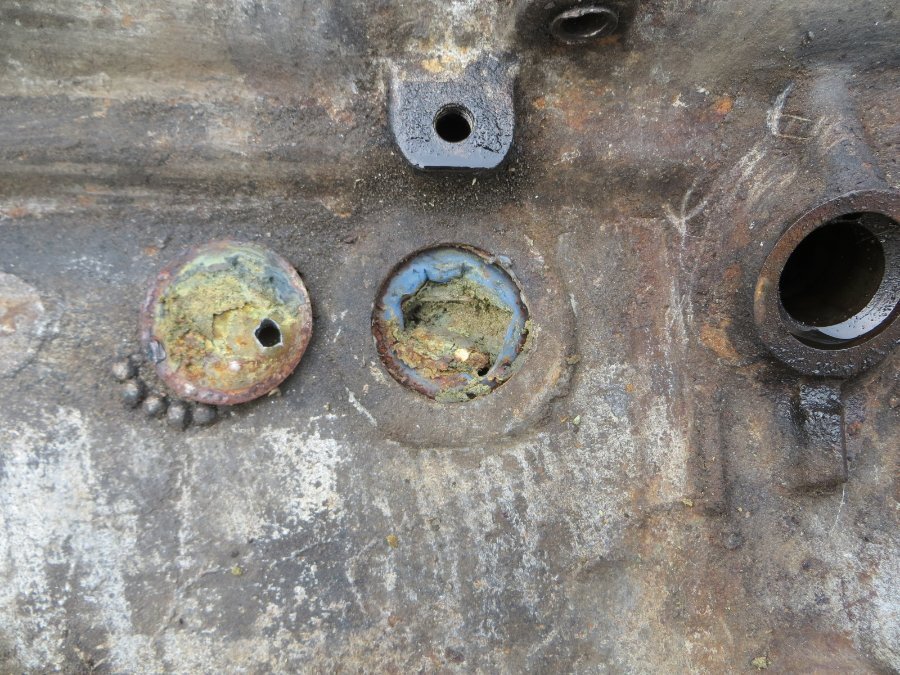
I know this thread is dated, but I had the same problem of a valve stuck in the open position. The engine had been sitting for 15 years, so I'm lucky that was the only major problem. After opening the valve covers (which is super simple), I didn't notice the problem at first until i took a series of picture as I rotated the engine (by turning the fan blade). Then I noticed one of the valves was stuck and not closing. The attached picture shows it all. I was able to put a screwdriver in between the spring and hit it with a hammer to free it up. Now it runs so much smoother.
 1 point
 -
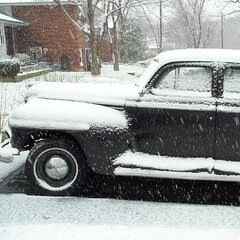
6-3: Me, my son, and my oldest daughter went on about a 2 hour cruise tonight. Just around town. Beautiful weather! Windows down, cowl vent open. Lots of stares, waves, and thumbs up. We stopped at Kwik Trip for snacks 3 times lol. It was just a great night. For a little while I forgot about gas prices ? First 2 pics: two different Kwik Trips. Not sure why my son had to show you his Hershey's Bar. Final pic: safe at home
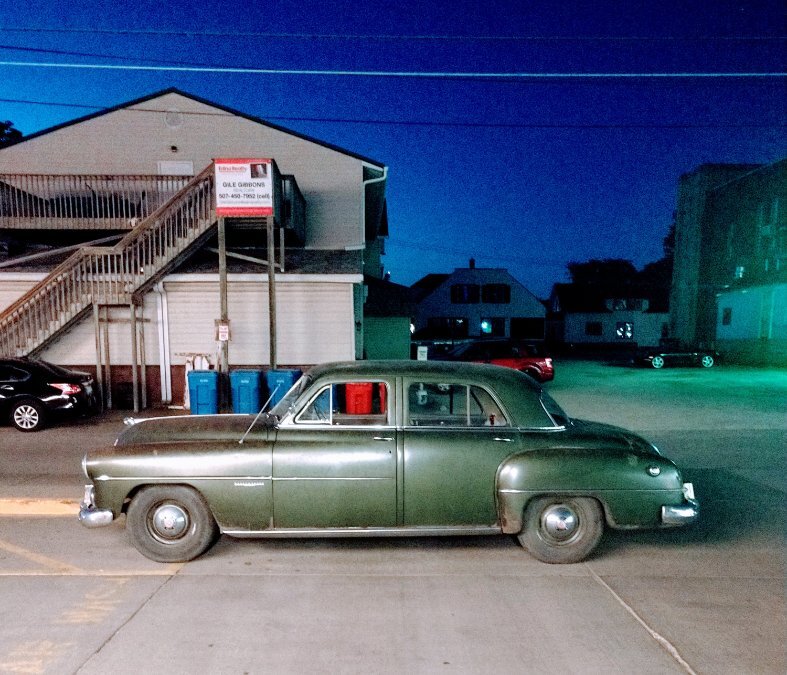
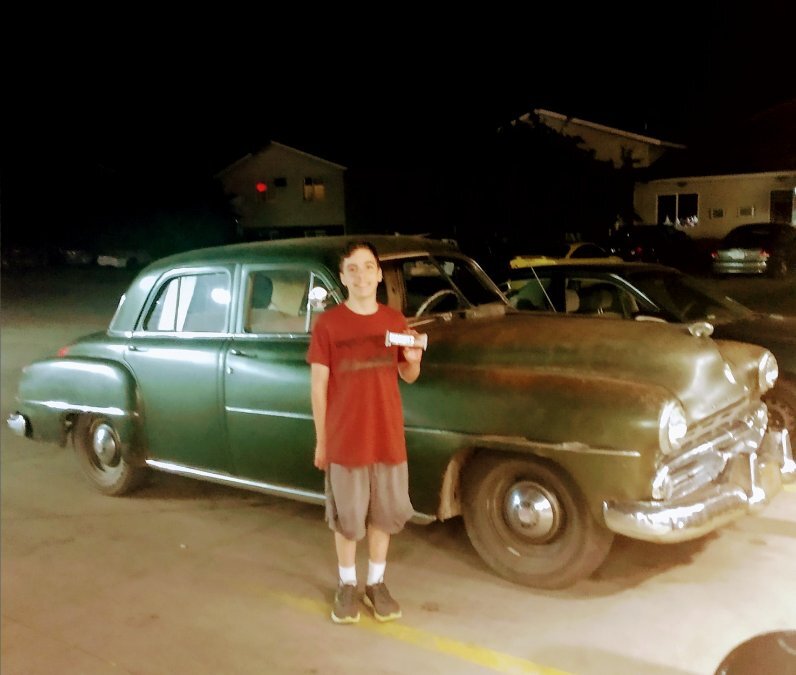
 1 point
 -
This is what you are looking for. The nut and ferrel start out one piece and snap into 2 on first install.1 point
-
Your “original” line is most likely not original. The line and ferrule I show is probably the first time it’s been separated from the gauge since new. It’s a spare gauge I have and I took it apart specifically for this thread. I have worked on many old Mopars from 1938 through 1954 and every oil gauge line had that fitting.1 point