Leaderboard

.thumb.jpg.d599d4c13e08899474e0348bd9baed3b.jpg)

Popular Content
Showing content with the highest reputation on 12/29/2021 in all areas
-
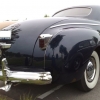
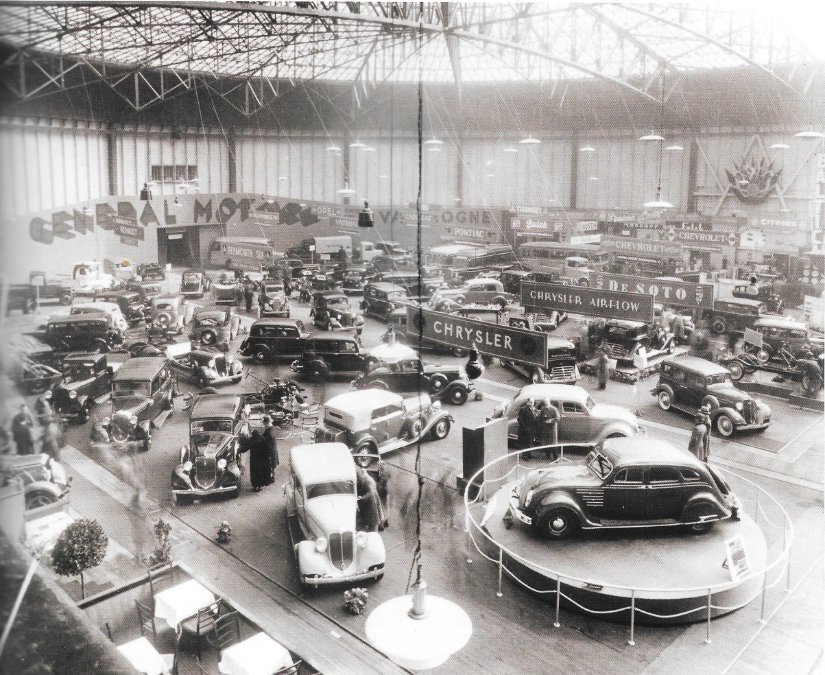
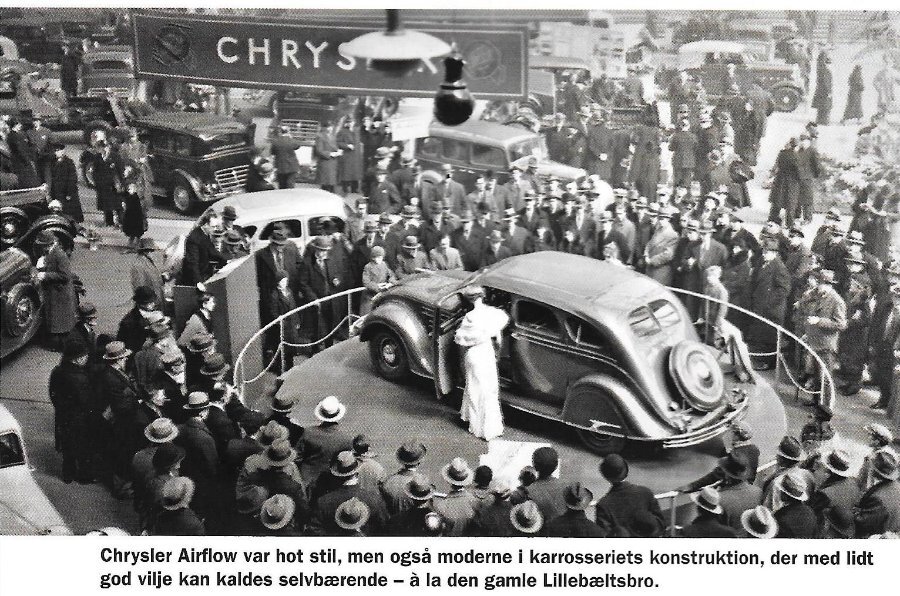
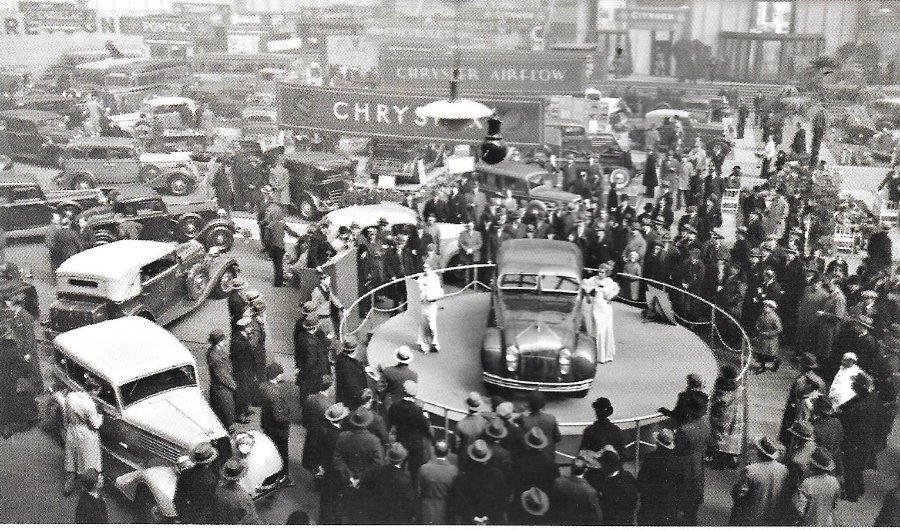
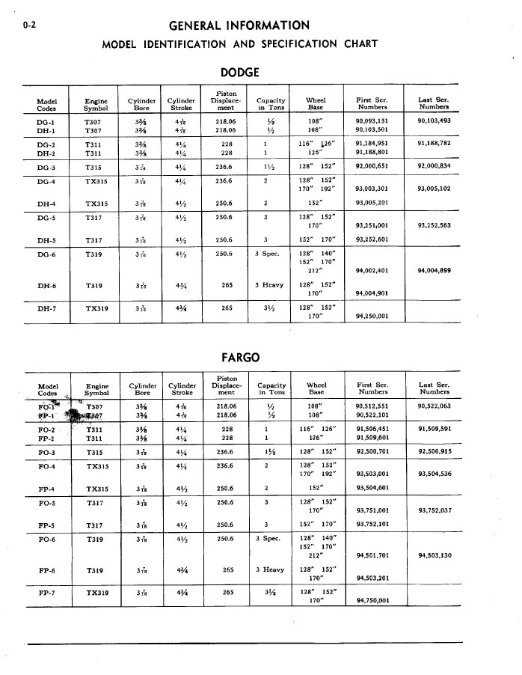
Local vintage club had an article about a multi-purpose arena located in Copenhagen that was built in 1926. One of its many events was the annually car and motorcycle exhibition showing the latest wonders and innovations. These photos from 1934 show MoPar’s stand with presentation of the new Chrysler/DeSoto Airflow. Text comparing body uni-construction to Lillebæltsbroen, a newly build bridge. Check out General Motor Art Deco lettering in background. Merry Christmas and Happy New Year to all.
 2 points
 -
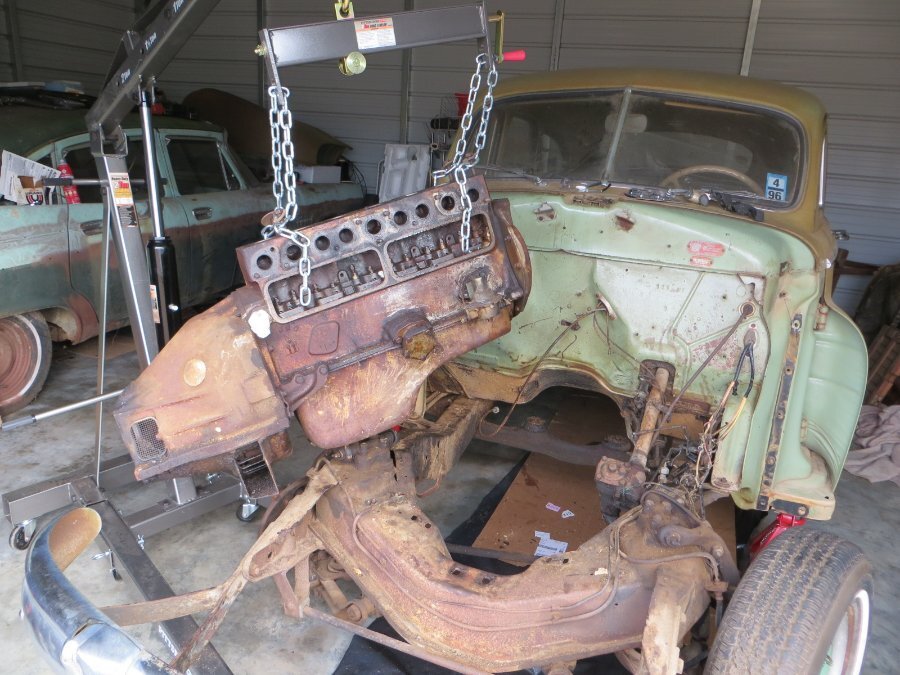
Got her pulled. Had to fill up the brand new Harbor Freight 2 ton engine crane to get it to work but it did..substituted bottle top for their crappy rubber plug.

 2 points
 -
I have some experience with that particular Toyota differential (except the one I dealt with had a locking differential). Toyota found out that they had undersized the rear axle for the vehicle and uprated them to the next size bigger later on. The failure I repaired were the bearings, everything else looked good. Horrible noise. The dealer did not stock any parts, only complete assemblies because they had no technicians capable of rebuilding one. The beauty of the Mopar axle is the removable differential carrier. It is so easy to pull it out for a ratio change or a rebuild. If my memory serves me it is called a Hotchkiss design after the French car that first used that type. Yes, it is an old idea. In point of fact it has been found that all things (automotive) mechanical had been tried before 1905, including Turbocharging! The only reason manufacturers use the integral design (such as a Dana 44) is that they are cheap. The Ford 9 inch is also called a "Straddle" mount type, referring to the way the pinion is lower than the usual hypoid gear set. The pinion gear kind of straddles the ring gear. They are very strong because of the greater tooth contact BUT because of that they not very efficient. The Mopar 8.25 (such as used in flathead 6 Plymouths) and the later Mopar 8.75 (1957 on) rear axles are hypoid and therefore are more efficient than the Ford 9 inch but not as strong. The 8.25 axle served well into the V8 era so it is plenty strong enough for any flathead 6. At issue are the ratios available. The lowest commonly available is the 3.54 (I believe there is a 3.36 but haven't seen one). It is my opinion that the stock Mopar axle is a very good design well executed. You're not going to get an improvement by changing it. If you want an alternate gear ratio there are several between 3.54 and 4.3. Lower numerical ratios also create a new problem. With each step lower you create a taller mountain for the engine to climb every time you let the clutch out. So your highway engine speed might go down but it will take longer to get there. The stock ratio delivered a quarter mile ET of around 20 seconds so there's precious little room for further degradation. The most elegant solution is an Overdrive which drops the engine rpm 30%. That gives you all the gear ratios you have now plus one more. A T5 gives you one more up and one more down. Instead of three to get to 1 to 1 (high gear) you row through 4, then a fifth gear which is a 28% overdrive ratio. The beef about Overdrives is expense but that is not necessarily true. As an example: a reproduction Overdrive relay is around $129 but a 6 volt modern relay is $5 to 8 and 12 volt relays are half that. NOS throttle switches can be found as low as $29 rather than $129. They should be only $5 to 10 but I am still looking. If a person were to feel the need to change the rear axle for strength reasons, my first choice would be the Mopar 8.75 (1957 and later) rear axle. It has a well earned reputation for strength, lots of ratios and limited slip differentials and the fact that it even looks like the stock axle is a plus. You can even get keyed tapered axles if you want them! lol2 points
-
The longest road trip made to the Q, was a 1938 Panel truck from Spokane, Washington, I believe. Brent has shown up from the Portland, Oregon area a few times with various 1 and 1.5 tonners. And even went to "Back to the 50's" in Minnesota, trailering his 1 tonner. Mark brings beer... Minnesota beer. Mark wins. 48D2 points
-
in the New Year.....what is the top item on your play list? Mine is to finish the Morris LCV and thus free me up to get back onto a couple of the Mopars......hopefully alongside this is organized the shop a bit better than it is now and maybe a less wet year for the possibility of taking a few of the cars out for a bit of driving. Being somewhat realistic here, I know well I cannot get to half of what is needed.1 point
-
Sniper, No I didn't so maybe I jumped the gun. All I did was go through the initial torque sequence in the correct order per the shop manual. I didn't expect to see any weeping at all from the head gasket. In any case I will definitely go through three heat up and re-torque operations this next time no matter what I do to the head bolts. Live and learn I guess. Thanks for getting back to me. Jocko1 point
-
It would be best to say that I do not use thread dope on anything, tape only. How much tape really depends on the size of the threaded connection. 3 or 4 wraps would probably be fine. Did you go thru the heat up and retorque sequences?1 point
-
Not sure they put the T5 in any truck bigger than an S10. That T5 is a car transmission. The Mustang 2.95 first gear NWC T5 is a very close match in gear ratios. The S10 one is horrible in comparison. stock MT5 ST5 1 2.57 2.95 4.03 2 1.83 1.94 2.37 3 1.00 1.34 1.49 4 1.00 1.00 5 0.73 0.86 All this said, an R10 is probably not any more expensive. Looking at car-parts.com the used one NWC T5 start at $800 and the remans start at $1100 plus core. Then you need a new driveshaft, speedo cable, deal with the shifter, etc. Some research is probably warranted.1 point
-
Be sure to get that block tested for cracks before spending any money ordering rebuild parts, or doing any machining.1 point
-
Reading your first sentence, sounds like you may have put the smallest ball in the wrong place. I'd be surprised if Mike's gave you the medium and large balls and not the smallest one, because when I talked to him he didn't have any medium size balls. A picture is worth a thousand words. I'm heading to my shop now and I'll brake down one of my spare EV1 carbs and take a picture of where they go. I'll post it in about 8 or 9 hours. Did you soak the accelerator pump in oil for awhile to swell up the leather? When I got my kit from Mike's I was surprised at how much wiggle room that leather part had once it was in the cylinder.1 point
-
No..I didn't mean using it for ours. Just that it looks similar in style..ring gear, the screw adjusters for carrier bearings, etc1 point
-
Glass bowl down. Inlet is by the glass bowl, outlet is nearest the block. At least that is how the pump mounts on my old Plymouth’s engine.1 point
-
And Brent has a fantastic copilot. I’m returning this year with my suburban. May pitch a tent and stay a while, great place for a respite for my lyme infection. Nice clean air and open spaces. I will be bringing a trailer full of mopar parts, I’m downsizing, so the prices will be chartable.1 point
-
I agree - The modifications I made to this car are not logical. I was getting close to retirement and knew that if I was going to build a quick car that I should get on with it while I still had the disposable income to do it. Spent more on modifications than I paid for the car. But this car is a total adrenalin rush. No drugs required. Zero to 60 in just under 4.5 seconds. When I can find enough traction.1 point
-
all that great big ad and you have no clue the ratio......lol and if you were to ask, they probably would not know either, computer says it fits....!! as for Franken-gear....putting this in the stock banjo....will not say it can't be done...just too much work doing it including a visit to a shop to cut axles...money/time not wisely spent......getting a larger TOY axle and installing it....odds are the only things in your way here is lack of initiation and imagination.1 point
-
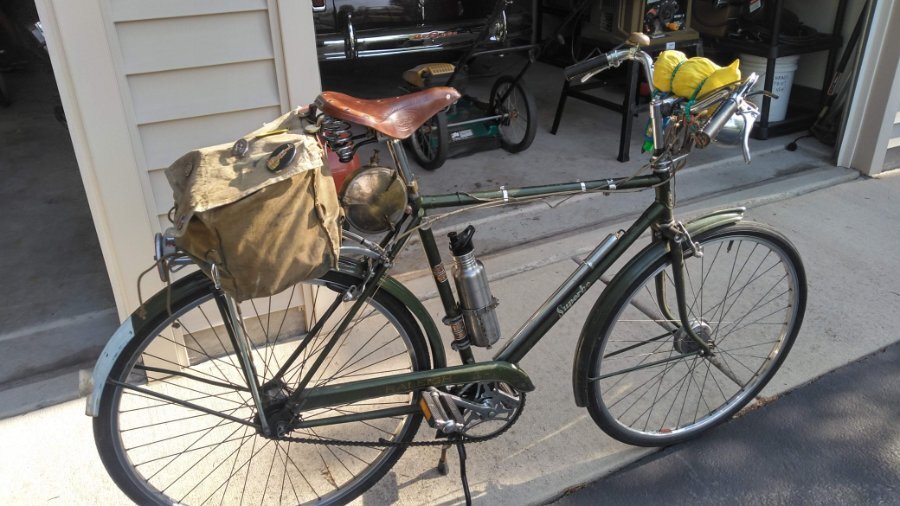
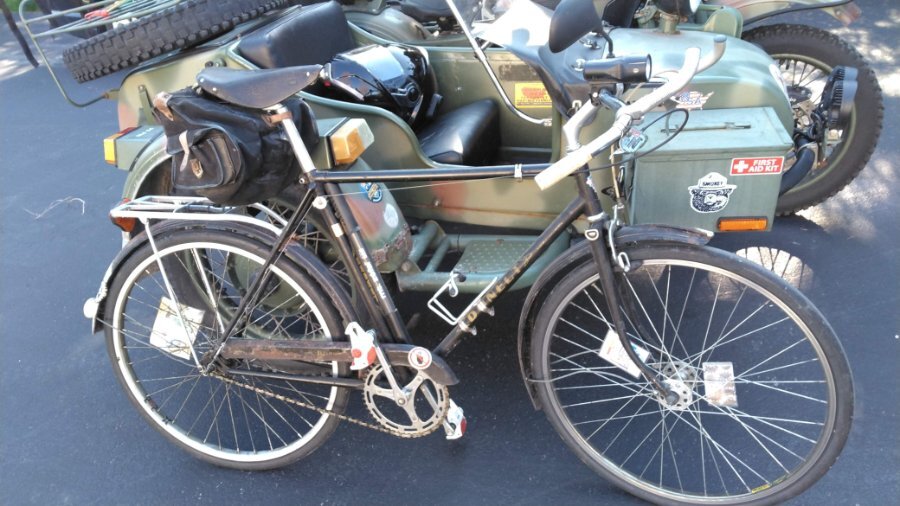
Last ones and I'll stop. Green 1968 Raleigh Superbe. What makes it a Superbe instead of your basic Raleigh Sports is the front Dynohub generator, lights, and a locking front fork. This was my Rehab bike. After getting hit from behind on another bike and getting banged up pretty bad, one of my riding buddies took me to a bike swap meet to get me out of the house. While moving around on crutches, I found this beat up Superbe for fifteen bucks. I worked on it while standing with crutches. I had it ready to ride before I was. The day I could swing a leg over it and ride to the end of my driveway meant I was recovering. I've covered thousands of miles on this one. I replaced the extra heavy Raleigh steel rims with Sun aluminum rims and that made it a completely new bike. Also tossed the 18t rear cog for a 22t which civilized it even more. The seat bag was made from a beat up Boy Scout Yucca pack and the brass thing behind the seat is the tank for a kerosene stove. The black thing is known by many of my cohorts as The Mighty Dunelt or The Tetanus Express. It's a 1964-ish Dunelt Sports, same thing as a Raleigh Sports but has a Dunelt badge on it. I found it in a dumpster without wheels. It was the test mule while I was working on a 2 speed fixed gear hub conversion. I added a brake after the first hub design failed at the end of my driveway. I lived on top of a hill at that time, too. Once I got the design down and working, this was my main commuter bike for nearly eight years. At 50, I raced several Alley Cats on it and had my ass handed to me every time by kids in their teens and early twenties but I had a ball doing it.
 1 point
 -
lol....I kid. Brent is fearless when it comes to towing. He's got that bunch of mountains between Oregon and California that are no joke. He has got some serious nuts holding those wheels on, I tell ya. Brent is a real trucker kinda guy for sure! 48D1 point
-
This kit was from Mike's, and I replaced two check balls for the accelerator pump (larger one and smaller one). I did not see a third check ball...where does the third one go? But I have to say my accelerator pump is still not quite as responsive as before my rebuild. I may try to swap out the old check ball, or find a new one. Brakes are on my list to go over again; My point was that the base work was done already once, and so I will go and refresh and update existing.1 point
-
beautyful! Thanks!1 point
-
Wow.......nice pics..........thanks.....andyd1 point
-
Jumping on the NOS bandwagon, found me a new two speed shift cable (1262101) and valve bracket (1188058) for my HH (A) Didn’t have the original box for the valve bracket but, I figured It won’t matter once it’s on the truck. ?
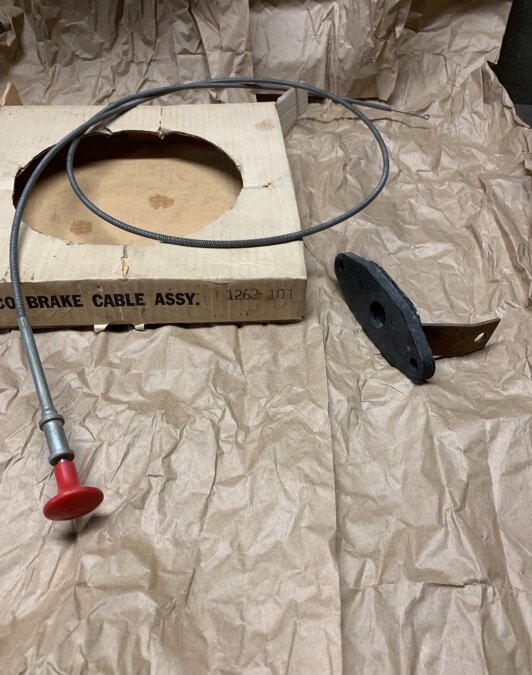 1 point
 -
Do you recall who made the wheel seal and the p/n ? I just recently replaced my pinion seal. It was my mistake to not send up a red flag when I saw that the the seal was the leather type when it arrived. Timken 7216. My second mistake was not soaking it in oil for a few days before installing it. This was pointed out to me by one of the gurus on here. He said it will probably leak in a month or so. It only took a couple days. So I pulled it out and put in a SKF 18912 seal, which is a Nitrile rubber type. Problem solved.1 point
-
DG2? Eric is the SN Guru, I've been told....... FB Group
 1 point
 -
I don't mean to sound like an alarmist, but by the time you are ready to leave in June, it will be 2 years since that mechanic did the brakes. I would go through them completely. Check all the wheel cylinders for moisture. Change the fluid and replace those two flex lines feeding the front wheels. Inspect the MC. I'm just finishing up a complete brake job on my 48 Windsor. I thought since my flex lines looked new and they were replaced a couple years ago. No rust on the metal end and they even had a label on one with the part number on it. The passenger one was fine and I blew air through it and poured a bit of brake fluid in it and it came out the other end looking like new. Today I was putting together the drivers side and I noticed a little bit of dirt around the inside of the fitting on that flex line, so I proceeded to blow some air through it with my compressor just to get that little bit out of the threads. No air came through. ???? I took the line off and proceeded to push a length of mechanics wire through the hose and no way. It was clogged solid. I ordered 2 new flex lines this afternoon. Btw, my old girl Harmony, was stopping perfectly before I started the brake inspection and the only reason I started to investigate the brakes is because I had replaced the wheel seals so I had to disconnect the rear brake lines. Once the seals were replaced, I was just going to bleed the brakes and call it a day. But the front right wheel cylinders wouldn't bleed. The front passenger top wheel cylinder was seized with rust inside ( I have a picture of it in a post a few weeks back) I had the front brakes adjusted correctly so perhaps it was just perfect timing that they decided to seize up and clog up just as I was replacing the wheel seals. I suppose my point is "looks can be deceiving". Because the wheel cylinders didn't have a speck of rust on the outside. They still looked brand new. There is a good article in the Technical section of this forum ( hold curser on browse and look to the right and click on technical) on how to service and adjust the brakes. Well worth the read.1 point
-
It’s not just Porsches either. You should see what they’re getting for freaking Volkswagen parts these days!1 point
-
Got the last of the valves out today. Also measured the upper edge of my cylinders. They seem to be standard 3.25". Just need to get a dial bore gauge to measure further down. Have a bunch of outside micrometers when I did my truck rear end. Reckon I'll order a bore gauge.
 1 point
 -
A properly operating Vacuum advance will result in less heat being generated by the engine under light load cruising. I used a vacuum advance from a later model Chrysler and cut the arm off, made a new arm for the flat head distributor and tacked it to the newer vacuum advance. I used vice grips as a heat sink. I only done this because I couldn't find a replacement vacuum advance in time for a event I wanted to attend but it worked fine. I did check how far the vacuum advance advanced the timing and was happy with the results. Sorry, no pictures.1 point
-
Lol, if that is what it takes to get you to the “Q” then YES, this is the last one!!! ? Yeah, time of year makes a difference to me for towing over the Rockies also imo, fly out this year, check out the event….. who knows after meeting us, you may be glad you didn’t bring the truck ?1 point
-
It doesn’t matter what brand you buy. You’re not gonna make money without a whole lotta labor that you’re not getting paid for. If you love old cars build an old car. If you’re interested in making money open liquor store.1 point
-
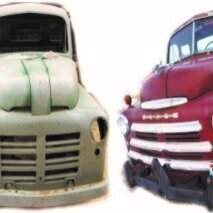
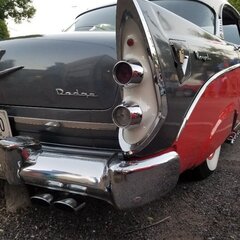
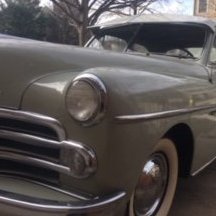
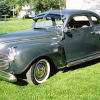
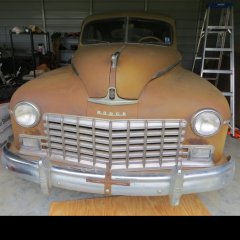
The value is what someone is willing to pay and what the seller is willing to let it go for. Just looking at the pictures I would not pay more than $2K but would try to get it for somewhere around $1200 (or less). Take a look at a Hemmings pricing guide. You can easily pour a lot of money into these cars trying to get them back to their original state. But I guess it is a labor of love. If you are looking to fix it up to enjoy ... go for it. If you are looking up to fix it up and flip it ... you will probably lose your shirt. These old MOPARs don't command the same value as Ford, Chevy, or other GM platforms. If you like it ... buy it, fix it, drive it, enjoy it. $15K can easily disappear working on a car like this ... especially if you have to source out some of the work.1 point
-
This is my 65 Schwinn.
 1 point
 -
I resolve to get '38 Ply back on the road and driving in 2022. Hoping to accomplish that by late April at the latest.1 point
-
Numero uno on the list is seeing my son. He's in Seattle and we're in Jersey and the last time he was here was Thanksgiving 2019. Thank you Covid (NOT)! Gotta get rid of more stuff and sell the house. It would be nice if we had an idea of where we're moving, but the jury is still out for various reasons. Also getting at least one of my Plymouths roadworthy would be a big plus.1 point
-
I have been telling myself that I would get the Miata back on the road for about four years. Finally ordered a new top for it and got it installed. First time to replace a convertible top. Turned out pretty good. The tops for these cars are basically unbolt and bolt the new one back on. But you have to take most of the interior out to get to the bolts. A few other mechanical fixes, new tires along with a good detailing and I'll have the car back on the road. This car has been modified. Almost 300 HP to the ground. When people ask what was done to the car it's easier to tell them that the fenders are stock.
 1 point
 -
Very nice, thanks for sharing.1 point
-
My uncle used to own a 48 Chryser,and the top speed seemed to be about 20-25 MPH. I used to sometimes catch a ride to the nearest grocery store (about 20 miles one way),and at times was tempted to just get out and walk. Seemed like that was the top speed of everything he owned.1 point
-
On a side note, I put it in three times. Probably only three ways to put it in and I bolted it together wrong twice. Of. Course, then I looked at the manual.1 point
-
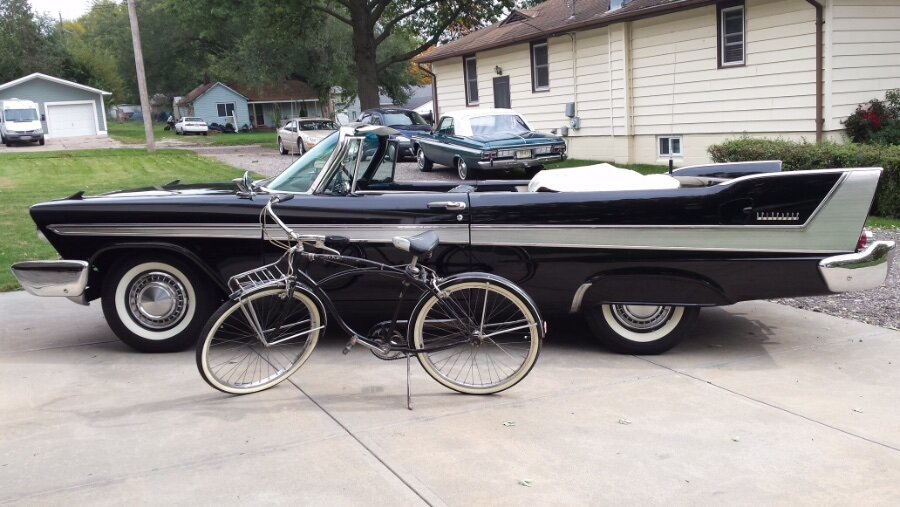
A picture of mine on a 48 after I installed it.
 1 point
 -
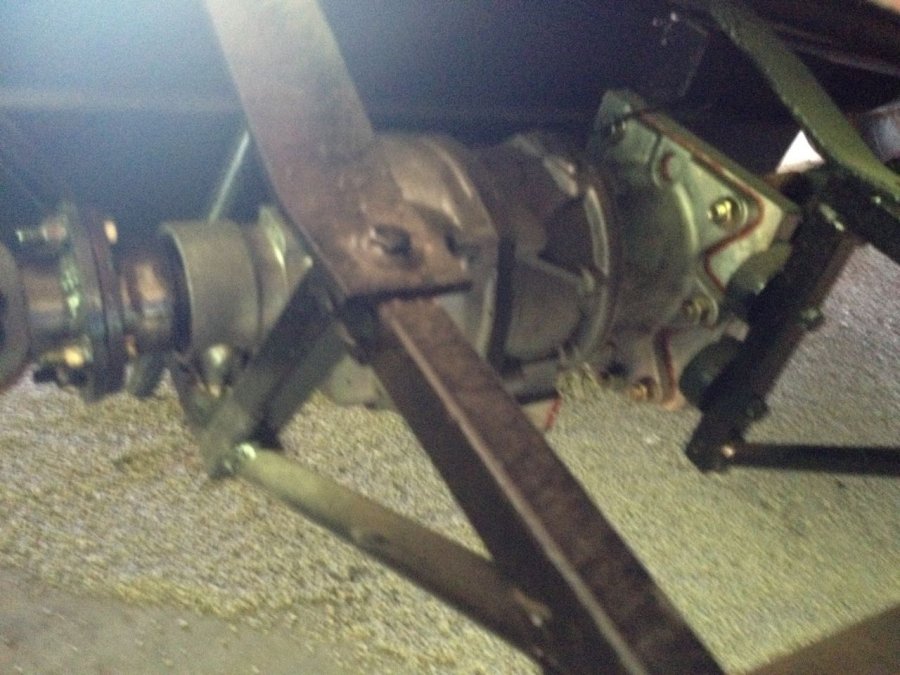
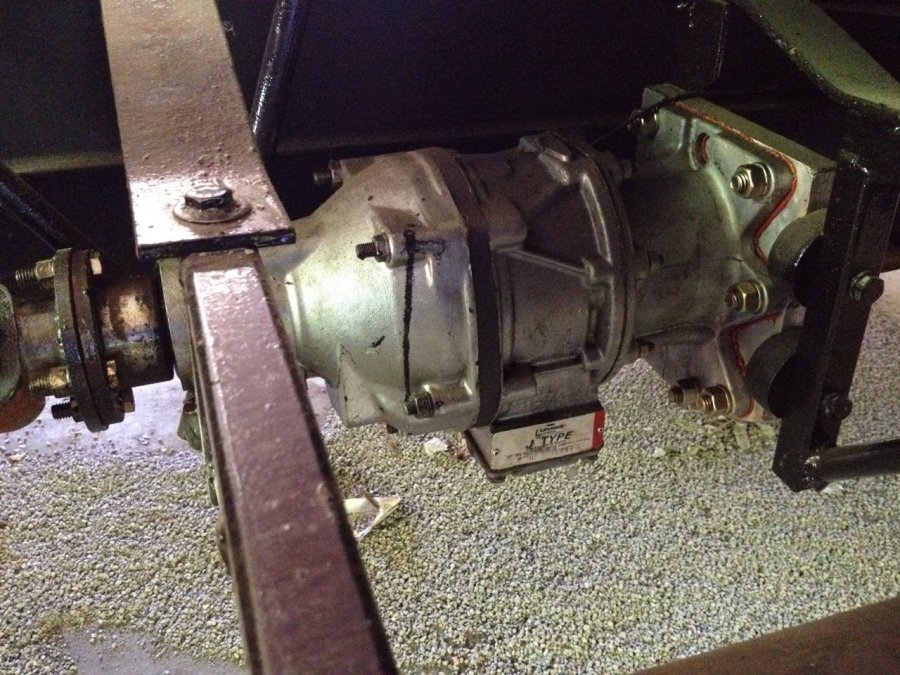
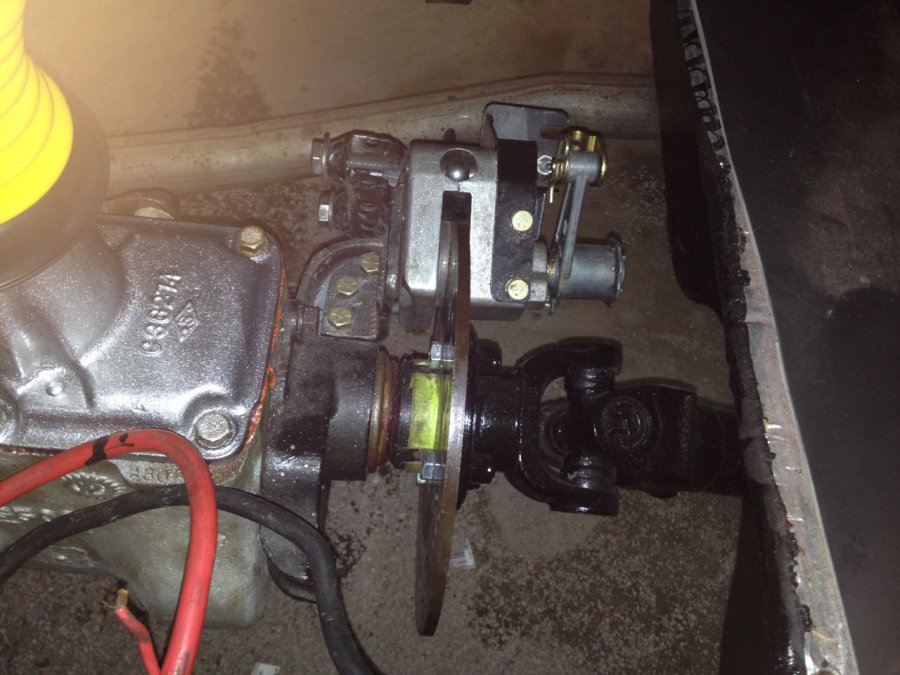
A lot of us want to keep our trucks as original as possible and, at the same time, improve the safety and performance to drive comfortably on today's roads. Along with brake upgrades, wringing more horses out of our flatheads, adding seatbelts and tightening up our suspension components, many of us have asked--how can I cruise at 65 while keeping the RPMs in a decent range? The three "big" solutions that stand out are a- swap transmissions for something with an overdrive, like a T-5 or an A833, b- swap rear ends, or c- add an overdrive, such as a Laycock. The problem with a- is that the engine may need to be pulled, an adapter plate might be required, a new hole in the floor must be cut and then there is the clutch... and what about the parking brake? The second option, b- presents the problem of gearing that is too tall for the torque output of the engine, especially if the flathead is wimpy, such as a 201. So... c- was the option that I was most interested in. No modifications needed for the parking brake, transmission or engine. Gear Vendors sells a unit, or you can opt for the route I followed: find a Laycock J-type from a donor Volvo. Here are the modifications that I did: The old truck came with the factory optional, slightly more desirable 4.10 ratio rear end (as opposed to the 5.63 stock rear end), so it could putter happily at 45 MPH and, sounding like a manic sewing machine, hit 65 MPH. I wondered about switching out the rear end—and had picked up one that was a 2.80:1 ratio. After doing a few calculations, I realized that the rear end would make the underpowered engine even more so. Maybe an overdrive would be better? I began a search that led to a Laycock model J overdrive, about the size and shape of a small watermelon. It fit nicely in mid-frame. I installed two drive shafts, one from the to transmission to the overdrive, the second from the overdrive to the rear end. It is important to mount these with the correct angles to preserve the u-joints. I also had to move the gas tank over by about an inch to fit around the overdrive. That wasn’t such an issue—the tank needed to be replaced, anyway. The Laycock overdrive is common on older Volvos. These are often listed on ebay—without the front drive shaft. I found a complete one, cut off the end of the shaft, and had a local machinist weld a u-joint receiver onto the end to accept a short drive shaft connection to the transmission. I fitted an aluminum plate with an oil seal for the front end of the overdrive unit. Ran a 12 volt wire to a fuse and button mounted below the dash--and added a pilot light that shows when the overdrive is engaged--and that was it. Simple! (an aside: make sure that the overdrive isn't engaged when putting the truck in reverse) My biggest issue was with the speedometer output shaft. The truck cable housing wasn’t long enough to reach and the knurled connector didn’t fit. I am working on an alternative, though. A sensor connected to an Arduino, to read the speed and drive a little electric motor connected to the speedometer head… I’ll probably use a GPS to provide the speed signal. BTW, in the process of putting the overdrive in, I discovered that the parking brake drum had developed a number of fractures and was close to exploding into fragments, so I replaced the whole arrangement with a snowmobile mechanical disc brake. That set up works very well for my purposes. Another tip: I put Lucas transmission oil additive—the stuff that you see on the car parts counters—into the non-synchro transmission and it worked so well that, for most of the gears, I can shift as if the transmission is synchro. Very nice. So, does the new setup work? Oh, yeah--I say with a big smile on my face. Oh, yeah, it is very, very cool. My 201 has no problem running the overdrive, and as a side benefit, I get an extra gear in 2nd and 3rd that makes puttering around town a lot more fun. Plus, the overdrive makes it easy to downshift without double clutching. I can wave to people as go around corners! Here are the pictures:
.jpg.4b5afc7ba3a8c980b1212cef1b9c7150.jpg)
.jpg.5a8da475075b4d7ec6a8322c9020cb67.jpg) 1 point
1 point -
I meant the below comparison.
 1 point
 -
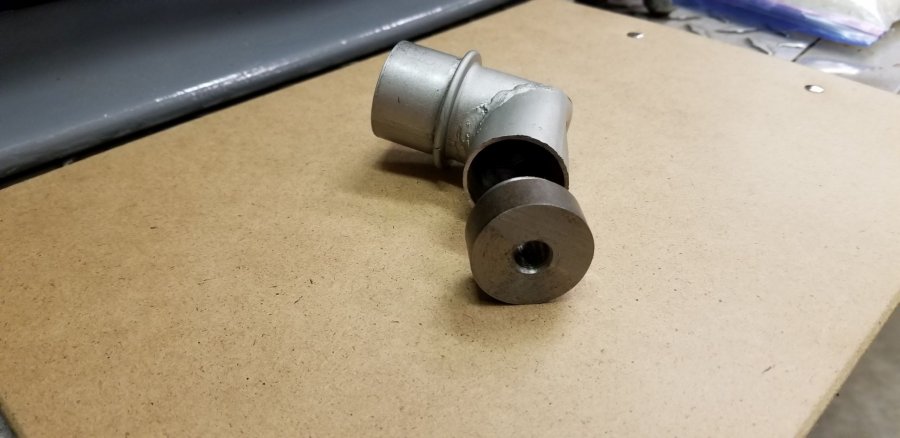
I've decided to go with a PCV system so I made an adapter out of a spare breather tube similar to what others have done. I tapped the plug that I made for 1/8" NPT and will use an adapter to 5/16" tubing up to the intake manifold where the PCV is located. The PCV is a Fram FV333 as recommended elsewhere in the Forum. Brad


 1 point
 -
Possibly you got the mat from Mitchell Motor Parts...now AMS. Original owner Frank Mitchell now deceased.1 point
-
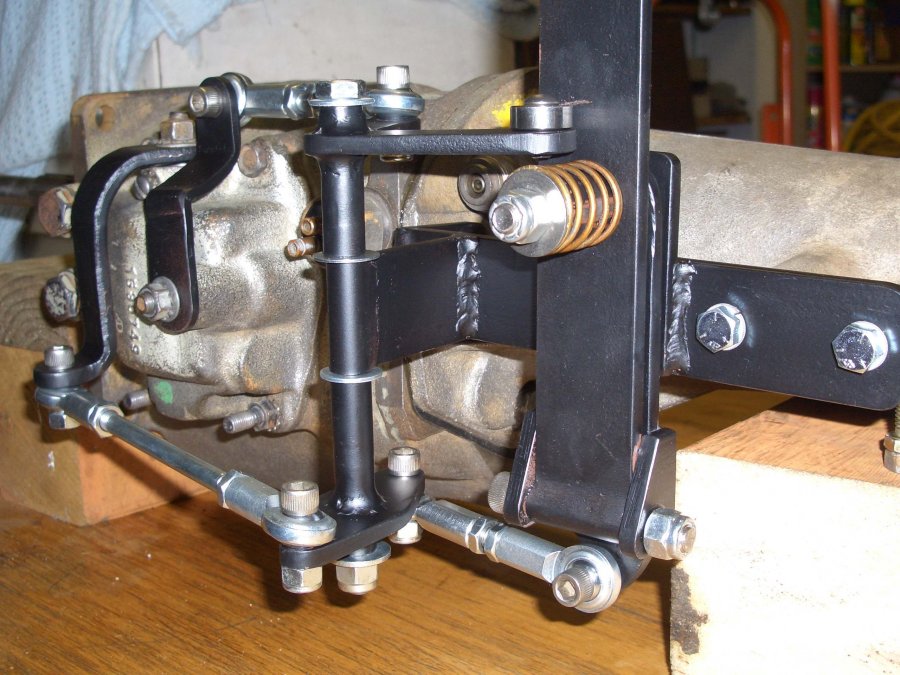
This one was made by Ron Allworth who made this one for a buddy's 1933 Plymouth that he was putting a 270 hemi in it For this one of course it would not work on an r10g1 overdrive, although that is not to say they couldn't make one for that purpose. I just thought I would post it up as while a tad over engineered I thought it was very cool.

 1 point