Leaderboard


Popular Content
Showing content with the highest reputation on 10/11/2021 in all areas
-
Of course you do.3 points
-
My Studebaker truck is engaged in spirited activity till the end of the month. I moved it out of the garage to create some work space for late fall and winter projects. When I went to collect it seems to be inhabited by some folks from the past. Previous owners perhaps. Whomever they are, they are keeping very quiet about their intentions. When I started up after there was a slight knocking under the hood. It may have been the fellow in the bed upset about having he boo tisleep interrupted. I think I might need a gallon of Visine also. Wonder if anyone still stocks the original 1956 formula? Wouldn't want to cause a problem using the incorrectly graded fluid.
 2 points
 -
Ran across this site that shows different color amounts to get a specific Dodge color 1948 Dodge (autocolorlibrary.com)2 points
-
On our old MoPars wider clearance or loose worn bearings... worn cylinder walls...I would use a some what thicker oil. New engine tight bearings, cylinder walls thinner oils.. say 5/30 over 10/30. The temperature range when you drive the car sets the type of oil to use as does the type of driving city/freeway etc. Try out a couple different types/weights of oil including single weight 30. Drive the old vehicle for a week month what ever. Watch that oil gauge like a hawk. IMO ..Use the oil that keeps the oil gauge reading the highest after a long hot drive at idle. Modern cars ....this doesn't count. Only use exactly what's stated on the oil filler cap or owners manual. A must on newer cars.2 points
-
More pictures .
 2 points
 -
1941-1942 DeSoto/ Chrysler were the model M-4 transmission...2 points
-
Nice car……..nice colour. I tell people my ‘51 Dodge is close to original colour and here’s the proof. Not exactly the same but close. OP says car is original so assume paint is as well. I know his is a Chrysler and mine’s a Dodge but all in the family.
 2 points
 -
Nope, not goin' down that rabbit hole, again. Reading BITOG can eat up a day at the computer.2 points
-
Talking oil is like talking politics....good luck! If you want more...."Bob is the Oil Guy" Endless oil talk...............2 points
-
Use my dwell meter a couple of times per year, per car. Tune up in the spring. Checking for something or other mid season. It’s good tool to own in my experience. You can eliminate one possibility when troubleshooting symptoms. I own a Snap-on model MT-816B. It reads RPM and dwell. 6V is no problem. As long as it is hooked up before I start the engine. If hooked up after engine is running RPM won’t read RPM for some reason. I suspect it’s a 6V related issue.2 points
-
I have an old '80s era Sears dwell/tach I found at a yard sale. The instructions say that it works on 12v neg. ground, but it works fine on my 6v pos. ground 1948 Dodge. You just need to be careful of the polarity when you hook it up. These meters show up regularly on ebay for short money.2 points
-
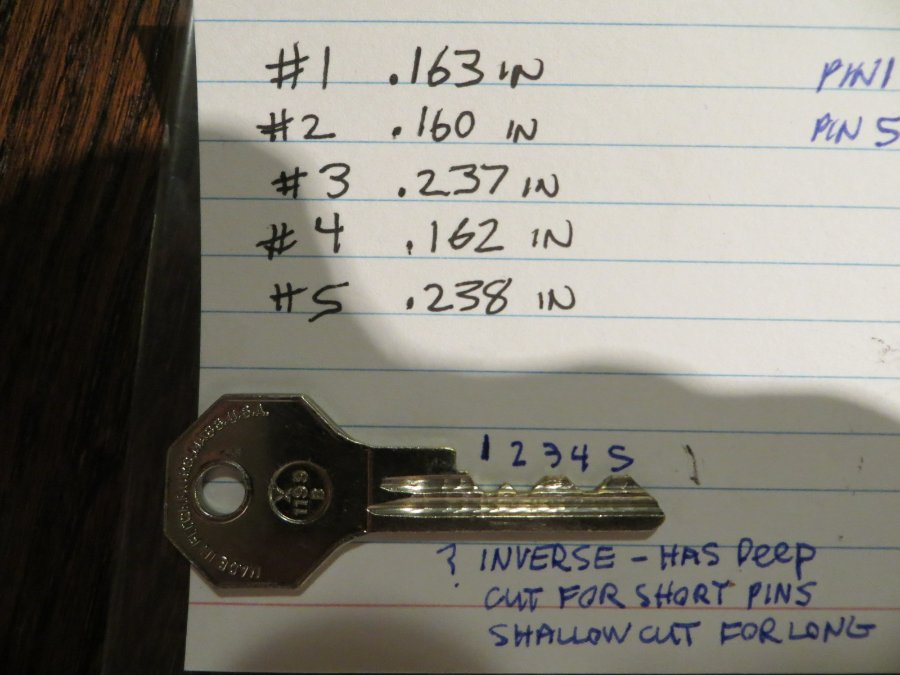
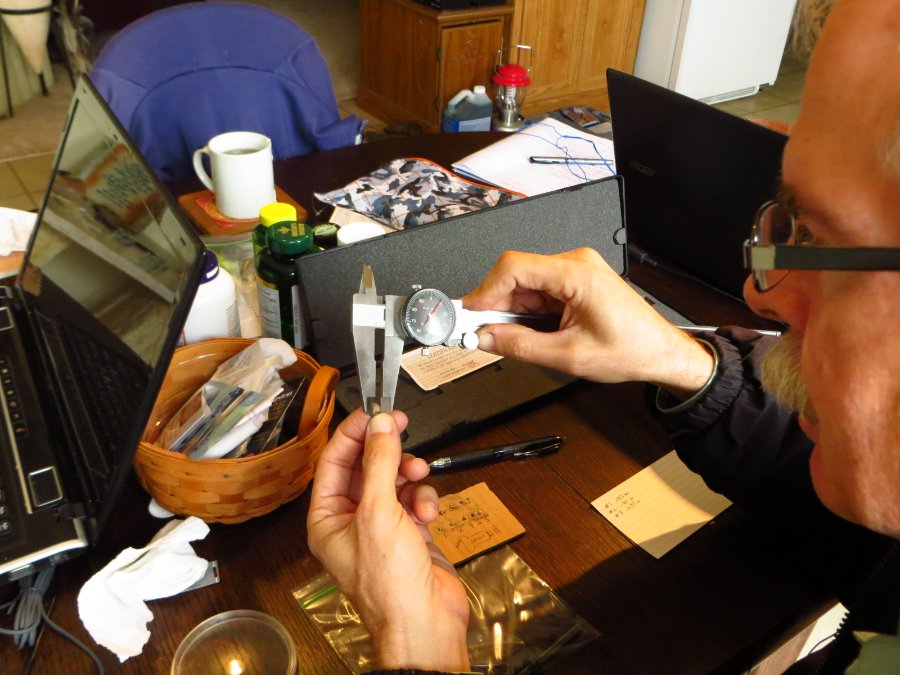
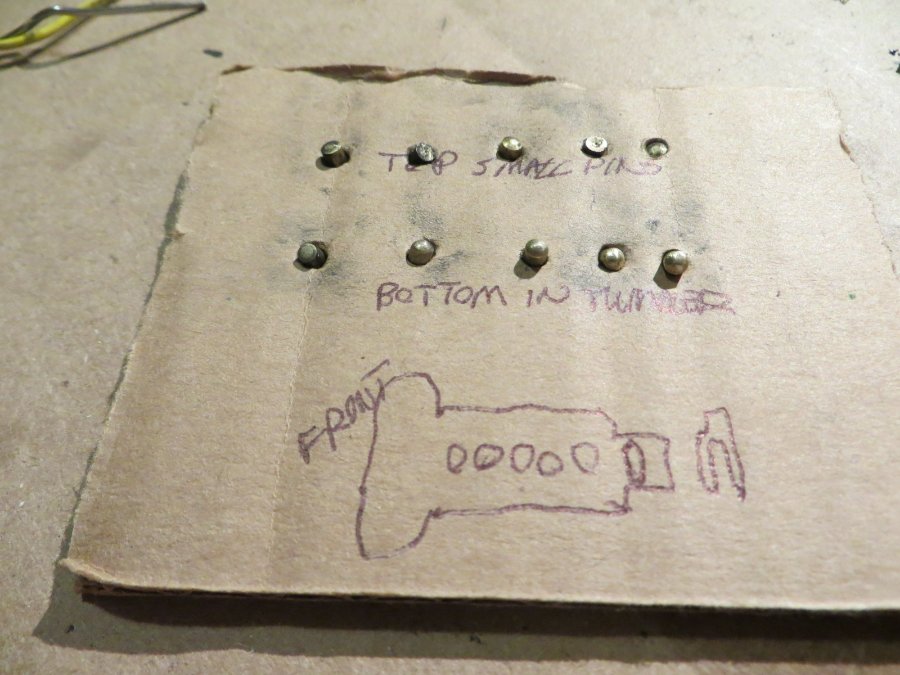
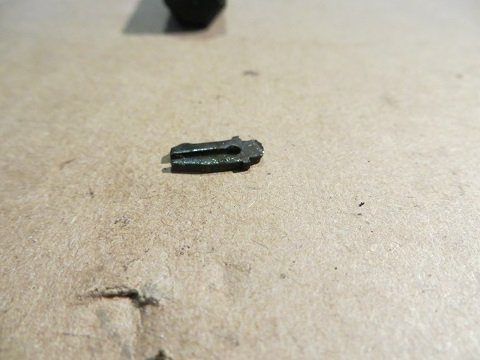
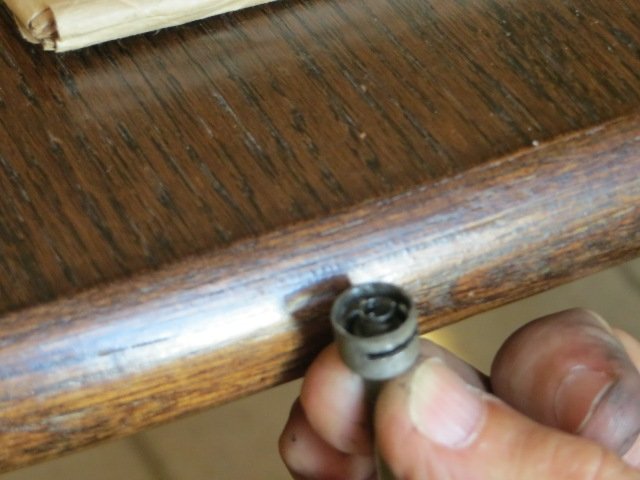
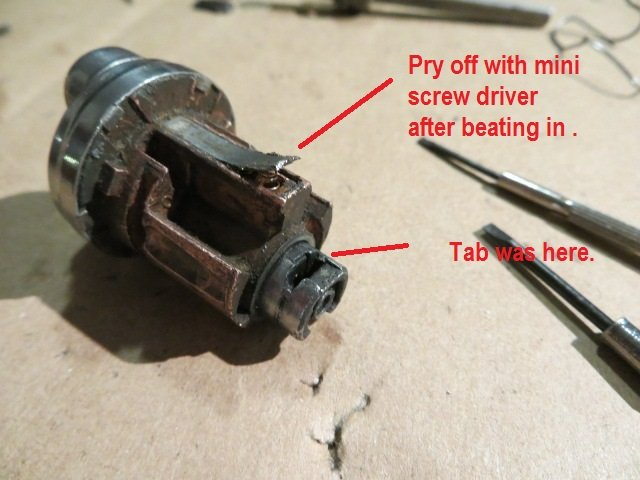
No, this guy based on the measurements of the lock pins (taken out and kept in order) would make a new key .1 point
-
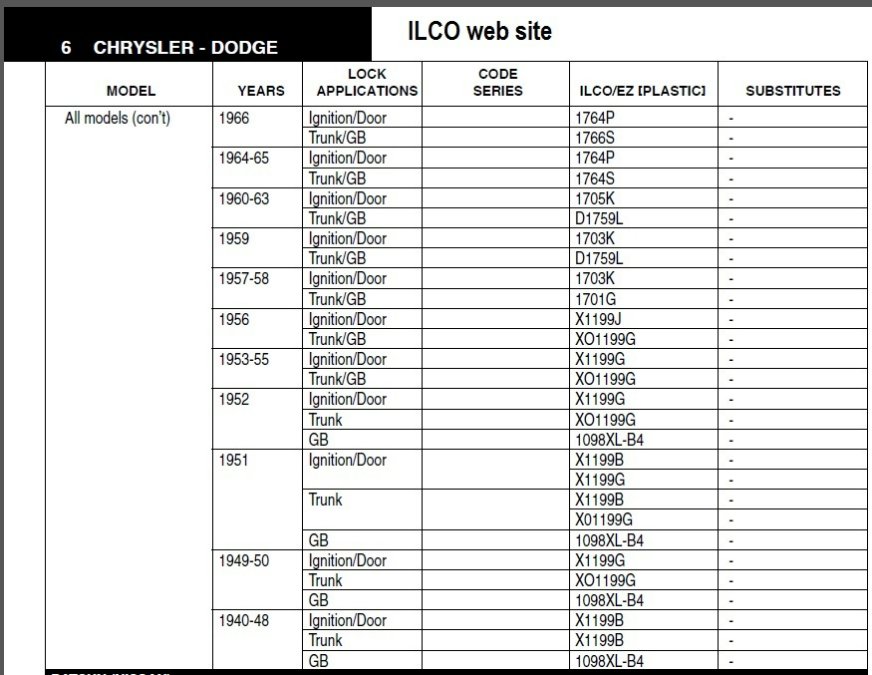
The problem is those toners are no longer available. I think the codes are for Dupont's acrylic lacquer and have been obsoleted for years as well as Dupont being out of the auto paint business for a number of years now also. Some of the old Dupont paint chip books had mix formulas in them but the practice seemed to become discontinued as formulas became more complicated and the switch to enamels became more prevalent. The best you get now is close, hoping for a 95% match or better.1 point
-
Thank You Mark. Im not sure what year they stopped using the X Frame style chassis. Looks like yours has much more room. My 1940 has an Xframe that the center appears to be about 1/4 to about 1 inch lower that the rest of the car. Tappers from the center X outwards . This is a custom car in which the X will sit on floor when the cars airbags are deflated. Ive seen many cars with these X frames sitting this low with dual exhaust but never looked under to see how they routed the exhaust. Most are V8's so they car run each exhaust rear to back on each side. I will have to run one exhaust under to route it though the drivers side of the car. Looks like there is a small space between the motor and transmission that might work. I'll be removing the body off the frame again and will have full access to fabricate an exhaust but my concerns are: -Heating other components due to proximity -where to add disconnects to make them accessible when replacement is needed -crossing one exhaust to the drivers side.1 point
-
You forget that 12v coils with less primary impedance have a ballast resistor that adds the missing impedance, you must take the entire circuit into account. Something a 6v setup does not have. Which is why I REPEATED have stated you need to run the ballast resistor if the coil requires one. Why does a 12v coil have different internal impedance? Because with the increase of input voltage you need to rewind the coil to maintain the output spark. If 27kv is the target output then with 12v in you need a 2250:1 step up, at 6v input you need to double that. This will change impedance, period, and explains why a 6v coil has almost double the impedance of a 12v coil. With the lesser impedance of a 12v coil the current thru the points goes up and a ballast is added to limit current thru the points so they don't burn up. Some other brands add that needed resistance/impedance into the coil design, others have a resistance wire feeding the coil, Mopar used a ballast resistor. This would be accurate if it said 6v and 12v vice 6 cylinder and 8 cylinder. As for why they may have different part numbers, any number of things, such as physical dimensions of the coil being different, terminals being different, heck the color of the coil can be a difference.1 point
-
I love seeing you enjoy your Meadowbrook with your family!1 point
-
I've got a thing for Divcos. One of my old man's favorite stories was when he was in high school, he had a job driving a milktruck, and rolled it over, taking a corner too fast on an icy road. Looking at how tall and narrow that thing is, I'll bet plenty of reckless teens did the same thing.1 point
-
Great stuff Bryan1 point
-
The first line in that article shows the writer bias and ignorance.....1 point
-
Did some work a long time ago. Guy on Ebay.. Let me post this first and see if I can find email or link for him. Pictures are out of order. Dang.


 1 point
 -
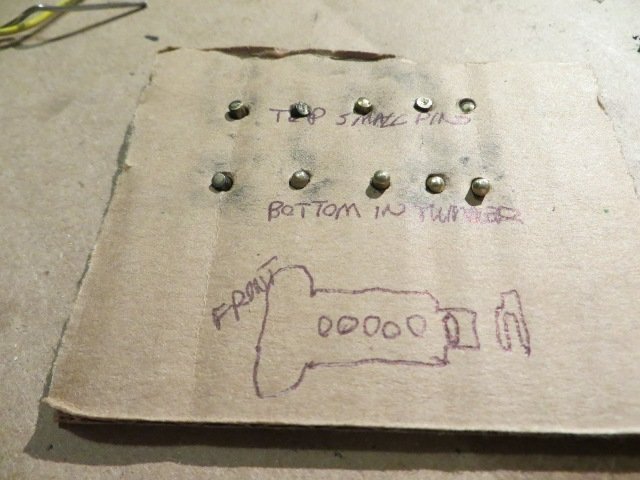
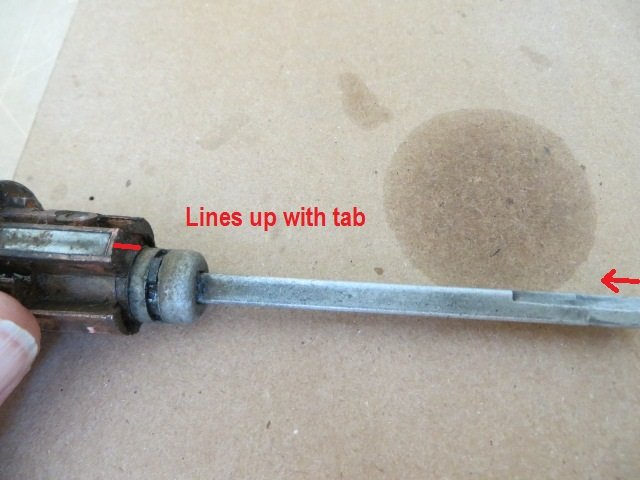
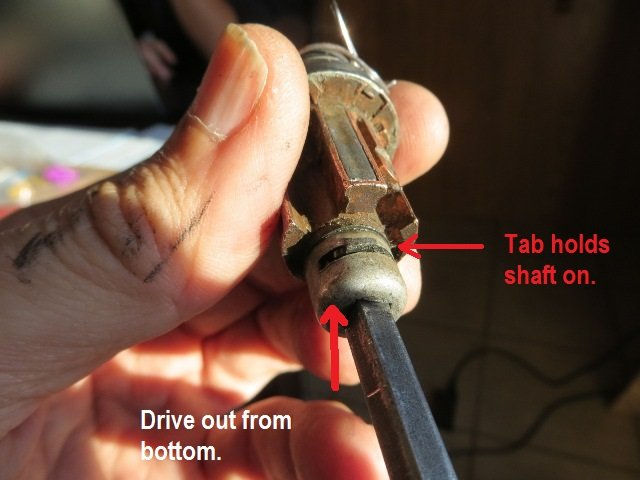
1941 Chrysler Shop Manual. Pictured is a M4 but linkages are same. And do you need a special tool to remove that heavy spring? Nope install top part of hook. Insert a philips screwdriver into one of the two holes in bracket and aim for same hole on frame. Then pry downwards until bracket meets frame and screw in bolt for other hole. In my opinion this spring is useless useless one has chicken legs Then there is a long spring behind it. what does that spring go to? , into a hole on frame. #121 point
-
Best bet is to call VPW and/or DCM.1 point
-
Regarding those two bearings............here in Oz the Oz Valiants used a nylon version of those split bearings which were identical in size, shape etc and I would have thought originated in the USA in your 1960's manual trans cars........andyd1 point
-
And thought this guy on the video was well informed. I guess not. I didn't know that the early Fluid Drives had a fill hole and a drain hole. How would you know which was which? And why would you need two anyway?1 point
-
Thanks for the link. At first I thought I'd seen this video made by Chrysler on the 41 Dodge. But this is new. It's 45 mins. long, but only about the first 9 or 10 mins. is on the Fluid Drive coupling with the M-3, M-5, and M-6 semi-auto transmissions. I always thought that the 41-42 semi-auto trans. were called the M-4, but I was just guessing.1 point
-
Install it on your car and turn the key.1 point
-
What a journey! Stay after it!1 point
-
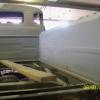
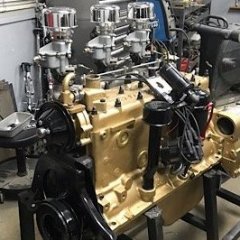
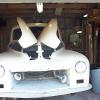
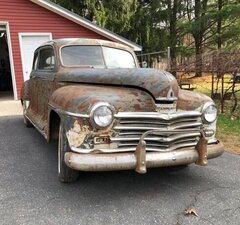
More progress! Last winter, I set the modest goal of being able to drive the 20 ft. out of the garage, and not have to push it back in. The summer was kind of a bust for wrenching...it was a tornado of family obligations, my house slowly falling to pieces, and brutal weather. So, here we are in October... No one was around to grab an action shot of it pulling out of the garage, but take my word for it, I got it back in, no problem. No fire, no smoke, no Exxon Valdez all over the driveway... I got the idle down to 450 rpms more or less, it seems pretty happy there. The second rebuilt carb really made a difference, and also the rebuilt distributor. Finding the hack repairs on this thing is kind of hilarious, sometimes. The dizzy was frozen to the engine block, you couldn't turn it, so someone broke off a hunk of where the distributor cap locks in, so they could rotate the cap and advance the timing. What a scream. Don't even get me started on the collision damage some genius bodyman "repaired." It still has little hiccups when it idles, I think that will clear up when I learn about and deal with timing and dwell. I'm still learning the ways of this ancient beast. When I was revving it, I heard a distinct "clunk" every time the rpms came back down, and I really got sick to my stomach, until I realized it was the famous clunk of the Clunk-O-Matic transmission--- in this case, the sound of the mechanical governor flapping around. I also learned never to leave the oilbath air cleaner sitting on the carb loose, because there's a law in physics that says you *will* knock it over, spill oil everywhere, and swear a lot. In my last post back in May, I mentioned rebuilding the starter and generator. I really got hung up on those tasks, but I'm very pleased with how they turned out, and glad I did them. There were some pretty hinky repairs on the starter, and the coils were absolutely soaked with oil from the profusely leaking oil filter. Coils before: After: Starts like a champ now. Replaced all bearings, retaped coils, painted inside of both with red Glyptol to help insulate it, cleaned, lubed, painted. This article was a huge help, and gave me the courage to tear into the starter, too: https://www.1942mb.com/article/96/G503-WWII-Jeep-6-volt-Autolite-Generator-Rebuild-Restore. The starter is a really robust looking thing---I used to get nervous that when it burns out, it'd all be over, since those square solenoids are incredibly scarce, but I think the only way it'd burn out would be through sheer abuse and neglect. You could probably pull a dumptruck with this thing. The coils in the pic above aren't wound with wire, they're some kind of thick, tinned flat stock, wrapped in the shape you see. As for the generator, no charging is happening while idling in the drive, but the ammeter shows some rising amp action when I rev the engine, but not off the charts, so it would seem the regulator is doing its regulating thing. What else...? Cured the oil spewing oil filter today, by running a bead of JB Weld around the seam at the bottom of the can. I can't believe that wasn't welded at the factory. It's weeping out of the brass junction at the engine, just the tiniest bit, oozing out around the nipple that threads into it. I wasn't able to come up with a new fitting there, unfortunately, so I'm going to have to live with it. I've driven worse, for sure. I got tired of looking at the huge triangular dent that someone mule-kicked into the right rear fender (you can see this in the winter video made in my driveway), so I pretended I knew how to do bodywork, and dollied it mostly out without making it worse. I pulled out the wire looms under the hood, made tape flags on all connections noting where they go, and now I'm getting ready to wire this sucker. Brakes are next, gonna have the original cylinders resleeved. Once I have brakes, I can start menacing the neighborhood. Thanks, as usual, for all the help I've been given here!1 point
-
I made brackets that where held on the outer corner headbolts, placed the engine and removed them and then torqued (as they are the last).1 point
-
Yes, I agree. I've been watching these filmstrips and reading the booklets since the 80s when I acquired a set of the early kits from 1947 to the early 50s. I got a projector and played the records on an old Califone school phonograph that has a 78 stylus. The records don't sound scratchy when played with a 78 needle even though they are 33 1/3 rpm records. They were not meant to be played with an LP stylus so that's why the sound is scratchy.1 point
-
Yes, the positive clip attaches to the positve batt. post, the neg clip to the distributer side of the coil.
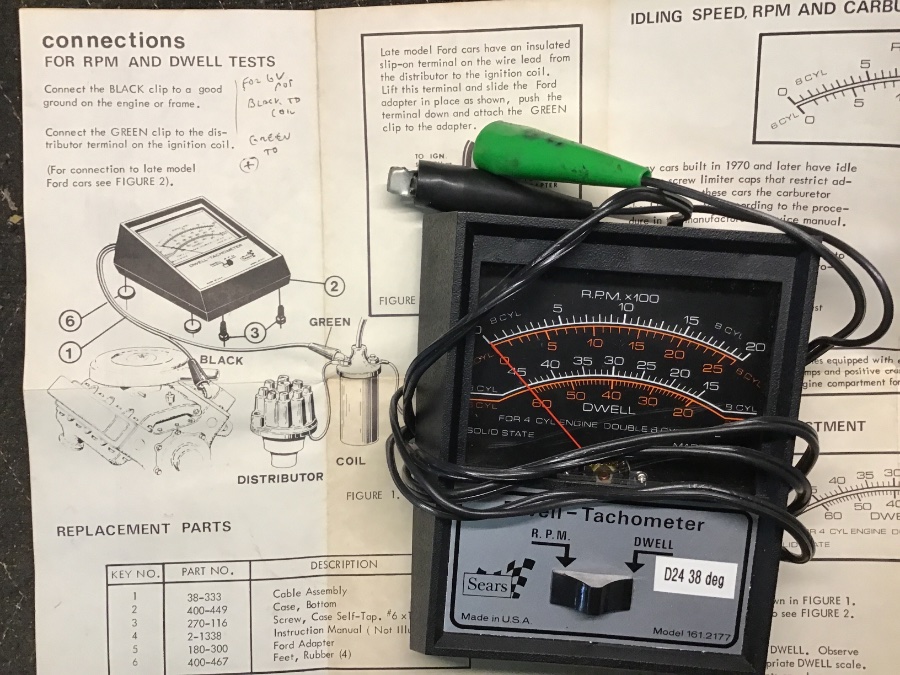 1 point
 -
In general expect to pay more for a quality built tool such as Mac or Snap-On. Craftsman/Sears brand will attract a lower sell price. Yet probably get the job done just fine. I had no problem spending $50 to $75 for a quality dwell tool too help keep my old cars running reliably. Doing all your own maintenance and repairs? You are already saving lots of money on hourly shop labor costs. You may want to spoil yourself a little and buy quality tools. To me, totally worth it.1 point
-
i have an old analog my grandfather bought me back around 1966. still works. made by a company in brooklyn, ny, and he got it mail order. it was around $25 then and you can get ones today for not much more. if you think $50 is too much for something these old cars need then keep looking on ebay,craigs list and other sites, including yard sales and swap meets. i am going to the moultrie GA swap meet next month and i would bet there will be a few there for sale. timing lights may be easier to get, i still have an old penske from about 30 years ago. it is 12 volt, but works on 6 volt too. capt den1 point
-
Right out of the 1957 Dodge service manual. Same recommendations in the 55 and 56 manual as well. Seems 1954 was the first year of multiviscosity oil so I would not expect to see a recommendation for it before then.
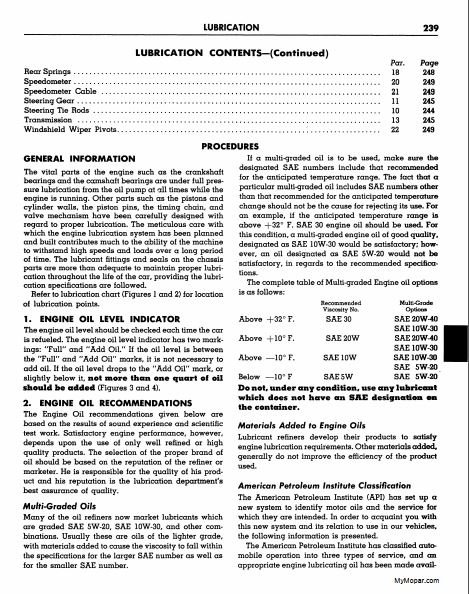 1 point
 -
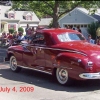
10-9: Out for a cruise in the Meadowbrook with my oldest daughter. We went down by a Veteran's Park, then on to a different part of the lake, and then to Bronx to look at their pumpkins! The Meadowbrook is so much easier to drive than my truck! ?1 point
-
10-9: More from Veteran's Park ?1 point
-
You know I actually was wondering that myself. I really wanted a club or business coupe when I was looking but I picked up this sedan for a song and dance. I don’t know actual production numbers but I surmised the sedan was somewhat rare just from what I see out there. Yeah I’m changing my mind a bit about keeping it a rat rod. I may do some quality body repair in the future. Thanks for the input guys!1 point
-
It's all very logical when you think about it. Flathead engines where fabricated with a certain tolerance and all (GM, Ford, Chrysler) manufacturers back then specified 30W. Not until ca mid fifties when higher HP engines were in demand, tight specification demanded thinner oil. Engines today are computer designed and assembled with super finish tolerance with short lifespan, they require 0 or 5W. If your theory is that fast lubrication and thin oil is ok for flatheads, it's your choice. The big three disagree1 point
-
You realize no oil is worse than thinner oil? You realize that when warmed up 5w30, 10w30 and 30 wt all have the same viscosity? You realize that the 30 viscosity measurement is taken at 212F oil temperature, which is when it is considered warmed up. How long you figure it takes that lump of iron we all love to get it's oil temps to 212? You realize that 5w is measured at -30 and 10w at -25 oil temperature? You realize that 5w and 10w30 oil will get pumped up into the engine faster than 30w will when the oil temperature is not up to 212F? The proper choice of oil viscosity is the thinnest oil that gives you acceptable oil pressure. What is oil pressure? Resistance to flow. If the tolerances of my engine was too loose for thinner oil viscosities then I would not have acceptable oil pressure, for the record I have acceptable oil pressures. Back when I had my Diplomat I would regularly monitor the oil pressure, when it dropped 10 psi from it's normal pressure at highway speeds it was time to change the oil. One oil change later pressure was back up to normal.1 point
-
14 PSI ? Strange MoPar had built in pressure valve in radiators up until 1949 using a cap with no valve. 1950-54 they switched to 4 PSI cap. Early V8s had a 7 PSI cap1 point
-
Thanks everyone. I’ve restored several muscle cars in my life but that was just bolting back together what came a part. This is really my first big adventure with so many modifications. I just take my time and there’s still some trial and error. As for dressing it up Andy, she’s really rough. It will eventually probably have a single coat of hot rod black and some pin striping at some point but it’s really too far gone in many areas to be worth a full on restoration. The bank account won’t handle it, or the wife for that matter. Hahaha1 point
-
This may help. MoPar 802 Radio Custom Controls Inst.pdf1 point
-
I had the old pump rebuilt on my ‘50 Plymouth last year. The rebuilder installed a sealed bearing, but also reinstalled the old grease fittings instead of plugging them, I’m guessing for authenticity. Because it was original to the car, reinstallation was a breeze and it works perfectly. Only problem is that when I had the car in for service, I forgot to tell my mechanic about the new bearing and he greased the pump. Oops! Don’t think it will cause any damage, but I’m keeping an eye on it anyway.1 point
-
I'll probably need mine to rust to match the rest of the car ?1 point
-
I have painted this water pump with Rustoleum primer + aluminum, ran it for years, still looks shiny ?1 point
-
I did a QA and review on that exact pump. http://www.yourolddad.com/cooling-system1 point
-
thread on bushing carb base1 point
-
If it were me I would: 1. Drain the fuel tank and make sure it is clean, take out the sender to look in. 2. Blow out the fuel lines and the brake lines. 3. Rebuild, or at lease put in new rubber, into the master cylinder and the wheel cylinders. DO NOT put in new cylinders without inspecting the internal parts carefully. New cylinders have had bad parts in them from reputable vendors. I would replace all the bake line hoses. 4. Drain the transmission and the rearend. Put in a few pints of kerosene and let it sit. 5. Take the radiator out and flush it. Flush the block. 6. Take the head off and the pan off. 7. Pop the pistons out and put a new set of rings in it. If they cylinder walls still have a cross hatch on it fine, if not, run a hone (lightly) to get a hatch. 8. Send the fuel pump down to Terrell Machine and have them rebuild it. 9. Start the thing up and run it with the rear end on blocks so the trans and rear end will spin. After about 15 minutes and the engine rings broke in... 10. Drain the trans and the rear end and re-fill with oil. Then drop it down and take it for a ride. I would also drain and replace the fluid coupling fluid. See my write up on that. If everyone checks out ok after all the above, drive it cross county if you like. James.1 point
-
Remember in the case of our 1bbls we do not have the middle part like that Quadrajet to align the reamer, so ream and bush one hole first, then do the other side and let the new bushing help guide the reamer. If there is a bit of bind when the throttle shaft is reinstalled just use the shaft and some light oil to burnish the bushings.1 point