Leaderboard


Popular Content
Showing content with the highest reputation on 07/27/2021 in all areas
-
I use a nice long thick (1/2" or so) rope. Tie one end to the front axle, loop the other around something smooth at the front of the trailer like a round front guard rail. One loop only, not two or more. Take up the tension on the rope and start pushing the truck off the trailer. As the truck moves backwards slowly release the rope. It's amazing how much control you have when rolling something off the trailer. My dad taught me this trick and I've used it for years without fail. My trailer has a front rail that is round that I wrap the rope around. Good luck! Brad2 points
-
This is a tentative date until I hear from some folks. Let me know in the comments if this date is a problem. 48D UPDATE: This is the Event Date. APRIL 2ND 2022...... 48D1 point
-
Glad you got it running.1 point
-
We have a runner!!! https://youtube.com/shorts/tyv5r8nlvJA?feature=share All ibdidndifferebt today was hook up the actual fuel line, changed the coil to cap wire, put on a new cap because i just didn't trust the one that was on there was new.... Got a bunch quieter as I ran it...probably been so long it took a while to get the motor juice everywhere again....doesn't seem to have any miss, carb needs some adjusting or refresh of seals...but it runs! And moves! Stopping...meh....not so much....so add that to the to do list..prob a full rebuild of cylinders, new lines, perhaps new master....that will be the next thing I'll work on.... In the meantime I've got a bunch of wires that need to be replaced Also, the batt read 8.35 when the car is off and 8.24 when it's running....I wanted to check to see if the generator was doing generator things so I had the multimeter the batt. I've read about the polarizing of the generator, but dont have 100% certainty on when I would need to do it.....or if it would hurt to do it if not needed. Also, the amm meter didn't really look like it was going to the charge side...may have been SLIGHTLY to the discharge side...I know it would go discharge when I turned lights on with the car off.....1 point
-
I currently have two old Mopars that originally had those rubber boots and I sold another one. I have had varying degrees of success with replacement boots. I’ve had some fail and I ended up replacing them with leather boots. I found it impossible to change the rubber boots without disassembling the joints. This is not required with the leather boots. I highly recommend them for not only the cars that came with them but also for the later cars. My ‘53 Plymouth currently has one rubber and one leather boot. I just don’t think the new replacement rubber boots are very good quality.1 point
-
Thanks. They do have smallerspools1 point
-
Click on the 3 dots on the far right next to author.1 point
-
The differential is the rotating part that contains the differential gears and mount the ring gear. The differential gears allow the outside wheel to rotate farther when cornering. The reason the differential can be different is the offset required for different ratios. When you make the pinion larger the ring gear has to move away from the pinion’s center. This is accomplished by making the ring gear thinner until it would lose strength if made any thinner. The fix is to move the flange on the differential. That’s why I said the differential could be different. We use a short hand when describing the parts. Differential has been used for the entire axle when it actually is only the part containing the differential gears and mounting the ring gear. Folks call the “differential carrier”, the pumpkin or 3rd member which are names which don’t appear in any shop manual. Automotive terms do vary from place to place and for the most part depend on who invented what. Sometimes things were invented at the same time in different countries, then confusion reigns. Some examples of who invented what, tapered roller bearings are measured in inches (because an American company invented them. Timkin) while ball bearings are measured in millimeters (a European company was the major manufacturer of them SKF) the threads on spark plugs are measured in millimeters for the same reasons even though they might have an inch wrench sized hex. Ford used pipe threads until superior spark plugs made their way from Europe. Just to clarify my M.O. when determining if a particular part may fit another, I look for the associated gasket. If a differential carrier gasket fits across the Mopar range then it’s likely you can swap the carriers between axle housings. Stuff that doesn’t have a gasket means you have to start measuring and fit the various parts or dig into the parts book. I use A.B.’s online catalog a lot because they list all the cars side by side that fit a particular part like gaskets. It’s a kind of quick reference. Sometimes a kit has a different part number between cars such as the king pins. I wanted to put 12 inch Chrysler brakes on my Plymouth but the Chrysler spindles had a different part number for the king pin kit. Digging deeper I found that the king pin was the same but the Chrysler had needle bearings on the top instead of a bushing. Therefore the Chrysler spindles would fit the Plymouth uprights just fine with the Chrysler king pin kit. A post on that project to follow.1 point
-
The points tension and contact spring should be under the condenser lead connection. Get more clearance between the condenser and cam. Adjust points on the high points of the cam, not the flat part. Lighter weight wire, without insulated terminals flex’s better for a vacuum advance to work easier. There is a bearing under the points plate that also needs to be checked and lubed for free movement.1 point
-
That's what I thought1 point
-
That last picture is an oil cup for lubing it. What's your point gap set at, looks huge.1 point
-
Capecoder........just watched your wobbly video.......lol.........brought back lots of memories............thats exactly what mine was doing and sounding like...........its easiest to drain water, pull the radiator and have at it then.........ain't old cars great?............lol............andyd1 point
-
Pretty sure even small engines no longer use points or condensers anymore. My push mower, B&S engine FWIW, will occasionally do this. The bowl vent is open to air and it will plug up on occasion, I clean it out and it runs. When this happens I can get it to run by pushing the prime bulb, I have to keep pushing it to keep it running. Design defect. I need to plum a line from the vent fitting to the clean side of the air filter to fix this permanently. Maybe a relevant video for you1 point
-
I’ve done both. Many years ago I traded a bottle of whisky for a a 251 CID that my wife’s cousin had to put in my ‘48 Dodge D25 club coupe. It came out of a three ton grain truck and was pulled because it had a miss and he wanted more power. It had a burnt intake valve in number 6 which I replaced with a used valve and lapped it and all the others. 40+ years later it is still in the car and running well without any other major work. I am sure good engines are still out there. They may be a rebuilt that a hot-rodder ? pulled and is now available to you. ? With my ‘51 Dodge D39 business coupe, it had the original motor. I wanted to keep it so had a total rebuild about six years ago done by an old time machinist who had rebuilt many Mopar flatheads. He replaced nearly everything.Total cost with all new parts and the necessary machining was around CDN$4500.00, about US$3600.00. He liked working on the old stuff and probably gave me a deal. You need to find someone you can trust. In your case, it sounds like you need to search for a good usable engine. Maybe down the road, if needed later, you could do a rebuild. It may take a while but they are out there. These are my thoughts for what they’re worth.1 point
-
$1500 might cover all the parts for a complete job. I have been ordering stuff for my 230 for a while now, not tracking the cost though. If you want to get real crazy the Freewheeling Tony Smith has a set of modern design forged pistons and rings for the 281/230. ~$2000.00. A set of Carillo rods, $2500.00. But he builds land speed record stuff and this is his top of the line, state of the art things. Now on the other end of the money spectrum Vintage Power Wagons has a set of NOS pistons for $75, call for sizes available.1 point
-
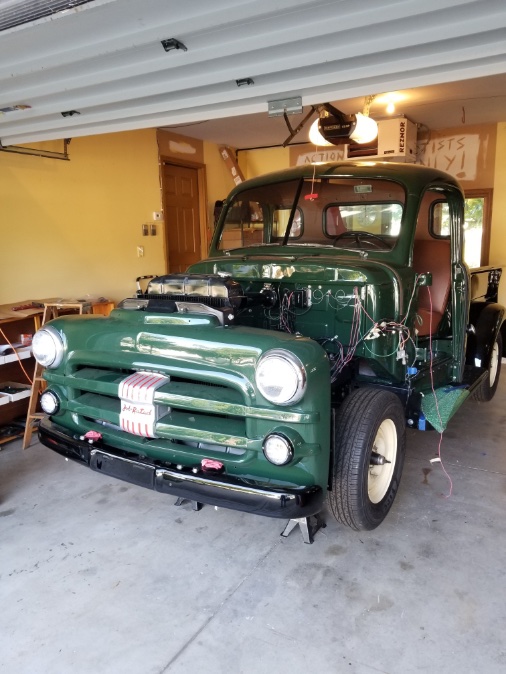
I installed a brand new throw out bearing and put in a NOS bearing sleeve from VPW. Same noise. I think the noise happens on initial contact between the pressure plate, disc, and flywheel. Maybe the noise is accentuated by not having the toe boards in yet. Maybe the new clutch disc and resurfaced flywheel need to "wear in". Maybe this. Maybe that. Who knows. The truck is still on jacks but the clutch seems to be working fine. I don't feel like pulling the pressure plate out right now so I'm going to put things together and drive it for a little while and see what happens next. Here's where the truck stands at the moment...
 1 point
 -
Julie, Since you are asking for a hard quote to do the body work and reassemble it, also ask for a hard quote to assemble it without the paint and body work. That way you can decide which route to a running, driving truck is worth it to you; right now, unfortunately, you have a lot of expensive sub-assemblies several hundred miles away.1 point
-
Thanks Veemony for the info on the seals coming with an outer sealant coating. Actual verified measurements for my car are are 1-3/4" shaft and 3-3/8" opening. Moral of the story, verify the dimensions before buying the part. OK, I'm editing this. 3-3/16 instead of 3-3/8.1 point
-
having been to Lake Geneva, Walworth (home of Kikkoman) and Williams Bay corn festival twice.....not a bad area at all.....1 point
-
From what I have seen (on my trucks) there are at least three different fill plug sizes and they are “vented”. If you do make your own, might keep that in mind. You could put a request on the “wanted” section with what fill cap your looking for (Or replace the whole lid, gasket and cap) or call Vic’s dodge garage https://vicsdodgegarage.com/products/brakes/ or call Steve at DCM https://dcmclassics.com both of of these vendors have parts trucks and might have a cap for yours good luck, Brent1 point
-
Use brake clean to clean off the housing where you want to use sealant. Been noticing a lot of parts listings are incorrect or incomplete. Clutch release bearing on fluid drive vs non-fluid drive comes to mind. All the listings show the non FD bearing only but do not say non-FD only, it is implied they are the same. Bearing and seal numbers are usually universal across manufacturers, so if the old part has a number on it use that number to get a replacement, assuming the old part fit properly.1 point
-
Every word Keithb wrote may well be true........,BUT you MIGHT only need rings and bearings,new gasket kit,and the valves ground. It costs absolutely nothing to HOPE for the best,while being prepared to get hit with the max load. This also depends on the use you want out of your car. If all you plan is an occasional trip to a local "park and show",why would you care if your car burns a little oil or the oil pressure is a little low? Even if that is so,I would spring for a new oil pump,fuel pump,and water pump. Don't overlook the water pump because it is on the outside and seems so simple. Sometimes the bushing in it may be worn out,or close to worn out plus rusty,and after driving it with no problems for a few days,your water pump will suddenly take a dump,leaving you stranded and facing a rollback ride that will cost you more than a new water pump would have cost. On the other hand,if your goal is road trips,you had better get everthing done that needs to be done,plus carry small parts like a spare water pump and fuel pump in the trunk,just in case. Not to mention spare belts and hoses,plugs,points,and condensor. You never know how hard this stuff might be to get if you are away from home. Consider the expense as an insurance payment.1 point
-
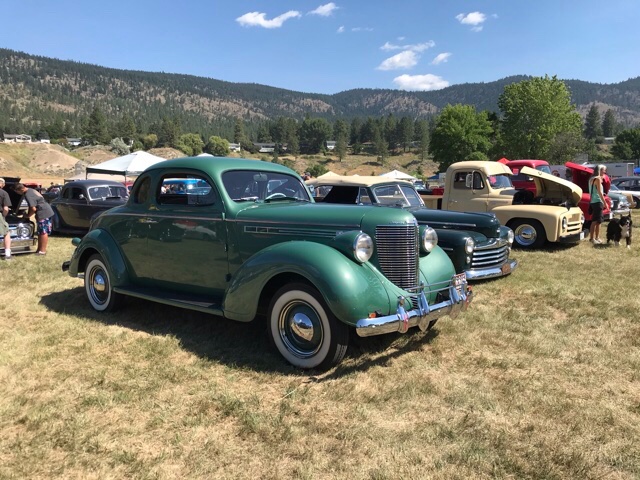
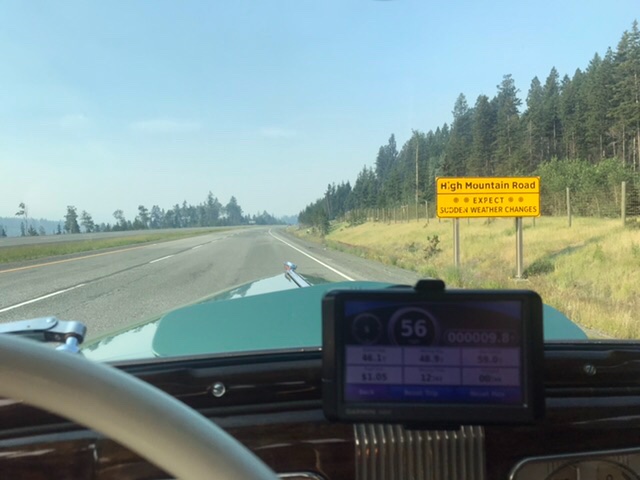
Today I finally drove my ‘38 Royal on the hiway. A trip of about 55 miles one way. There was a car event in my area. Finally we are seeing some resemblance of pre-pandemic life. I wanted to go to the car event. It was also a great excuse to test my car outside city limits. Up to today, I had briefly engaged the stock OD to test it. It seemed to work just fine. Today I finally got some considerable time on a divided hiway, OD engaged. I drove a mountain pass. Plenty of driving up and down hills. The Royal seems most comfortable to me at about 55 mph. It will go faster. I had it up to 62. The OD engaged and above 60, she’s not got much power left to overcome wind resistance. Perhaps I should try 60+ without OD. Then the engine revs are a bit higher. Maybe the engine is able to produce a little more torque? Although for me, I have little desire to drive at 60+ mph. I lean more toward the conservative type. Safety is a major factor for me. Stock tires are pretty narrow. Not a lot of rubber on the road. I like the driving experience. Not speed. The car handled fine. No shimmy. No wobble. Steering true. It drove straight and had good road feel. I felt really planted and secure up to 60 mph. I felt I could easily cruise all day, without tiring at 55 mph. Overall, the OD experience was very positive. Lower RPM’s, less buzzy. Fuel conserving I suspect. Climbing long hills on the hi-way she lost some speed. To be expected. The faster you go more power is needed to overcome wind resistance. Diminishing returns so to speak. So with a later 30’s flathead you can only expect so much. I got to thinking about cars and driving in 1938. Owing this Chrysler and cruising at 60 mph, I suspect you’d have been in a class above the majority of car owners. 60 mph in 1938 on public roads was pretty serious business I’d think. I am pretty-well convinced that my Chrysler would benefit from a 4.11 rear end. Based on where I live and drive, the hilly terrain, I think it would be better for me. From memory, I think my car currently has about a 3.9 to 4.0 gear set in it now. I’ve not opened it up to confirm. I’ll keep my eye out for a 4.11 assembly. A few pics from today.

 1 point
 -
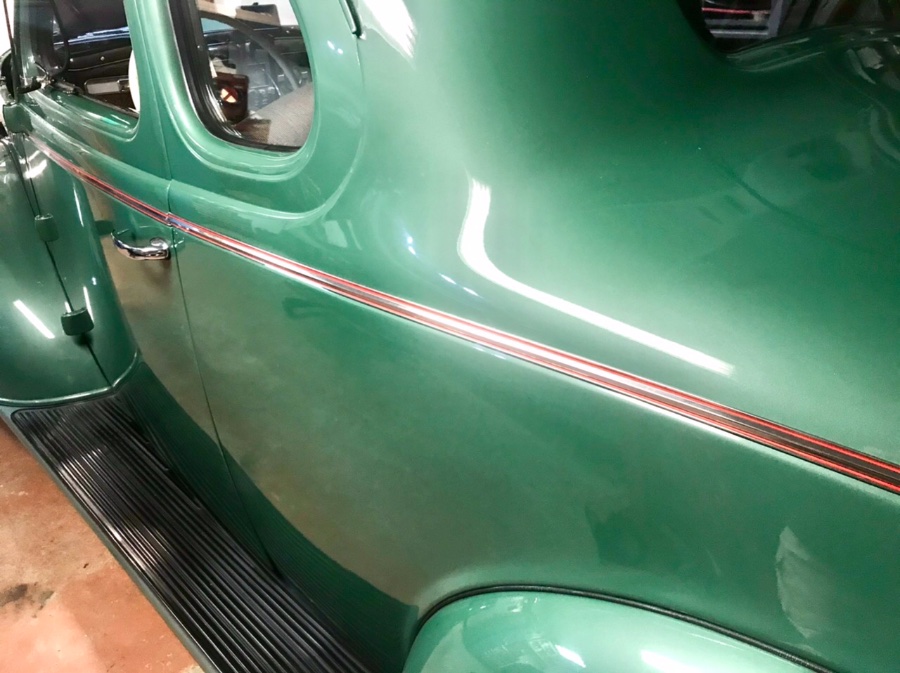
In the photo seen my wife was using a small metal scraper to remove loose, flaking-off, old red paint. Then she reapplied new red paint. More paint touch up and clay bar work to go yet, but there is a car show tomorrow morning. Hmm.
 1 point
 -
Re-applying the red strip detailing. anyone know what the hood ornament is supposed to represent? A fast moving locomotive?
 1 point
 -
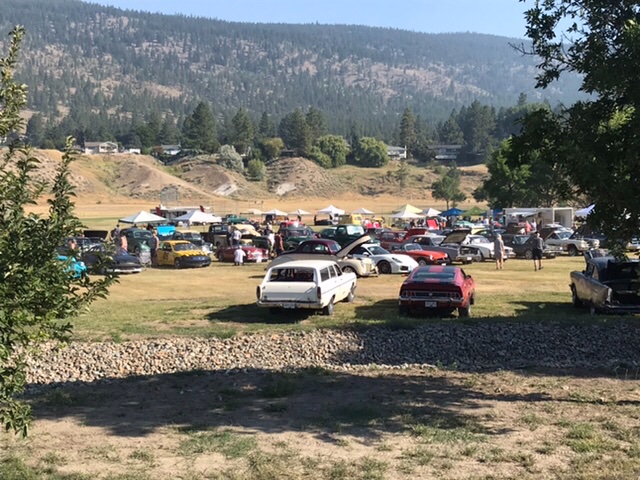
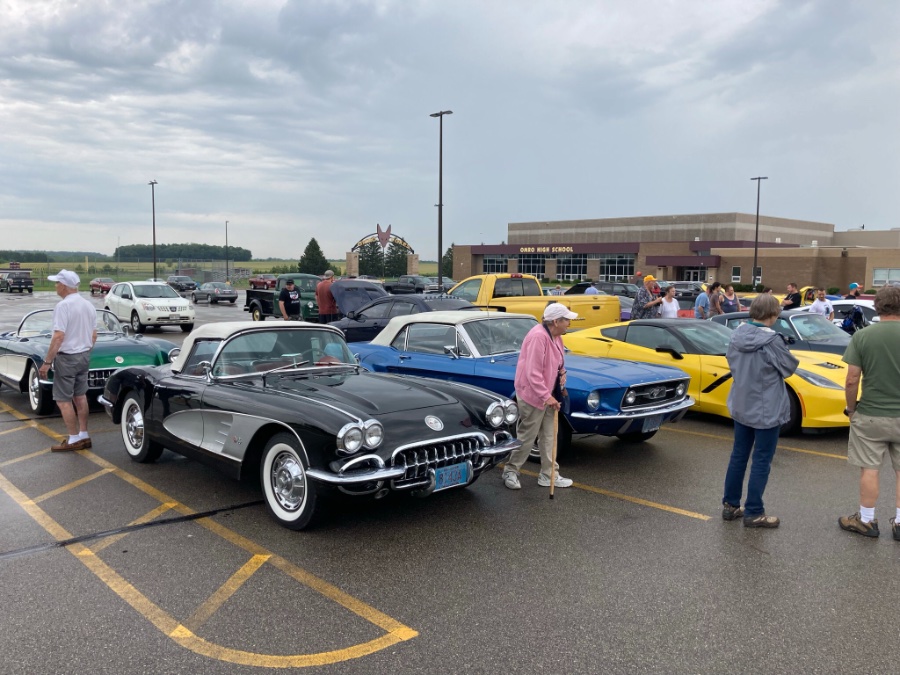
I was out with the newbies today too. It was a quickly thrown together show for a gentleman in hospice care. He is a classic car guy and wanted to go to one last car show. I saw a post about it on Facebook. It was a rainy morning, but several cars showed up. I parked next to a nice looking 57 Ford. Several late model Camaros, Mustangs, and Challengers. But the 2 older Corvettes were pretty nice.
 1 point
 -
My WT puller...I can slowly wedge them out or slide hammer out....I prefer to slowly wedge them out...prevents tearing the slots

.jpg.a1d26238645b521927a3837c62947700.jpg)
.JPG.27521bb98a623cf6bb15a41d0c8fae87.JPG) 1 point
1 point -
These hood openings were designed to create an intimate bond between the mechanic and your car's engine.1 point
-
So many variables on rebuilding an engine. How good do you want it to be? An engine rebuild may or may not require all the parts that I recently purchased. Everyone here will have a different opinion. I’d say Figure on +/- $2500 USD for parts gasket & seal kit, complete pistons & pins Piston rings exhaust valves intake valves valve guides valve keepers timing chain & both gears all main bearings all rod bearings piston pin bushings camshaft bushings new oil pump new water pump new water distribution tube new spark plugs New head bolts All new block expansion plugs possible: all new tappets new camshaft plug wires coil new valve springs Figure +/- $1500 USD for machining work. Again, pending what is needed. hot tank and crack check block. If it gets a pass: Bore cylinders out mill top deck mill head turn main crank journals down turn rod crank journals down Re-cut valve seats check con-rods for straightness install the new cam bearings install the new valve guides align bore main caps. Rarely needed. lap-in new valves Want them to do all the work? You just drop off an engine core? Add $1500 to $2K for labor. More Options: rebuild carb rebuild fuel pump rebuild generator rebuild starter rebuild distributor flush radiator how’s the clutch and motor mounts? It adds up…Fast.0 points